- How to enable (or disable) Game Mode in Windows 10
- Enable (and disable) Game Mode
- More Windows 10 resources
- Affordable accessories that’ll pair perfectly with your PC
- KLIM Aim RGB gaming mouse ($30 at Amazon)
- AmazonBasics USB speakers ($16 at Amazon)
- Razer mouse bungee ($20 at Amazon)
- Halo: MCC’s live service elements make it better, not worse
- Microsoft’s Surface Duo is not ‘failing up’
- Here’s what you can do if Windows 10 update KB5001330 is causing issues
- These are the best keyboards to use with Xbox Series X and S
- How To Disable Windows 10 Gaming Features
- Windows 10 Gaming Features
- Game Bar
- Game DVR/Captures
- Game Mode
- Windows 10 «Redstone 5» 1809 (October 2018) or newer
- Windows 10 «Fall Creators Update» 1709 and «Redstone 4» 1803 (April 2018)
- Disable Game Mode globally using the Registry
- Disable Game Mode per-game
- Guides/Info
- Install Instructions
- How to enable or disable Game DVR or Game Bar in Windows 10
- Disable Game Bar & Game DVR
- How to turn off Xbox DVR through the Registry Editor
- How to Enable or Disable Windows 10 Game Mode Feature
- Steps to Enable Windows 10 Game Mode
- Disable Game Mode
- What’s Does Game Mode Do in Windows 10?
How to enable (or disable) Game Mode in Windows 10

In our tests, we found that Game Mode didn’t have a huge impact on higher-end systems, but if you’re prone to multi-tasking or have lots of processes running in the background, Game Mode could be useful to you. Additionally, Microsoft has plans to improve the feature in subsequent updates, so it’s at least worth knowing where it is.
Here’s how to enable (and disable) Game Mode in Windows 10.
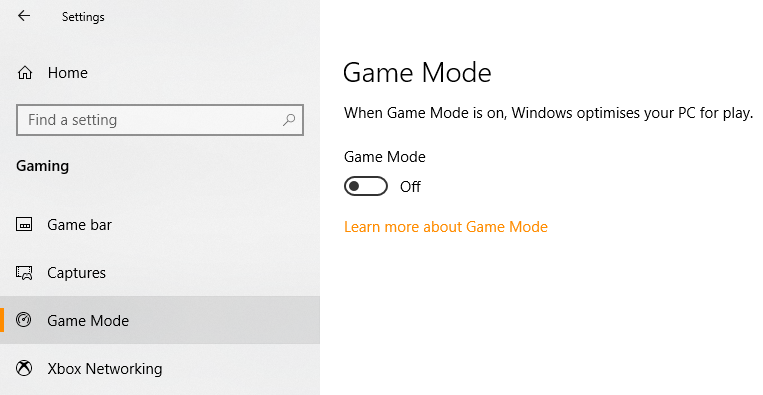
Enable (and disable) Game Mode
You can also force Game Mode on in specific games, whether they’re tested by Microsoft or not. Previously, you could toggle Game Mode in the Windows 10 Game Bar, but the setting has since moved. To do this now (as of the October 2018 update), you need to use the Windows 10 Settings Menu.
- Open the Settings menu by clicking the cogwheel icon in the start menu.
Select the Gaming section of the settings menu.

Click to toggle Game Mode on or off.
While Game Mode won’t make a huge difference for most games, if you’re prone to heavy background task usage, or you’re using a lower-end system without much overhead for games, Game Mode could be useful.
More Windows 10 resources
For more help articles, coverage, and answers to common questions about Windows 10, visit the following resources:
Affordable accessories that’ll pair perfectly with your PC
Every one of these awesome PC accessories will enhance your everyday experience — and none cost more than $30.
![]()
KLIM Aim RGB gaming mouse ($30 at Amazon)
Whether you’re a gamer or not, this is an absurdly good mouse for the price. It’s ambidextrous, has a responsive sensor, a braided cable, tank-like build quality, and, yes, it has RGB lighting, though you can turn it off if that’s not your thing.
![]()
AmazonBasics USB speakers ($16 at Amazon)
These neat little speakers may only pack 2.4W of total power, but don’t let that fool you. For something so small you get a well-rounded sound and a stylish design. And they only cost $16.
![]()
Razer mouse bungee ($20 at Amazon)
Use a wired mouse? You need a mouse bungee to keep your cable tidy and free of snags. You get no drag on the cable, and this one has subtle styling, a rust-resistant spring and a weighted base, all for $20.
We may earn a commission for purchases using our links. Learn more.
![]()
Halo: MCC’s live service elements make it better, not worse
Halo: The Master Chief Collection is more popular than ever, but some fans don’t agree with the live service approach 343 Industries has taken with it. Here’s why those elements are, at the end of the day, great for the game and for Halo overall.
![]()
Microsoft’s Surface Duo is not ‘failing up’
Microsoft announced this week that it was expanding Surface Duo availability to nine new commercial markets. While Surface Duo is undoubtedly a work in progress, this is not a sign of a disaster. It’s also doesn’t mean that Surface Duo is selling a ton either. Instead, the reason for the expansion is a lot more straightforward.
![]()
Here’s what you can do if Windows 10 update KB5001330 is causing issues
In this guide, we’ll show you the steps to get rid of the update KB5001330 to fix profile, gaming, and BSoD problems with the Windows 10 October 2020 Update and May 2020 Update.
![]()
These are the best keyboards to use with Xbox Series X and S
Xbox Series X and S continue Xbox’s support of mouse and keyboard control, so we rounded up the best keyboards to use with your next-gen console.
How To Disable Windows 10 Gaming Features
Certain Windows 10 gaming features can cause rendering and encoding issues when using OBS. It is recommended you disable them to ensure OBS performs at its best. As of March 2019, as long as you’re running 1809 or higher and have the latest Windows updates installed, it is now recommended to leave Game Mode enabled.
All features can be found in the Windows Settings App under Gaming. The keyboard shortcut to open Settings is Windows + i.
Windows 10 Gaming Features
Game Bar
- Settings App > Gaming > Game bar> set «Record game clips, screenshots and broadcast using Game bar» to «Off»
Game DVR/Captures
Game DVR can cause conflicts with OBS when using hardware encoding such as NVENC.
Consumer NVIDIA GPUs for example are limited to two(2) encoding sessions. Game DVR and Geforce Experience(ShadowPlay) will often consume both of these sessions if enabled, preventing you from recording or streaming(or both simultaneously) when using NVENC.
Game DVR can also cause performance issues, it is still recommended to disable Game DVR even if you don’t plan on using hardware encoding.
Depending on your version of Windows 10 the name of this feature changes.
- Settings App > Gaming > Game DVR> set «Record in the background while I’m playing a game» to «Off»
- Settings App > Gaming > Captures> set «Record in the background while I’m playing a game» to «Off»
Game Mode
This feature used to cause major performance issues with OBS and games. On older versions of Windows 10, it is recommended you disable it.
The Windows 10 Creators Update (version 1703) added Game Mode. Game Mode tries to allocate all GPU resources to the current game in focus, starving OBS of the GPU resources it needs to render.
Game Mode is enabled automatically by Windows and disabling it is performed differently depending on your version of Windows 10. Not sure which you have?
- Press Windows + R and type in winver to show your current version of Windows 10.
Windows 10 «Redstone 5» 1809 (October 2018) or newer
Thanks to optimizations Microsoft made in March 2019, you should leave it on. You can check whether it’s currently on using the settings below.
- Settings App > Gaming > Game Mode > set Game Mode to «Off», reboot your PC.
Windows 10 «Fall Creators Update» 1709 and «Redstone 4» 1803 (April 2018)
For Windows 10 1803 or earlier, Game Mode must be disabled individually per-game or globally using the Registry.
It’s recommended to disable it globally.
Disable Game Mode globally using the Registry
The following steps require Administrator access to perform.
- Press Windows + R> type regedit > hit OK/Enter. You can also open the Start Menu and type regedit or Registry Editor and launch the application.

In the Registry Editor:
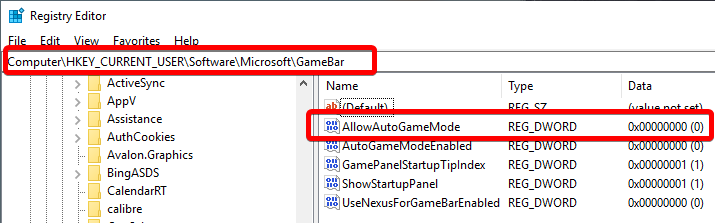
Navigate to HKEY_CURRENT_USER\Software\Microsoft\GameBar . You can paste this directly into the address bar at the top to go there quickly.
In the GameBar folder look for an key called AllowAutoGameMode in the right panel, if the key is not there you can create it.
- To create the key, right-click inside the panel and select New > «DWORD (32-bit) Value». Rename the new key to AllowAutoGameMode .
To disable Game Mode, set the value for AllowAutoGameMode to 0 , close the Registry Editor, reboot your PC.
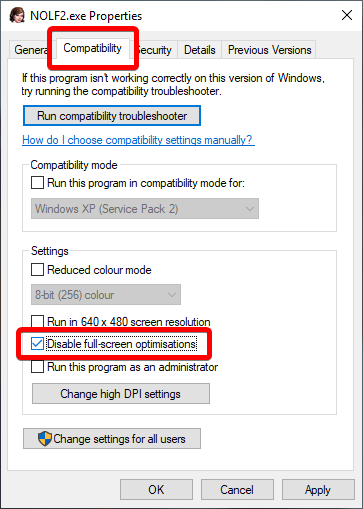
Disable Game Mode per-game
To disable Game Mode per-game:
- Open the properties for the game shortcut or executable, go to Compatibility and turn on «Disable full-screen optimizations»
Guides/Info
Install Instructions
© 2012-2021. OBS and OBS Studio are created and maintained by Jim. Development by OBS Studio Contributors.
Website designed and created by Warchamp7, powered by Kirby CMS. Downloads powered by Fastly.
How to enable or disable Game DVR or Game Bar in Windows 10
You can use the Game DVR feature of the Xbox app in Windows 10 to record videos of your PC game play and upload them to any social site, easily via the app’s Game Bar. We have seen how to use the Game DVR in Windows 10, now let us see how to disable Game DVR of Xbox app on Windows 10, if you have no need for it. Towards the end of this post, we will also show you how to turn off Xbox DVR through the Registry Editor.
You can pop up the “Game Bar” with a simple shortcut, Win+G and get quick access to gaming features. The functionality of this bar is not limited to capturing visuals running on video games played on the device but also take screenshots of the game clips.
The Game DVR feature allows you to record your gameplay in the background. It is located on the Game Bar – which offers buttons to record gameplay & take screenshots using the Game DVR feature. But it can slow your gaming performance by recording video in the background.
Disable Game Bar & Game DVR
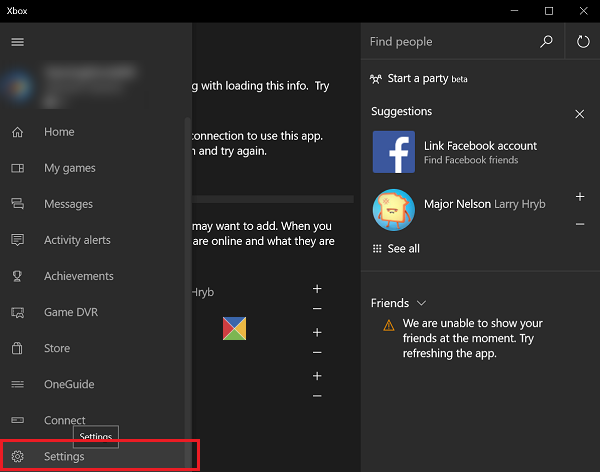
Navigate your mouse cursor to Start Button, click it to expand the menu. From the expanded menu, chose the ‘All Apps’ entry. It is located at the very end of the menu. Click on All Apps and scroll until you find the Xbox entry. Upon finding it, click the button. If prompted, connect to the Internet.
Next, when the Xbox screen appears look for the three horizontal lines in the upper left corner of the Xbox screen – the hamburger menu, and click on it. Now, scroll down to locate the Settings option.
Click on Settings. Underneath the Settings title, three separate options will appear. Choose Game DVR.
A slider denoting the ON position of Record game clips and take screenshots using Game DVR should be visible to you. Slide it to the Off position for disabling the recording element of Game DVR.
How to turn off Xbox DVR through the Registry Editor
Run regedit to open the Registry Editor and then navigate to the following registry key:
Right-click AppCaptureEnabled and set its value to 0. A value of 1 enables it, whereas 0 disables it.
Next navigate to the following key:
Right-click GameDVR_Enabled and set its value to 0. A value of 1 enables it, whereas 0 disables it.
The Game DVR feature on Windows 10 is enabled by default so that you can easily share the captured screen on popular social media network or store them locally to a PC. So, once you disable the feature, all the shortcuts will fail to respond. But if you do not have any need for it or if you face any performance issues while playing games, you might want to disable it and see if it helps.
How to Enable or Disable Windows 10 Game Mode Feature
Windows Game Mode priorities gaming and improves its performance. Here’re the steps to disable or enable Game Mode in Windows 10.
To improve gaming performance, Microsoft introduced a new feature called Game Mode back in the Creators Update (v1703). Regardless of your computer’s hardware and its age, when turned on, game mode potentially optimizes the system resources and increases the overall gaming performance. Now, the increase in gaming performance won’t be that dramatic. However, squeezing a bit more juice out of your hardware to increase the FPS (frames per second) and decrease frame drops is never a bad thing.
Simply put, the Game Mode feature gives you potentially better FPS (Frames per Second) and decrease frame drops. So, without further ado, here’s how you can enable or disable Windows 10 Game Mode.
Steps to Enable Windows 10 Game Mode
All you have to do is toggle a switch and you are done.
Press Win + R to open the Windows 10 “Settings” app.
Go to Game Mode page
After opening the Settings app, go to “Gaming → Game Mode” page.
Turn ON the option
On the right page, turn ON switch under “Game Mode“.
The above steps will turn on the Game Mode. From this point forward, whenever you launch a game, Windows will automatically detect the game and makes the necessary Game Mode configuration changes to improve the game performance.
Note: By default, the Game Mode feature is enabled on all Windows 10 machines. However, some applications or you yourself disabled the feature, you can follow the above steps to enable it via the Windows 10 Settings app.
Disable Game Mode
If the Game Mode feature is not working as intended or causing unnecessary problems, you can disable it. To disable the game mode, open the Settings app, go to “Gaming → Game Mode” and turn OFF the switch under the Game Mode option.

Once you turn off Game Mode, Windows will not make any changes to the system while you are playing.
What’s Does Game Mode Do in Windows 10?
Out of the box, Windows 10 runs in what’s called a Standard mode profile. As the name suggests, it is the default mode. In this mode, Windows tries to balance both performance and power consumption by limiting certain applications, applications behavior, and Windows behavior. In the day to day computer usage, the Standart mode is pretty helpful for the vast majority of users.
However, if you are a gamer you might want the game to run at its full potential and not be limited in terms of performance due to power consumption limitations. This is especially true for desktop gamers. That’s where the Game Mode feature comes into play.
When the Game Mode is enabled, it will automatically detect when you are playing a game and removes the regular standard restrictions. Game Mode also limits the number of background processes and the system resources they can use for background activities like scanning, updating, indexing, etc. Moreover, Windows also configures some settings to prioritize gaming processes and tasks both in CPU and GPU. This potentially increases the available system resources for the running game which in turn gives you better overall performance with increased FPS.
Now, for those of you wondering, Windows already has a high-performance mode which can be enabled in the Control Panel’s Power Options. The high-performance setting removes the power consumption limits. However, it doesn’t optimize the system for gaming. That’s the reason why Microsoft introduced the Game Mode feature.
That is all. It is that simple to enable or disable the Game Mode feature in Windows 10. If you are stuck or need some help, comment below and I will try to help as much as possible. If you like this article, do check out how to enable ultimate performance mode Windows 10.


