- What are the CPU c-states? How to check and monitor the CPU c-state usage in Linux per CPU and core?
- What are C-states, cstates, or C-modes?
- How can I disable processor sleep states?
- How to read and interpret /dev/cpu_dma_latency?
- What is the maximum C-state allowed for my CPU?
- How do I check the existing latency value for different C-states?
- How to check and monitor the CPU c-state usage in Linux per CPU and core?
- What is POLL idle state ?
- 🇺🇸 Как включить (UP) и отключить (DOWN) порт сетевого интерфейса (NIC) в Linux?
- 1) Как подключить и отключить сетевой интерфейс в Linux с помощью команды ifconfig?
- 2) Как включить и отключить сетевой интерфейс в Linux с помощью команды ifdown / up?
- 3) Как вывести из строя или поднять сетевой интерфейс в Linux с помощью команды ip?
- 4) Как включить и отключить сетевой интерфейс в Linux с помощью команды nmcli?
- 5) Как вывести из строя сетевой интерфейс в Linux с помощью команды nmtui?
What are the CPU c-states? How to check and monitor the CPU c-state usage in Linux per CPU and core?

Below list of topics are covered in this article
What are C-states, cstates, or C-modes?
There are various power modes of the CPU which are determined on the basis of their current usage and are collectively called “C-states” or “C-modes.”
The lower-power mode was first introduced with the 486DX4 processor. To the present, more power modes has been introduced and enhancements has been made to each mode for the CPU to consume less power in these low-power modes.
- Each state of the CPU utilises different amount of power and impacts the application performance differently.
- Whenever a CPU core is idle, the builtin power-saving logic kicks in and tries to transition the core from the current C-state to a higher C-state, turning off various processor components to save power
- But you also need to understand that every time an application tries to bind itself to a CPU to do some task, the respective CPU has to come back from its “deeper sleep state” to “running state” that needs more time to wake up the CPU and be again 100% up and running. It also has to be done in an atomic context, so that nothing tries to use the core while it’s being powered up.
- So the various modes to which the CPU transitions are called C-states
- They are usually starting in C0, which is the normal CPU operating mode, i.e., the CPU is 100% turned on
- With increasing C number, the CPU sleep mode is deeper, i.e., more circuits and signals are turned off and more time the CPU will require to return to C0 mode, i.e., to wake-up.
- Each mode is also known by a name and several of them have sub-modes with different power saving – and thus wake-up time – levels.
Below table explains all the CPU C-states and their meaning

How can I disable processor sleep states?
Latency sensitive applications do not want the processor to transition into deeper C-states, due to the delays induced by coming out of the C-states back to C0. These delays can range from hundreds of microseconds to milliseconds.
There are various methods to achieve this.
Method 1
By booting with the kernel command line argument processor.max_cstate=0 the system will never enter a C-state other than zero.
You can add these variable in your grub2 file. Append “ processor.max_cstate=0 ” as shown below
Rebuild your initramfs
Reboot the node to activate the changes
- The second method is to use the Power Management Quality of Service interface (PM QOS).
- The file /dev/cpu_dma_latency is the interface which when opened registers a quality-of-service request for latency with the operating system.
- A program should open /dev/cpu_dma_latency , write a 32-bit number to it representing a maximum response time in microseconds and then keep the file descriptor open while low-latency operation is desired. Writing a zero means that you want the fastest response time possible.
- Various tuned profile can do this by reading the file continously and writing a value based on the input provided foe eg, network-latency, latency-performance etc.
Below is a snippet from latency-performance tuned file
Here as you see this file will always be on open state by the tuned as long as tuned is in running state
These profiles write force_latency as 1 to make sure the CPU c-state does not enters deeper C state other than C1.
How to read and interpret /dev/cpu_dma_latency?
If we use normal text editor tool to read this file then the output would be something like
Since this value is “raw” (not encoded as text) you can read it with something like hexdump.
When you read this further
It tells us that the current latency value time is 2000 seconds which is the time a CPU would need or take to come up from a deeper C state to C0.
When we set a tuned profile with force_latency=1
For example here I will set tuned profile of network-latency
Check the existing active profile
Now lets check the latency value
As you see the latency value has been changed to 1 micro second.
What is the maximum C-state allowed for my CPU?
We have multiple CPU c-states as you can see in the above table but depending upon the latency values and other max_cstate value provided in the GRUB the maximum allowed c-states for any processor can vary.
Below file should give the value from your node
How do I check the existing latency value for different C-states?
The latency value may change depending upon various C-states and the transition time from deeper C-states to C0.
Below command shall give you the existing latency values of all the c-states per cpu
# for state in state <0..4>; do echo c-$state `cat $state/name` `cat $state/latency` ; done
c-state0 POLL 0
c-state1 C1-HSW 2
c-state2 C1E-HSW 10
c-state3 C3-HSW 33
c-state4 C6-HSW 133
Similar value can be grepped for all the available CPUs by changing the cpu number in the above highlighted area.
How to check and monitor the CPU c-state usage in Linux per CPU and core?
You can use “turbostat” tool for this purpose which will give you runtime value for the CPU c-state usage for all the available CPU and cores.
I will be using ‘turbostat’ and ‘stress’ tool to monitor the CPU c-state and put some load on my CPU respectively.
To install these rpms you can use
Case 1: Using throughput-performance tuned profile
To check the currently active profile
With this our latency value is default i.e. 2000 seconds
Check the output using turbostat
As you see all the available CPU and cores are at c-6 state because all are free. Now if I start putting stress then the CPU will start transitioing from C6 to c0 state and c6 will become free as all CPU will be in running state
Core CPU Avg_MHz Busy% Bzy_MHz TSC_MHz IRQ SMI CPU%c1 CPU%c3 CPU%c6 CPU%c7 CoreTmp PkgTmp PkgWatt RAMWatt PKG_%RAM_%
– – 2428 86.63 2804 2599 85363 656 6.08 0.96 6.33 0.00 57 60 119.27 17.04 0.00 0.00
0 0 2377 84.85 2802 2600 5756 41 9.47 1.09 4.59 0.00 55 60 55.56 6.59 0.00 0.00
1 8 1835 65.48 2801 2602 5742 41 20.04 2.11 12.37 0.00 54
2 1 2802 99.93 2803 2601 5037 41 0.07 0.00 0.00 0.00 57
3 9 2802 99.93 2803 2601 5035 41 0.07 0.00 0.00 0.00 56
4 2 2802 99.94 2803 2600 5044 41 0.06 0.00 0.00 0.00 57
5 10 1992 71.12 2802 2598 5688 41 16.62 1.77 10.50 0.00 54
6 3 2799 99.94 2803 2599 5049 41 0.06 0.00 0.00 0.00 57
7 11 1914 68.39 2801 2598 5720 41 18.45 2.09 11.07 0.00 51
0 4 2066 73.79 2800 2600 5335 41 9.85 2.19 14.17 0.00 46 53 63.72 10.45 0.00 0.00
1 12 2803 99.86 2807 2600 5088 41 0.14 0.00 0.00 0.00 52
2 5 656 23.46 2800 2597 3312 41 21.81 6.10 48.63 0.00 45
3 13 2799 99.86 2807 2597 5610 41 0.14 0.00 0.00 0.00 53
4 6 2799 99.86 2807 2597 7143 41 0.14 0.00 0.00 0.00 51
5 14 2799 99.86 2807 2597 5044 41 0.14 0.00 0.00 0.00 50
6 7 2799 99.86 2807 2597 5679 41 0.14 0.00 0.00 0.00 50
7 15 2799 99.86 2807 2597 5081 41 0.14 0.00 0.00 0.00 48
Core CPU Avg_MHz Busy% Bzy_MHz TSC_MHz IRQ SMI CPU%c1 CPU%c3 CPU%c6 CPU%c7 CoreTmp PkgTmp PkgWatt RAMWatt PKG_%RAM_%
– – 2421 86.42 2807 2595 84373 656 6.28 1.07 6.23 0.00 59 62 120.52 17.00 0.00 0.00
0 0 2798 99.83 2808 2595 5039 41 0.17 0.00 0.00 0.00 57 62 55.92 6.54 0.00 0.00
1 8 1891 67.58 2803 2595 5151 41 16.92 2.72 12.78 0.00 55
2 1 2798 99.83 2808 2595 5032 41 0.17 0.00 0.00 0.00 59
3 9 2798 99.83 2808 2595 6068 41 0.17 0.00 0.00 0.00 58
4 2 2798 99.83 2808 2595 5041 41 0.17 0.00 0.00 0.00 58
5 10 1527 54.56 2804 2595 5540 41 24.02 3.73 17.70 0.00 56
6 3 2793 99.83 2808 2590 5045 41 0.17 0.00 0.00 0.00 58
7 11 1692 60.57 2804 2590 5556 41 20.66 3.24 15.53 0.00 54
0 4 1425 50.99 2800 2595 5251 41 19.20 4.24 25.57 0.00 48 57 64.60 10.46 0.00 0.00
1 12 2799 99.85 2809 2595 5053 41 0.15 0.00 0.00 0.00 54
2 5 2799 99.84 2809 2595 5054 41 0.16 0.00 0.00 0.00 53
3 13 1419 50.79 2800 2595 4642 41 17.88 3.22 28.11 0.00 49
4 6 2799 99.85 2809 2595 5059 41 0.15 0.00 0.00 0.00 55
5 14 2799 99.84 2809 2595 5047 41 0.16 0.00 0.00 0.00 53
6 7 2799 99.84 2809 2595 6206 41 0.16 0.00 0.00 0.00 53
7 15 2801 99.84 2809 2597 5589 41 0.16 0.00 0.00 0.00 50
Now towards the end as you see the Busy% increases and the CPU state under c-6 is reduced which means the CPU are currently in running state.
Case 2: Change tuned profile to latency-performance
Next monitor the CPU c-state when the system is idle
As you see even when the CPU and cores are sitting idle still the CPU won’t transition to deeper c-states since we are forcing it to stay at C1
What is POLL idle state ?
If cpuidle is active, X86 platforms have one special idle state. The POLL idle state is not a real idle state, it does not save any power. Instead, a busy-loop is executed doing nothing for a short period of time. This state is used if the kernel knows that work has to be processed very soon and entering any real hardware idle state may result in a slight performance penalty.
There exist two different cpuidle drivers on the X86 architecture platform:
“acpi_idle” cpuidle driver
The acpi_idle cpuidle driver retrieves available sleep states (C-states) from the ACPI BIOS tables (from the _CST ACPI function on recent platforms or from the FADT BIOS table on older ones). The C1 state is not retrieved from ACPI tables. If the C1 state is entered, the kernel will call the hlt instruction (or mwait on Intel).
“intel_idle” cpuidle driver
In kernel 2.6.36 the intel_idle driver was introduced. It only serves recent Intel CPUs (Nehalem, Westmere, Sandybridge, Atoms or newer). On older Intel CPUs the acpi_idle driver is still used (if the BIOS provides C-state ACPI tables). The intel_idle driver knows the sleep state capabilities of the processor and ignores ACPI BIOS exported processor sleep states tables.
Источник
🇺🇸 Как включить (UP) и отключить (DOWN) порт сетевого интерфейса (NIC) в Linux?
Вам может потребоваться выполнить эти команды в соответствии с вашими требованиями.
Я могу привести несколько примеров, где вам это понадобится.
При добавлении нового сетевого интерфейса или при создании нового виртуального сетевого интерфейса из исходного физического интерфейса.
вам может понадобиться отослать эти команды, чтобы вызвать новый интерфейс.
Кроме того, если вы внесли какие-либо изменения или если они не работают, вам нужно выполнить одну из следующих команд, чтобы применить их.
Это можно сделать разными способами, и мы хотели бы добавить лучшие пять методов, которые мы использовали в статье.
Это можно сделать, используя следующие пять методов.
- Команда ifconfig: Команда ifconfig используется для настройки сетевого интерфейса. Он предоставляет много информации о NIC.
- Команда ifdown / up: команда ifdown отключает сетевой интерфейс, а команда ifup запускает сетевой интерфейс.
- Команда ip: команда ip используется для управления NIC. Это замена старой и устаревшей команды ifconfig. Она похожа на команду ifconfig, но имеет много мощных функций, которые недоступны в команде ifconfig.
- Команда nmcli: nmcli – это инструмент командной строки для управления NetworkManager и создания отчетов о состоянии сети.
- Команда nmtui: nmtui – это основанное на curses приложение TUI для взаимодействия с NetworkManager.
Приведенные ниже выходные данные показывают информацию о доступной сетевой карте (NIC) в моей системе Linux.
1) Как подключить и отключить сетевой интерфейс в Linux с помощью команды ifconfig?
Команда ifconfig используется для настройки сетевого интерфейса.
Он используется во время загрузки для настройки интерфейсов по мере необходимости.
Он предоставляет много информации о NIC.
Мы можем использовать команду ifconfig, когда нам нужно внести какие-либо изменения в сетевую карту.
Общий синтаксис для ifconfig:
Выполните следующую команду, чтобы отключить интерфейс enp0s3 в Linux.
Запишите его, вы должны ввести имя вашего интерфейса вместо нашего варианта.
Да действительно, данный интерфейс не работает согласно следующему выводу.
Выполните следующую команду, чтобы включить интерфейс enp0s3 в Linux.
Да, данный интерфейс работает сейчас согласно следующему выводу.
2) Как включить и отключить сетевой интерфейс в Linux с помощью команды ifdown / up?
Команда ifdown отключает сетевой интерфейс, а команда ifup – поднимает сетевой интерфейс.
Примечание. Она не работает с новым интерфейсным именем устройства, таким как enpXXX.
Общий синтаксис для ifdown / ifup:
Выполните следующую команду, чтобы отключить интерфейс eth1 в Linux.
Выполните следующую команду, чтобы включить интерфейс eth1 в Linux.
Да, данный интерфейс работает сейчас согласно следующему выводу.
ifup и ifdown не поддерживают последние имена интерфейсных устройств enpXXX.
При запуске команды я получил следующее сообщение.
3) Как вывести из строя или поднять сетевой интерфейс в Linux с помощью команды ip?
Команда ip используется для управления картой сетевого интерфейса (NIC).
Это замена старой и устаревшей команды ifconfig в современных системах Linux.
Она похожа на команду ifconfig, но имеет много мощных функций, которые недоступны в команде ifconfig.
Общий синтаксис для IP:
Выполните следующую команду, чтобы отключить интерфейс enp0s3 в Linux.
Да, данный интерфейс не работает согласно следующему выводу.
Выполните следующую команду, чтобы включить интерфейс enp0s3 в Linux.
Да, данный интерфейс работает сейчас согласно следующему выводу.
4) Как включить и отключить сетевой интерфейс в Linux с помощью команды nmcli?
nmcli – это инструмент командной строки для управления NetworkManager и создания отчетов о состоянии сети.
Его можно использовать в качестве замены для nm-applet или других графических клиентов. nmcli используется для создания, отображения, редактирования, удаления, активации и деактивации сети.
подключения, а также контролировать и отображать состояние сетевого устройства.
Выполните следующую команду, чтобы определить имя интерфейса, потому что команда nmcli выполняет большую часть задачи, используя имя профиля вместо имени устройства.
Общий синтаксис для IP:
Выполните следующую команду, чтобы отключить интерфейс enp0s3 в Linux.
Вы должны дать имя профиля вместо имени устройства, чтобы отключить его.
Да, данный интерфейс не работает согласно следующему выводу.
Выполните следующую команду, чтобы включить интерфейс enp0s3 в Linux. Вы должны дать имя профиля вместо имени устройства, чтобы включить его.
Да, данный интерфейс работает сейчас согласно следующему выводу.
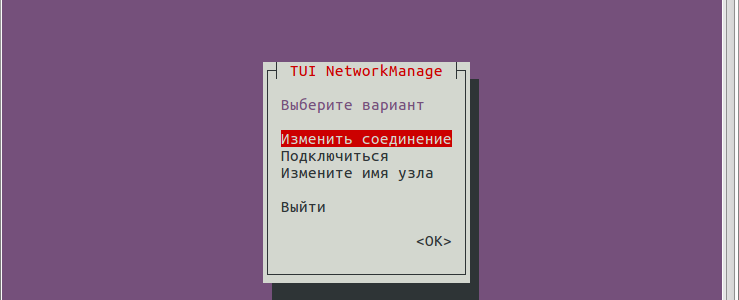
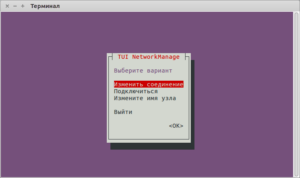
5) Как вывести из строя сетевой интерфейс в Linux с помощью команды nmtui?
nmtui – приложение TUI на основе curses для взаимодействия с NetworkManager.
При запуске nmtui пользователю предлагается выбрать действие для выполнения, если оно не было указано в качестве первого аргумента.
Запустите следующую команду, чтобы запустить интерфейс nmtui.
Выберите «Подключится» и нажмите «ОК».
Выберите интерфейс, который хотите отключить, затем нажмите кнопку «отключить».
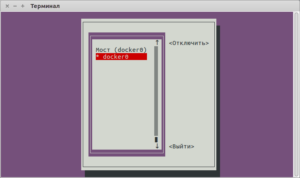
Для активации выполните ту же процедуру, что и выше.
Источник


