- How to Permanently Disable Swap in Linux?
- How to Permanently Disable Swap in Linux
- If You Appreciate What We Do Here On TecMint, You Should Consider:
- SWAP — как создать, подключить, очистить и отключить файл подкачки в Linux
- Что такое SWAP
- Когда может понадобиться своп
- Преимущества SWAP
- Недостатки SWAP
- Как создать и подключить файл подкачки SWAP
- Проверка наличия свопа в системе
- Проверка наличия свободного места на диске
- Какого размера создать swap
- Создание файла SWAP
- Как подключить SWAP файл
- Добавление свопа в автозагрузку
- Дополнительные вопросы
- Как очистить SWAP в Linux
- How to Disable Swap in Linux
- Disable swap in Linux
- Re-enable swap in Linux
- Deleting swap space
How to Permanently Disable Swap in Linux?
Swapping or swapping space is a physical memory page placed at the top of a disk partition or a special disk file that is used to expand a system’s RAM as the physical memory fills up. Inactive memory pages are often dumped into the swap area when no RAM is available, using this method of expanding RAM resources. However, swap space is much lower in transfer speeds and access time compared to RAM, due to the spinning speed of standard hard disks.
Reserving a small partition for swapping will significantly increase access time and speed transfer compared to conventional HDD on newer machines with fast SSD hard drives, but the speed is still lower than RAM memory. Some say that it is appropriate to set the swap space to twice the amount of computer RAM. However, swap space should be set to 2 or 4 GB on systems with more than 4 GB of RAM.
If your server has sufficient RAM memory or does not need the use of swap space or your device output is significantly reduced by swapping, you can consider disabling the swap field.
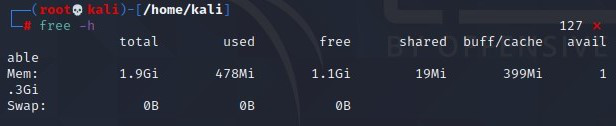
You first need to visualize your degree of memory load before actually disabling swap space, and then identify the partition that holds the swap area by issuing the commands below.
Look for the Used Swap Space size. If 0B or close to 0 bytes is the size used, it can be assumed that swap space is not used intensively and can be disabled for protection.

Next, check for TYPE=”swap” line after the blkid command to define the swap partition, as shown in the screenshot below.

check swap partition type
Again, issue the following lsblk command to search and identify the [SWAP] partition as shown in the below screenshot.
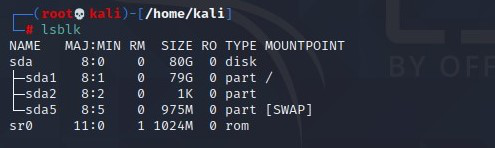
Search Confirm Swap Partition
Run the below command to deactivate the swap area after you have identified the swap partition or file.
Or disable all swaps from /proc/swaps.
To check if the swap area has been disabled, run the free command.
Disable Swap Partition
To permanently disable Linux swap space, open the /etc/fstab file, search for a swap line and add a # (hashtag) sign in front of the line to comment on the entire line, as shown in the screenshot below.
Afterwards, reboot the system in order to apply the new swap setting or issuing mount -a command in some cases might do the trick.
After a system reboot, the commands presented at the beginning of this tutorial should be issued to indicate that the swap area in your system has been completely and permanently disabled.
In simple ways or the other step:
If you really want to disable swapping (note: this is not suggested, even if you’re pretty sure there’s more than enough physical RAM), follow these steps:
- Run swapoff -a: this will immediately disable the swap.
- Remove any swap entry from /etc/fstab.
- Get the system rebooted. Ok, if the swap is gone. If it’s still here for some reason, you have to remove the swap partition.
- Repeat steps 1 and 2 and, after that, use fdisk or parted to delete the (now unused) swap partition. Use great caution here: removing the wrong partition would have devastating results!
Источник
How to Permanently Disable Swap in Linux
Swapping or swap space represents a physical memory page that lives on top of disk partition or a special disk file used for extending the RAM memory of a system when the physical memory fills up.
Using this method of extending RAM resources, inactive memory pages are frequently dumped into the swap area when no RAM is available. However, do to the spinning speed of classical hard disks, swap space is way lower in transfer speeds and access time compared to RAM.
On newer machines with fast SSD hard disks, reserving a small partition for swapping can greatly improve access time and speed transfer compared to classical HDD, but the speed is still more magnitudes lower than RAM memory. Some suggest that the swap space should be set as twice the amount of machine RAM. However, on systems with more than 4 GB or RAM, swap space should be set between 2 or 4 GB.
In case your server has sufficient RAM memory or does not require the use of swap space or the swapping greatly decreases your system performance, you should consider disabling the swap area.
Before actually disabling swap space, first you need to visualize your memory load degree and then identify the partition that holds the swap area, by issuing the below commands.
Look for Swap space used size. If the used size is 0B or close to 0 bytes, it can be assumed that swap space is not used intensively and can be safety disabled.
![]() Check Swap Space
Check Swap Space
Next, issue following blkid command, look for TYPE=”swap” line in order to identify the swap partition, as shown in the below screenshot.
![]() Check Swap Partition Type
Check Swap Partition Type
Again, issue the following lsblk command to search and identify the [SWAP] partition as shown in the below screenshot.
![]() Search Confirm Swap Partition
Search Confirm Swap Partition
After you’ve identified the swap partition or file, execute the below command to deactivate the swap area.
Or disable all swaps from /proc/swaps
Run free command in order to check if the swap area has been disabled.
![]() Disable Swap Partition
Disable Swap Partition
In order to permanently disable swap space in Linux, open /etc/fstab file, search for the swap line and comment the entire line by adding a # (hashtag) sign in front of the line, as shown in the below screenshot.
![]() Disable Swap Partition Permanently
Disable Swap Partition Permanently
Afterwards, reboot the system in order to apply the new swap setting or issuing mount -a command in some cases might do the trick.
After system reboot, issuing the commands presented in the beginning of this tutorial should reflect that the swap area has been completely and permanently disabled in your system.
If You Appreciate What We Do Here On TecMint, You Should Consider:
TecMint is the fastest growing and most trusted community site for any kind of Linux Articles, Guides and Books on the web. Millions of people visit TecMint! to search or browse the thousands of published articles available FREELY to all.
If you like what you are reading, please consider buying us a coffee ( or 2 ) as a token of appreciation.

We are thankful for your never ending support.
Источник
SWAP — как создать, подключить, очистить и отключить файл подкачки в Linux
Что такое SWAP
SWAP (своп) — это механизм виртуальной памяти, при котором часть данных из оперативной памяти (ОЗУ) перемещается на хранение на HDD (жёсткий диск), SSD (твёрдотельный накопитель), флеш-накопитель или иное вторичное хранилище. Как правило, swapping (свопинг) происходит, когда оперативная память переполнена, и ей для работы требуется дополнительное пространство.
Когда может понадобиться своп
Зачастую, от недостатка свободной памяти первой страдает база данных. Вы можете сталкиваться с проблемами типа:
- Постоянное падение сайта: Ошибка соединения с базой данных — означает, например, что MySQL упал;
- При внимательном изучении логов /var/log/mysql.log обнаруживается ошибка InnoDB: Fatal error: cannot allocate memory for the buffer pool . Она свидетельствует о том, что базе данных не хватает выделенной ей оперативной памяти для создания буфера.
При подобных симптомах и ошибках может помочь своппинг.
Преимущества SWAP
| Сравнение стоимости оперативной памяти и SSD | ||
| (цены актуальны на 7 июля 2017 года) | IHOR | FirstVDS |
| Оперативная память, в среднем за 1 гигабайт | 100 рублей в месяц | 170 рублей в месяц |
| SSD, в среднем за 1 гигабайт | 10 рублей в месяц | 13 рублей в месяц |
Как видно из таблицы, экономия выйдет примерно в 10 раз.
Недостатки SWAP
SWAP — это не замена оперативной памяти, а всего лишь его поддержка.
Как создать и подключить файл подкачки SWAP
Далее, в работе используется командная строка SSH.
Инструментарий: Far Manager или Putty.
Для примера приводятся команды из под root . Если Вы работаете не под root , перед командами задавайте префикс sudo
Проверка наличия свопа в системе
Для начала, нужно убедиться, что своп ещё не подключен:
Если команда выдала пустой результат или что-то навроде:
— значит, своп, скорее всего отсутствует.
Дополнительно проверим командой:

Если в таблице в строке swap стоит 0, значит своп отсутствует.
Проверка наличия свободного места на диске
Теперь, надо проверить, сколько свободного места есть на диске:
В результате, мы увидим что-то подобное:
Как мы видим, доступно 9 гигабайт дискового пространства — вполне достаточно, чтобы создать своп-файл.
Какого размера создать swap
Исходите из принципа — сколько может понадобиться, столько и выделяйте. Как правило, можно начинать с размера объёма оперативной памяти, либо его удвоенного количества. Например, если у вас в системе 2 гигабайта оперативки, своп можно сделать размером 2-4 гигабайта, как правило, этого должно хватать. Но, Вы можете скорректировать его размер под себя.
Создание файла SWAP
Допустим, мы хотим создать swap-файл размером 4 гигабайта.
Далее, здесь существует 2 подхода, традиционный медленный и новый быстрый:
Быстрый способ Используем fallocate :
Результатом будет пустая строка, это нормально.
В отличие от dd , результат будет получен почти сразу, и я рекомендую именно его. Традиционный, медленный способ Или используем команду:
Синтаксис команды простой:
- dd — команда предназначена для того, чтобы что-то куда-то копировать побайтово;
- if=/dev/zero — указывает на источник, т.е. на то, откуда копируем, в данном случае из /dev/zero — это специальный файл в UNIX-подобных системах, представляющий собой источник нулевых байтов;
- of=/swapfile — указывает путь назначения, куда копируем данные;
- bs=1G — количество байт, которые будут записаны за раз. В нашем случае, 1 гигабайт. Обозначения: G — гигабайт, M — мегабайт, K — килобайт, и так далее;
- count=4 — сколько блоков размером с bs будет создано, в нашем случае 4.
Будьте очень внимательны с синтаксисом команды, потому что если, например, ошибиться с определением пути для of= (куда сохранять файл), можно повредить данные на диске.
Теперь, когда файл создан, проверим результат:
В результате увидим:
-rw-r—r— 1 root root 4.0G Jul 07 16:16 /swapfile
Как видим, файл создался верно и с нужным объёмом.
Как подключить SWAP файл
Для начала, ограничим права доступа к вновь созданному файлу.
Предоставление другим пользователям возможности читать или писать в этот файл будет представлять собой огромный риск для безопасности, поэтому ограничение командой ниже строго обязательно:
В результате, мы должны увидеть подобное:
-rw——- 1 root root 4.0G Jul 07 16:16 /swapfile
Права прописаны верно.
Теперь нужно сделать из swapfile файл подкачки:
В результате, увидим примерно следующее:
Setting up swapspace version 1, size = 4193300 KiB
no label, UUID=e5f3e9cf-c1a9-4ed4-b8ab-711b6a7d6544
Теперь, файл готов в роли свопа. Подключим его к системе:
Если на данном этапе выходит похожая ошибка, значит, скорее всего, своп запрещено подключать в систему. Такое ограничение часто ставят на VDS с виртуализацией OpenVZ. Рекомендую использовать IHOR, сервера от 100 рублей в месяц и виртуализация KVM позволяют включать SWAP.
Всё, теперь своп подключен и работает. Осталось проверить правильность работы самой первой командой:
Своп также будет виден в стандартных командах:
Всё, теперь точно, своп в системе готов и будет использоваться при необходимости.
Добавление свопа в автозагрузку
Чтобы при перезагрузке сервера своп автоматически подтягивался в систему, нужно прописать его в /etc/fstab :
Теперь система знает, где и как при перезагрузке искать и подключать своп.
Проверить, подключен ли своп в автозагрузке, можно с помощью редактора:
Дополнительные вопросы
Как очистить SWAP в Linux
Вообще, это делается с помощью отключения и включения свопа.
Однако, я не рекомендую прибегать к этому способу, так как swap просто очищается, а не переносится в ОЗУ, и, в случае наличия данных системных процессов, система может стать недоступна.
Источник
How to Disable Swap in Linux
You may encounter a scenario where you need to disable the swap in Linux. Suppose you want to change the swap size. You should disable it before making any changes.
If for some reasons, you decided to disable swap in Linux, this tutorial shows you the steps to do it.
There are two kinds of swap space in Linux:
- swap partition (a dedicated partition)
- swap file (a file under root acting as swap)
A system can have either of the swap partition or swap file or both. You can check active swap using command:
However, more reliable information can be found in /etc/fstab file that shows all the swap on your system, active or inactive.

Now that you know how to locate your swap file or partition, let’s see how to disable it.
Disable swap in Linux
If you want to disable a specific swap file or partition, provide its path like this:
An easier way is to disable all the active swap on your system like this:
If you check for active swap again using swapon –show command, you won’t see any swap anymore.
Re-enable swap in Linux
If you want to reactivate a disabled swap space, you can use the swapon command like this:
Or you can enable all the available swap space using this command:
Deleting swap space
If you want to delete the swap partition or file, you’ll have to first disable it. You just saw the steps for disabling it.
Now, if you have a swap file, deleting it is the same as removing any file in Linux.
If you have a swap partition, you can delete the partition using fdisk command.
The important part is that you should also remove the entry for the deleted swap file or partition from the /etc/fstab file.
I hope you found this quick little tutorial helpful in handling swap space to your Linux system.
Источник


