- Enable disable system restore and service from command line
- Отключить запрос на восстановление системы
- Disable-Computer Restore
- Syntax
- Description
- Examples
- Example 1: Disable System Restore on the specified drive
- Example 2: Disable System Restore on multiple drives
- Parameters
- Inputs
- Outputs
- Notes
- How to Restore Server 2016 or 2012 in a Previous System State from Windows GUI (Online Method)
- How to Restore Server 2016 in a Previous System State from a System Image Backup.
Enable disable system restore and service from command line
We can enable or disable system restore from Windows command line by modifying the relevant registry keys. We can also configure system restore service from command prompt using sc command.
Disable System Restore from Windows command line
We can disable system restore by setting the registry key DisableSR to1 under the node В
From Windows command line we can edit this registry key by running the following command.
Reg add «HKEY_LOCAL_MACHINE\SOFTWARE\Microsoft\Windows NT\CurrentVersion\SystemRestore» /v DisableSR /t REG_DWORD /d 1 /f
To enable System restore from command line you can run the below command:
Reg add «HKEY_LOCAL_MACHINE\SOFTWARE\Microsoft\Windows NT\CurrentVersion\SystemRestore» /v DisableSR /t REG_DWORD /d 0 /f
Disable System restore service from command line
We can disable system restore service from command line using the below command.
To enable system restore service from command line you can run the below command.
Note that the above commands do not change the current running status of the system restore service. If the service is running currently, disabling the service won’t stop it in the current session, but when the system is restarted this service won’t be started.
To stop system restore service from command line we can run the below command.
To start system restore service from command line we can run the below command.
Thanks for the useful information.
But,there are some mistakes, please correct.
> /v DisableCR /d 1 /f
в†’ /v DisableSR /t REG_DWORD /d 1 /f
Corrected the post..thanks for letting me know..
I tried all of the above, but it said my system restore wasn’t running. I looked in services.msc and noticed there was no line for system restore. Do I have to insert something in services for system restore to start in the first place? Thanks.
Can’t wail until I buy a Mac…
Sean,
This post applies to XP only. Looks like you are using Windows 7/Vista. Please check this link for questions on Win7 system restore.
http://windows.microsoft.com/en-US/windows-vista/System-Restore-frequently-asked-questions
Yes. In Windows 7 it gives this error:
Does both “sc config srservice start= disabled” & “net stop srservice” cmd code work on win 7?
thanks very much. helped.
In Windows 10, and maybe in Windows Vista and Windows 7.
System Properties > System Protection > Restore Settings.
– Turn on system protection.
In DOS (wmic doesn’t work in PowerShell) : wmic /namespace:\\root\default Path SystemRestore Call enable “C:\”
In PowerShell : Enable-ComputerRestore “C:\”
– Disable system protection.
In DOS (wmic doesn’t work in PowerShell) : wmic /namespace:\\root\default Path SystemRestore Call disable “C:\”
In PowerShell : Disable-ComputerRestore “C:\”
– Resizes the maximum amount of storage space that can be used for shadow copy storage.
In DOS and PowerShell : vssadmin resize shadowstorage /for=C: /on=C: /maxsize=10%
– Deletes all of the shadow copies.
In DOS and PowerShell : vssadmin delete shadows /all /quiet
Command line equivalent in DOS : wmic shadowcopy delete
Отключить запрос на восстановление системы
У нас в организации есть так называемые посты охраны на которых сидит охранник за небольшим компьютером и смотрит на автоматически подгружаемые в зоне его видимости камеры через ПО Интеллект. Так вот мониторит он значит обстановку и тут, кстати такое уже не редкость ни только у постов охраны, но и сотрудников компании которые сидят в офисе происходит внезапное отключение розеток. Обычно это подключение большей нагрузки чем рассчитано на автомат (привет Обогреватель, чайник и т.д), либо же просто скачок напряжения. Так вот система выключилась, пользователь ее включает и система в место того, чтобы начать грузиться в привычном режиме запускает элемент «Запуск средства восстановления при загрузке (рекомендуется)».

И что тут такого можно сказать, а это гемор ходить по всем у кого такое произошло и просто передвинуть клавишами на элемент «Обычная загрузка Windows» и система будет грузиться, как будто и ни чего и не было. Вот этот вот кстати элемент якобы восстановления у меня лично на практике никогда ничего не восстанавливает, а это значит его бы практичнее было деактивировать. В следствии этого закралась задумка, как в будущем съэкономить на времени, мол кто-то скажет, да ладно подумаешь отправим обычного инженера пусть учится, а если Вы также как и я работаете в сменной графике и один на весь большой центр — бегать по каждому уж извольте.
Ну ладно, нужно централизованно решить данную проблему, для единичном рабочей станции нужно выполнить ниже указанные строки с правами Администратора:
C:\Windows\system32>bcdedit /set
Операция успешно завершена.
C:\Windows\system32>bcdedit /set
Операция успешно завершена.
Теперь больше не будет звонков и писаний на предмет у меня система после отключения электричества упала и не грузиться написано идет восстановление. Замечу что режим F8 не деактивирован, отключай его ни в коем случае нельзя т. к. он является Вашей надеждой на реанимацию в случае падения системы. Если случится сбой некорректного выключения то после включения система загрузится игнорируя возникнувшие ошибки в обычном режиме. Чтобы вернуть все как было, то команда:
C:\Windows\system32>bcdedit /set
Операция успешно завершена.
А сделать пакость отключив режим F8 можно так (хоть обнажимайся):
C:\Windows\system32>bcdedit /set
Операция успешно завершена.
Включить обратно режим F8:
C:\Windows\system32>bcdedit /set
Операция успешно завершена.
Хорошо, как быть если нужно сделать такое по всем компьютерам домена? А если нужно сделать вот прям сейчас то задействую пакет pstools и утилиту из него именуемую, как psexec. Создаю Bat-файл с необходимыми командами и текстовый файл с именами компьютеров взятых из GLPI системы.
drecovery.bat
bcdedit /set
bcdedit /set
c:\PSTools>type files.txt
И запуск данного bat-файл по всем компьютерам списка:
C:\Windows\system32>cd /d c:\PSTools
c:\PSTools>psexec @c:\pstools\files.txt -c c:\PSTools\drecovery.bat
и на консоль выводятся все сообщения если нужно проанализировать то делаем перенаправление в файл:
c:\PSTools>psexec @c:\pstools\files.txt -c c:\PSTools\drecovery.bat > c:\pstools
\drecovery_report.log
открывать полученный файл советую через расширенный текстовый редактор notepad++ т. к. с ним нет проблем с читаемость кодировок. Вот кусок из лога:

Как видно все запланированное отработало.
Можно не заморачивать со скриптом, а сделать локальную групповую политику , на Windows 7 Pro SP1)
Win + R — gpedit.msc — Политика «Локальный компьютер» — Административные шаблоны — Система — Восстановление системы:
Отключить восстановление системы Включить
Изменения применятся после перезагрузки компьютера. Вот только как сделать групповую политику на весь домен я не знаю, для меня же это хоть и важно но тратить время на поиск это лишнее в качестве альтернативы решению пакет pstools отлично справляется.
Вот собственно и все, результат достигнут а по мне меньше проблем счастливый админ. На этом я прощаюсь, до новых заметок с уважением автор блога — ekzorchik.
Disable-Computer Restore
Disables the System Restore feature on the specified file system drive.
Syntax
Description
The Disable-ComputerRestore cmdlet turns off the System Restore feature on one or more file system drives. As a result, attempts to restore the computer do not affect the specified drive.
To disable System Restore on any drive, it must be disabled on the system drive, either first or concurrently.
To re-enable System Restore, use the Enable-ComputerRestore cmdlet. To find the state of System Restore for each drive, use Rstrui.exe.
System restore points and the ComputerRestore cmdlets are supported only on client operating systems, such as Windows 7, Windows Vista, and Windows XP.
Examples
Example 1: Disable System Restore on the specified drive
This command disables System Restore on the C: drive.
Example 2: Disable System Restore on multiple drives
This command disables System Restore on the C: and D: drives. The command uses the Drive parameter, but it omits the Drive parameter name.
Parameters
Prompts you for confirmation before running the cmdlet.
| Type: | SwitchParameter |
| Aliases: | cf |
| Position: | Named |
| Default value: | False |
| Accept pipeline input: | False |
| Accept wildcard characters: | False |
Specifies the file system drives. Enter one or more file system drive letters, each followed by a colon and a backslash and enclosed in quotation marks, such as C:\ or D:. This parameter is required.
You cannot use this cmdlet to disable System Restore on a remote network drive, even if the drive is mapped to the local computer, and you cannot disable System Restore on drives that are not eligible for System Restore, such as external drives.
To disable System Restore on any drive, System Restore must be disabled on the system drive, either before or concurrently.
| Type: | String [ ] |
| Position: | 0 |
| Default value: | None |
| Accept pipeline input: | False |
| Accept wildcard characters: | False |
Shows what would happen if the cmdlet runs. The cmdlet is not run.
| Type: | SwitchParameter |
| Aliases: | wi |
| Position: | Named |
| Default value: | False |
| Accept pipeline input: | False |
| Accept wildcard characters: | False |
Inputs
None
You cannot pipe input to this cmdlet.
Outputs
None
This cmdlet does not generate any output.
Notes
To run this cmdlet on Windows Vista and later versions of Windows, open Windows PowerShell with the Run as administrator option.
To find the file system drives that are eligible for system restore, in System in Control Panel, see the System Protection tab. To open this tab in Windows PowerShell, type SystemPropertiesProtection .
This cmdlet uses the Windows Management Instrumentation (WMI) SystemRestore class.
How to Restore Server 2016 or 2012 in a Previous System State from Windows GUI (Online Method)
Last updated on July 5th, 2019
In a previous article I had described how you can automatically back up your Windows Server 2016/2012 or 2012R2 by using the Windows Server Backup feature, in order to protect your server from any problem that may occur and prevent it from functioning properly.
In this article I will explain how to restore Server 2016/2012/2012R2 to a previous system state, from a system image backup, which created with the Windows Server Backup application, if the system is online (Windows is able to start normally).
Related Articles:
How to Restore Server 2016 in a Previous System State from a System Image Backup.
The only way to perform a system state recovery on Server 2016/2012, when your server is online, * is by using the WbAdmin command utility.
* Note: If your server cannot start normally, then read the instructions in this tutorial.
To Restore the System State on Server 2016/2012 with WbAdmin:
1. Open Command prompt as administrator. (type CMD on the search box, right-click at the ‘Command Prompt’ result and select Run as Administrator)
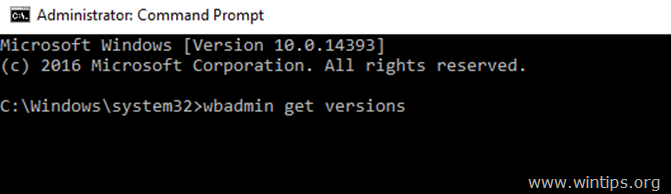
2. At command prompt, type the following command to view all the available backup versions:
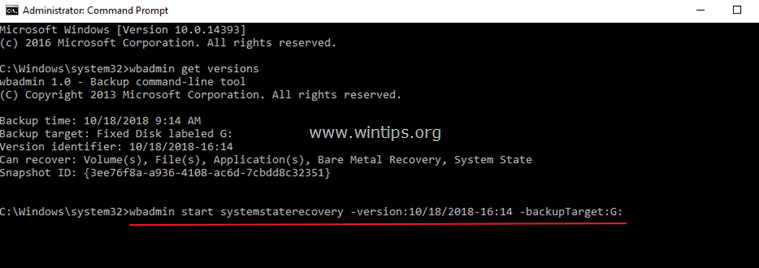
- wbadmin get versions
3. At the «wbadmin get versions» command output, note the version identifier of the backup that you want to restore and the backup location.

4. To perform a system state restore, use the wbadmin with the following syntax:
- wbadmin start systemstaterecovery -version: versionIdentifier -backupTarget: Backup Destination location -machine: MachineName -quiet
e.g. In this example, we want to restore the backup version: 10/18/2018-16:14 which is stored at drive G: on the local machine (server). So the command will be:
- wbadmin start systemstaterecovery -version:10/18/2018-16:14 -backupTarget:G:
WbAdmin start systemstaterecovery (Explanation of the Base Parameters): *
* Note: Type «WbAdmin start systemstaterecovery» to view all available parameters.
-version Specifies the version identifier for the backup to recover in MM/DD/YYYY-HH:MM format. If you do not know the version identifier, type wbadmin get versions.
-backupTarget Specifies the storage location that contains the backup or backups you want to recover. This parameter is useful when the storage location is different from where the backups of this computer are usually stored.
e.g. If the backup is stored at the following network share folder \\192.168.1.200\Public\Backup, the command will be:
- wbadmin start systemstaterecovery -version:10/18/2018-16:14 -backupTarget:\\192.168.1.200\Public\Backup
-machine Specifies the name of the computer that you want to recover. This parameter is useful when multiple computers have been backed up to the same location. Should be used when the -backupTarget parameter is specified.
e.g. If you want to recover another machine (e.g. the «Server01»), from a backup which stored at the following network folder \\192.168.1.200\Public\Backup, the command will be:
- wbadmin start systemstaterecovery -version:10/18/2018-16:14 -backupTarget:\\192.168.1.200\Public\Backup -machine:server01
-quiet Runs the subcommand with no prompts to the user.
That’s it! Let me know if this guide has helped you by leaving your comment about your experience. Please like and share this guide to help others.


