- How to Disable “Open File Security Warnings” in Windows 10, 8 and 7
- Disabling the warning window when running an app downloaded from the Internet
- Security warning when running apps from the network share
- How to disable the security warning for specific file types using GPO
- How to Disable the “Low Disk Space” Warning on Windows 10
- Disabling the ‘Low Disk Space’ Warning
- How to disable Open File security warning on Windows 10
- How can I disable Open File security warning on Windows 10?
- 1. Change your Internet options
- 2. Disable User Account Control
- 3. Modify your registry
- 4. Edit your Group Policy
- 5. Use Command Prompt
- 6. Unblock the file
- 7. Uncheck Always ask before opening this file option
- 8. Take ownership over the problematic file
- 9. Change Local intranet settings
- 10. Use Command Prompt
- 11. Check Include all network paths options
- 12. Create a bat file that will run the problematic file
- 13. Use the icals command
- 14. Download and use streams utility
- 15. Copy the files to a different location
How to Disable “Open File Security Warnings” in Windows 10, 8 and 7
When you trying to run an exe, msi, bat, cmd and other executable types of files from a local drive or network folder in Windows, you can see this warning: “Open file — Security Warning”. In order to continue the program, user must manually confirm the launch of such a file by clicking Run button. This Windows security warning usually appears when you run an application file downloaded from the Internet or executable file that is located in a network shared folder.
Such Windows behavior is designed to protect your computer from running potentially dangerous executable files that was downloaded from the Internet or from others untrusted sources. This feature is present both in Windows 7 and Windows 10.
In some cases, when this software is being run or installed in the background using the scheduler task, Group Policies, SCCM scripts, etc., it can cause some issues since the warning window doesn’t appear in the user session. So, it becomes impossible to install / run such an application in a batch mode.
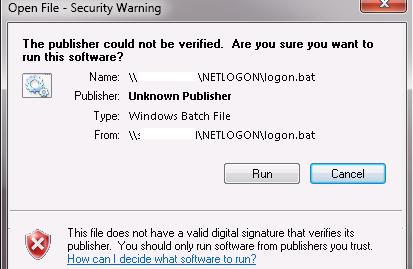
Let’s remind what the warning window looks like. For example, when you try to open a file from the network folder, the security warning alert looks as follows:
Open File — Security Warning
The Publisher could not be verified. Are you sure you want to run this software?
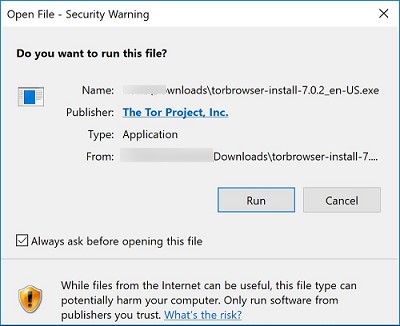
When running a file downloaded from the Internet from the local drive (or a network share mounted through net use), the text of the warning is a bit different:
Open File — Security Warning
Do you want to run this file?
While files from the Internet can be useful, this file type can potentially harm your computer. Only run software from publishers you trust.
Let’s try to find out how to remove security warnings when running executable or installation files in Windows 7 and Windows 10 (this guide is also suitable for all other Microsoft operating systems, starting from Windows XP).
We offer several options on how to disable this security warning window. Choose the suitable one depending on the necessary solution (in some cases you will have to combine the solutions).
Disabling the warning window when running an app downloaded from the Internet
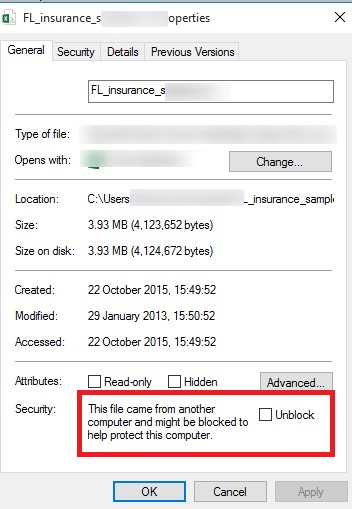
The executable files downloaded from the Internet are automatically marked as potentially dangerous (downloaded from an untrusted source). This feature is implemented with the help of the alternative NTFS file streams technology (Alternate Data Streams – ADS). To make it simple, let’s consider it to be a special file mark, which is automatically assigned to the downloaded file (see an article How does Windows know if a file is downloaded from the Internet). To remove this marker, you need to unblock this file. To do it:
- Open the properties of the executable file;
- On the General tab click the button or mark the Unblock checkbox. If the file has been downloaded from the Internet, the following warning will be displayed next to the button (checkbox): This file came from another computer and might be blocked to help protect this computer.

- Save the changes by clicking OK button. After the file has been unblocked, it is run without the warning window (NTFS alternate data streams is removed).
The alternative NTFS stream mark Zone.Identifier can be reset using these two commands (a new file will be created):
move oldapp.exe > newapp
type newapp > oldapp.exe
Or with the help of the Sysinternal’s utility:
Also you can unblock file using PowerShell:
Unblock-File -Path C:\Downloads\somefile.exe
If you want to disable this warning only for files downloaded using the browser, then you can disable setting the Zone.Identifier attribute in the different browsers:
For Google Chrome and IE, you need to create such a registry key:
And for Mozilla Firefox, on the settings page about:config change the value of browser.download.saveZoneInformation to false.
Security warning when running apps from the network share
The warning window may appear when the program is launched from a shared network folder using the UNC path. This problem is usually applies to corporate users working in the organization’s network. In this case, it’s easiest to add the name and / or IP address of the server where the executable file is stored to the Local Intranet zone in the Internet Explorer settings. This will indicate that the resource is trusted. To do it:
- Go to Control Panel → Internet Option
- Security tab
- Open Local Intranet → Sites → Advanced

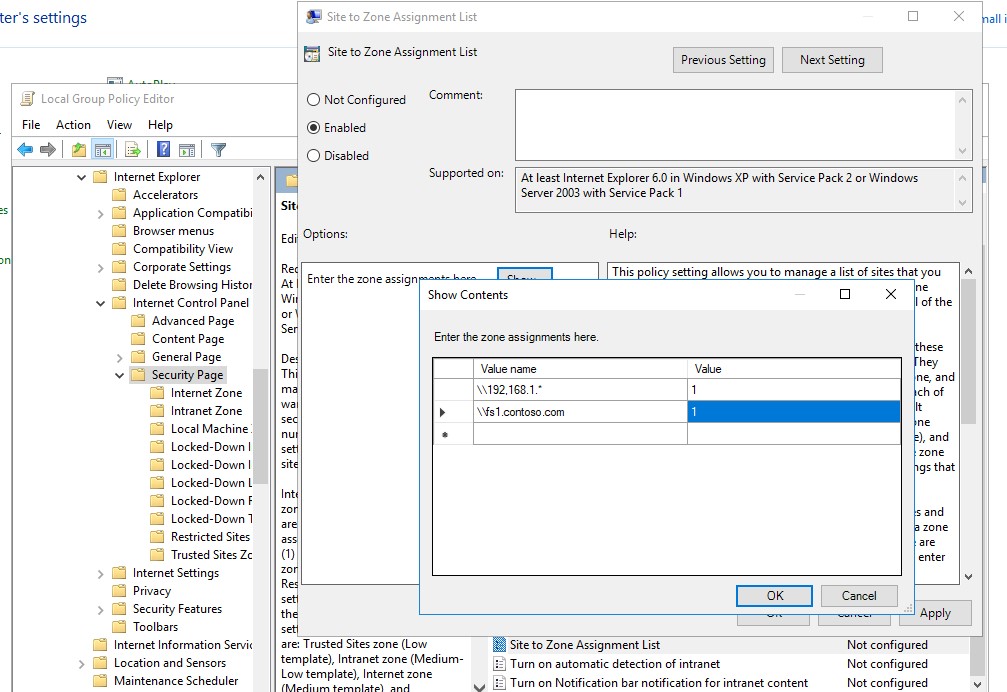
Also you can add the addresses of network folder and servers to the Local Intranet zone using GPO. Open the local (gpedit.msc) or the domain policy editor (gpmc.msc). Enable the policy Compute Configuration -> Administrative Templates ->Windows Components -> Internet Explorer -> Internet Control Panel -> Security Page -> Site to Zone Assignment List. In the policy settings, you must specify a list of trusted servers in the following format:
- Server name (e.g., file://server_name, \\server_name, server_name or IP)
- Zone number (1 for the Local Intranet Zone)
Save the policy changes and update it on the client (gpupdate / focre). Warning when opening executable files from the specified shared folders should cease to appear.
In addition, in Group Policies, you can enable the following settings in the section User Configuration -> Administrative Templates -> Windows Components -> Internet Explorer -> Internet Control Panel -> Security Page. This is the best option for domain users:
- Intranet Sites: Include all local (intranet) sites not listed in other zones
- Intranet Sites: Include all network paths (UNCs)
- Turn on automatic detection of intranet

How to disable the security warning for specific file types using GPO
In some cases, it is advisable to completely disable the appearance of the security warnings for certain types (extensions) of files through group policies. Although, of course, this is not very safe, because the user can accidentally run something malicious.
To do it, in the GPO Editor go to: User Configuration -> Administrative Templates -> Windows Components -> Attachment Manager.
- Enable the policy Do not preserve zone information in file attachments. All the downloaded files will be run without the warning on all computers.
- Enable the policy Inclusion list for low file types, and in its settings specify the list of file extensions you would like to run, e.g., .exe; .vbs; .msi. The system will ignore the markers on the files with these extensions and run them without the warning.
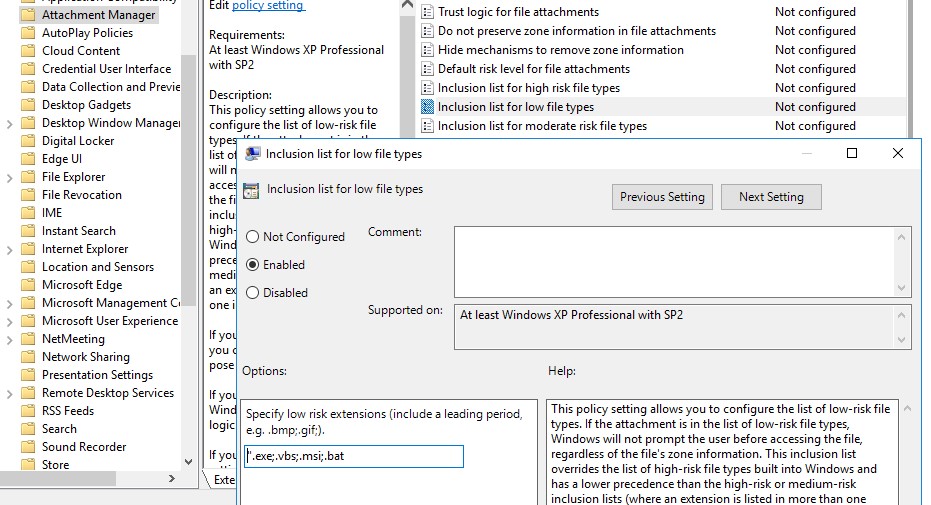
Save the policy, assign it to the target OU and apply it to clients by running on them gpupdate /force
How to Disable the “Low Disk Space” Warning on Windows 10
Microsoft is extremely diligent when it comes to user experience in their products. But sometimes they tend to overdo. Whenever your computer’s hard drive is almost full or running out of free space, a ‘Low Disk Space’ warning appears in the form of a little balloon notification.
Different versions of Windows have specific durations for low disk space warnings and their reminders. For example, Windows Vista has predefined disk space check per minute while for Windows 7, 8 and 10; they have it scheduled for every ten minutes with notification screen time of ten seconds. There are three levels of this warning pop-up:
- Level 1 : ‘You are running out of disk space’
- Level 2 : ‘You are running very low on disk space’
- Level 3 : ‘You have run out of disk space’
Even though this warning pop-up is convenient when it appears for the first time but after a while, it becomes extremely annoying and is not as useful as it was before. To tone down the annoying factor you can disable this warning by making a few changes in the Windows registry.
Disabling the ‘Low Disk Space’ Warning
In order to disable the low disk space warning checks in Windows 10, you only need to follow the steps given below that are easy and can be implemented in less than 5 minutes:
Step 1: Open the Registry Editor .
- Click on Start Menu.
- Type ‘ Run ’ and press the ‘ Enter ’ key. A ‘Run’ dialog box will open.
- Type ‘ regedit ’ and click ‘ Ok ’. A ‘ User Account Control ’ dialog will appear. Give access to the app by clicking on ‘ Yes ’.
- A new window with the label Registry Editor will open.
Step 2: in the Registry Editor, locate the folder with the name ‘ HKEY_CURRENT_USER’ under the option Computer and click on the expand symbol next to this folder in order view all the inner folders.
Step 3: Keep on expanding the folders till you reach the current window’s registry key. The path should be HKEY_CURRENT_USER\Software\Microsoft\Windows\CurrentVersion after expansion of the folders.
Step 4: Under CurrentVersion , click on the key named Policies . (If there is subkey called Explorer available then skip to step 6.)
Step 5: From the menu select Edit -> New -> Key . A new key with default name New Key #1 will be created. Change the name to ‘ Explorer ’ and hit the Enter key.
Step 6: Select Explorer and then click on Edit -> New -> DWORD (32-bit) Value .
Step 7: DWORD created will have New Value #1. Change the name to NoLowDiskSpaceChecks and press Enter.
Step 8: Right-click on this newly renamed DWORD and click on Modify. A pop-up with ‘ Edit DWORD (32-bit) Value ’ will open.
Step 9: In the pop-up, change the ‘0’ to ‘1’ in the Value data field.
Step 10: Select ‘ Ok ’ and close the Registry Editor.
Once you have followed these steps, your Windows 10 will stop giving you low disk space warnings but take great care during this process as changes are made directly in the registry and it is better to take a backup of your registry keys before editing anything.
How to disable Open File security warning on Windows 10

- Eager to discover a quick way to disable Open File security warning on Windows 10? That’s precisely what we have for you.
- To make that happen, change your Internet options. You may also disable User Account Control.
- Feel free to visit our Windows 10 Settings section to find several easy to understand tips and tricks.
- Don’t forget to bookmark this Tech Tutorials Hub to be one click away from professional assistance at any hour.
Your online security is rather important, so getting a message that states Your Internet security settings prevented one or more files is nothing out of the ordinary.
How many times have you tried to browse freely, only to receive a message like this? You know the answer to that better than anyone else.
Open File security warnings can be a bit annoying, and in this article, we’ll show you how to easily disable them on Windows 10.
How can I disable Open File security warning on Windows 10?
1. Change your Internet options
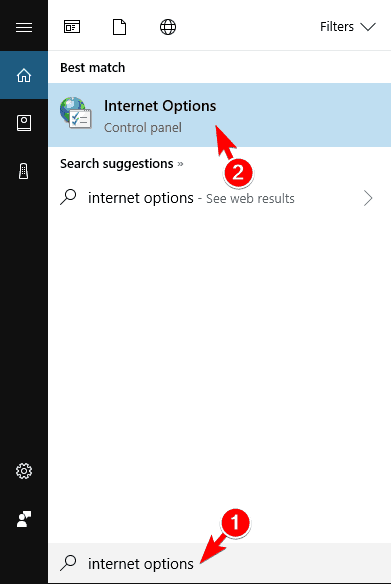
- Press Windows Key+ S and enter Internet options. Select Internet Options from the list of results.
- When the Internet Properties window opens, go to the Security tab and click on the Custom Level button.
- A list of settings will appear. Locate Launching applications and unsafe files and select Enable. Now click OK to save changes.

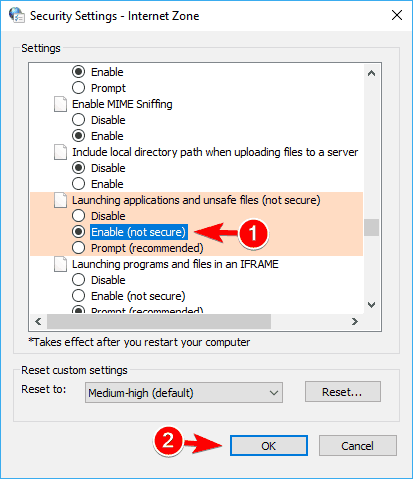
Open File security warning usually appears when trying to run downloaded files, but you can fix this problem simply by changing your Internet options.
This is relatively simple and you can do it by following the above steps. After changing these settings you should be able to run downloaded files without any problems.
2. Disable User Account Control
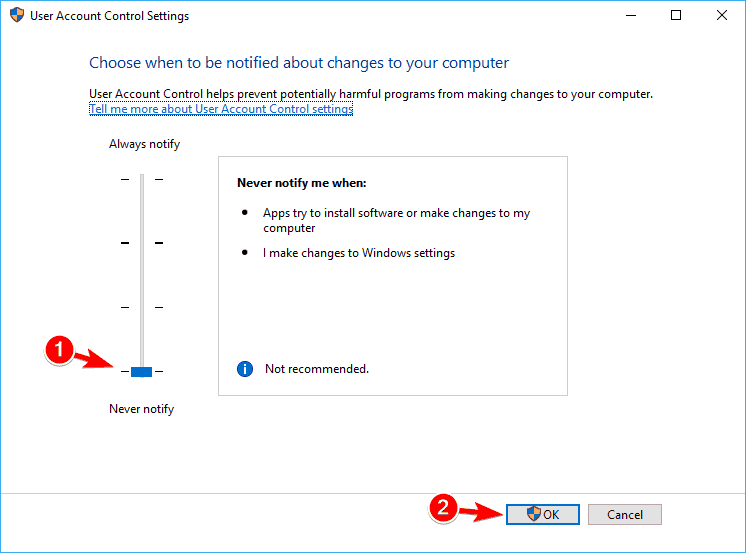
- Press Windows Key + S and enter user. Select Change User Account Control settings from the menu.
- When User Account Control Settings window appears, move the slider all the way down to Never notify. Click on OK to save changes.
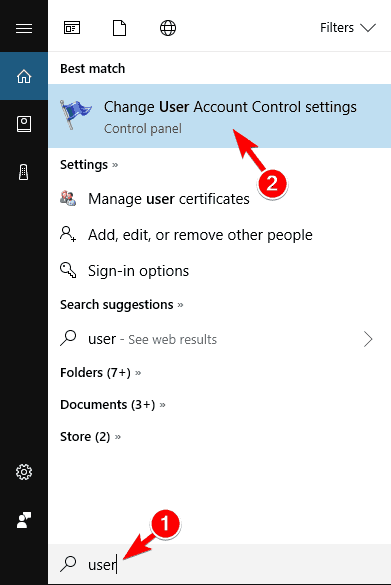
Once you disable User Account Control, you should see fewer security warnings on your PC. Disabling User Account Control won’t greatly reduce your security, so you can disable it without fear.
If you’re frequently getting an Open File security warning, you might be able to disable it by turning off User Account Control.
This is a security feature of Windows that notifies you when trying to change a setting or perform an action that requires administrative privileges.
Users claim that this feature is the cause behind this security warning, and if you want to disable it, you need to turn off User Account Control.
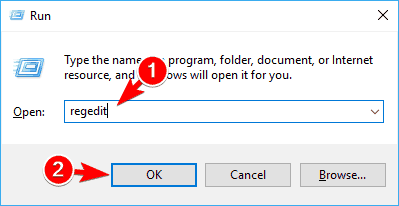
3. Modify your registry
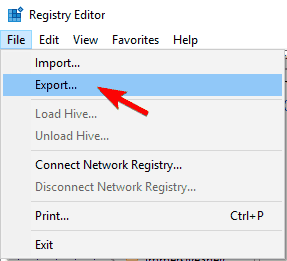
- Press Windows Key + R and enter regedit. Press Enter or click OK.
- When Registry Editor opens, go to File > Export. Select All as Export range, enter the desired File name, choose a safe location and click on Save. In case anything goes wrong after modifying your registry, you can easily restore it by running the exported file.
- Navigate to the Associations key. If this key isn’t available, you’ll need to create it. To do that, simply right click the Policies key and choose New > Key from the menu. Now enter Associations as the name of the key and navigate to it.
- Once you navigate to Associations key, look for LowRiskFileTypes in the right pane. If this value isn’t available, you’ll need to create it manually. To do that, right-click the empty space in the right pane and choose New > String Value from the menu. Enter LowRiskFileTypes as the name of the string. Double click the LowRiskFileTypes to open its properties.
- When the Properties window opens, paste the following into the Value data field: .avi;.bat;.cmd;.exe;.htm;.html;.lnk;.mpg;.mpeg;.mov;.mp3;.mp4;.mkv;.msi;.m3u;.rar;.reg;.txt;.vbs;.wav;.zip;.7zIf needed, you can add more extensions in order to disable the security warning for them. After you’re done, click on OK.
- After making the changes, close Registry Editor and restart your PC.
 Select All as Export range, enter the desired File name, choose a safe location and click on Save.
 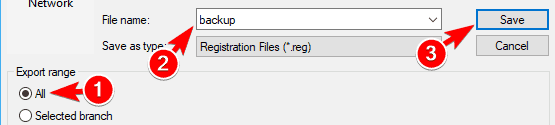 In case anything goes wrong after modifying your registry, you can easily restore it by running the exported file.
 Now enter Associations as the name of the key and navigate to it.
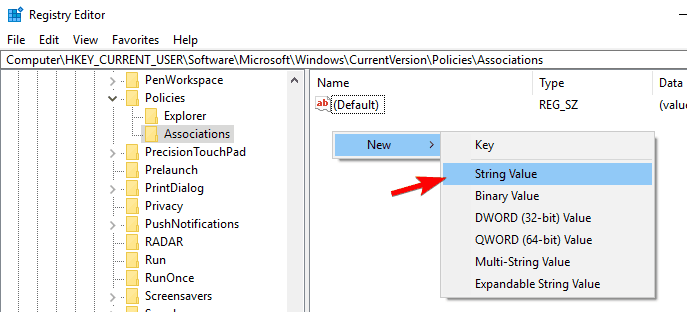 Enter LowRiskFileTypes as the name of the string. Double click the LowRiskFileTypes to open its properties.
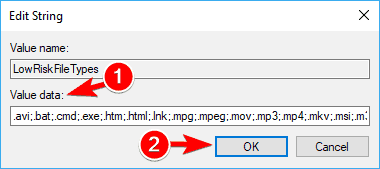 If needed, you can add more extensions in order to disable the security warning for them. After you’re done, click on OK.
Your registry holds sensitive system information, and by modifying it you can disable this security warning from appearing.
Modifying the registry can be potentially dangerous if you’re not careful, so we advise you to be extra cautious.
Once your PC restarts, the problem should be fixed and you won’t see the security warning anymore.
If you don’t want to manually edit your registry, you can download Disable_Open-File_Security_Warning.reg file and run it.
By doing that, you’ll disable the security warning for the specified file types. In case you want to enable the security warning, simply download Enable_Open-File_Security_Warning.reg and run it.
4. Edit your Group Policy
- Press Windows Key + Rkeyboard shortcut and enter gpedit.msc. Press Enter or click OK.
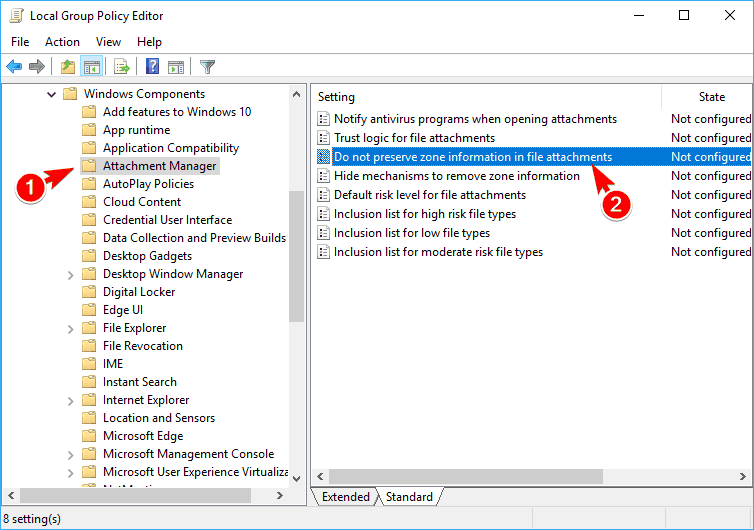
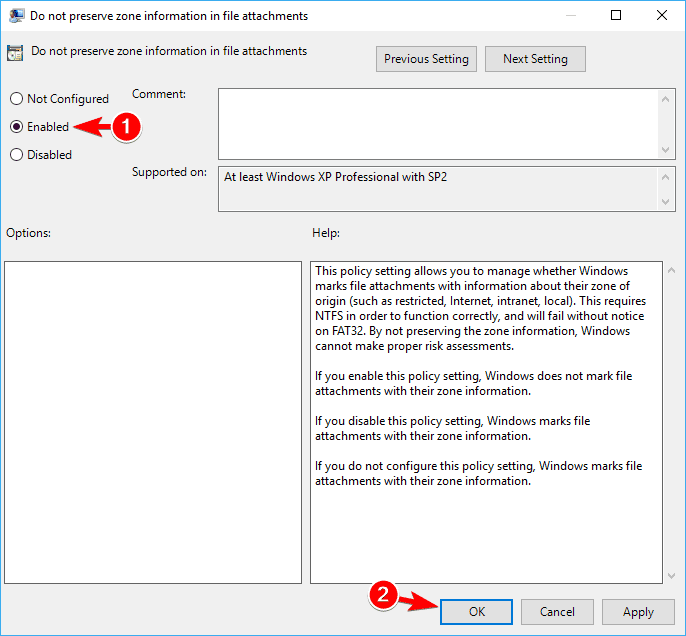
- In the left pane navigate to User Configuration > Administrative Templates > Windows Components > Attachment Manager. In the right pane locate Do not preserve zone information in file attachments.
- Select Enabled and click on Apply and OK to save changes.
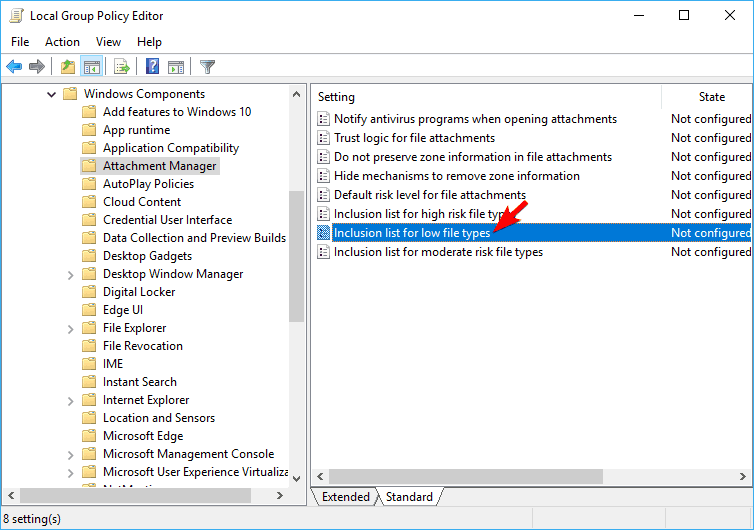
- Now click on the Inclusion list for low file types.
- Select Enabled and paste the following line in Specify low-risk extensions input field: .avi;.bat;.cmd;.exe;.htm;.html;.lnk;.mpg;.mpeg;.mov;.mp3;.mp4;.mkv;.msi;.m3u;.rar;.reg;.txt;.vbs;.wav;.zip;.7z
- Click on Apply and OK to save changes.

You can prevent this security warning from appearing by using Group Policy Editor.
This is a useful application that allows you to change various settings, but unfortunately, it’s available only on Pro and Enterprise versions of Windows.
To use Group Policy, do as described above. Close Group Policy Editor and restart your PC. Once your PC restarts, check if the problem still appears.
Check our handy guide to easily edit the Group Policy like a pro.
5. Use Command Prompt
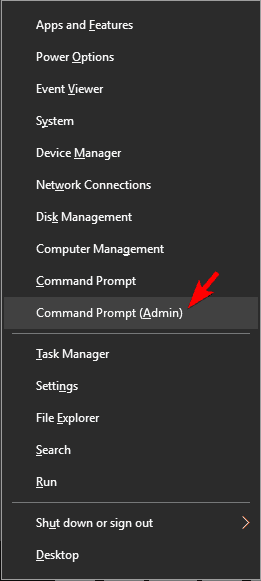
- Press Windows Key + X and choose Command Prompt (Admin) from the menu. If Command Prompt isn’t available, you can use PowerShell(Admin) instead.
- When Command Prompt starts, enter the following lines:
- REG ADD «HKCUSoftwareMicrosoftWindowsCurrentVersionInternet SettingsZones3» /V «1806» /T «REG_DWORD» /D «00000000» /F
- REG ADD «HKLMSoftwareMicrosoftWindowsCurrentVersionInternet SettingsZones3» /V «1806» /T «REG_DWORD» /D «00000000» /F
- REG ADD «HKLMSOFTWAREPoliciesMicrosoftInternet ExplorerSecurity» /V «DisableSecuritySettingsCheck» /T «REG_DWORD» /D «00000001» /F
You can also prevent this security message from appearing by using Command Prompt. Many users don’t know this, but you can use Command Prompt to quickly edit your registry.
We have to warn you that modifying the registry can be potentially dangerous, so you’re doing it at your own risk. To fix this problem using Command Prompt, do as described above.
After commands are executed, you might have to restart your PC to apply the changes.
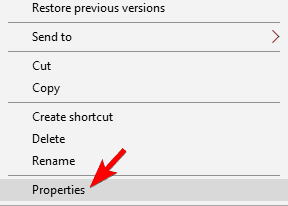
6. Unblock the file
- Right-click the problematic file and choose Properties from the menu.
- When the Properties window opens, go to the General tab and click on the Unblock button.
To stop this security warning from appearing, you might need to unblock your file. Sometimes files can become blocked causing this warning to appear.
To unblock your file, be sure that the file is located in a directory that is associated with your user accounts such as your Desktop or Documents.
If you want to unblock a specific file, complete the above procedure. After doing that, you won’t see the security warning for this file anymore.
7. Uncheck Always ask before opening this file option
- Run the problematic file.
- You should see an Open File security warning. Uncheck Always ask before opening this file option. Now click on Run to continue.
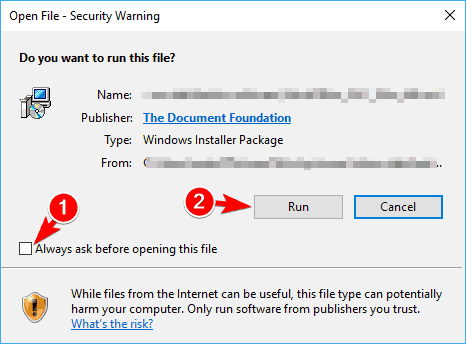
If you want to disable Open File security warning for a specific file, you can do it simply by unchecking a single option. To do that, follow the above procedure.
After doing that, you should be able to open that file without any security warnings.
This method is simple and straightforward, and it’s rather useful if you want to disable this security warning for a specific file.
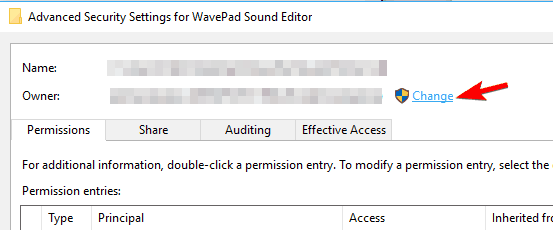
8. Take ownership over the problematic file
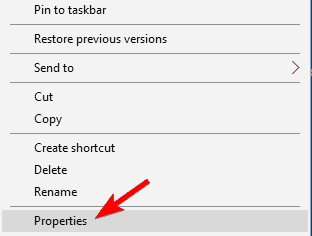
- Locate the file that is giving you this security warning and right-click it. Choose Properties from the menu.
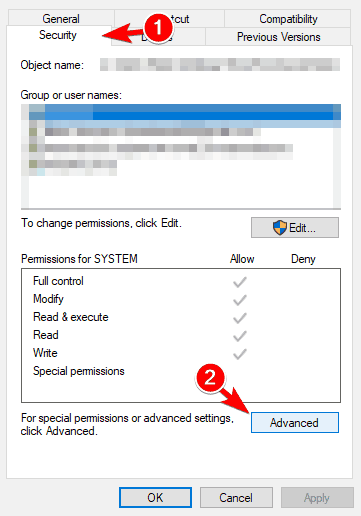
- When the Properties window opens, go to the Security tab and click on Advanced.
- In the Owner section click on Change.
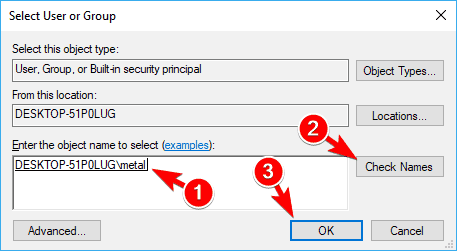
- Select User or Group window will appear. In the Enter the object name to select field enter your user name. Now click on Check Names. If everything is in order, click on OK to save changes.
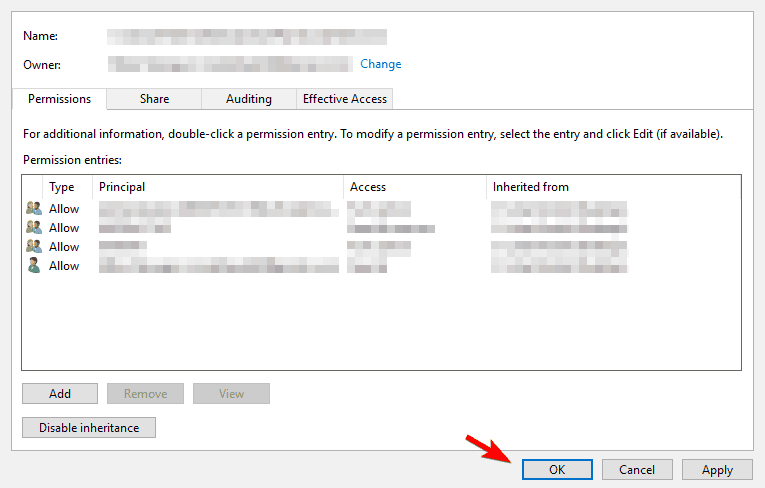
- The owner of the file should now be changed. Now you just have to click on Apply and OK to save changes.
If you’re getting this security warning on your PC, you might be able to disable it for a specific file by taking ownership of that file.
This is relatively simple, and you can do it by following the above procedure.
After taking ownership of the file, you should be able to run it without any security warnings. If you’re an advanced user, you can also use Command Prompt to take ownership of a certain file.
To do that, just follow these steps:
- Start Command Prompt or PowerShell as administrator.
- When Command Prompt opens, enter:
- takeown /F
Of course, be sure to replace the
with an actual path to the problematic file. This method is faster, but it requires you to enter the exact path to the problematic application.
If you’re an advanced user and familiar with Command Prompt, feel free to try this method instead.
9. Change Local intranet settings
- Open InternetOptions. We showed you how to do that in Solution 1, so be sure to check it for detailed instructions.
- When the Internet Properties window opens, go to the Security tab and select Local intranet. Now click on the Sites button.
- The local intranet window will now appear. Click on the Advanced button.
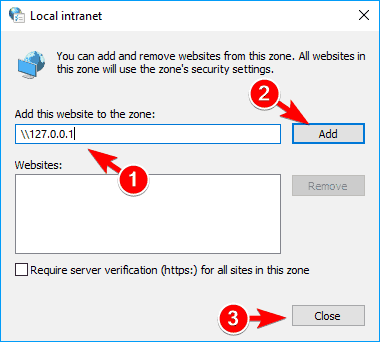
- Now enter the address of the server in the Add this website to the zone field. You can use the server’s domain or you can use its IP address. Just be sure to enter before the server’s address or domain. Now click on the Add button. After you’re done adding servers, click the Close button.
- Save changes and your problem should be resolved completely.


According to users, this security warning can appear if you’re trying to run an application from a network directory.
To fix this problem, you need to add the name or the IP address of the server on which the application is stored in Intranet settings.
This is relatively simple to do, and you can do it by following the above steps.
If you don’t want to use Internet Options, you can make the same changes using the Group Policy Editor. To do that, follow these steps:
- Open Group Policy Editor. To see how to do that, check the first step of Solution 4.
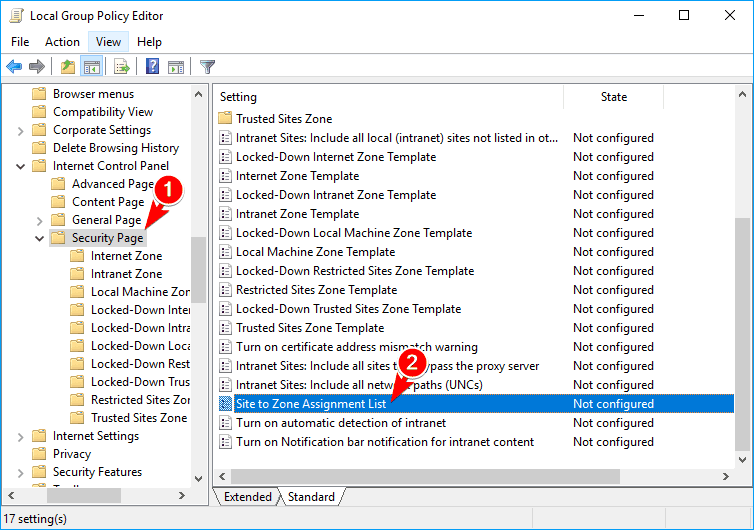
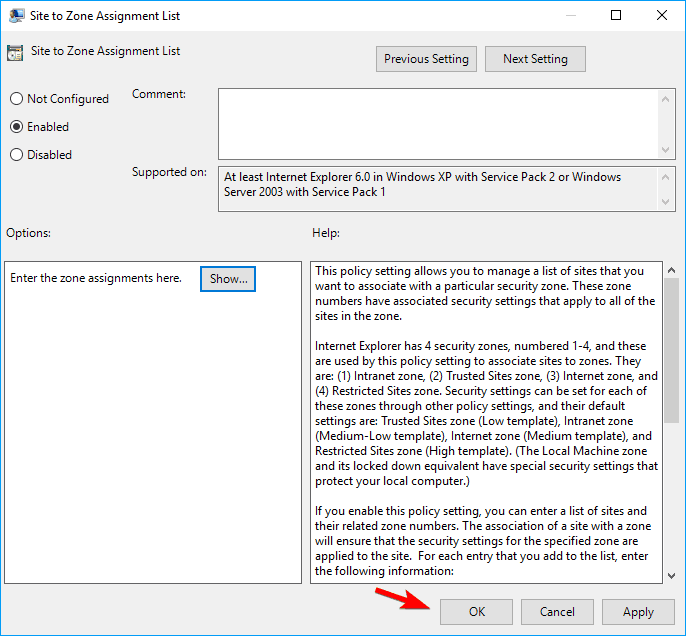
- When Group Policy Editor starts, navigate to ComputerConfiguration > Administrative Templates > Windows Components >Internet Explorer > Internet Control Panel > Security Page in the left pane. In the right pane, locate and double click Site to Zone Assignment List.
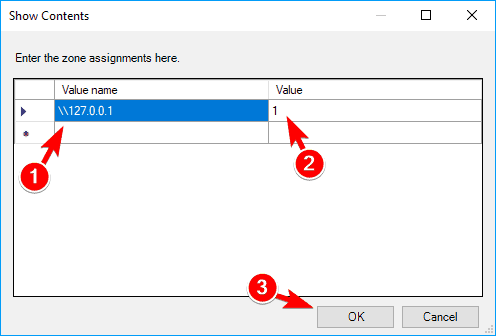
- Now select Enabled and click on the Show button.
- In the Value name column enter the IP address or domain name of the server. As for Value, enter 1. After you enter all the necessary addresses, click on OK to save changes.
- Now just click on Apply and OK to apply changes.

Both methods will achieve the same results, so you can use any of them. Keep in mind that this solution works only if you’re trying to run an application from a network directory.
10. Use Command Prompt

- Start Command Prompt as administrator.
- Use Command Prompt to navigate to the location of the problematic file.
- Now enter the following commands:
- move your_file_name.exe NewName
- type NewName > your_file_name.exe
If you’re frequently getting this security warning, you might be able to disable it for a specific file by using Command Prompt. To do that you need to follow these above steps.
This is a solid workaround, and it works according to users, so feel free to try it out. Keep in mind that in order to use this solution you need to have a basic understanding of Command Prompt syntax.
11. Check Include all network paths options
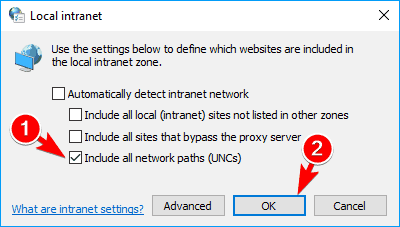
- Open Internet Options. Navigate to the Security tab, select Local intranet, and click on Sites button.
- The local intranet window will appear. Uncheck all options except Include all network paths (UNCs). After doing that, click on OK to save changes.
- Optional: Few users suggest that you should check Include all local (intranet) sites not listed in other zones option as well, so you might want to do that.
Few users claim that you can fix this problem simply by checking a few settings in Internet Options. To do that, follow the above procedure.
After doing that, the problem should be fixed and you’ll be able to run files from network directories without any problems.
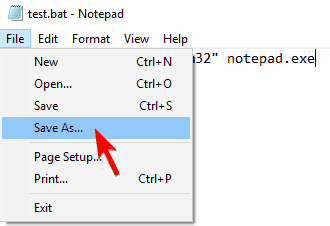
12. Create a bat file that will run the problematic file
- Open Notepad.
- Now paste the following code:
- start c:windowssystem32 notepad.exe
We used Notepad as an example, but if you want to launch any other application using the bat file, you need to enter the location of the file between the quotes and the file name after it.

According to users, you can avoid this security warning while running a certain application simply by creating a bat file that will start the application for you. To do that, follow these steps:
This is a solid workaround, but it might be a bit complicated since you have to create a bat script for that specific file.
Since this is just a workaround, you’ll have to use the script to start the desired application every time.
13. Use the icals command

- Open Command Prompt as administrator.
- When Command Prompt starts, run the following commands one by one:
- ICACLS «%programdata%MicrosoftWindowsStart MenuPrograms» /Setintegritylevel (OI)(CI)Medium
- ICACLS «%userprofile%FavoritesLinks» /Setintegritylevel (OI)(CI)Medium
- ICACLS «%userprofile%AppDataRoamingMicrosoftInternet ExplorerQuick Launch» /Setintegritylevel (OI)(CI)Medium
- ICACLS «%userprofile%AppDataRoamingMicrosoftInternet ExplorerQuick LaunchUser pinnedTaskbar» /Setintegritylevel (OI)(CI)Medium
Several reported this security warning while trying to run applications from Start Menu or from the Taskbar.
According to them, you can fix this problem simply by using the icals command. This is relatively simple and you can do it by following the above steps.
After running these commands the security warning should disappear and you won’t see it while trying to run applications from Taskbar or Start Menu.
If you’re having this problem with Desktop shortcuts, you might be able to fix it by running Command Prompt and using ICACLS C:Users Desktop /Setintegritylevel (OI)(CI)M command.
After doing that, you should be able to run shortcuts from your Desktop without problems.
14. Download and use streams utility

If you’re getting Open File security warning while opening a specific file, you might be able to fix it by using streams tools. This tool is a part of Sysinternals and you can download it for free from Microsoft’s website.
After you download the tool, you need to start it manually or use Command Prompt to navigate to its directory and enter the following command:
- streams.exe -accepteula -d
After running this command you’ll remove all zone data from that file and you won’t see any security warnings while running it.
15. Copy the files to a different location

According to users, you might be able to fix the problem with the annoying security warning simply by copying the affected files to a new location.
To do that, locate the problematic files and select them. Now copy them to your Desktop.
After doing that, delete the original files from their directory. Now move the files from your Desktop to the original location. After doing that you should be able to run those files without any problems.
Users reported that this workaround works with Internet Explorer favorites, but be sure to try it with other files that are giving you this security warning.
Open File security warning can be rather annoying at times, but you should be able to prevent it from appearing by using one of our solutions.
Moreover, use them when encountering these similar issues too:
- Open file security warning we can’t verify who created this file – Solve this rather common issue shouldn’t be too complicated. Feel free to change your Internet options or set up the file location as a trusted site and see if this makes any difference.
- Open file security warning add trusted locations – Countless users have been constantly trying to solve this issue to absolutely no avail. If you’re one of them too, the above tips are pure gold.


