- Как полностью отключить Защитник Windows (Microsoft Defender)
- Отключение защитника Windows через запись в реестре.
- 2. Отключение встроенного антивируса Windows с помощью редактора групповых политик.
- 3 Easy Ways To Disable Windows Defender in Windows 10
- Share this post
- Our guide on how-to disable Windows Defender in Windows 10
- What is Windows Defender?
- Why turn off Windows Defender?
- Turn off Windows Defender through settings:
- How to disable Windows Defender through the registry:
- How to turn off Windows Defender through Group Policy:
- Verdict:
Как полностью отключить Защитник Windows (Microsoft Defender)
Добрый день товарищи. Вы не представляете как сегодня меня разозлил стандартный антивирус от майкрософт, прямо настолько что я захотел полностью его отключить, а чтобы время потраченное на отключение не было потрачено зря, решил записать все в пошаговую инструкцию, чтобы и вам это тоже помогло. Почему же до этого дошло? Да потому что в конец Microsoft в конец обнаглели и начали добавлять в список «Зараженных» некоторые системные программы, позволяющие устанавливать драйвера (я думаю думаю есть и другие программы). Я и так пользуюсь преимущественно лицензионным ПО, я даже не пожалел денег для покупки Mirilias Action (хотя есть бесплатные аналоги), но как и у всех у меня есть некоторые программы, за которые я не готов отдавать 100$, а они мне очень редко, но нужны. Но они уже добавили в список зараженных все активаторы, которые есть на моем компьютере, пришлось добавлять папки в исключения и качать заново. В общем, достал меня этот псевдоантивирус. Я думаю уже понятно, с чем он борется на самом деле. Так что будем его отключать.
Конечно же вам, я бы порекомендовал установить какой-нибудь сторонний антивирус и пользоваться им, тем более при установке ещё одного антивируса все встроенная в систему защита автоматически выключается. Но я пойду по жесткому варианту.
Отключение защитника Windows через запись в реестре.
С целью безопасности вашего компьютера и упрощения иснтрукции рекомендую просто скачать файлы по ссылке. И использовать их. Перейдя по ссылке вы увидите два файла:
Windows Defender — OFF.reg — выключает встроенный антивирус и запрещает их использование.
Windows Defender — ON.reg — возвращает все к «заводским» настройкам.
Просто скачивайте нужный файл и запускаете его. При вопросе о внесении изменений жмите «Да».
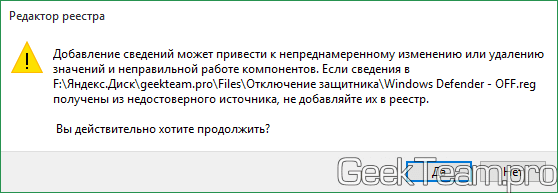
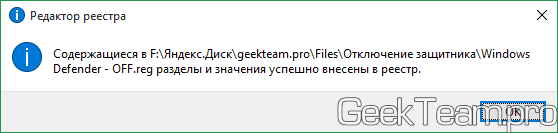
Дальше потребуется только перезагрузка компьютера. После запуска при попытке открытия защитника, он будет сообщать что запрещен групповыми политиками.
Если вы уверены в своих силах и уверены, что не накосячите в реестре. То вот, что вам нужно сделать.
Идём в ветку (при необходимости создаем ветки)
HKEY_LOCAL_MACHINE\SOFTWARE\Policies\Microsoft\Windows Defender
создаем в ней dword параметр DisableAntiSpyware со значением 1
Переходим в ветку:
HKEY_LOCAL_MACHINE\SOFTWARE\Policies\Microsoft\Windows Defender\Real-Time Protection
И создаем три dword параметра:
DisableBehaviorMonitoring со значением 1
DisableOnAccessProtection со значением 1
DisableScanOnRealtimeEnable со значением 1
Для возвращения все к заводским настройкам, необходимо удалить эти параметры.
2. Отключение встроенного антивируса Windows с помощью редактора групповых политик.
Как бы все настройки, используемые в редакторе групповых политик, находятся в реестре и по сути своей эта часть инструкции выполняет те же действия, что и первая. Но здесь же графическая оболочка, а не строковые параметры. Поэтому для некоторых этот способ покажется более удобным, а мне не сложно его описать;)
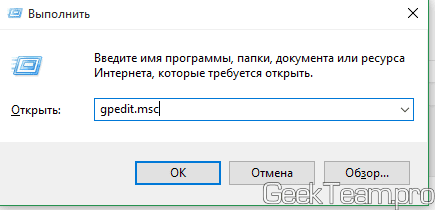
Запускаем утилиту «Выполнить» нажатием клавиш Win+R и вводим команду gpedit.msc
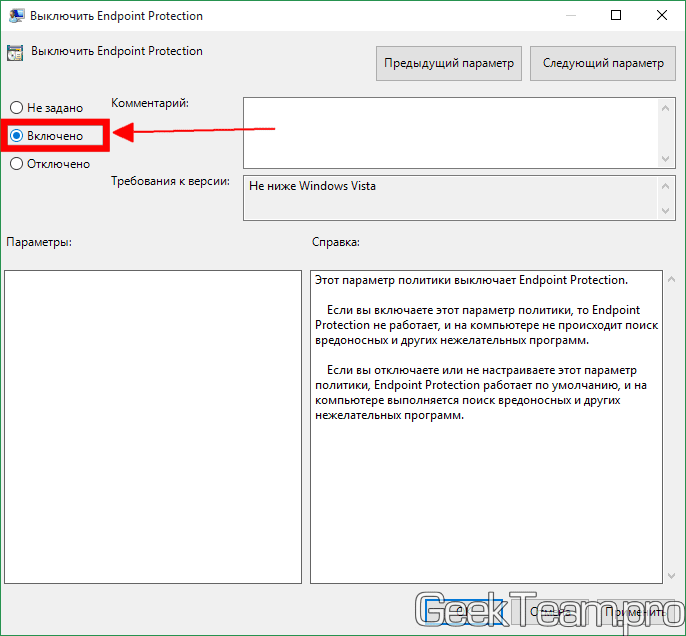
Идем по пути «Конфигурация компьютера»→»Административные шаблоны»→»Компоненты Windows». Открываем ветку Endpoint Protection (я так понимаю, что скорее всего Microsoft скоро переименует Microsoft Defender в Endpoint, но на момент написания статьи название старое. В ранних релизах ветка называлась Microsoft Defender, но в каких-нибудь сборках может называться «Защитник Windows»). И открываем параметр «Выключить Endpoint Protection».
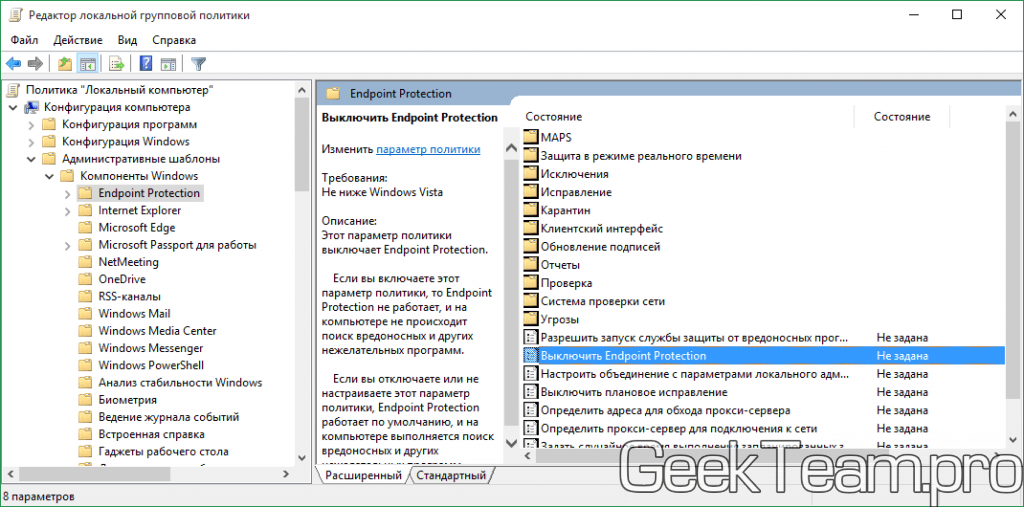
Переводим точку на пункт «Включено» и жмем ОК.
Осталось только перезапустить компьютер. И отключить центр уведомлений, чтобы не надоедал сообщениями об отключенном антивирусе.
Вроде всё. Надеюсь эта статья оказалась вам полезной, нажмите одну из кнопок ниже, чтобы рассказать о ней друзьям. Также подпишитесь на обновления сайта, введя свой e-mail в поле справа или подписавшись на группу во Вконтакте и канал YouTube.
Спасибо за внимание 
3 Easy Ways To Disable Windows Defender in Windows 10

Share this post
Our guide on how-to disable Windows Defender in Windows 10
What is Windows Defender?
Windows Defender (now known as Microsoft Defender Antivirus) is an always on, anti-malware software that guards your computer from external threats. The antivirus is developed by Microsoft to protect computers from virus threats that are running the Windows 10 operating system.
This antivirus comes preinstalled with any version of Windows 10. Windows Defender protects your computer in realtime from not only viruses, but also ransomware, rootkits, trojans, spyware, and many forms of malicious attacks. The program is free to use, and Microsoft sends regular updates on Windows 10.
Why turn off Windows Defender?
Good question you ask! If Microsoft Windows Defender is a free antivirus that protects your system from malware attacks, then why would anyone feel the need to disable it or turn it off? There are however specific cases where you would want to disable the Windows Defender.
You may want to install specific software or program on your system, but Microsoft Windows Defender in Windows 10 might keep interrupting. Take 3rd Party Software as an example. Windows Defender can treat programs or applications from small developers as a threat, and it will not allow you to install it. This can sometimes be helpful as you don’t know if the software is legitimate or it may contain some form of malware which may breach your security.
Nevertheless, sometimes you’re sure that the software is safe and legitimate and want to install it, but the Windows Defender keeps deleting it. In this case, you might want to disable Windows Defender temporarily.
There may arise a case where you don’t trust the capabilities of Microsoft Windows Defender and decide to install a third-party antivirus for virus threat protection. There are numerous third-party antivirus programs on the market that can be used in place of Windows Defender.
One benefit of installing a third-party antivirus is that it gives you more security and control over it. You can disable it at any time and re-enable it again.
You may also want to disable Windows Defender in Windows 10 as it utilizes a lot of resources when it runs in the background. You may not have enough ram, or you may want the processor to focus on some specific task rather than waste resources on scanning your computer.
These are just a few reasons for disabling the Microsoft Defender antivirus.
Whatever your reason may be, Microsoft Windows Defender in Windows 10 is still a valuable resource. Something is better than nothing, meaning your computer is much more prone to being infected while using it with the Defender disabled. If you’re planning to use another antivirus, then disabling the Windows Defender is justifiable. The Defender antivirus does not have a disable or uninstall option anywhere. Keep in mind that when Windows Defender disable, the security of your computer will be at risk of malware attacks.
Let’s look into how to turn off Windows Defender.
Windows Defender can still be disabled on Windows 10 through settings, registry, and through group policy.
Let’s look into each one, step by step on how to turn off Windows Defender.
Turn off Windows Defender through settings:
This is one of the fastest and easiest ways to disable Windows Defender. All of the operations are going to be done through settings. Just follow these steps:
1. Open Start by clicking on the Windows logo on the bottom left of your screen.
2. On the Start menu, locate and click on Open Settings by clicking on the gear-shaped icon on the left panel.

Disable Windows Defender Start Menu Open Settings
3. Windows Settings will open up. Proceed by clicking on Update & Security. It will be the last option.

Disable Windows Defender: Select Update and Security
4. Next, proceed by clicking on Windows Security on the left side panel.

Disable Windows Defender Select Windows Security Left Panel
5. Under Protection Areas, click on Virus & threat protection.

disable windows defender virus and threat detection
6. The Virus & threat protection Window will open up. Under Virus & threat protection settings, proceed by clicking on Manage settings.

disable windows defender manage settings
7. Real time protection will be the first option in front of you. Under real time protection, click on the blue ON switch.

virus and threat detection settings
8. Windows will prompt you if you want to make the change. Click on Yes. You’ll see the message stating that real time protection is off, an indication that you have successfully turned off the Windows Defender.

Windows Defender real time protection is off
Anytime you can follow steps 1 to 7 and again click on the Off button to re-enable real time protection.
The benefit of turning off real time protection through virus threat protection settings is convenience and speed. You can quickly turn it off and then again on. One thing to keep in mind is that when you restart your computer, Windows Defender will automatically be turned on. By disabling real time protection, you can install your desired application or software which you previously could not, but your security will be at risk. You can also make your desired system changes. This is not a permanent solution, but it is the fastest solution through virus threat protection settings.
How to disable Windows Defender through the registry:
This is a bit of lengthy process to disable Windows Defender:
Follow these steps to permanently disable Windows Defender through Registry.
1. Open Start, by clicking on the Windows logo on the bottom left of your screen.
2. Type “Regedit” in the search bar, and proceed by clicking on the Registry Editor with the blue icon. Click on yes when prompted by Windows.

Type “Regedit” to open the Registry Editor
3. The registry editor will open. On the left side, you’ll see different options. You need to locate to Microsoft Defenders location, by expanding the following:
- First, expand the “HKEY_LOCAL_MACHINE” folder by double-clicking on it.
- Next, expand the “SOFTWARE” folder.
- Scroll down and find the “Policies” folder and expand it.
- Expand the “Microsoft” folder.
- Next, click once on the “Windows Defender” folder.

Windows Defender folder
4. Now, right-click on the “Microsoft Defender” folder and hover your cursor above “New.” A new menu will pop out. Proceed by clicking on “DWORD (32-bit) Value”.

DWORD (32-bit) Value
5. A new file will appear on the right side with the option to name it. Enter “DisableAntiSpyware” as the name and hit Enter.

6. Next, double click on the newly created “DisableAntiSpyware” file.
7. Edit the value under “Value data:” as 1.

8. Press “Ok” on the bottom to save the value.
9. Finally, restart your system for the changes to take place. After restarting, the Microsoft Windows Defender will be disabled successfully.
If anytime you want to enable the Windows Defender again, follow these steps:
- Open the registry editor.
- Locate to the “Windows Defender.”
- Double click on “DisableAntiSpyware.”
- Edit the “Value Data” as 0, and click on Ok.
- Restart your system for the changes to take effect.
This method is a bit tricky and lengthy, but this will disable Windows Defender permanently. Restarting your computer will not enable the Defender again. Through this method, you can install any app and tweak any setting without the fear of Windows Defender interrupting in Windows 10. Your computers security will be compromised so make sure to enable the Defender again so your security stays active.
How to turn off Windows Defender through Group Policy:
This is our last instruction set to disable Windows Defender.
Follow these steps to turn off Windows Defender permanently:
1. Press “Win + R,” Window key, plus the “R” key together.
2. A dialogue box will appear. Type in “gpedit.msc” and hit Enter.
3. The local group policy editor Window will open in front of you.

local group policy editor
4. Under “Computer Configuration,” double-click on “Administrative Templates.”
5. Next, click on “Windows Components” to expand it.
6. Scroll down, locate, and click on “Windows Defender Antivirus.”

Windows Defender Antivirus Group Folder
7. On the right side, double-click on “Turn off Windows Defender Antivirus.”

Turn off Windows Defender Antivirus
8. A new Window opens. Highlight the “Enabled” option on the left and click on Apply and then Ok.

Turn off Windows Defender Antivirus “Enabled”
9. Finally, restart your computer for the changes to take effect.
In case you need to enable Windows Defender again, follow steps 1 to 7, highlight the “Not Configured,” click on Apply and then Ok. Restart your computer, and Windows Defender will be enabled again.
This is the third and final way to disable Windows Defender permanently. In this way, the Defender antivirus will not enable itself automatically when you restart your system. This is a permanent fix for the Defender antivirus.
Verdict:
Temporarily disabling the Defender antivirus to install some software or tweak some settings, is fine. There is no issue with that, but disabling the Defender antivirus for a prolonged time can put your security at risk. At any time, your system can be attacked by malicious programs. So, it’s a good practice to at least have a third-party antivirus installed, or to just disable it temporarily.


