- How to Enable and Disable the Windows Key
- Method 1: Press Fn + F6 or Fn + Windows Keys
- Method 2: Press Win Lock
- Method 3: Change Registry settings
- Method 4: Clean the keyboard
- For Computer:
- For notebook:
- Method 5: Replace the keyboard
- How to disable the Windows Key in Windows 10 [FULL GUIDE]
- How can I disable the Windows Key while gaming?
- 1. Modify your registry
- 2. Use Disable Windows key reg
- 3. Use AutoHotkey
- 4. Use SharpKeys
- 5. Use Gaming mode on your keyboard
- 6. Use your keyboard software
- How to Disable / Enable Windows Key on Keyboard Windows 10
- Ways to Disable / Enable Windows Key on Windows 10
- Method 1 – Using Registry Editor
- Method 2 – Again Disable / Enable Windows Key on Keyboard Windows 10 using the Registry editor
- Method 3 – Using the Group policy Editor
- Finalizing words
How to Enable and Disable the Windows Key
Windows key is located on every keyboard, and we are using this key for various actions. If you press Windows key, you will open the Start menu. Also, you can use Windows key in combination with another key. For example, if you press Windows key + E you will open Windows Explorer or File Explorer, if you press Windows key + R, you will open a Run dialog box and many others combination keys. If Windows key is not working properly, you will not be able to to this actions. So, why this problem occurs?
There are different reasons why Windows key is not working, including keyboard issue, system settings, game settings or application settings.
We will show you how to solve the issue by using 5 different methods. These methods are compatible with operating systems from Windows XP to Windows 10. I hope you are using minimum Windows 7 because previous operating systems are not anymore supported by Microsoft. If you are one of the users who want to disable Windows key when playing games, you will be able to do it after reading this article.
Method 1: Press Fn + F6 or Fn + Windows Keys
In the first method, we will use combination keys to activate or deactivate Windows key. Please, press Fn + F6 to activate or deactivate Windows key. This procedure is compatible with computers and notebooks, regardless which brand are you using. Also, try pressing “Fn + Windows” key which can sometimes get it working again.
Method 2: Press Win Lock
Are you using gaming keyboard? If not, you should read next method. If you are using gaming keyboard, please check is there Win Lock key located on your keyboard. If yes, you should press this key to enable or disable Windows key. Few users solved their problem by pressing Win Lock key on their gaming keyboard, including keyboard model Logitech G15. If you can not find Win Lock key, please read the technical documentation of your gaming keyboard.

Method 3: Change Registry settings
If combination keys are not working well, you will need to enable Windows key through Registry Editor. Before you do any registry configuration, we are recommending you to backup registry database. Why do you need to do registry backup? In the case of some misconfiguration, you can revert registry database to the previous state when everything worked without any problems. For this method, you will need to use a user account with Administrator privilege, because Standard user account is not allowed to do any system changes. How to do registry backup? Please read instructions on this LINK, and follow the procedure of on the method 4, from step 1 to step 7. After that, you will need to download and run registry file from this LINK. Also, if you want to disable Windows key, you will need to download and run registry key from this LINK.
Method 4: Clean the keyboard
If your keyboard is dirty and if there is dust between your keys, you should clean your keyboard. Sometimes, dust can block some of your keys, including Windows key. Based on that, we are recommending you to clean your keyboard. Please follow the procedure below.
For Computer:
- Unplug keyboard from computer
- Clean the keyboard
- Plug keyboard back
- Test Windows key
For notebook:
- Turn off your notebook
- Unplug AC DC adapter from notebook
- Unplug battery from notebook
- Clean the keyboard
- Plug battery back
- Plug the AC DC back
- Turn on your notebook
- Test Windows key
Method 5: Replace the keyboard
If cleaning your keyboard did not solve your problem, we are recommending you to replace your keyboard with the new one. Before purchasing new keyboard you should test your computer keyboard on another machine or plug another keyboard to your current computer or notebook. If you are using a notebook, please plug USB keyboard on your notebook and check is working properly. If another keyboard is working properly on your machine, you will need to purchase a new keyboard. Before purchasing a new keyboard, please check is your brand name computer, keyboard or notebook under warranty. If yes, the vendor will replace your keyboard for free.
How to disable the Windows Key in Windows 10 [FULL GUIDE]

- Have you wondered how to disable the Windows key? Modifying the registry is one solution.
- Instead of modifying the registry, you can download a .reg file and use it to disable the Windows key.
- Usually, gaming keyboards have dedicated software so you can check the key settings there.
- Using a dedicated third-party tool is another solution of how to disable the Windows key button.

- Download Restoro PC Repair Tool that comes with Patented Technologies (patent available here).
- Click Start Scan to find Windows issues that could be causing PC problems.
- Click Repair All to fix issues affecting your computer’s security and performance
- Restoro has been downloaded by 0 readers this month.
The Windows Key is rather useful and it’s a part of many shortcuts on Windows 10. Even though many users use it frequently, some users want to disable it.
Every advanced Windows user knows how useful Windows Key button is. Despite its usefulness, the key can sometimes be a problem, especially during intense gaming sessions.
By default, pressing the Windows Key will open the Start Menu and that can be a problem during gaming. By accidentally pressing the Windows button you’ll lose focus on your game and that can be a big problem.
In order to avoid these kinds of problems, many gamers disable their Windows Key during the gaming sessions.
In this guide, we’re going to show how to disable the Windows button. There are a couple of methods you can use from where you can choose the best for you.
How can I disable the Windows Key while gaming?
1. Modify your registry
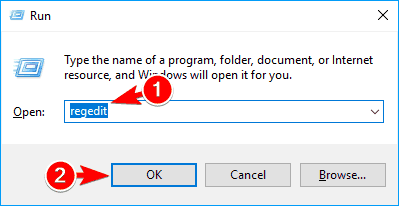
- Press Windows Key + R and enter regedit.
- Click on OK or press Enter.

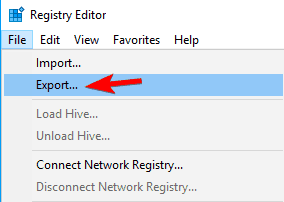
- Optional: Before you make any changes to your registry it’s always a good idea to create a backup. To do that, just click on File > Export.
- Select All as Export range, choose a safe location, enter the desired file name and click on Save.
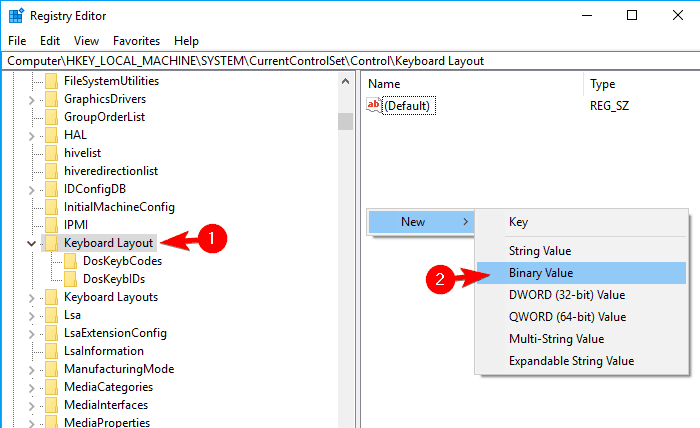
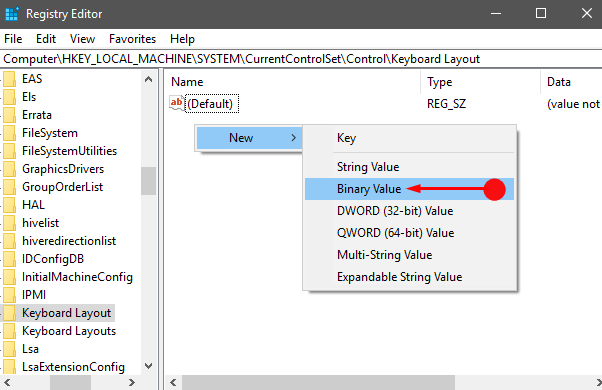
- In the left panel, navigate to: Computer\HKEY_LOCAL_MACHINE\SYSTEM\CurrentControlSet\Control\Keyboard Layout
- In the right pane, right-click the empty space and choose New >Binary Value from the menu.
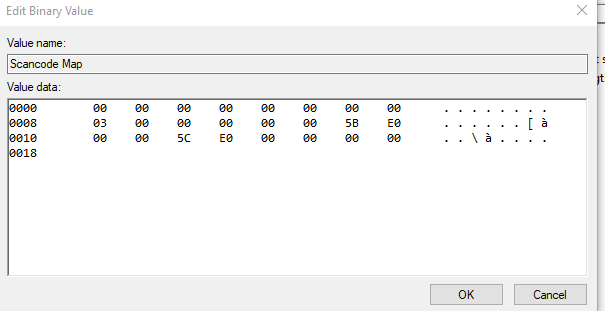
- Enter Scancode Map as the name of the new value.
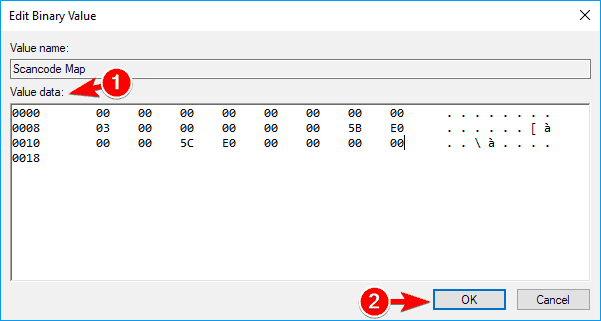
- Double click Scancode Map value and enter 00000000000000000300000000005BE000005CE000000000 in the Data field.
- Be extra cautious and double-check if the entered value is correct. Now click OK.
- After doing that, close Registry Editor and restart your PC.

Note: Keep in mind that your registry has sensitive information in it, so if you want to edit it, use extra caution. If you encounter any problems with your PC after modifying the registry, restore the backup created at steps 3-4.
After your PC restarts, the Windows Key should be completely disabled. To enable the Windows Key, you need to go back to Registry Editor and delete the Scancode Map that you created.
2. Use Disable Windows key reg

If you don’t want to modify your registry manually, there’s a .reg file available that you can use to modify it. Simply download Disable Windows key.reg and run it.
When the warning message appears, click on Yes. If you want to enable Windows Key again, download and run Enable Caps Lock and Windows keys.reg.
This method is a lot faster and simpler, so if you’re not comfortable with modifying the registry manually, be sure to try using the .reg file.
This method is great if you want to disable Windows Key and prevent other users from enabling it. Modifying the registry manually might not be the simplest method, but you can always use the .reg file to modify it automatically.
3. Use AutoHotkey

If you want to disable your Windows Key, you might want to try using AutoHotkey. This is an open-source and powerful automation scripting language.
The application allows you to assign certain commands to your keys, but it also allows you to disable keys. AutoHotkey isn’t the simplest application , so you might want to learn how it works before you can use it correctly.
Basically, you need to create a script that will block Windows Keys and add that script to AutoHotkey. Simply click AutoHotkey icon in your Taskbar and choose Edit this Script. Now you need to paste the following script at the bottom:
Save your script, right-click AutoHotkey and choose to Reload This Script from the menu. After doing that, both Windows Keys will be disabled.
Keep in mind that this solution won’t disable shortcuts that involve Windows Key, instead, it will just disable the keys themselves.
It’s worth mentioning that some online games might recognize AutoHotkey as a cheating application, so keep that in mind.
Before you use this solution it’s always a good idea to do some research and check if the game developers allow you to use AutoHotkey with their game.
⇒ Download Autohotkey
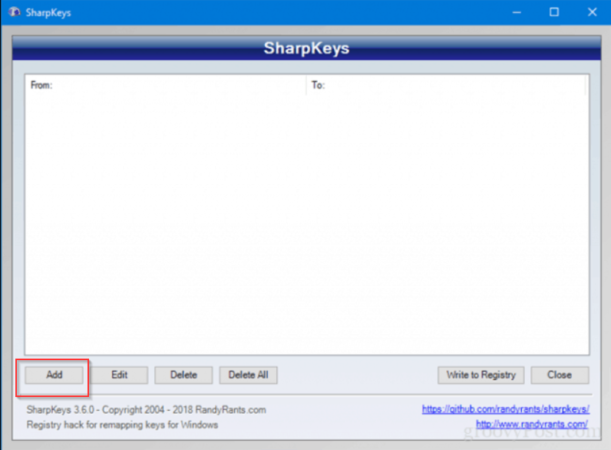
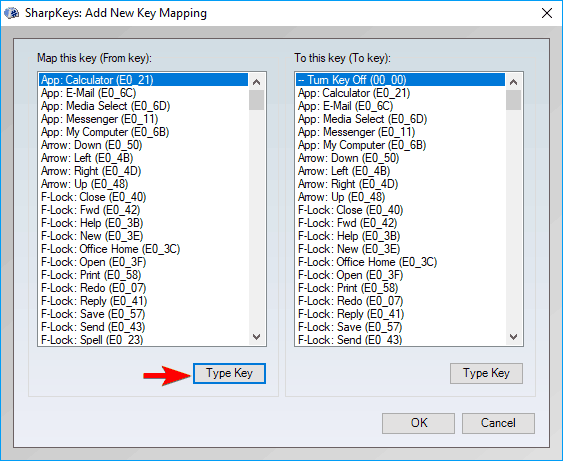
4. Use SharpKeys
- Download and start SharpKeys.
- Once the application starts, click on Add.
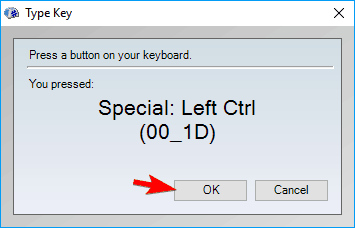
- Now you’ll see two columns. Click on Type Key in the left pane and press the Windows Key.
- Now click on OK to select the pressed key.
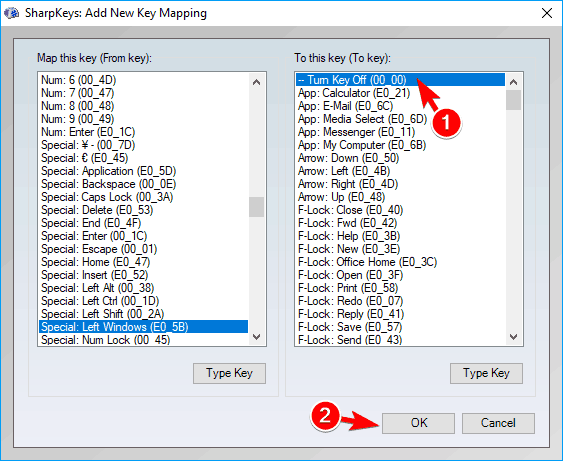
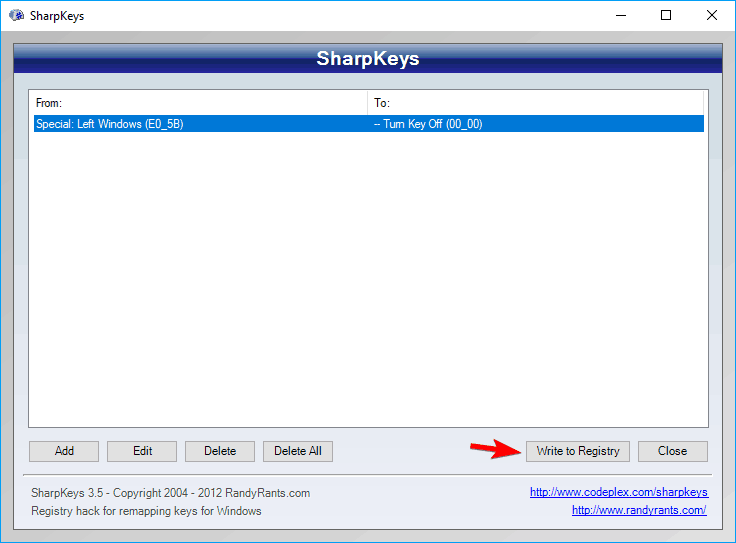
- Select Turn Key Off in the right pane and click on OK to save changes.
- Now click on Write to Registry button.
- Now you just have to restart your PC or log out and log back in to apply the changes.
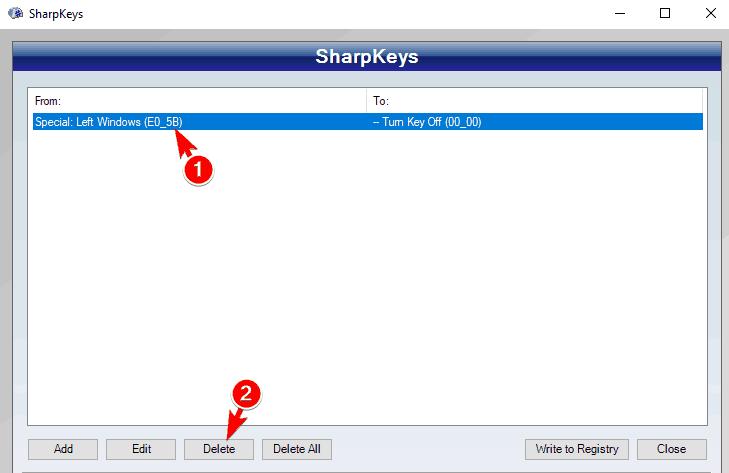
- To enable Windows Key again, start Sharpkeys, s elect the desired key from the menu, and click on Delete.
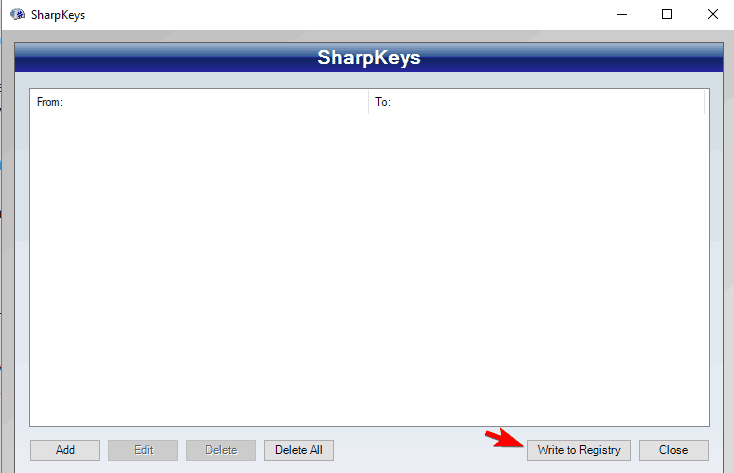
- After deleting the key, click on Write to Registry button.
- Now restart your PC or log off and back on to apply the changes.
Note: This is a free and portable tool that allows you to remap your keys, but it also has the ability to disable keys or to assign them to certain functions. Keep in mind that this is a powerful application, so you’re using it at your own risk.
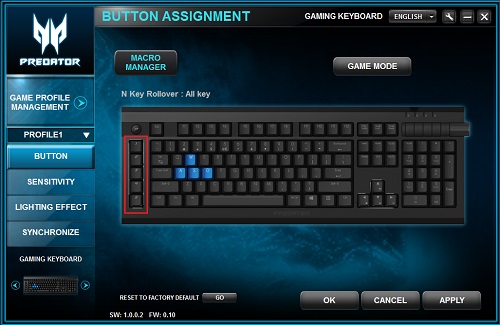
5. Use Gaming mode on your keyboard

Many gaming keyboards have a Gaming mode feature that allows you to block Windows Key with ease. To activate Gaming mode you usually have to press a certain keyboard shortcut.
Some keyboards even have a controller icon on one of its keys so you can easily find the shortcut key for Gaming mode. If you can’t find the shortcut on your own, we advise you to check your keyboard manual for detailed instructions on how to activate Gaming mode.
Keep in mind that not all keyboards support this feature, so before you can use it you need to check if your keyboard supports it. Activating the Gaming mode is the simplest and fastest way to disable Windows Key, but unfortunately, not all keyboards support this feature.
6. Use your keyboard software
As we previously mentioned, many gaming keyboards support Gaming mode. These keyboards usually have dedicated software that you can use to configure various settings such as macros and lighting.
How to Disable / Enable Windows Key on Keyboard Windows 10
Procedures to Disable and Enable Windows Key in Windows 10 with steps. – On the Keyboard, Windows key performs multiple tasks such as open Start menu, Supports other keys to work as shortcuts. Some users find the key in the disabled state on Windows 10. Moreover few want to disable it for their own reasons.
So you will see here a guide explaining How to Disable / Enable Windows Key on Windows 10 with different methods. You should know that Ctrl+Esc functions as a substitute for the key on the keyboard. So in absence of the Windows key, you can effectively use this shortcut combination. See a very interesting article How to Create Keyboard Shortcut for a Website on Windows 10 in this regard.
Ways to Disable / Enable Windows Key on Windows 10
This will take a few minutes to perform. Just read the steps given below to accomplish the task.
Method 1 – Using Registry Editor
Step 1 – Click the Start button, type regedit and press Enter. This will open the Registry Editor on your screens.
Read this guide to find more ways to Access Registry Editor in Windows 10.
Step 2 – Navigate to the following path:
HKEY_LOCAL_MACHINE> System> CurrentControSet> Control> Keyboard Layout
Step 3 – Go to the right pane, right click on an empty field and select New followed by Binary Value. Name the value Scancode Map.
Step 4 – Right click on the Scancode Map Binary value and select Modify.
Step 5 – Edit Binary Value pop up appears. Type the following value data manually in the value data field –
00 00 00 00 00 00 00 00
03 00 00 00 00 00 5B E0
00 00 5C E0 00 00 00 00
and click OK.
Step 5 – Close the Registry Editor and restart the system. When you need to again enable the key just delete Scancode Map value and restart the PC.
Method 2 – Again Disable / Enable Windows Key on Keyboard Windows 10 using the Registry editor
Step 1 – Access the Registry Editor (Click Start, type regedit, and press Enter).
Step 2 – Navigate to the following keys:
Step 3 – Navigate to the right pane, right-click on an empty space and select DWORD (32-bit) value from the list. Name it NoWinKeys.
Step 4 – Double click on NoWinKeys, and put value 1 under Value data and select OK. Oppositely, use the value data 0 to restore the previous status.

That’s it. Simply close the system and restart it.
Method 3 – Using the Group policy Editor
Step 1 – Press the shortcut key Win+R. Run dialog box will appear in the bottom left of the screen.
Step 2 – Type gpedit.msc and click OK.
Step 3 – Navigate to the following path in your Group Policy editor
Computer configuration > Administrative Templates > Windows Components > File Explorer
Step 4 – Check in the right pane, an entry name Turn off Windows + X hotkeys. Double click on it and select Enabled.

That’s all done now.
Finalizing words
So these are the ways leading to Disable / Enable Windows Key on Keyboard Windows 10. Once you make the key working it supports you perform the above-said works. And disabling the same you prevent using to open the Start menu, pay supportive role as keyboard shortcuts.


