- How to disable programs that run when you start Windows XP Home Edition or Windows Vista
- Summary
- More Information
- Method 1: Use Windows Defender to modify the list of programs that run when a Windows XP Home Edition-based or a Windows Vista-based computer starts
- Windows XP Home Edition
- Windows Vista
- Method 2: Use a registry key to modify the list of programs that run when a Windows XP Home Edition-based computer starts
- References
- How to Disable Startup Apps on Windows 10
- How to Disable Startup Apps on Windows 10
- Disable Startup Apps via Task Manager
- How to Disable Startup Programs in Windows 7 & 10?
- How to disable startup programs?
- How to Disable Startup Programs in Windows 7
- Using System Configuration Utility
- Using Startup Folder Shortcuts
- How to Disable Startup Programs in Windows 10
- Using Task Manager
- Manual Registry Editing
- External Utilities for Windows Startup Programs Management
- Autoruns Utility
- CCleaner Utility From Restoro
- Disabling a Startup Program from its Own Settings Dialog
- Video Showing how to Disable Startup Programs in Windows 7
How to disable programs that run when you start Windows XP Home Edition or Windows Vista
Summary
This article describes how to modify a list of programs that run when you start Windows XP Home Edition or Windows Vista.
You can create and modify the list of programs that start automatically when you start or log on to your computer. Some of these programs can be set up to automatically configure themselves to run when you log on to your computer.
More Information
To modify the list of programs that run when you start Windows, choose one of the following methods.
Method 1: Use Windows Defender to modify the list of programs that run when a Windows XP Home Edition-based or a Windows Vista-based computer starts
Use Windows Defender to find out what programs are running when you start Windows XP Home Edition or Windows Vista..
Windows XP Home Edition
To use Windows Defender to disable programs in Windows XP Home Edition, follow these steps:
Click Start, click All Programs, and then click Windows Defender.
Click Tools, and then click Software Explorer.
Click the application name in the Name column that you want to disable, and then click Disable.
Windows Vista
By default, Windows Defender is installed as part of the Windows Vista installation.
How to use Defender to disable programs in Windows Vista
For more information about how to use Software Explorer in Windows Defender, visit the following Microsoft Web site:
http://windowshelp.microsoft.com/Windows/en-us/Help/d360ec81-0dd6-480f-a180-746dc6a12f001033.mspx For more information about how to stop a program from running automatically when Windows Vista starts, visit the following Microsoft Web site:
http://windowshelp.microsoft.com/Windows/en-us/Help/b38d44d3-c61f-411f-a069-8f189d2f914e1033.mspx You can also use Windows Defender to scan for spyware or for other potentially unwanted software. For more information about how to use Windows Defender to scan for spyware and for other potentially unwanted software, visit the following Microsoft Web site:
Method 2: Use a registry key to modify the list of programs that run when a Windows XP Home Edition-based computer starts
Important This section, method, or task contains steps that tell you how to modify the registry. However, serious problems might occur if you modify the registry incorrectly. Therefore, make sure that you follow these steps carefully. For added protection, back up the registry before you modify it. Then, you can restore the registry if a problem occurs. For more information about how to back up and restore the registry, click the following article number to view the article in the Microsoft Knowledge Base:
322756 How to back up and restore the registry in Windows If you want to modify only the list of legacy programs that run at Startup, use Registry Editor. To do this, follow these steps:
Start Registry Editor, and then locate one of the following registry keys:
If you do not want a program to run at Startup, find that particular program, and then delete its entry from one of these registry keys.
You can add entries here also. But we recommend that you use the Windows Run at Startup policy setting to add programs that you want to run at Startup.
References
For more information about how to modify the startup programs for Windows XP Professional, click the following article number to view the article in the Microsoft Knowledge Base:
314488 How to modify the Group Policy for programs that run at user logon on a computer that is running Windows XP
For more information about other startup issues with Windows XP, click the following article numbers to view the articles in the Microsoft Knowledge Base:
147381 How to use system policies on a stand-alone computer
179365 Run, RunOnce, RunServices, RunServicesOnce and Startup
How to Disable Startup Apps on Windows 10


Windows 10 is a fast and responsive operating system. But if you have a lot of apps set to start up when you log in, it can bog down the boot process substantially. Many apps you install will add themselves to the boot process. Let’s review how to disable startup programs/apps on Windows 10 and make the boot process fast again.
How to Disable Startup Apps on Windows 10
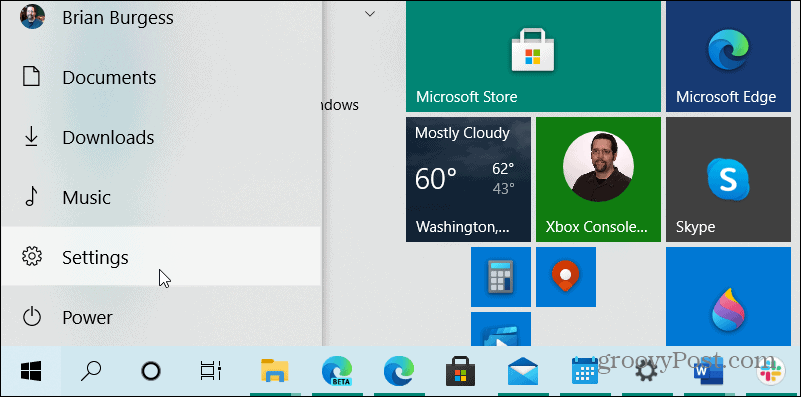
Click the Start button and choose Settings or you can use the keyboard shortcut Windows Key + I to open Settings.
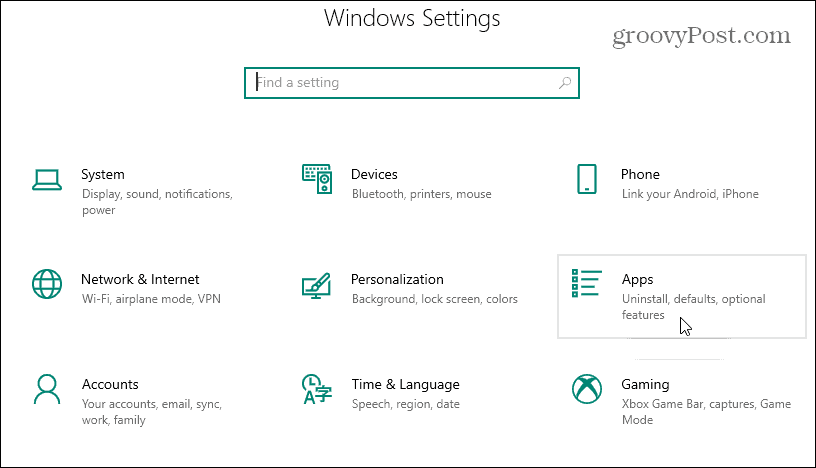
Once Settings has opened, click on Apps.
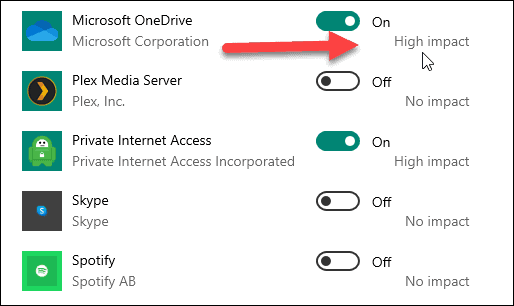
On the next screen click on Startup in the left panel. And on the right, all of the installed apps that are set to startup during boot will be listed. You can scroll through the list and turn off the ones you don’t want to run.
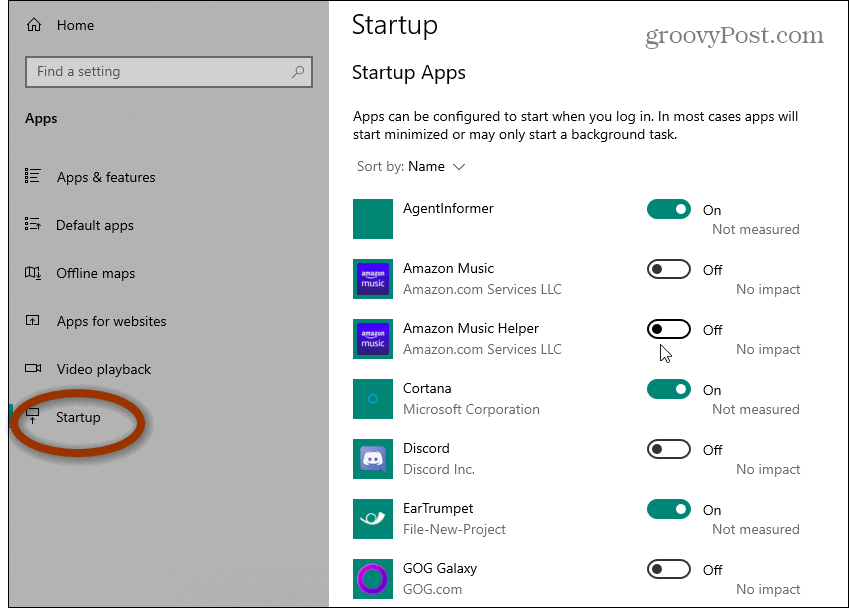
Next to each one, you will see the app’s impact on the startup process. For example, here you can see Microsoft OneDrive has a high impact. That can help you in determining which apps you allow to run or not during startup.
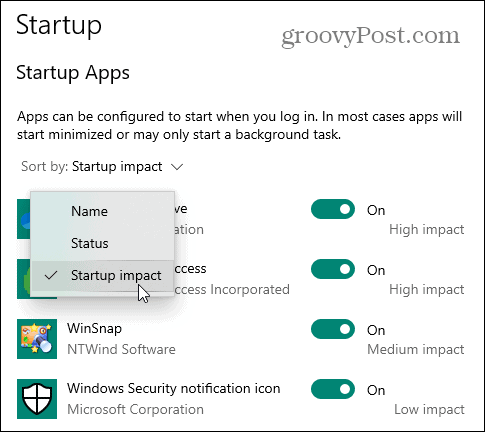
It’s also worth noting that there is an option to sort apps by name, startup impact, or status.
Disable Startup Apps via Task Manager
You can also use the old school method of disabling startup apps as you can on older versions of Windows. Here are the steps:
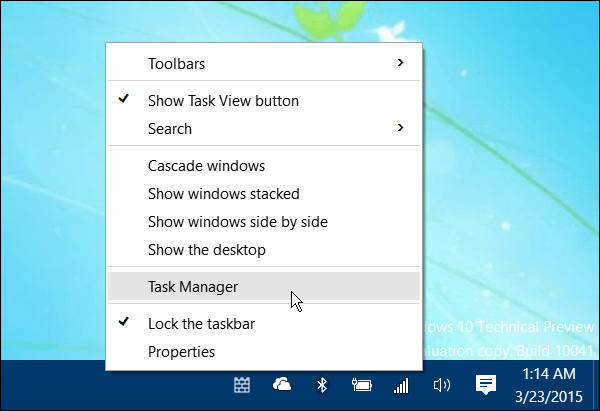
Step 1: Right-click on an empty area on the taskbar and select Task Manager.
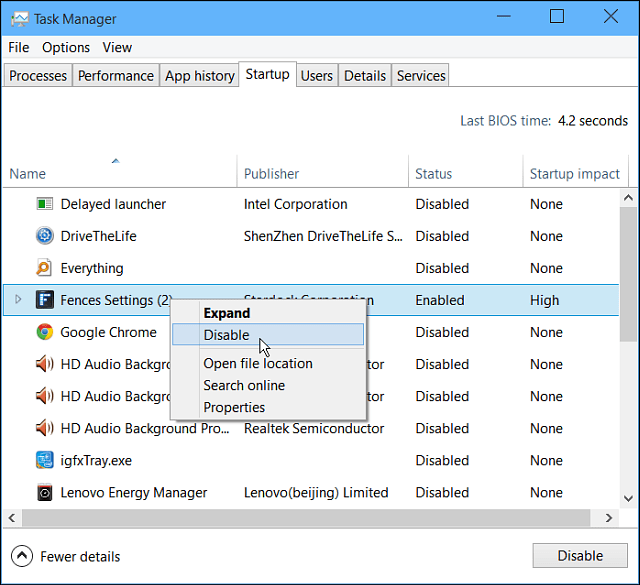
Step 2: When Task Manager comes up, click the Startup tab, and look through the list of programs and apps that are enabled to run during startup. Then to stop them from running, either highlight the app and click the Disable button or right-click on one, and select Disable from the menu.
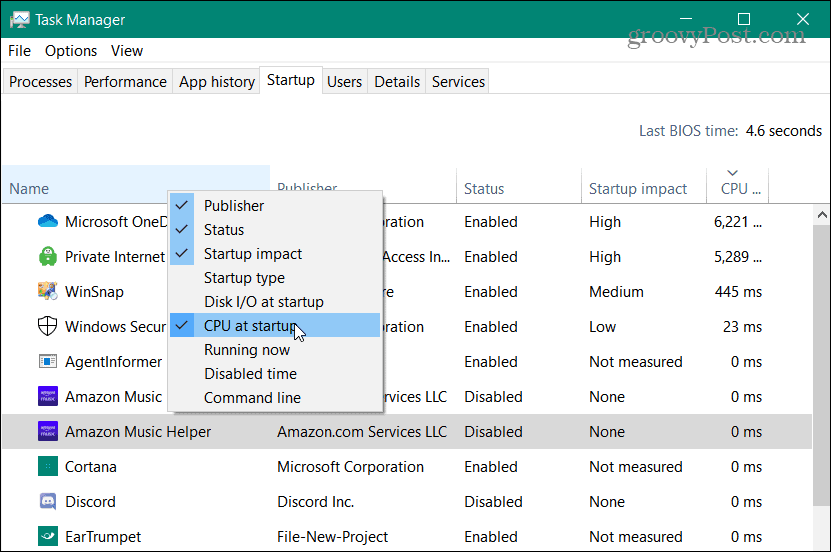
Task Manager in Windows 10 also provides a few more options in determining if you want to disable an app from startup or not. Like in Settings, you can sort by startup impact, name, or status; but you can also sort by publisher. And if you want to add more columns to sort by you can right-click a column header and check what you want to add. For example, here I added a “CPU at startup” column.
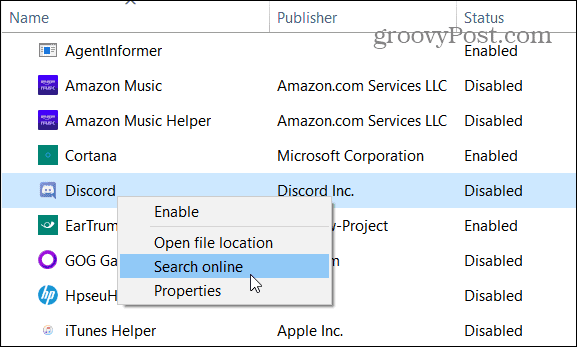
Over time you might install so many programs you forget what they’re for. And Task Manager allows you to open an app’s file location and properties. And if that doesn’t help, you can search for the app online. Just right-click on an app and choose the information you need.
After setting up a new computer I will disable all but a few programs. Another thing to remember after installing a new app is to go in see if it added itself to startup. Then you can disable it if it’s something you need to access quickly. Or if you notice your PC isn’t starting up as fast as it used to, this is a good place to look first. Run through the list and disable anything that isn’t necessary – especially apps that have a high startup impact.
I often get the question: “Which apps need to be enabled?” and the answer is simple: None! You can disable them all and Windows will start up normally. However, some things you want at the ready, won’t be. You’ll need to start them up manually.
It’s not a perfect science, but you can experiment and see which apps are delaying the startup process when you log in.
Not on Windows 10 yet? Check out our articles on how to disable startup programs on Windows 7 (which is no longer supported) or Windows 8.1.
How to Disable Startup Programs in Windows 7 & 10?
How to disable startup programs?
Startup programs in Windows 7 and Windows 10 are user programs that are launched automatically after Windows boots on your PC. Any program in Windows can become a startup program if it is included in the Startup programs list. Sometimes, during installation of a Windows program, the user is given the option to include the program in the Startup list. Other programs may be added without such notifications. Often, various programs responsible for product updates and upgrades are added to the Startup list and continually poll update servers for new software versions. Typical examples of startup programs are Spotify, Skype, Dropbox, Microsoft OneDrive, etc. Unfortunately, Malware programs can also appear in your Startup list. It is convenient to maintain useful programs in the list that you know you will need every day, however, the more programs that reside in your Startup, the longer it takes to launch Windows.
Remember, that Startup programs are launched when you Restart Windows. Resuming Windows from Hibernate or Sleep states does not cause Startup programs to be executed again, since they are already loaded in memory and their execution is simply resumed. If programs are launched that you so not actually use, then you waste computer memory and reduce system performance. If you believe your computer had suddenly or gradually became slow, a simple idea is to check how many programs you have in your Windows Startup and disable unnecessary ones. Removing a program from the Startup list does not uninstall it, and it can be launched manually any time later. Furthermore, you can always return any program (that was previously removed) to the Startup list. This article demonstrates how simple it is to disable programs that you do not want to be launched at Windows boot.

Table of Contents:
It is recommended to run a free scan with Malwarebytes — a tool to detect malware and fix computer errors. You will need to purchase the full version to remove infections and eliminate computer errors. Free trial available.
How to Disable Startup Programs in Windows 7
Using System Configuration Utility
Push the Start button and type System Configuration in the the Search programs and files field. In the drop down list, select System Configuration.

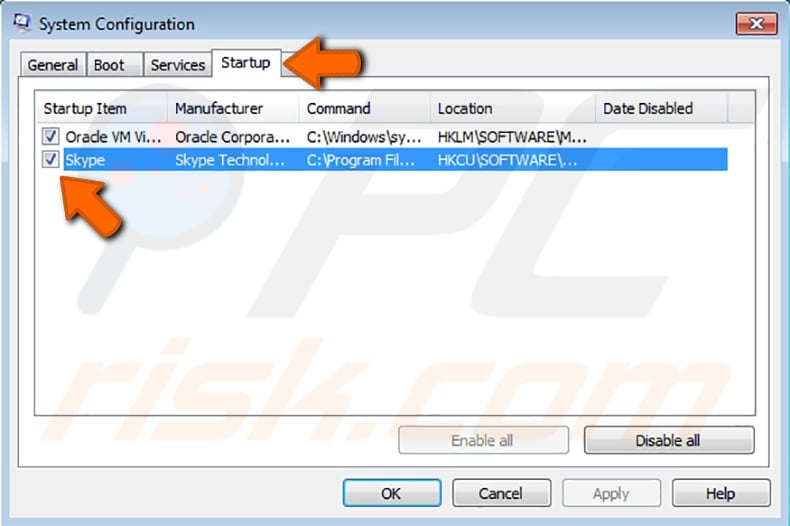
In the System Configuration window, select Startup tab. In the Startup tab, you will see all programs that are launched at Windows boot. Uncheck entries for programs that you wish to remove from the Startup list, and then click Apply. For example, you may wish to uncheck the Skype program from the list.
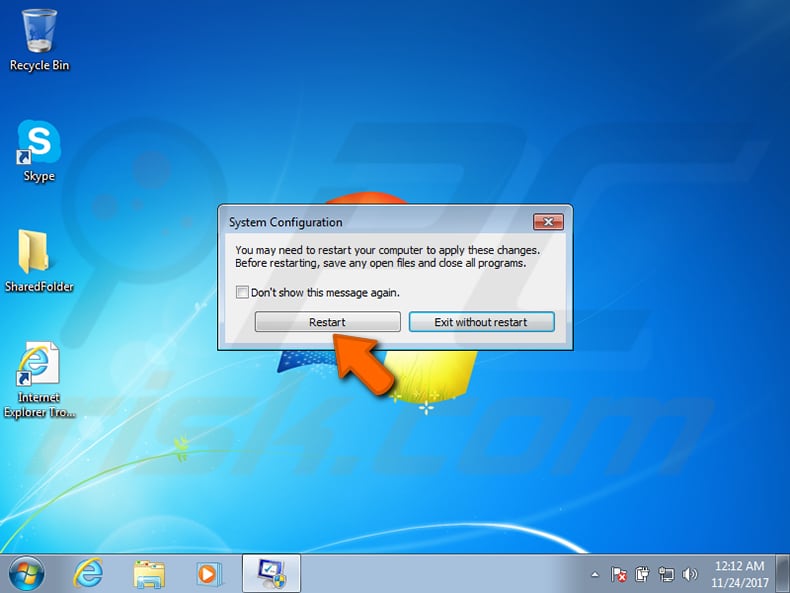
Click OK in the System Configuration window. Before closing, it may ask to restart the system to apply changes. Select Restart button or Exit without restart depending on your wish (for example if you have other programs open, or wish to restart at some later time).
Using Startup Folder Shortcuts
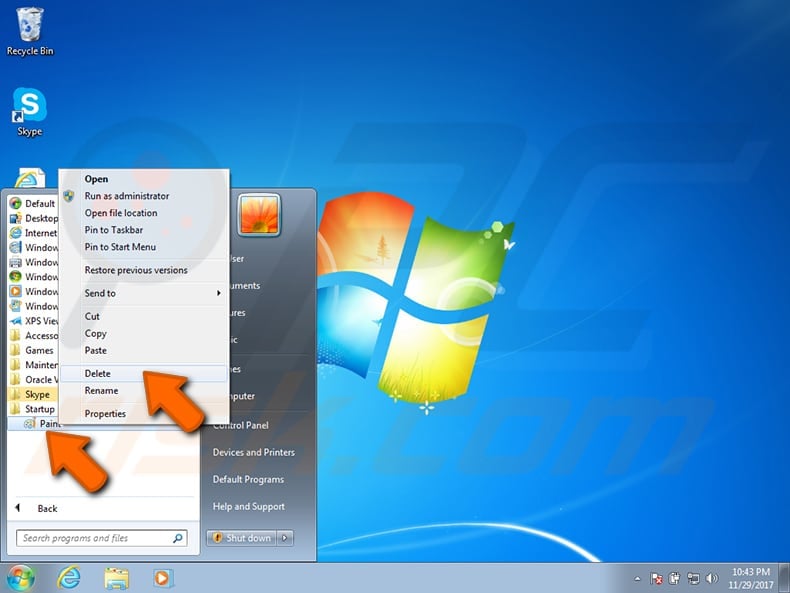
One quick way to disable Startup programs is to look for and delete their shortcuts from the Startup folder. To do this, go to Windows Start and navigate to the All Programs folder called Startup. In the Startup folder, select the program (in fact, this will be a ‘shortcut’ to the program) you wish to remove from Startup, and choose Delete from the drop-down menu. When the pop-up window appears asking for confirmation: “Are you sure you want to move this shortcut to Recycle Bin”, click Yes. The image below shows how to remove the Paint program shortcut from the Startup folder.
Bear in mind that when you delete a shortcut, you do not delete the program itself and, later, it can be launched using shortcuts located elsewhere or directly invoking the program executable.
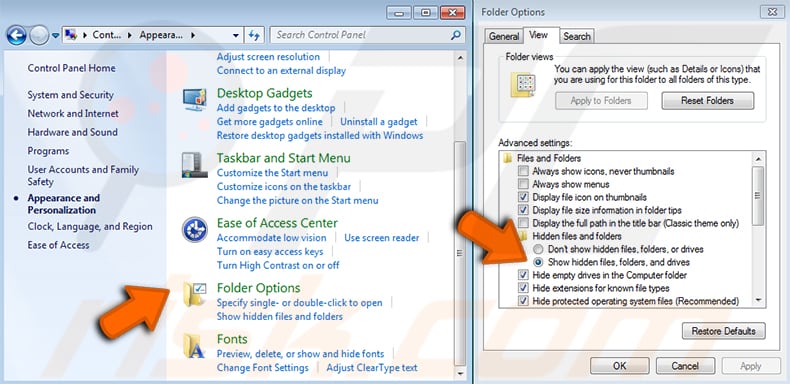
If the folder Startup is not visible, you can find it by navigating to the folder “C:\Users\MyUser\AppData\Roaming\Microsoft\Windows\Start Menu\Programs” using Explorer. Since folder AppData is usually hidden, you may need to configure Folder Options to show hidden files. To achive this, access the Control Panel / Folder options View tab and check Show hidden files to show folders and drives under the Hidden files and folders item. Press OK to confirm your selection.
How to Disable Startup Programs in Windows 10
Using Task Manager
To disable Startup programs in Windows 10, use the Task Manager utility. Launch Task Manager by going to Start / Windows System / Task Manager. An alternative option is to simultaneously press Ctrl + Alt + Del on the keyboard and select Task Manager from the list.
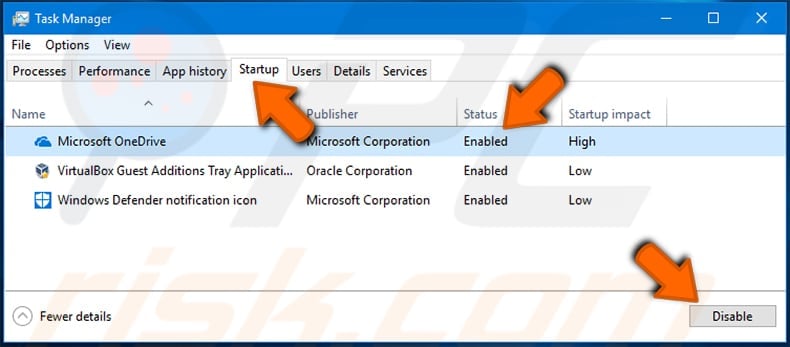
In the Task Manager window, select the Startup pane and mark a program to disable on Windows Startup. For example, you may wish to choose the Microsoft OneDrive utility as shown in the picture. Click Disable and close Task Manager window. The next time you reboot Windows, the disabled program will not start automatically. You can verify this by returning to Task Manager and confirming that Status column of Microsoft OneDrive indicates it as Disabled.
Manual Registry Editing
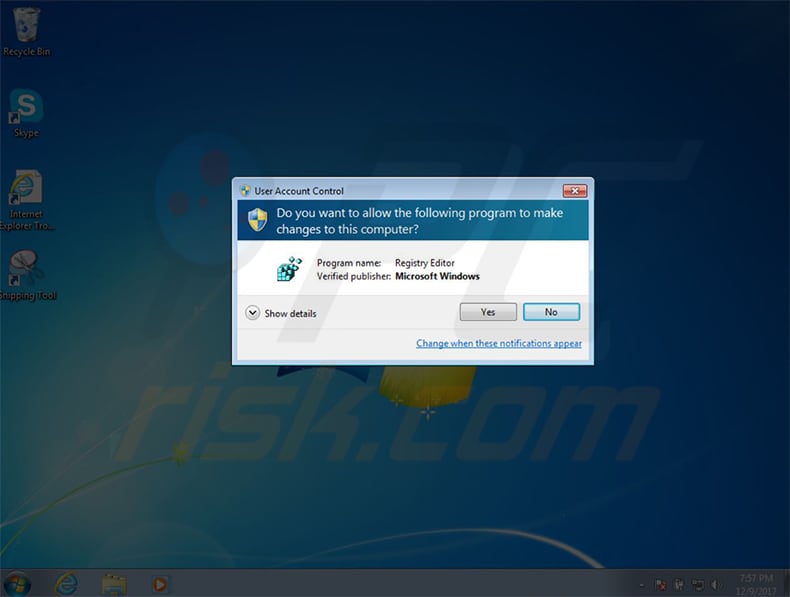
Startup programs can be removed by manually editing Windows Registry using Registry Editor tool. To invoke Windows Registry Editor in Windows 7, type regedit in the Start search field. To invoke Windows 10 Registry Editor, also enter regedit in the Start search field. When you attempt to start Registry Editor, the Windows User Account Control utility may ask you to confirm that you want to allow Registry Editor to make changes to this computer. Windows 7 and Windows 10 dialogue windows are shown below. Press Yes to allow Registry Editor to start.
First, you will see the window registry folders displayed on the left panel.
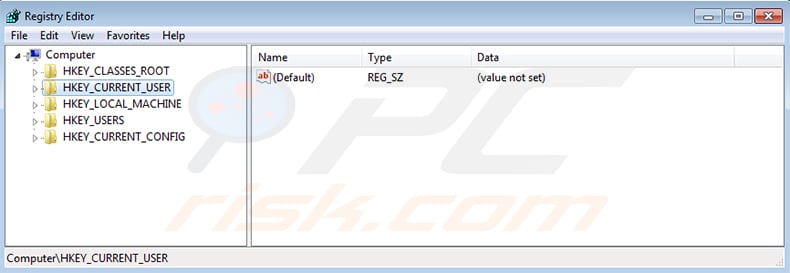
Programs that are launched at Windows Start can be listed in one of the following folders:
- HKEY_LOCAL_MACHINE\Software\Microsoft\Windows\CurrentVersion\Run
- HKEY_LOCAL_MACHINE\Software\Microsoft\Windows\CurrentVersion\RunOnce
- HKEY_LOCAL_MACHINE\Software\Microsoft\Windows\CurrentVersion\RunServices
- HKEY_LOCAL_MACHINE \Software\Microsoft\Windows\CurrentVersion\RunServicesOnce
- HKEY_CURRENT_USER\Software\Microsoft\Windows\CurrentVersion\Run
- HKEY_CURRENT_USER \Software\Microsoft\Windows\CurrentVersion\RunOnce
- HKEY_CURRENT_USER \Software\Microsoft\Windows\CurrentVersion\RunOnceEx
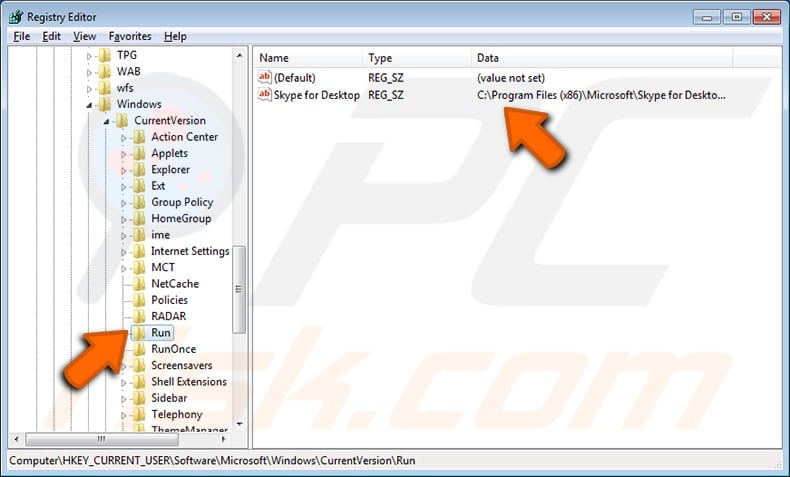
For example, to disable the Skype program from starting up at Windows reboot, navigate to HKEY_CURRENT_USER\Software\Microsoft\Windows\CurrentVersion\Run. Then select Skype for Desktop entry on the right panel of Registry Editor and choose Delete from Edit menu.
Note: Be very carefull when modifying Windows Registry. If you do not know the purpose of particular entries, never change them. It is advisable to create a restore point for Windows before making any registry modifications. In this case, you can restore the system from the last working backup if you damage something.
External Utilities for Windows Startup Programs Management
Autoruns Utility
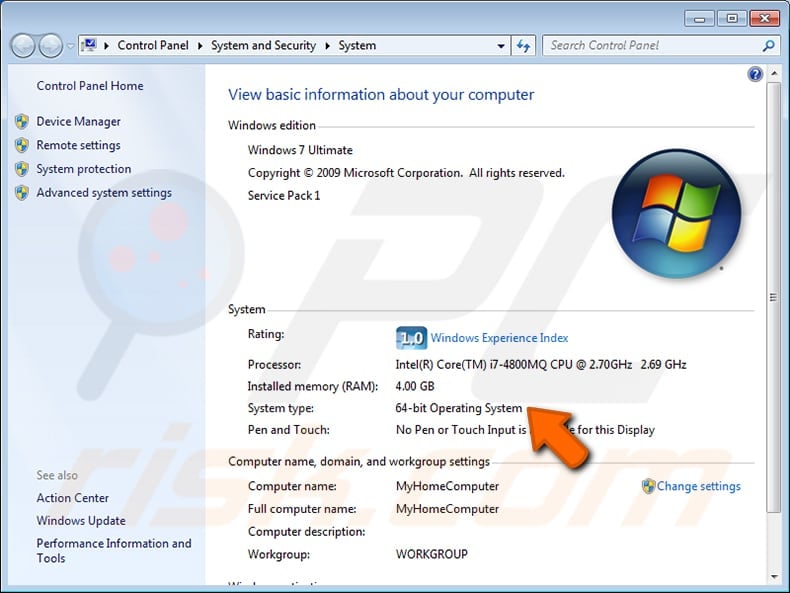
You may like to use free Autoruns utility from Sysinternals to manage your Windows Startup programs. First, download Autoruns.zip archive from https://docs.microsoft.com/en-us/sysinternals/downloads/autoruns. Then unzip Autoruns.zip to the folder of your choice and launch Autoruns.exe or Autoruns64.exe (dependent on whether you run the 32-bit or 64-bit version of Windows). In Windows 7, this easily found in Control Panel/System and Security/System: ‘System type’.
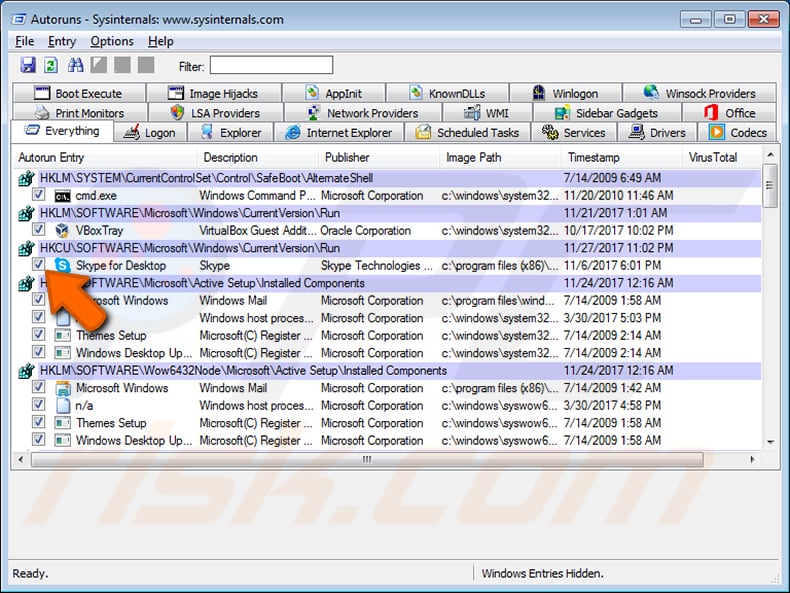
When you first start Autoruns, it will ask you to agree with the license. Click Agree at the bottom of the dialog window. When Autoruns starts, allow it to collect all the information from your Windows system. An example of the appearance of the Autoruns window is shown below. If, for example, you want to disable Skype on Windows Start, simply unckeck the box in the Autorun Entry column in front of the Skype for Desktop title. Close the Autoruns program and your selections will automatically be saved.
In Autoruns, you can also delete entries (startup programs) in addition to disabling them. To do this, mark the entry you want to delete and select Delete item from Entry menu. To delete entries, you may be asked to re-launch Autoruns with administrative rights. Note that, unlike disabled entries, deleted entries cannot be renabled.
Be careful not to delete or disable entries you do not know, since this might impact on entire system operation!
CCleaner Utility From Restoro
A free version of CCleaner utility can be downloaded from http://www.piriform.com/ccleaner. Although a paid professional version of CCleaner is available, the functionality of the free version is sufficient for managing Windows Startup program in the way shown below.
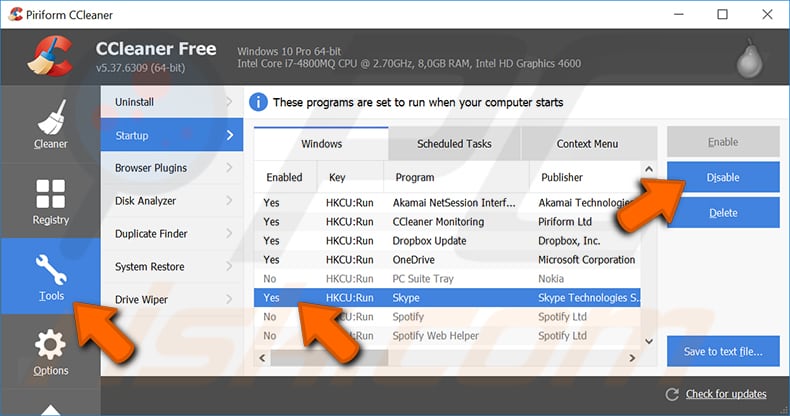
By default, CCleaner adds itself to the list of Startup programs. If you do not wish it to monitor your system and automatically start after Windows boot, then remove CCleaner Monitor from Startup using CCleaner itself (as explained above) or using any other method described in this article. Also, bear in mind that you cannot close CCleaner simply by closing the main window. To completly close CCleaner, position the mouse over its icon in the Task Tray, click the right mouse button and select Exit fomr the drop down list.
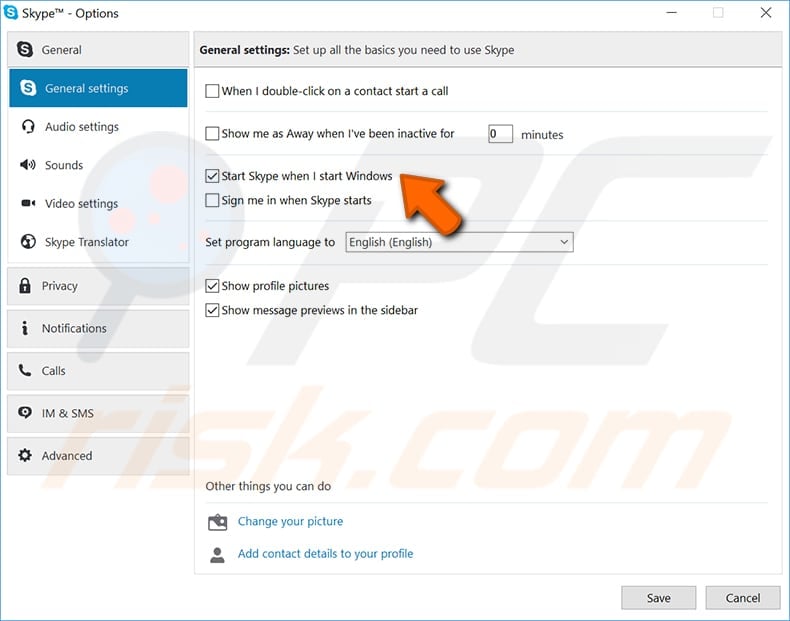
Disabling a Startup Program from its Own Settings Dialog
It is a good practice to manage startup settings from the individual program settings. Usually, the enable/disable option for a program’s startup status is located under menu items such as Settings, Properties, Options, Preferences, etc. For instance, to disable Skype from automatically launching upon Windows start, login to Skype and go to menu item Tools/Options. In the General Settings page, uncheck ‘Start Skype when I start Windows’ and click Save as shown below. Similar possibilities may exist in various other programs.