- Отключение Superfetch в Windows 10
- Способ 1: Управление службами
- Способ 2: «Командная строка»
- Способ 3: Системный реестр
- SuperFetch как отключить в Windows 10?
- Comments
- Добавить комментарий Отменить ответ
- Как отключить службу SysMain (SuperFetch) в Windows 10
- Как отключить службу SysMain (Superfetch) используя консоль «Службы»
- Как отключить службу SysMain (Superfetch) в командной строке
- Как отключить службу SysMain (Superfetch) в Windows PowerShell
- Видео-инструкция
- Windows 10, 8 & 7: Enable or Disable Superfetch
- Disable from Services
- Enable or Disable from Registry
- You Might Also Like
- Reader Interactions
- Comments
- Did this help? Let us know! Cancel reply
- Primary Sidebar
- Recent Posts
- Who’s Behind Technipages?
Отключение Superfetch в Windows 10
Способ 1: Управление службами
Самое простое в в своей реализации решение – отключение через менеджер служб.
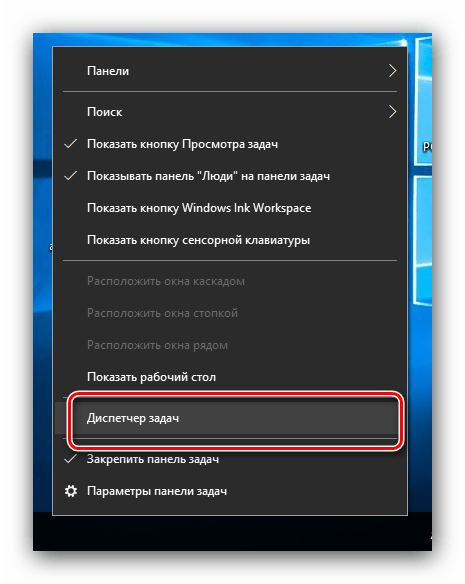
- Первым делом вызовите «Диспетчер задач» – например, наведите курсор на панель задач, кликните правой кнопкой мыши и выберите соответствующий пункт контекстного меню.
Читайте также: Как открыть «Диспетчер задач» в Windows 10
Далее откройте раздел «Службы» и найдите там пункт «SysMain», в описании которого должно значиться «Superfetch» либо «SysMain». Щёлкните ПКМ по этой записи и выберите «Отключить».

Закрывайте «Диспетчер задач» и вызовите окно «Выполнить» сочетанием клавиш Win+R. Введите в этом окне код services.msc и нажмите «ОК».

Просмотрите список рабочих процессов и найдите среди них «Superfetch». Дважды кликните по ней левой кнопкой мыши.

В окне свойств щёлкните по кнопке «Остановить», а затем установите тип запуска как «Отключена».

Если требуемая запись отсутствует, проведите описываемую манипуляцию со службой SysMain.
Нажмите «Применить» и «ОК», после чего закрывайте все окна и перезагружайте компьютер.

Данный метод чаще всего эффективен и прибегать к иным обычно не требуется.
Способ 2: «Командная строка»
Альтернативный вариант решения поставленной задачи заключается в использовании «Командной строки».
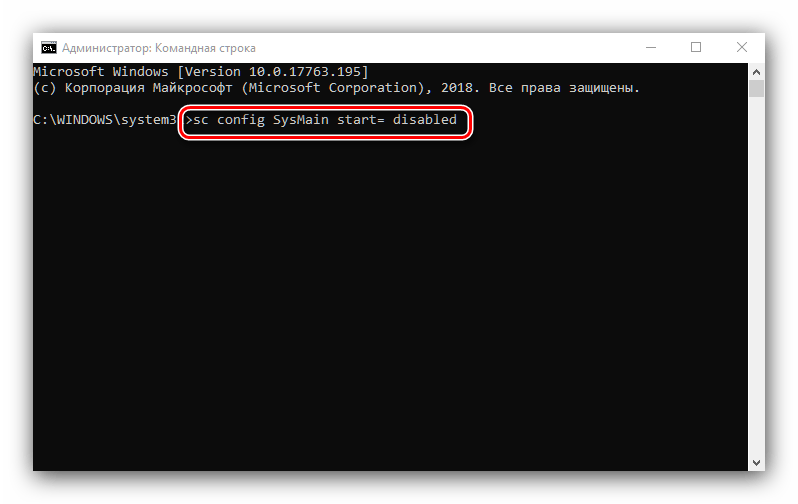
- Откройте «Поиск», в котором введите запрос cmd . Далее найдите результат «Командная строка», выделите его и воспользуйтесь пунктом «Запуск от имени администратора» в меню справа.

sc config SysMain start= disabled
Проверьте правильность ввода и нажмите Enter.
После этого закройте «Командную строку» и перезагрузите машину.
Задействование интерфейса ввода команд технически ничем не отличается от использования рассмотренной в предыдущей части статьи оснастки, но состоит из меньшего количества шагов.
Способ 3: Системный реестр
В некоторых ситуациях обычной остановки службы может оказаться недостаточно. Здесь на помощь приходит реестр ОС.
- Вызовите средство «Выполнить» (об этом рассказывается в первом способе), введите команду regedit и нажмите «ОК».

После запуска «Редактора реестра» перейдите по следующему пути:
HKEY_LOCAL_MACHINE\SYSTEM\CurrentControlSet\Control\Session Manager\Memory Management\PrefetchParameters
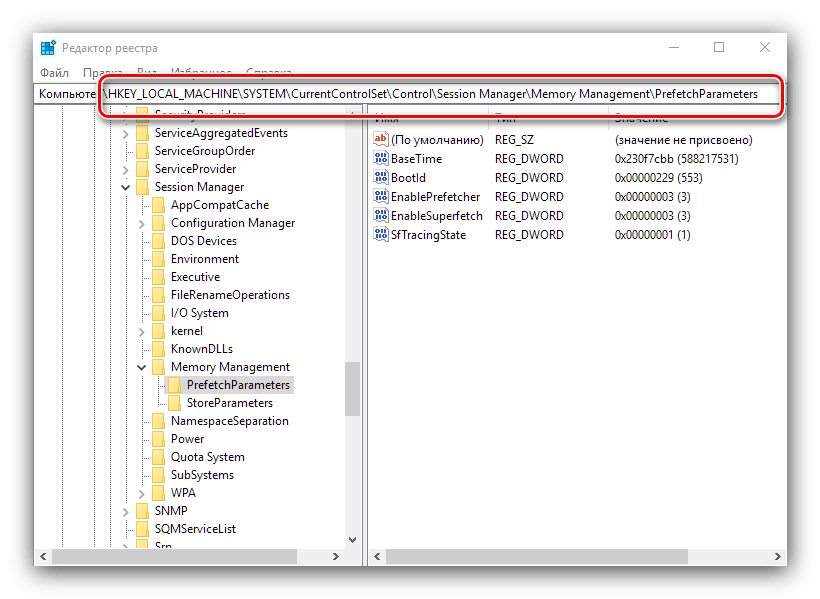
Найдите запись с именем EnableSuperfetch, выделите её, затем воспользуйтесь пунктами «Правка» – «Изменить».

Если запись с таким именем отсутствует, её понадобится создать – выберите соответствующий пункт в меню «Правка», а тип записи установите как «Параметр DWORD (32 бита)».

Значение параметра задайте как «0», после чего нажмите «ОК».

После внесения всех изменений закрывайте оснастку и перезагрузите целевой ПК или ноутбук. Как правило, настройка через реестр позволяет раз и навсегда отключить Superfetch.
Подводя итоги, отметим, что выключать отключить службу Superfetch в Windows 10 рекомендуется только владельцам SSD, тогда как пользователи обычных винчестеров могут столкнуться с замедлениями в работе своего компьютера.
SuperFetch как отключить в Windows 10?
 Всем привет, в этой заметке я вам, дорогие друзья, покажу как отключить Prefetch (префетч) и Superfetch (суперфетч) в Windows 10. В старых версиях Windows, даже в XP эти приблуды также отключали, так как польза от них была сомнительная (хотя можно поспорить). Как бы там не было на самом деле, а если вам нужно это отключить, то попробуйте — вдруг это действительно сделает комп немного быстрее.
За кэширование в винде отвечает служба SysMain, но вы не думайте что это какая-то левая, нет, просто в списке служб вы видите название SuperFetch, а второе имя ее это SysMain! Вот такие пироги!
Грузить вас не хочу и не буду, но все таки пару слов о том, что такое SuperFetch напишу (Prefetch было в XP, можно так сказать, это предыдущая версия технологии). Значит так, это такая технология, которая позволяет вроде бы как сделать Windows еще быстрее, то есть те программы или файлы, с которыми вы чаще всего работаете, они загружаются в оперативку и именно для того, что бы если что, к ним был быстрый доступ.
То есть с одной стороны, то вообще полезно, но зачем тогда отключать? Честно, врать не стану, я не знаю насколько стабильно работает система, когда эта технология по максимум начинает отгребать себе память, кстати другими словами этот SuperFetch (появился еще в Vista) является кэшем Windows 10. Так вот, насколько стабильно будет работать Windows, если например кэш ее будет около пару гб? Лично я не могу ответить точно.. но в интернете, можно встретить отзывы что система виснет и тормозит, ну и в этом духе, и именно поэтому пользователи и интересуются как отключить кэш в Windows 10.
Ну надеюсь что вы поняли то, что я хотел до вас донести  Настоятельно рекомендую отключать эту технологию, если у вас SSD-накопитель, ибо он и так по себе быстрый. Кстати, я не могу сказать что этот кэш очень эффективен — ведь он кэширует файлы, а не блоки, понимаете? А вот например утилита PrimoCache, кэширует именно блоки! Если интересно, то о ней я писал тут, в статье как ускорить жесткий диск.
Итак, приступим (в принципе данный способ подходит и для других Windows) — открываем Диспетчер задач (на панели задач правой кнопкой мышки и там выберите в меню), и там переходим на вкладку Службы. Тут вам нужно найти пункт SysMain (это и есть служба кэширования), и по нему нажать правой кнопкой и выбрать Остановить:

После этих действий, служба SuperFetch остановится и прекратит свою работу. Но это так, чтобы по быстрому отключить, если же вы хотите навсегда избавится от SuperFetch, то нужно открыть службы, просто зажмите на клаве Win + R и введите туда вот такое: services.msc:

После этого откроется окно со службами. Там сразу рекомендую переключится на стандартный вид, потом найти необходимую службу:

Нажимаем по ней два раза мышкой, появится окно настроек — нужно указать, чтобы эта служба вообще никогда не запускалась, сделать это можно тут:

Все! Теперь кэширование отключено, но, десятка все равно что-то будет кэшировать, почему и что — я не знаю (может быть какие-то особо важные системные компоненты?), но надеюсь что это не будет создавать тормоза. А вообще, вы наверно сами знаете, что сколько бы не было оперативки (если суперфетч включен), Windows под этот кэш может десятки гб брать… (врать не буду, у меня такого не было, но было у других!).
Comments
Спасибо, очень познавательная и полезная статья. У меня есть вопрос. До конца не могу понять, что значат эти слова:»ведь он кэширует файлы, а не блоки». Очень хочу понять, разъясните пожалуйста. Спасибо.
Ответил там 
Добавить комментарий Отменить ответ
Этот сайт использует Akismet для борьбы со спамом. Узнайте как обрабатываются ваши данные комментариев.
Как отключить службу SysMain (SuperFetch) в Windows 10

В данной статье показаны действия, с помощью которых можно отключить службу SysMain (Superfetch) в операционной системе Windows 10.
Функциональность SuperFetch отслеживает, какие приложения используются наиболее часто. Эта информация учитывается и используется для предварительной загрузки приложений в оперативную память компьютера. Таким образом обеспечивается более быстрый запуск приложений, потому как они уже частично находились в оперативной памяти.
Причины для отключения службы SysMain (Superfetch) могут быть разные. Например если в системе используется SSD или M.2 накопители, то от функционала SuperFetch можно не увидеть прироста производительности, потому что твердотельные накопители (SSD, M.2) работают быстро сами по себе. Также, иногда SuperFetch может вызвать высокую загрузку жесткого диска, что и является причиной для отключения службы SysMain (Superfetch).
Чтобы отключить службу SysMain (Superfetch), необходимо войти в систему с правами администратора
Как отключить службу SysMain (Superfetch) используя консоль «Службы»
Чтобы отключить службу SysMain (Superfetch) откройте консоль «Службы», для этого нажмите сочетание клавиш  + R, в открывшемся окне Выполнить введите services.msc и нажмите клавишу Enter ↵.

В окне «Службы» дважды щелкните левой кнопкой мыши службу с названием SysMain.

В открывшемся окне «Свойства: SysMain (локальный компьютер)» остановите службу нажав кнопку Остановить.

Затем в выпадающем списке Тип запуска: выберите пункт Отключена и нажмите кнопку OK.

Как отключить службу SysMain (Superfetch) в командной строке
Также отключить или включить службу SysMain (Superfetch) можно используя командную строку.
Чтобы отключить службу SysMain (Superfetch), запустите командную строку от имени администратора и выполните следующую команду:
sc stop «SysMain» && sc config «SysMain» start=disabled

Чтобы включить службу SysMain (Superfetch), запустите командную строку от имени администратора и выполните следующую команду:
sc config «SysMain» start=auto && sc start «SysMain»

Как отключить службу SysMain (Superfetch) в Windows PowerShell
Также можно использовать консоль PowerShell для отключения или включения службы SysMain (Superfetch).
Чтобы отключить службу SysMain (Superfetch), откройте консоль Windows PowerShell от имени администратора и выполните следующую команду:
Stop-Service -Force -Name «SysMain»; Set-Service -Name «SysMain» -StartupType Disabled

Чтобы включить службу SysMain (Superfetch), откройте консоль Windows PowerShell от имени администратора и выполните следующую команду:
Set-Service -Name «SysMain» -StartupType Automatic -Status Running

Используя рассмотренные выше действия, можно отключить или включить службу SysMain (Superfetch) в операционной системе Windows 10.
Видео-инструкция
Также, можно посмотреть видео ролик в котором показано как отключить службу SysMain в операционной системе Windows 10.
.Windows 10, 8 & 7: Enable or Disable Superfetch
By Mitch Bartlett 56 Comments
Enable or disable the Windows 10, 8, or 7 Superfetch (otherwise known as Prefetch) feature. Superfetch caches data so that it can be immediately available to your application. Sometimes this can affect the performance of certain applications. It tends to not work well with gaming, but can improve performance with business apps.
To modify whether Superfetch is enabled or disabled, you can perform the following steps.
Disable from Services
- Hold the Windows Key, while pressing “R” to bring up the Run dialog box.
- Type “services.msc“, then press “Enter“.
- The Services window displays. Find “Superfetch” in the list.
- Right-click “Superfetch“, then select “Properties“.
- Select the “Stop” button if you wish to stop the service. In the “Startup type” dropdown menu, choose “Disabled“.
Enable or Disable from Registry
- Hold the Windows Key, while pressing “R” to bring up the Run dialog box.
- Type “Regedit“, then press “Enter“.
- The Registry Editor window appears. Navigate to the following location in the Registry.
- HKEY_LOCAL_MACHINE
- SYSTEM
- CurrentControlSet
- Control
- Session Manager
- MemoryManagement
- PrefetchParameters
- On the right side, double-click on “EnableSuperfetch“. If this value doesn’t exist, right-click the “PrefetchParameters” folder, then choose “New” > “DWORD Value“.
- Give “EnableSuperfetch” one of the following values:
- 0 – to disable Superfetch
- 1 – to enable prefetching when program is launched
- 2 – to enable boot prefetching
- 3 – to enable prefectching of everything
- Select “OK“.
- Close the Registry Editor.
Note: If you disable Superfetch and would like to enable it for certain applications, you can use special switch in the program shortcut: /prefetch:1
Where is the prefetch data stored?
By default, prefetch data is stored at “C:\Windows\Prefetch“.
You Might Also Like
Reader Interactions
Comments
Does Itmatter says
If you have a “PROPER” SSD this is actually beneficial to speed by a lot. I bet most of those complaining have a plain old HDD.
Kudos to those who noted that superfetch was renamed to SysMain. I spent considerable time searching Services for “SuperFetch”, which was nowhere to be found. I was unaware of the name change because I am not that deep into the OS management side of this field any longer. More of a Hardware guy now.
Does not work superfetch is contınuenıng to run although I do these operaions and after doing , I HAVE CHECKEd and I saw that I had changed in this article way but not working.
The comments here condemning Superfetch / SysMain are bull. Superfetch only consumes main memory that is not currently used otherwise. If you have enough main memory, its benefits are great, even with an SSD (other than what usual rumors say).
The problem with these blogs purporting to be information is the lack of datestamping. Information is ALWAYS date sensitive: some may become more valuable as they age, but usually information becomes less relevant or even incorrect as it ages.
Someone already remarked 3 months ago that the SuperFetch service got renamed to SysMain (as of Windows 10 build 17763.1), yet this article has not been updated to reflect that change. This article’s author doesn’t read the comments or has abandoned his article (too often the case with these blogs purporting to be references). This outdated information becomes a disservice to users since they may not find a service named SuperFetch.
Yes this was a huge help on my Dell Inspiron Win10 machine. I am not a gamer by any stretch but my laptop was running slow, locking up, etc. I’ve never seen task manager take several minutes to load. When I could finally get it to load, it showed 100% disk capacity and “superfectch” was the only process with a high usage.
my pc runs good but when i open a game and plays for a while (it happends the most in open world games) after i play when i close the game my pc is being slow hope it will fix it
the “Superfetch” service has been renamed to “Sysmain” now.
Turbotortoise Stickle says
Yes, this article did help.. Why would anyone want a bunch of apps not being used hogging up resources (CPU, RAM, and sometimes even WAN bandwidth) do to an assumption? Keeps re-activating after updates.
Your advice seems to have healed my limping junkpile of a machine. I was running at 95%-100% disk usage randomly for no reason out of the vast blue sky of terrible fate and luck. Thanks to you I can use this clunker in peace for the time being. I hope to whatever vengeful computer gods that dictate our messed up lives that this peace isn’t short lived and I praise your name and your post.
Microsoft’s first OS was MSDOS, the MicroSoft Disk Operating System. Since then they have been obessed with disk related performance and Superfetch is the latest evidence of that obession. Thanks for the solution to switch this irritant off. Here an idea Microsoft, make the OS read only, prefetch every app as part of it’s install and create a profiling suite with a prefetching optimization tool for users to initiate when they choose.
Yesterday after Windows 10 automatically updated, my computer couldn’t boot. It forced me to reset. After that, Windows 10 did NOT allow me to choose default programs! And it ran superfetch and a lot of other programs I didn’t want! I’d say Microsoft team has become very rude to users!
Superfetch is a serious PITA! What sucks is that are some Windows updates, it sometimes will be reset to run automatically, and then my poor laptop is at 100% disk usage which makes it pretty much a paperweight. Then I have to stop the service, disable it again, do a disk check, and reboot. ARG! I hate it with a passion!
Ed Reichenbach says
Superfecth is hell. Nobody asks it to run, it runs on its own, and then it takes up so much disk capacity as to entirely block usage of the computer. I hate and I hate Windows for inventing it and imposing it onto us users. Windowns is a necessary evil… for want of any better solution.
George Gough says
Thank you my hero,
If you ever need any organs I’m willing to donate any of mine after this fix. I have tried dozens of other help sites but nothing worked, until now.
Thank you! It definitely freed up disk space, now to work on memory… what is cortana doing that is taking up so much memory? She is just a search bar… ? Safe to ditch her too?
Biff.. It’s on the properties page if you follow the above instructions.. “Disable from services”.. about halfway down..
In Windows 10, there is no ” “Startup type” dropdown menu”
Whatever the ‘experts’ try to tell you, disabling Superfetch WILL benefit your computer’s performance if it has limited RAM. I have a Lenovo Ideapad with 2Gb RAM, and disabling Superfetch boosted its performance significantly and freed up 10% of RAM.
If your device has 8GB of RAM that might not make a huge difference and the price to pay might be too big. If it has 2GB RAM it’s well worth giving it a try.
Thank you for the registry instruction. Easy and clear!
Thanks for this! Easy to follow instructions 🙂
I’m having a problem. Before, I could open prefetch anytime and not have any problems but now it’s not opening at all. How do I solve this issue?
Thank you. i checked and my superfetch was enabled again.
Keep your eyes open though.. I had it disabled then windows updated and kindly put it back on.. pc slowed down again making me go and look at it again.. only to find it back on..
I have never seen anybody experience any problems after disabling Superfetch.
Will there be any risks to disabling superfetch regarding my PCs well being, or is it OK to disable it completely?
I just found this. I changed superfetch and prefetch to 1 and disk went from constant 90-100% to 0-10% at idle. thanks a bunch for the information.
Great post. Thank you for the help!
Mr. PCMasterrace says
Thanks for the awesome post. It was very ez to follow the steps!
Thank you so much!! Superfetch has been the bane of my existence for the last year.
You are a gem and a treasure.
Thank you for sharing your expertise and for your kindness.
Greg Futrelle says
this seems to have worked. I still see 100% disk usage at startup, and superfetch still runs, but only for a few seconds. total startup time doesn’t seem to last as long either. by the way, in Regedit, Superfetch and Prefetch had the same settings, so I changed each from ‘3’ to ‘1’.
Jonni Starre says
Thanks for this post. I disabled SuperFetch and now my computer is running much better; the way it was originally.
Uh, mine only does it for like 10 seconds and then it goes back to normal.
I have a gaming PC so I don’t know, just got this 3 days ago.
Thanks a ton for this post! It’s super useful and now that I disabled superfetch, my computer is back to running at an optimal speed. It also helps that it was very easy to follow.
Thanks a lot for the help. I stopped the system service and performance returned to normal. I still will have to play around with the registry setting but I’m confident it will turn out O.K.
Can to safe mode to find out super fetch was not enabled try to get back on but stuck on welcome
Thanks! Tried another fix but it turned back on when I restarted. Now I see why.
Typically Microsoft hunk of junk is SuperFetch. Good idea just poorly executed, again.
Daniel Gonsoulin says
Wow! Great tip!! Thanks!
worked like a charm…my core 1 and core 0 temperatures went down to optimal levels, video no longer lags..I am such a happy camper.
Like someone said above, you would think Microsoft would have a warning or disclaimer or something so that prefetch does not take or hog up CPU usage.
Core 1 at this writing 38C
Core 0 at > 36 C
On a side note I cleaned my fans using a vacumm (very powerful I might add) and this also cooled my laptop.
running HP Pavillon i5 450M
4GB Ram.
I am very very happy
I understand now how it works…
I am using both Edge + Chrome and recently got blocked due to Disk permanetly @ 100%
Tried Great Suspender on Chrome but not of much help…
Had similar but was showing it was using 100% disk !! and took forever to respond. usually had to shut down chrome and wait 10 mins before i could reboot.. then be ok for another 2 days before doing it again.. Since stopping it, this pc is running like a dream.. Thanks for the solution.
thank you very much, simple as that, it works!
Thank you Very Much for your clear instructions and for your time and generosity in posting it for everyone to use.
I am unable to disable Superfetch. I followed the directions and tried to set to 0. It came back with an error. I tried to enter hex and decimal as well as directly editing the word by replacing the 3 with a 0. All to to avail.
In the services.msc the startup option is grayed out and I have administrator status.
My disk usage is stuck at 100%
My Lenovo laptop with windows 10 had been very very slow lately, it had almost permanently almost 100% of CPU and disk usage. Today I uninstalled the Lenovo Companion app and the Lenovo System Interface Foundation app (which was using all the CPU). That brought my CPU down a lot, now it never even reaches 50% in normal usage. I also disabled superfetch and it has apparently solved the disk usage wich now very infrequently has shown 100%, normally it has been very low. Thanks for the help! I hope this fix sticks.
i enabled superfetch, set it too 3
my boot speeded up, installations of games speed up … .
overall speed up … .
and i am on windows10pro … .
it definitely works … .
even on windows 10 pro … .
Dan Liston says
VERY NICE!! Thank you. However, I believe there is a piece of instruction missing and a typo at the end of the regedit instructions. Suggested corrections are in square brackets.
On the right side, double-click on “EnableSuperfetch“. If this value doesn’t exist, right-click the “PrefetchParameters” folder, then choose “New” > “DWORD Value“. [Type: EnableSuperfetch and press Enter.]
Give “[EnableSuperfetch]” one of the following values:
How long would you have to wait to load a program anyway. 10 levels of disk and memory look-ahead and read cache and still someone comes up with this (miserable) idea.
At least twice a day Superfetch would bog down my computer to the point where It would not even function. Disk cache would hover around 96 – 100%. Always at 9:30 am and 3:30 pm…..when I need full use! Tried to reschedule tasks….but you know thats nearly impossible. Finally shut off Superfetch – problem totally solved.
You’d think Windows would know better by now – how to build an operating system that you can actually work with. How lazy are these designers?
I got this laptop used and the ram was stuck at 70-90% so I did abled superfetch and that fixed it – but now I feel cheated
It was superfetch for me, thanks so much for the guide!
Great tutorial. Thanks!
Lisa Taylor says
Thanks so much!! Seems my Win 10 has finally allowed me to use internet without rebooting all the time. YEA!!
These were shortest most thorough instructions I could find anywhere. I got curious about the process I found in my task manager named ‘Superfetch’ that was eating into my resources. This helped me a lot and I hope that you don’t mind me sending some traffic your way. Thanks
Did this help? Let us know! Cancel reply
This site uses Akismet to reduce spam. Learn how your comment data is processed.
Primary Sidebar
Recent Posts
Who’s Behind Technipages?
 My name is Mitch Bartlett. I’ve been working in technology for over 20 years in a wide range of tech jobs from Tech Support to Software Testing. I started this site as a technical guide for myself and it has grown into what I hope is a useful reference for all.
Follow me on Twitter, or visit my personal blog.


