- How to Disable or Remove Automatic Updates in Windows 10
- Do it with the Services tool
- Try Local Group Policy Editor
- Free utilities to disable automatic updates in Windows 10
- How to remove the updates that have already been installed?
- How to Stop Windows 10 Update Completely [2019 Guide]
- 4 Easy Ways to Disable Windows 10 Auto Update!
- How Can I Disable Windows 10 Update?
- Why I can’t stop Windows 10 auto update?
- Completely uninstall Windows 10 Update Assistant
- Way 1: Meter your network connection to stop Windows 10 update
- Way 2: Disable Windows Update service to stop Windows 10 update
- Way 3: Change Group Policy Settings to stop Windows 10 update
- Way 4: Change Device Installation Settings to stop Windows 10 update
- Bonus Tip
How to Disable or Remove Automatic Updates in Windows 10
Read this article to find out how to disable automatic update option in Windows 10. Let’s explore how to remove an unnecessary or faulty Windows update by using integrated system tools or with third-party apps.
Do it with the Services tool
The first method works for Windows 10 Home, Professional and Enterprise.
Type Services in the search field (the magnifying glass icon on the taskbar) and run this system tool.

Find Windows Update service and open its properties.

Click on Stop and select Startup Type – Disabled

After these changes are applied and the computer restarts, Windows Update will not work anymore, so updates won’t be downloaded and installed automatically.
Try Local Group Policy Editor
The second method is only good for Windows 10 Professional and Enterprise. As other versions of Windows lack such component as Local Group Policy Editor.
To start the Local Group Policy Editor, type gpedit.msc in the search field and press Enter.

When in the Editor, go to Computer Configuration – Administrative Templates – Windows Components – Windows Update.

Find the policy Configure Automatic Updates, open it and set it to Disabled. Click Apply/Ok.

Free utilities to disable automatic updates in Windows 10
Also, you can use free utilities to prevent Windows 10 from updating automatically.
As an example, we’ll show you Win Updates Disabler, but there are other tools as well.
Run the program, jump to the tab Disable to check the box next to Disable Windows Updates. After that, click Apply Now for the changes to take effect.

As seen from the screenshot, this program can also disable Windows Firewall and Windows Defender. If necessary, you can turn everything on again in the tab Enable.

How to remove the updates that have already been installed?
If some updates were installed incorrectly, or you want to remove only particular Windows 10 updates, this is also possible.
Go to Control Panel and select Programs & Features.

Jump to the tab View Installed Updates.

Sort them by installation date by clicking on Installed On.

Right-click on one of the updates which you want to delete from the system and click Uninstall.

Confirm your decision and changes will take effect after the system restart.

See the full article with all additional video tutorials. If you still have any questions, please ask in a comments. Also visit our Youtube channel, there are over 400 video tutorials.
How to Stop Windows 10 Update Completely [2019 Guide]
4 Easy Ways to Disable Windows 10 Auto Update!
Last Updated: 2 years ago
As a Windows 10 user, you may have noticed you’re always forced to install the Windows automatic updates (whether you like it or not). Whenever you’re working on your computer, Windows automatically updates the system, and you have to restart the system very often, spending so much time on updating and restarting. This’s frustrating, isn’t it?
Don’t worry, this article introduces the easy methods to stop Windows 10 update completely.
How Can I Disable Windows 10 Update?
Here are the methods you can try. You don’t need to try them all; just work your way down the list until you find the one that works for you.
Why I can’t stop Windows 10 auto update?
As indicated by Microsoft, for Home edition users, Windows updates will be pushed to the users’ computer and automatically installed. So if you’re using Windows 10 Home version, you can’t stop Windows 10 update.
With Windows 8.1 and earlier versions, you can choose to update your Windows in the following four options:
1. Install updates automatically (Recommended)
2. Download Updates but choose when to install them
3. Check for updates but let me choose whether to download and install them
4. Never check for updates (Not Recommended)
However, in Windows 10, these options have been removed and you can disable Windows 10 update at all.
Completely uninstall Windows 10 Update Assistant
Sometimes you’ve tried the solutions below to stop Windows 10 update, but it fails to work in times. one of the possible reasons is that Windows 10 Update Assistant modifies the settings in your computer and Windows 10 auto update starts to work again.
If you have Windows 10 Update Assistant installed in your computer, you should uninstall it completely.
Note: if you don’t want to uninstall Windows 10 Update Assistant, you can disable it from Task Scheduler. Go to Task Scheduler > Task Scheduler Library > Microsoft > Windows > UpdateOrchestrator, then click Update Assistant in the right pane. Make sure to disable each trigger in Triggers tab.
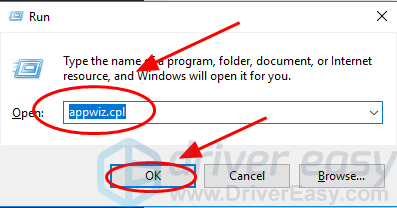
1) Press the Windows logo key and R at the same time, type appwiz.cpl, and click OK.
2) Find the Windows 10 Update Assistant in the listed programs, and right click on it, then select Uninstall.
3) Confirm the delete.
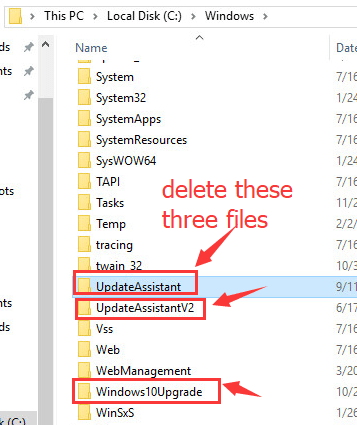
4) Open File Explorer, and click This PC.
5) If the Windows Update Assistant is installed by default when you install your Windows OS, go to the file where your system is installed, normally it’s This PC > C drive > Windows > Windows10Upgrade, then delete the Windows10Upgrade folder.
If the Windows 10 Update Assistant is installed separately, you can go to the location where the Windows 10 Update Assistant is saved, and delete the installation folder. It’s normally named as Windows10Upgrade.
6) Go to This PC > Windows, delete the folders named UpdateAssistantV2 and UpdateAssistant.
After the full uninstallation of Windows 10 Update Assistant, restart your computer.
Then you can try the methods below to stop Windows 10 update and it should work.
Way 1: Meter your network connection to stop Windows 10 update
Many people may not notice that there is a simple way to stop Windows 10 automatic updates. You can set your WiFi network as metered connection. So if your computer is connecting to WiFi, you can try this:
1) Click the Start button at the bottom left on your desktop, then c lick the Settings app.
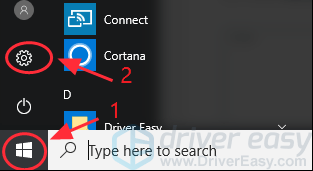
2) Click Network & Internet.

3) Click WiF on the left pane, then click the name of your Wi-Fi connection.
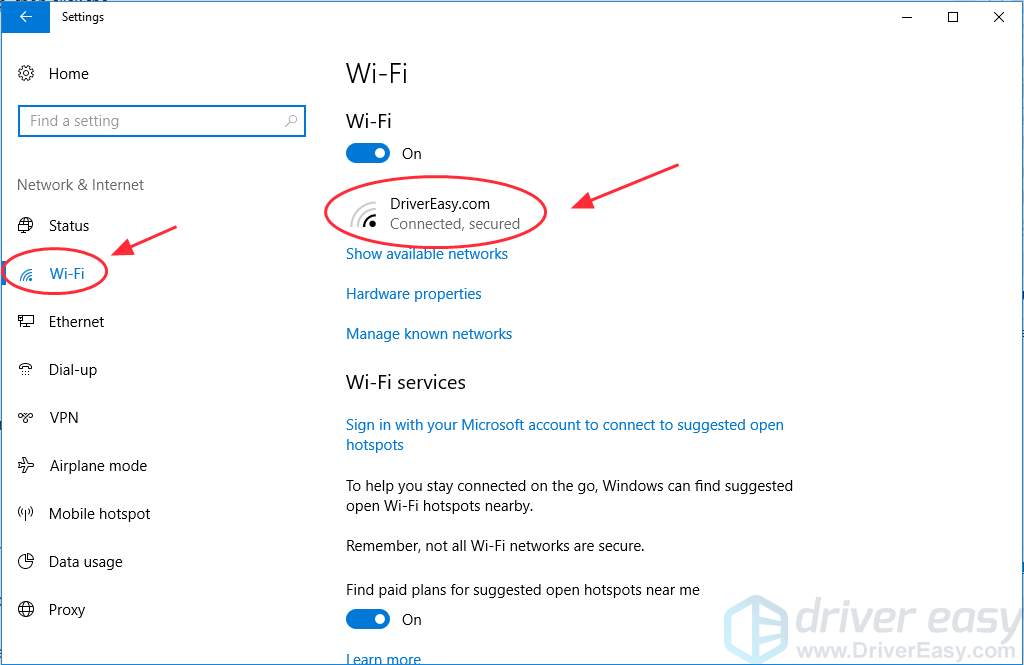
4) Click to turn on Set as metered connection.
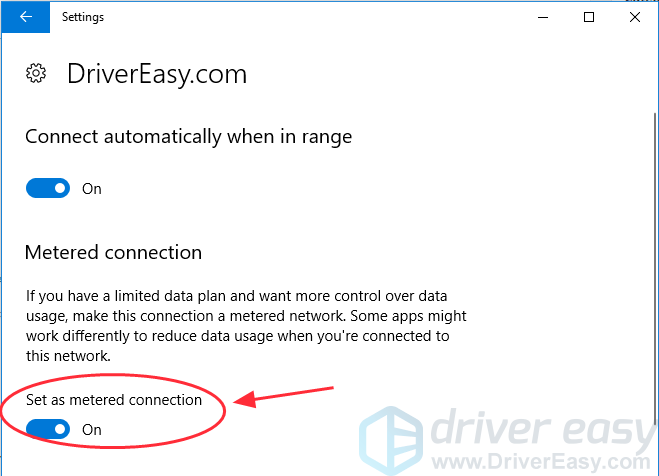
In doing this, Windows will assume that you have limited data plan when using WiFi. So it won’t push installing updates in your computer. However, if your computer is connecting to Ethernet, Windows will assume that you have unlimited data plan, and this method will not work. But you can also try the following methods to turn off Windows 10 update.
Way 2: Disable Windows Update service to stop Windows 10 update
Windows Update service can detect, download and install the Windows updates and programs. Once disabled, you can not use the Windows automatic update feature, and programs will not be able to automatic download and install.
Some people find it impossible to disable Windows 10 update in the Windows Update service, and the settings changes every time your computer starts installing the Windows update. It’s likely caused by Windows 10 Update Assistant. If that’s your case, you should completely uninstall Windows 10 Update Assistant in your computer first.
Once uninstall Windows 10 Update Assistant, you can start the steps below:
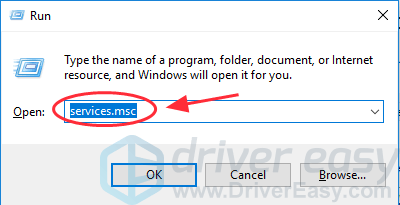
1) On your keyboard, press the Windows logo key + R at the same time to invoke the Run box.
2) Type services.msc and press Enter.
3) Scroll down to Windows Update, and double click it.
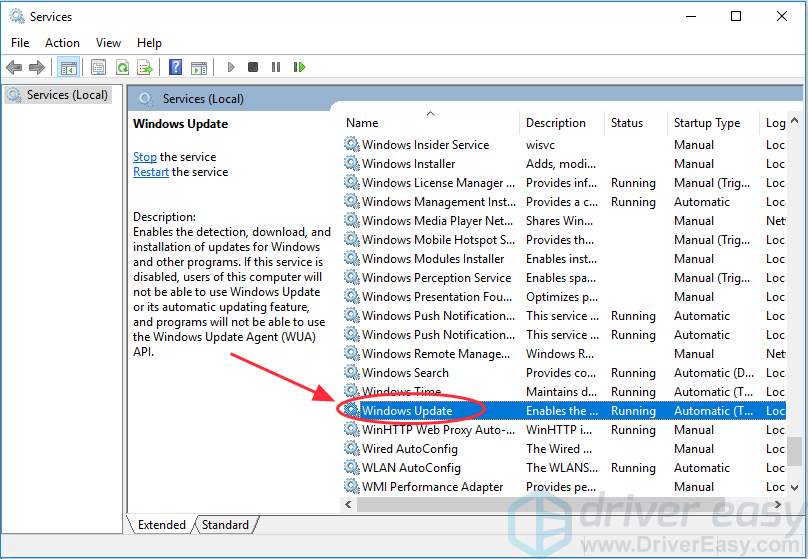
4) In Startup type, select Disabled. Then click Apply and OK to save the settings.
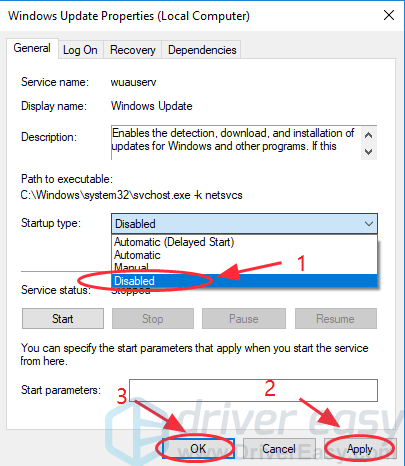
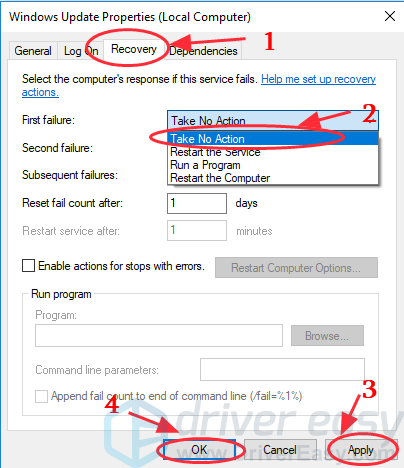
5) If it’s the first time that you stop the Windows Update service, you may also need to take one more step:
Still on the Windows Update Properties pane, click the Recovery tab, select Take No Action in the First failure section, then click Apply and OK to save the setting.
6) Restart your PC to make it take effect.
Way 3: Change Group Policy Settings to stop Windows 10 update
You can also use the Group Policy Editor to change the settings to prevent Windows 10 from automatically updating.
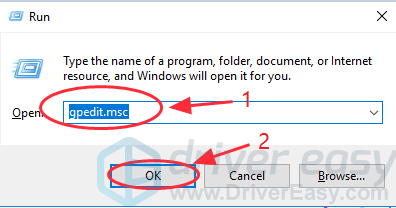
1) On your keyboard, press the Windows logo key + R at the same time to invoke the Run box.
2) Type gpedit.msc and click OK.
3) Go to Computer Configuration > Administrative Templates > Windows Components > Windows Update.
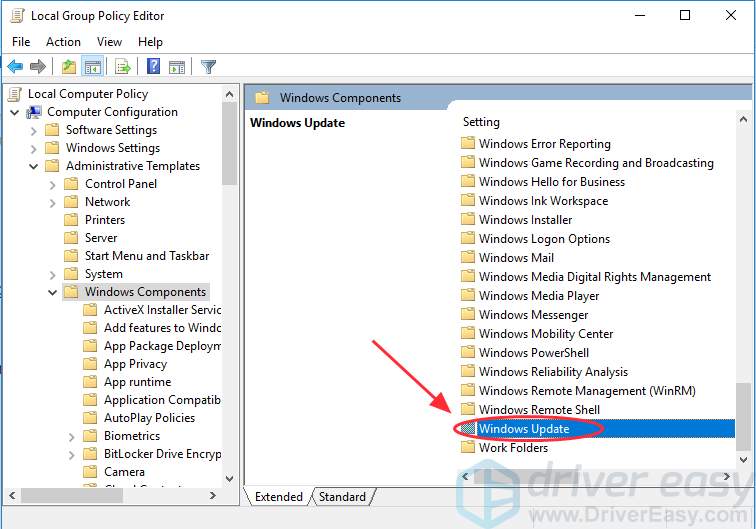
4) Double click Configure Automatic Updates.
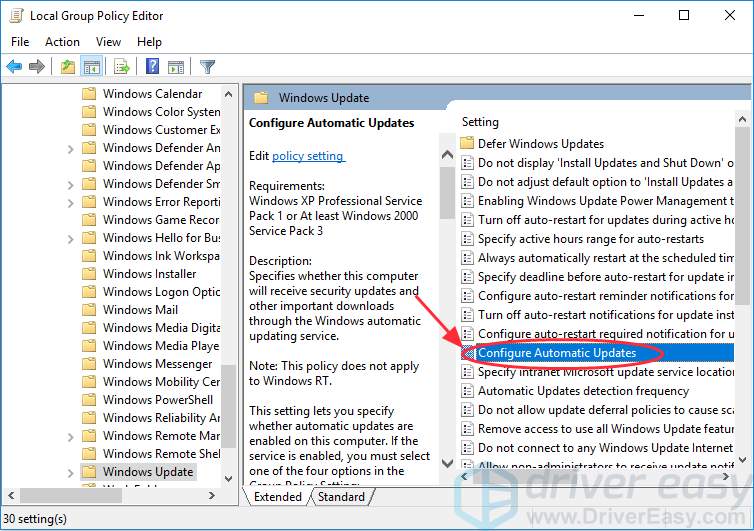
5) Select Disabled in Configured Automatic Updates on the left, and click Apply and OK to disable the Windows automatic update feature.
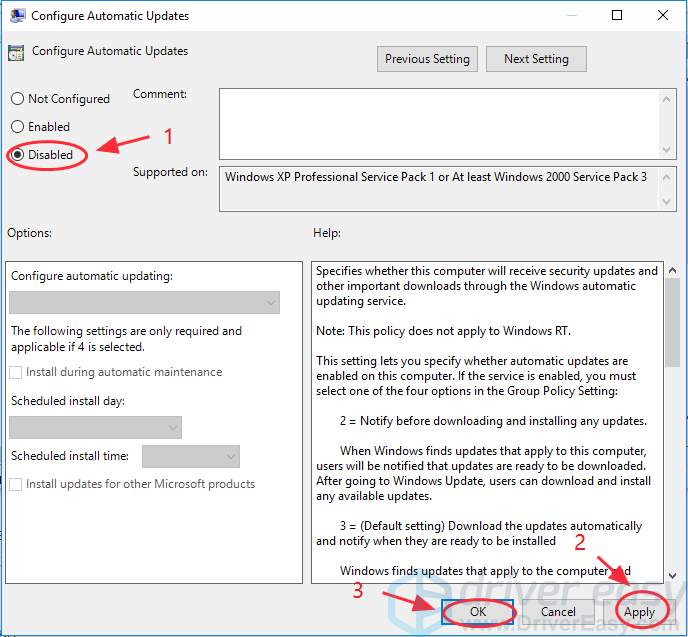
Tips: When you need to update your Windows version later, you can repeat the steps above, then select Enabled to turn on this feature, so that you can continue to download the updates.
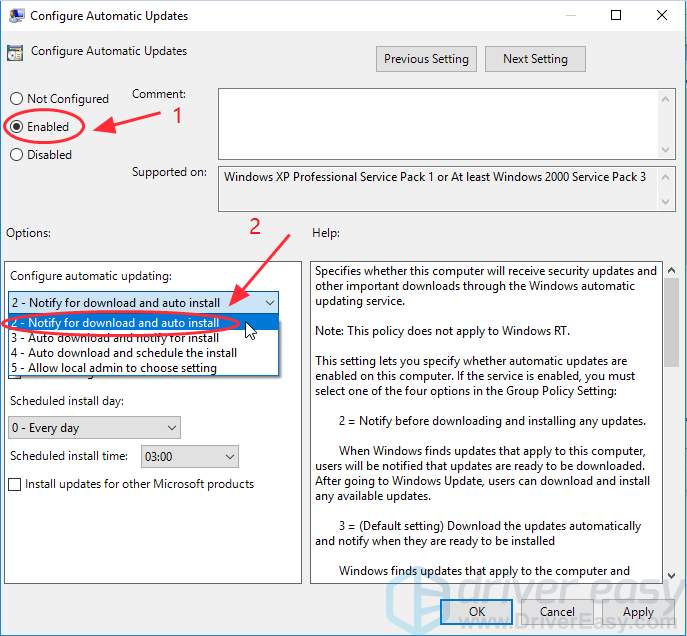
Note: It’s not recommended to disable it because you may sometimes miss the important Windows update. It’d better to select Enabled , then choose: 2 – Notify for download and auto install. In doing so, you will receive notifications about new Windows update, and you can to choose when to download the update as you wish.
Way 4: Change Device Installation Settings to stop Windows 10 update
If you don’t want to automatically update your device drivers in your computer, you can try these steps:
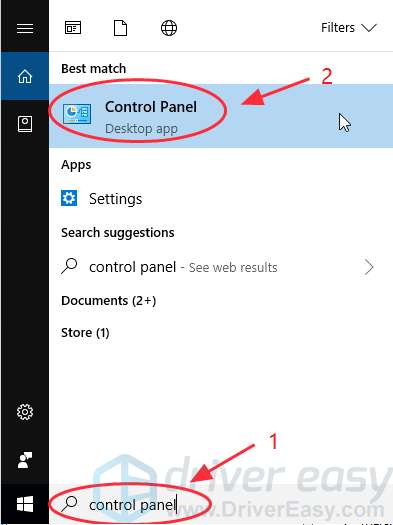
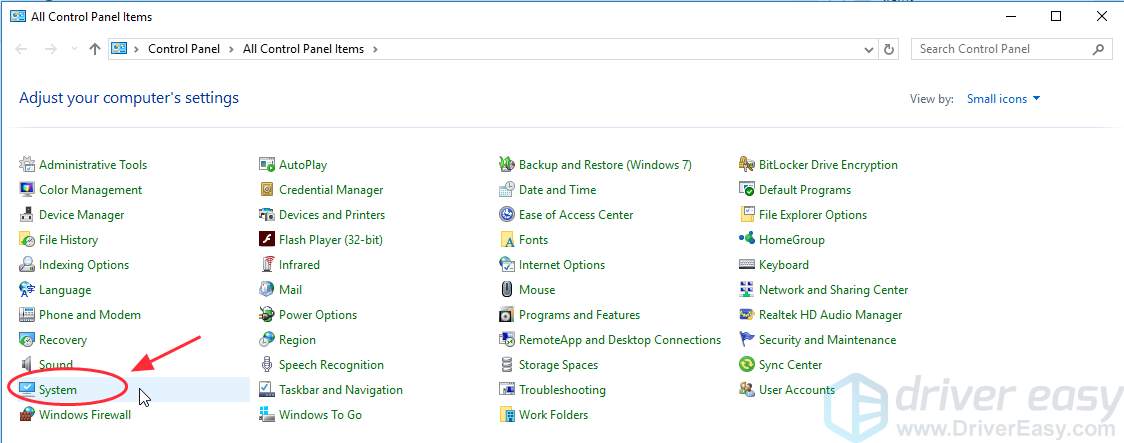
1) Type control panel in the search box, and click Control Panel.
2) Click System.
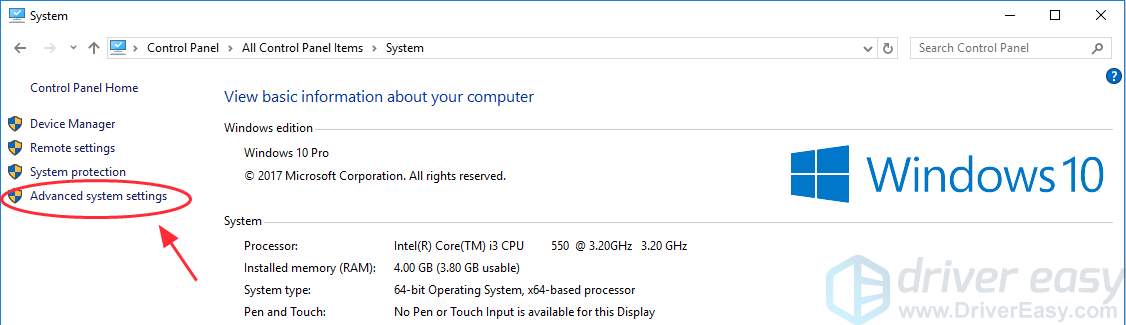
3) Click Advanced system settings on the left.
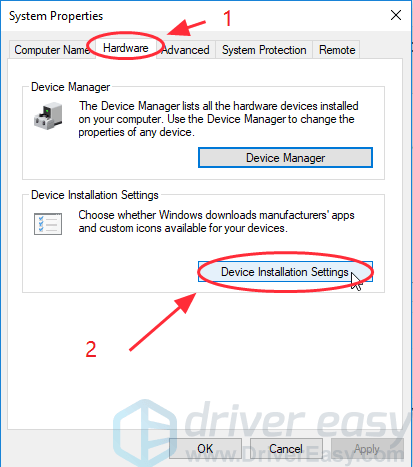
4) Click the Hardware tab, then click Device Installation Settings.
5) Select No (your device might not work as expected) and click Save changes.
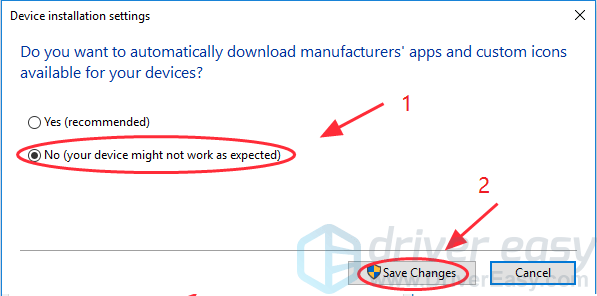
6) Click OK to finish the settings. Then your device drivers will not automatically download from the manufacturers.
Bonus Tip
Windows Update updates your computer, so you can enhance your system performance and fix some issues. Since Windows 10 update has been disabled in your computer, you should consider updating your device drivers in your computer, with the attempt to keep your computer hardware in good condition and improve the performance.
Tips: It’s possible there are problems with some drivers, as the outdated or missing drivers can cause problems as well. So you should keep your device drivers up to date.
There are two ways to update your device drivers: manually and automatically.
Update your drivers manually – You can update all available drivers manually ONE BY ONE until you pin down the exact driver at fault. Firstly you’ll have to go to the manufacturer’s website, search for the most recent correct driver for the devices. Be sure to choose only drivers that are compatible with your variant of Windows system versions. Then download & update them all by yourself.
OR
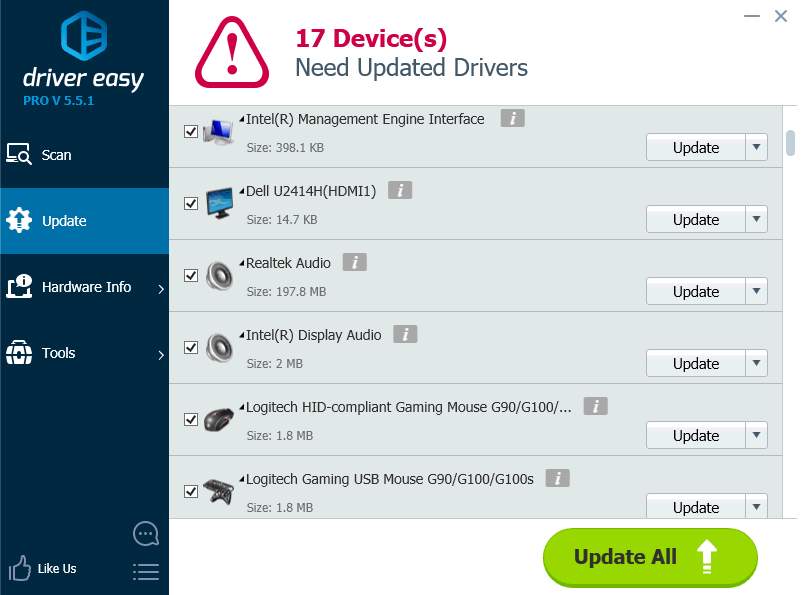
Update your drivers automatically – If you are not familiar with playing around with drivers, it’s recommended to do it with Driver Easy. With Driver Easy, y ou don’t need to know exactly what system your computer is running, you don’t need to risk downloading and installing the wrong driver, and you don’t need to worry about making a mistake when installing.
You can update your drivers automatically with either the FREE or the Pro version of Driver Easy. But with the Pro version it takes just 2 clicks (and you get full support and a 30-day money back guarantee ):
2) Run Driver Easy and click the Scan Now button. Driver Easy will then scan your computer and detect any problem drivers.

3) Click the Update button next to a flagged device to automatically download and install the correct version of this driver (you can do this with the FREE version).
Or click Update All to automatically download and install the correct version of all the drivers that are missing or out of date on your system (this requires the Pro version – you’ll be prompted to upgrade when you click Update All).
4) After updating, restart your computer to make it take effect.
There are the helpful methods to stop Windows 10 update. Hope it works for you. If you have any questions, feel free to comment below and we will see what more we can do to help.


