- Disk Cleanup Free для Windows
- How to Run Disk Cleanup (Cleanmgr.exe) on Windows Server 2016/2012 R2/2008 R2?
- Using Disk Cleanup Tool on Windows Server 2016
- Cleanmgr.exe: Disk Cleanup Command-Line Options
- How to Enable Disk Cleanup on Windows Server 2012 R2/2008 R2 without Installing Desktop Experience?
- Использование очистки диска на Windows Server Using Disk Cleanup on Windows Server
- Включение очистки диска в более ранней версии Windows Server с помощью установки возможности рабочего стола Enable Disk Cleanup on an earlier version of Windows Server by installing the Desktop Experience
- Добавление средства очистки диска вручную на более ранних версиях Windows Server Manually add Disk Cleanup to an earlier version of Windows Server
Disk Cleanup Free для Windows
| Оценка: |
3.00 /5 голосов — 4 |
| Лицензия: | Бесплатная |
| Версия: | 1.7 | Сообщить о новой версии |
| Обновлено: | 25.11.2019 |
| ОС: | Windows 10, 8.1, 8, 7, XP |
| Интерфейс: | Английский |
| Разработчик: | ManyProg |
| Категории: | Очистка диска — Настройка, оптимизация |
| Загрузок (сегодня/всего): | 0 / 3 675 | Статистика |
| Размер: | 27,26 Мб |
| СКАЧАТЬ | |

Disk Cleanup Free — простая программа для очистки компьютера от всевозможного мусора, неиспользуемых системных файлов и следов работы в браузерах. С течением времени на Вашем ПК собираются файлы, которые не участвуют в работе системы, а только занимают место и тормозят работу компьютера. Это могут быть различные временные файлы, остатки установленных и удаленных приложений, некоторые устаревшие системные данные и следы Вашего серфинга в Интернете.
Простому пользователю, не владеющему специфическими познаниями в сфере оптимизации ПК, разобраться с тем, какие файлы можно удалить, а какие нет, достаточно сложно. Да и найти такой мусор в системе не так-то уж и просто. Специально для таких ситуаций и придумано это приложение.
Программа имеет простой интуитивно понятный и не отягощенный настройками интерфейс, который ориентирован на не опытных пользователей. Тут Вам нужно только выделить меткой разделы для сканирования и дождаться его результатов. Удобно, что программа сразу же показывает какой объем данных очистится. Кликнув на кнопку «Remove», Вы избавитесь от ненужных файлов.
Disk Cleanup Free находит мусор в:
- самых популярных браузерах Opera, Google Chrome, Mozilla Firefox, Safari, Internet Explorer — кэш, история, куки, загрузки, сессии, настройки, пароли,
- Проводнике Windows,
- операционной системе — временные файлы, дамп памяти, лог-файлы, отчеты с ошибками и др.,
- разнообразных приложениях — MS Office, Adobe, Notepad, uTorrent, Skype и др.,
- антивирусных программах и т.д.
Такую процедуру очистки рекомендуется периодически проводить на своей машине, тогда компьютер будет в чистом виде, а производительность конфигурации железа оставаться на максимальном уровне.
How to Run Disk Cleanup (Cleanmgr.exe) on Windows Server 2016/2012 R2/2008 R2?
The Disk Cleanup tool allows the administrator to quickly clean up the Windows Server system drive by deleting unnecessary and temporary files, including cleaning the WinSxS directory from files of outdated components that remained after installing the latest cumulative updates. The Disk Cleanup utility (cleanmgr.exe) is installed by default on the GUI editions of Windows Server 2016/2019 (Desktop Experience). However, in previous versions of Windows Server (2012 R2/2012/2008 R2), the cleanmgr.exe tool is missing.
Using Disk Cleanup Tool on Windows Server 2016
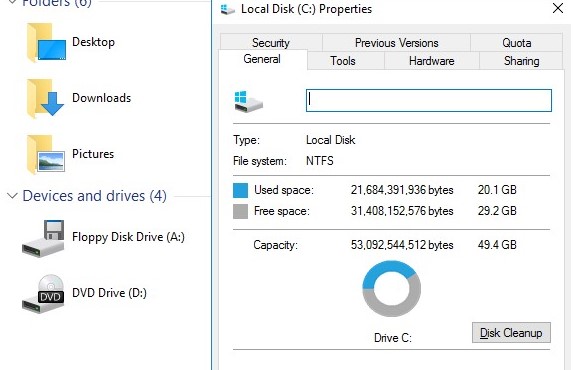
To clean the system disk from unneeded files on Windows Server 2016 using the Disk Cleanup utility, you need to open the disk properties in File Explorer and click the Disk Cleanup button.
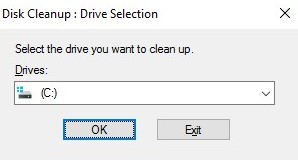
Select the drive you want to clean.
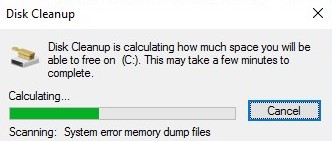
Wait until the cleaning wizard checks your disk and finds unnecessary files that can be safely deleted.
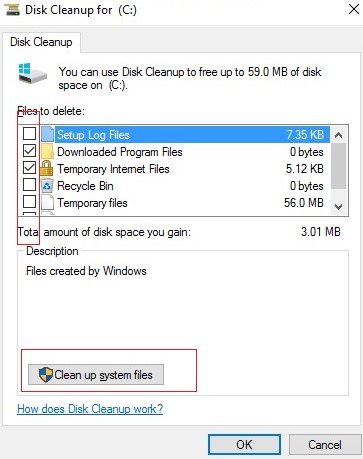
You can select components whose files can be deleted. You are prompted to delete the following temporary files:
- Setup Log Files;
- Downloaded Program Files;
- Temporary Internet Files;
- Recycle Bin;
- Temporary files;
- Thumbnails.
To remove unneeded system files, click on the Clean up system files button.
Additionally, it is proposed to clean up:
- Outdated Windows Defender files;
- System archived Windows Error Reporting files (the folder C:\ProgramData\Microsoft\Windows\WER\ReportQueue);
- System queued Windows Error Reporting;
- Device driver packages (see How to Remove Unused Drives from Driver Store);
- Windows Update Cleanup — this allows you to clean up the component store in the WinSxS directory. Old versions of components files that remain after installing updated ones are removed.
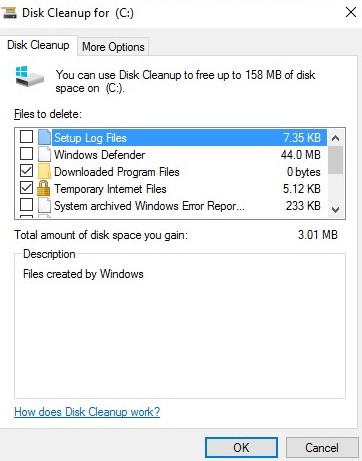
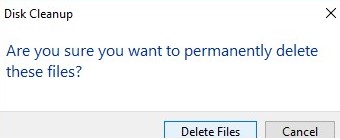
Select the options you need, and Disk Cleanup will show the amount of disk space you gave. Click OK and confirm the deletion of files.
Wait for the cleanmgr.exe tool to remove the unnecessary files.
Cleanmgr.exe: Disk Cleanup Command-Line Options
The cleanmgr.exe tool has several command-line options that allow it to be used in various automatic drive cleaning scenarios. They can be used both on Windows Server and on user desktop workstations running Windows 10.
cleanmgr.exe [/d driveletter] [/SAGESET:n | /SAGERUN:n | TUNEUP:n | /LOWDISK | /VERYLOWDISK | /SETUP | /AUTOCLEAN]
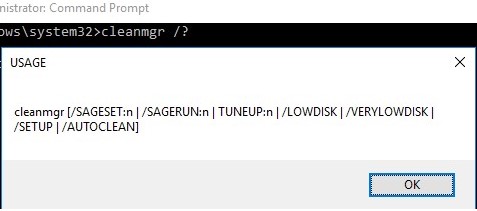
The /AUTOCLEAN parameter is used to delete old files left after upgrading a Windows build. The /SETUP option allows you to delete files left from a previous version of Windows (if you performed an in-place upgrade).
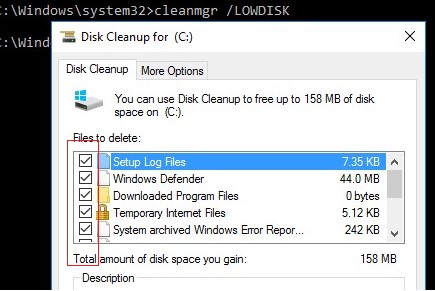
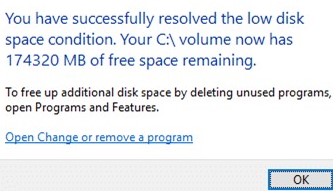
The cleanmgr /LOWDISK command runs the Disk Cleanup GUI with the already selected cleaning options.
The cleanmgr /VERYLOWDISK command performs automatic drive cleanup (without showing GUI), and after the end it displays information about the actions performed and available free space.
Using the /sageset:xx and /sagerun:xx options, you can create and run a customized set of cleanup options.
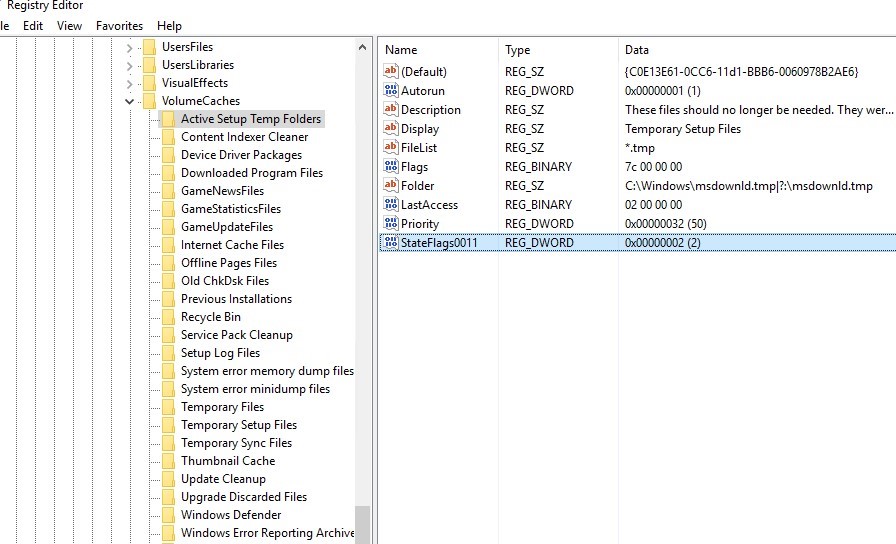
For example, run the command: cleanmgr /sageset: 11 . In the window that opens, select the components and files that you want to automatically cleanup (I selected all the options).
These settings are saved to the registry key HKEY_LOCAL_MACHINE\SOFTWARE\Microsoft\Windows\CurrentVersion\Explorer\VolumeCaches. This registry section lists all the Windows components that can be cleaned using the Disk Cleanup tool. For each option you select, a DWORD parameter is created with the name StateFlags0011 ( 0011 is the number you specified in the sageset parameter).
To start the drive cleanup task with the selected parameters, run the command:
If you need to configure automatic disk cleanup task on computers (or servers) in an Active Directory domain, you just need to export this registry key and deploy it on computers through the GPO.
To automatically cleanup the system drive on workstations with Windows 10, you can create a simple scheduled task with the following PowerShell code:
Start-Process -FilePath CleanMgr.exe -ArgumentList ‘/sagerun:11’ -WindowStyle Hidden -Wait
How to Enable Disk Cleanup on Windows Server 2012 R2/2008 R2 without Installing Desktop Experience?
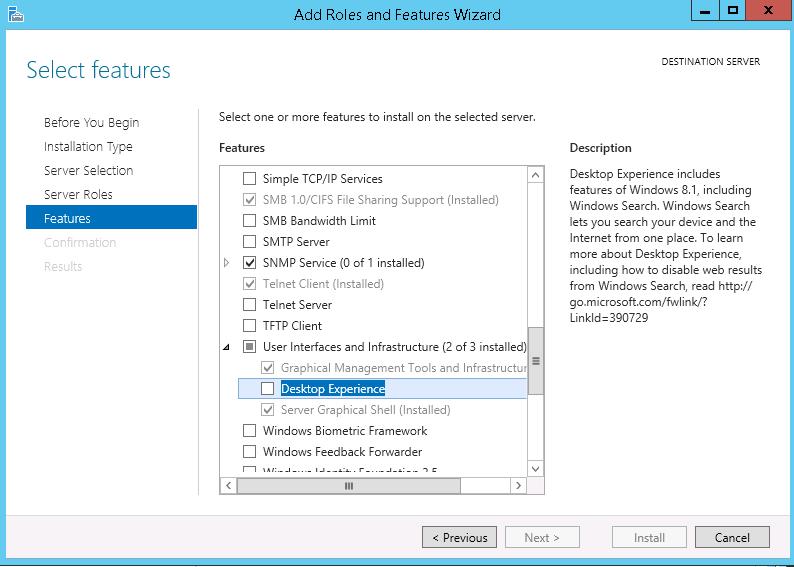
By default, in Windows Server 2012/R2 and 2008/R2 the Disk Cleanup (cleanmgr.exe) tool is not installed by default. To use the cleanmgr utility, first you have to install a separate server Desktop Experience feature using either Server Manager or PowerShell ( Install-WindowsFeature Desktop-Experience ).
Together with Desktop Experience, many other unnecessary components are installed on the server:
- Windows Media Player;
- Desktop themes;
- AVI support for Windows;
- Windows SideShow;
- Windows Defender Antivirus;
- Disk Cleanup;
- Sync Center;
- Audio recording;
- Character Map;
- Snipping Tool.
To run the Disk Cleanup on Windows Server, you can use a simple method: just copy two files Cleanmgr.exe and Cleanmgr.exe.mui from WinSxS to the system32 directory. Below you can see commands to copy cleanmgr files in different Windows versions (in all cases, the path is used for Windows Server English language editions).
| OS version | Command to copy cleanmgr bin files |
| Windows Server 2008 R2 x64 | copy C:\Windows\winsxs\amd64_microsoft-windows-cleanmgr_31bf3856ad364e35_6.1.7600.16385_none_c9392808773cd7da\cleanmgr.exe C:\Windows\System32\ copy C:\Windows\winsxs\amd64_microsoft-windows-cleanmgr.resources_31bf3856ad364e35_6.1.7600.16385_en-us_b9cb6194b257cc63\cleanmgr.exe.mui C:\Windows\System32\en-US\ |
| Windows Server 2008 x64 | copy C:\Windows\winsxs\amd64_microsoft-windows-cleanmgr_31bf3856ad364e35_6.0.6001.18000_none_c962d1e515e94269\cleanmgr.exe C:\Windows\System32\ copy C:\Windows\winsxs\amd64_microsoft-windows-cleanmgr.resources_31bf3856ad364e35_6.0.6001.18000_en-us_b9f50b71510436f2\cleanmgr.exe.mui C:\Windows\System32\en-US\ |
| Windows Server 2012 x64 | copy C:\Windows\WinSxS\amd64_microsoft-windows-cleanmgr_31bf3856ad364e35_6.2.9200.16384_none_c60dddc5e750072a\cleanmgr.exe C:\Windows\System32\ copy C:\Windows\WinSxS\amd64_microsoft-windows-cleanmgr.resources_31bf3856ad364e35_6.2.9200.16384_en-us_b6a01752226afbb3\cleanmgr.exe.mui C:\Windows\System32\en-US\ |
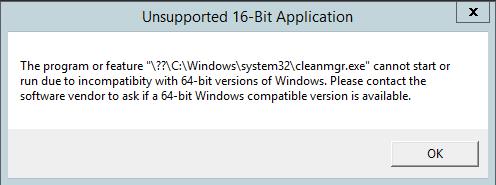
Windows Server 2012 R2 x64
The trick described above doesn’t work on Windows Server 2012 R2 due to the changes made by KB2821895 update. The matter is that after you install this update, compression is used to store the binary component files. When you trying to run the copied cleanmgr.exe, the following error appears:
As a workaround, you can use this method:
- Install Desktop Experience feature using PowerShell: Install-WindowsFeature Desktop-Experience
- Restart your server;
- Copy the files %windir%\system32\cleanmgr.exe and %windir%\system32\en-US\cleanmgr.exe.mui to any directory (c:\temp);
- Uninstall the feature: Uninstall-WindowsFeature Desktop-Experience
- Reboot;
- Copy the files cleanmgr.exe and cleanmgr.exe.mui to the directories mentioned above.
Later both of the files can be copied to other servers or integrated into your Windows Server 2012 R2 virtual machine template.
To start the Disk Cleanup tool, run the cleanmgr.exe command with the administrator privileges. 
Использование очистки диска на Windows Server Using Disk Cleanup on Windows Server
Применяется к: Windows Server 2019, Windows Server 2016, Windows Server 2016 R2, Windows Server 2012, Windows Server 2012 R2 Applies to: Windows Server 2019, Windows Server 2016, Windows Server 2012 R2, Windows Server 2012, Windows Server 2008 R2
Средство очистки диска удаляет ненужные файлы в среде Windows Server. The Disk Cleanup tool clears unnecessary files in a Windows Server environment. Это средство доступно по умолчанию в Windows Server 2019 и Windows Server 2016, но в более ранних версиях Windows Server могут потребоваться дополнительные действия вручную для его включения. This tool is available by default on Windows Server 2019 and Windows Server 2016, but you might have to take a few manual steps to enable it on earlier versions of Windows Server.
Чтобы запустить средство очистки диска, выполните команду cleanmgr.exe или последовательно выберите Пуск, Средства администрирования Windows, Очистка диска. To start the Disk Cleanup tool, either run the Cleanmgr.exe command, or select Start, select Windows Administrative Tools, and then select Disk Cleanup.
Кроме того, средство очистки диска можно запустить командой Windows cleanmgr, указав в параметрах командной строки параметры для удаления определенных файлов. You can also run Disk Cleanup by using the cleanmgr Windows command and use command-line options to specify that Disk Cleanup cleans up certain files.
Если вы просто хотите освободить место на диске, рассмотрите возможность использования Синхронизации файлов Azure с включенным распределением по уровням облака. If you’re just looking to free up disk space, consider using Azure File Sync with cloud tiering enabled. Благодаря этому вы сможете кэшировать часто используемые файлы локально и распределять редко используемые файлы по уровням облака, сохраняя пространство в локальном хранилище и поддерживая производительность. This allows you to cache your most frequently accessed files locally and tier your least frequently accessed files to the cloud, saving local storage space while maintaining performance. Дополнительные сведения см. в статье Планирование развертывания Синхронизации файлов Azure. For details, see Planning for an Azure File Sync deployment.
Включение очистки диска в более ранней версии Windows Server с помощью установки возможности рабочего стола Enable Disk Cleanup on an earlier version of Windows Server by installing the Desktop Experience
Выполните описанные ниже действия, чтобы использовать мастер добавления ролей и компонентов для установки возможностей рабочего стола на сервере под управлением Windows Server 2012 R2 или более ранней версии, в составе которых устанавливается и средство очистки диска. Follow these steps to use the Add Roles and Features Wizard to install the Desktop Experience on a server running Windows Server 2012 R2 or earlier, which also installs Disk Cleanup.
Если диспетчер серверов уже открыт, переходите к следующему шагу. If Server Manager is already open, go on to the next step. Если диспетчер серверов еще не открыт, откройте его одним из следующих способов. If Server Manager is not already open, open it by doing one of the following.
На рабочем столе Windows запустите диспетчер серверов, щелкнув Диспетчер серверов на панели задач Windows. On the Windows desktop, start Server Manager by clicking Server Manager in the Windows taskbar.
Откройте Начальный экран и щелкните плитку «Диспетчер сервера». Go to Start and select the Server Manager tile.
В меню Управление выберите добавление ролей и компонентов. On the Manage menu, select add Roles and Features.
На странице Прежде чем приступить к работе проверьте готовность конечного сервера и сетевого окружения к установке нужного компонента. On the Before you begin page, verify that your destination server and network environment are prepared for the feature that you want to install. Выберите Далее. Select Next.
На странице Выбор типа установки выберите Установка ролей или компонентов, чтобы установить все компоненты для отдельного сервера. On the Select installation type page, select Role-based or feature-based installation to install all parts features on a single server. Выберите Далее. Select Next.
На странице Выбор целевого сервера выберите сервер из пула серверов или автономный виртуальный жесткий диск. On the Select destination server page, select a server from the server pool, or select an offline VHD. Выберите Далее. Select Next.
На странице Выбор ролей сервера щелкните Далее. On the Select server roles page, select Next.
На странице Выбор компонентов выберите элемент Пользовательский интерфейс и инфраструктура, а затем — Возможности рабочего стола. On the Select features page, select User Interface and Infrastructure, and then select Desktop Experience.
В диалоговом окне Добавление компонентов, необходимых для возможностей рабочего стола щелкните элемент Добавить компоненты. In Add features that are required for Desktop Experience?, select Add Features.
Продолжите установку, затем перезагрузите систему. Proceed with the installation, and then reboot the system.
Убедитесь, что в диалоговом окне «Свойства» появилась кнопка Очистка диска. Verify that the Disk Cleanup option button appears in the Properties dialog box.

Добавление средства очистки диска вручную на более ранних версиях Windows Server Manually add Disk Cleanup to an earlier version of Windows Server
Средство очистки диска (Cleanmgr.exe) отсутствует в Windows Server 2012 R2 и более ранних версиях, если не установлен дополнительный компонент «Возможности рабочего стола». The Disk Cleanup tool (cleanmgr.exe) isn’t present on Windows Server 2012 R2 or earlier unless you have the Desktop Experience feature installed.
Чтобы использовать программу cleanmgr.exe, установите возможности рабочего стола, как описано выше, или скопируйте два файла cleanmgr.exe и cleanmgr.exe.mui, которые уже имеются на сервере. To use cleanmgr.exe, install the Desktop Experience as described earlier, or copy two files that are already present on the server, cleanmgr.exe and cleanmgr.exe.mui. С помощью следующей таблицы выберите нужные файлы для используемой операционной системы. Use the following table to locate the files for your operating system.
| Операционная система Operating System | Архитектура Architecture | Расположение файла File Location |
|---|---|---|
| Windows Server 2008 R2 Windows Server 2008 R2 | 64-разрядная 64-bit | C:\Windows\winsxs\amd64_microsoft-windows-cleanmgr_31bf3856ad364e35_6.1.7600.16385_none_c9392808773cd7da\cleanmgr.exe C:\Windows\winsxs\amd64_microsoft-windows-cleanmgr_31bf3856ad364e35_6.1.7600.16385_none_c9392808773cd7da\cleanmgr.exe |
| Windows Server 2008 R2 Windows Server 2008 R2 | 64-разрядная 64-bit | C:\Windows\winsxs\amd64_microsoft-windows-cleanmgr.resources_31bf3856ad364e35_6.1.7600.16385_en-us_b9cb6194b257cc63\cleanmgr.exe.mui C:\Windows\winsxs\amd64_microsoft-windows-cleanmgr.resources_31bf3856ad364e35_6.1.7600.16385_en-us_b9cb6194b257cc63\cleanmgr.exe.mui |
Найдите файл cleanmgr.exe и переместите его в папку %systemroot%\System32. Locate cleanmgr.exe and move the file to %systemroot%\System32.
Найдите файл cleanmgr.exe.mui и переместите его в папку %systemroot%\System32\en-US. Locate cleanmgr.exe.mui and move the files to %systemroot%\System32\en-US.
Теперь вы можете запустить средство очистки диска, выполнив команду Cleanmgr.exe из командной строки, или открыв начальный экран и набрав строку Cleanmgr на панели поиска. You can now launch the Disk cleanup tool by running Cleanmgr.exe from Command Prompt, or by clicking Start and typing Cleanmgr into the search bar.
Чтобы в диалоговом окне «Свойства» для диска появилась кнопка «Очистка диска», необходимо установить компонент «Возможности рабочего стола». To have Disk Cleanup button appear on a disk’s Properties dialog, you will also need to install the Desktop Experience feature.


