- Disk Diag 4+
- Rocky Sand Studio Ltd.
- Screenshots
- Description
- What’s New
- Ratings and Reviews
- Out of sight, out of mind, so out with it!
- Developer Response ,
- SIMPLE, NO MUSS, NO FUSS, WORKS GREAT
- Almost Flawless
- Developer Response ,
- App Privacy
- No Details Provided
- Disk Diag 4+
- Rocky Sand Studio Ltd.
- Screenshots
- Description
- What’s New
- Ratings and Reviews
- Brilliant app, plus half the price.
- Developer Response ,
- Easy Peasy
- Does what it says on the can..just what I wanted.
- App Privacy
- No Details Provided
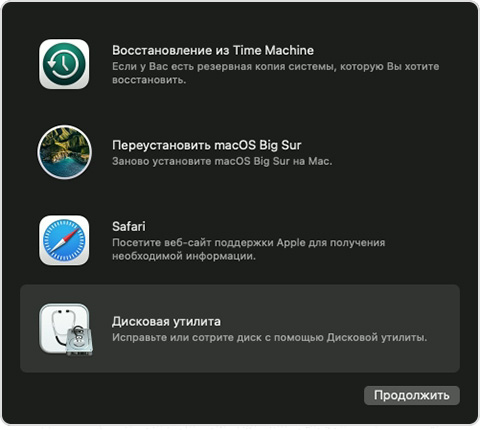
- Восстановление диска компьютера Mac с помощью приложения «Дисковая утилита»
- Запустите приложение «Дисковая утилита»
- Выберите нужный диск в приложении «Дисковая утилита»
- Восстанавливайте сначала тома, затем контейнеры, затем диски
- Если приложение «Дисковая утилита» обнаружило ошибки, которые не может исправить
- Если диск не отображается в приложении «Дисковая утилита»
- Blackmagic Disk Speed Test 4+
- Blackmagic Design Inc
- Screenshots
- Description
- What’s New
- Ratings and Reviews
- Almost Perfect, Great Price
- Blackmagic is now faster enough to rate internal SSD speeds, even the Startup Disk
- Nice FREE Utility
- App Privacy
- No Details Provided
Disk Diag 4+
Rocky Sand Studio Ltd.
Screenshots
![]()
Description
Disk Diag helps you to quickly find out how much disk space is used in your home folder by
— Application Caches and Logs
— Downloads and Mail Downloads folder
— Items in your Trash
— Browser Data for selected browsers
— Large files
— Application Leftovers
— iOS Software Updates
— Xcode generated files (for developers)
For your convenience you can select such predefined groups and delete all their content with a click.
We’d like to know how to improve Disk Diag, contact us at Rocky Sand Studio http://www.rockysandstudio.com
What’s New
[added] New module to remove unnecessary iOS software updates
[added] New module for developers to remove Xcode generated files (archives, derived data, etc.)
Ratings and Reviews
Out of sight, out of mind, so out with it!
I tend to go with the out of sight out of mind approach when it comes to files on my computer. If I haven’t touched it or thought about it for long enough that I’ve forgotten it’s there, chances are it’s not important enough to keep, and those are exactly the files that Disck Diag digs out of the netherworld. Mind you, it’s best to double check exactly what the app has signed up for the chopping block, but for the most part, the biggest things weighing down my Macbook Pro mid-2012 were useless email files and caches. Before using Disk Diag, I had a measly 28 G left of my 750 G hard drive. One click and maybe 5 minutes of waiting later, 4 years worth of useless junk was wiped away, and my free storage jumped up to around 260 G. A simple and efficient way to do a little (or a lot) of spring cleaning. Very happy that I bought this app.
Developer Response ,
Thank you so much for your praise and detailed feedback! It feels great to us and thanks for sharing your experiences with others.
SIMPLE, NO MUSS, NO FUSS, WORKS GREAT
Using any tool like Disk Diag involves a certain level of trust in what the program does and how it does it. You have turned your computer over to an unknown enitty, and then must hope/pray it does what it is supposed to do, does it well, without any ‘funny business’. I’ve used Disk Diag on and off for a long time, it seems to be simple to use and effective in getting rid of ‘stuff’.
At this point, I trust it to work as advertised, and it seems to do that very well. As I say, no muss, fuss or bother. It is simply another tool to help keep my computers happy and healthy. And these days, that is no mean feat.
Almost Flawless
Don’t get me wrong, I love this application. It is super useful and I can really tell a difference after cleaning up space on my hard drive. I wish I could give this a 5-Star review, but there is only one problem with this. Every time I clean my hard drive, it deletes the iCloud Drive caches on my computer, therefore not allowing me to sync my documents to iCloud until I turn off iCloud Drive and restart my computer. I know one solution would be to just turn off deleting caches on my computer, but that is where most of my hard drive space is wasted. If there was any way to select specific files I wanted to delete, or make a way to not delete important application caches, I would absolutely change my review. Other than that, it works perfectly!
Developer Response ,
Thanks a lot for your detailed feedback. We’ve added the issue to our todo list!
App Privacy
The developer, Rocky Sand Studio Ltd. , has not provided details about its privacy practices and handling of data to Apple. For more information, see the developer’s privacy policy.
No Details Provided
The developer will be required to provide privacy details when they submit their next app update.
Источник
Disk Diag 4+
Rocky Sand Studio Ltd.
Screenshots
![]()
Description
Disk Diag helps you to quickly find out how much disk space is used in your home folder by
— Application Caches and Logs
— Downloads and Mail Downloads folder
— Items in your Trash
— Browser Data for selected browsers
— Large files
— Application Leftovers
— iOS Software Updates
— Xcode generated files (for developers)
For your convenience you can select such predefined groups and delete all their content with a click.
We’d like to know how to improve Disk Diag, contact us at Rocky Sand Studio http://www.rockysandstudio.com
What’s New
[added] New module to remove unnecessary iOS software updates
[added] New module for developers to remove Xcode generated files (archives, derived data, etc.)
Ratings and Reviews
Brilliant app, plus half the price.
This is a brilliant app, and im glad to have it at half price. Its good to have apps like this to clean or make your Apple laptops and your desktop IMacs run faster and last longer, by getting rid of unwanted or temporary files on your device. I be using this more often now, like when i use to use ccleaner, which i sometimes do.. I would recommend getting this app, plus get it now coz its half the pice too..
Developer Response ,
Thank you so much for your praise and detailed feedback! It feels great to us and thanks for sharing your experiences with others.
Easy Peasy
I’m not great with technology but this seems so simple and a breeze to use. Compared to other apps that seemed to offer similar things, the price was a bargain for me to try out and so far so good. Perhaps if I understood technology better, I would be able to give a fairer more detailed review, but as it stands, this does what I want it to do and I am very happy.
Does what it says on the can..just what I wanted.
It doesnt get much easier than this. Point to home drive, see how much space it can reclaim, hit the button and voila, reclaimed space.
Just what I needed for my Mac pro with a tiny boot drive.. not all apps respect symbolic links and I still get data building up on the drive.
App Privacy
The developer, Rocky Sand Studio Ltd. , has not provided details about its privacy practices and handling of data to Apple. For more information, see the developer’s privacy policy.
No Details Provided
The developer will be required to provide privacy details when they submit their next app update.
Источник
Восстановление диска компьютера Mac с помощью приложения «Дисковая утилита»
Использование функции «Первая помощь» в приложении «Дисковая утилита» для восстановления диска.
Приложение «Дисковая утилита» может находить и исправлять ошибки, связанные с форматированием и структурой каталогов диска компьютера Mac. Ошибки могут приводить к неожиданному поведению при работе с компьютером Mac, а существенные ошибки могут препятствовать загрузке компьютера Mac.
Прежде чем продолжить, убедитесь, что у вас есть актуальная резервная копия содержимого компьютера Mac на случай, если потребуется восстановить поврежденные файлы или приложение «Дисковая утилита» обнаружит ошибки, которые не может исправить.
Запустите приложение «Дисковая утилита»
Как правило, вы можете просто запустить приложение «Дисковая утилита» из подпапки «Утилиты» папки «Программы». Если компьютер Mac не запускается надлежащим образом или требуется восстановить загрузочный диск компьютера Mac, запустите приложение «Дисковая утилита» из раздела восстановления macOS:
- Убедитесь в том, что используете компьютер Mac с процессором Apple, а затем выполните следующие действия:
- Компьютер с процессором Apple: включите Mac и продолжайте удерживать нажатой кнопку питания пока на экране не появится окно с параметрами запуска. Щелкните по значку в виде шестеренки (меню «Параметры»), затем нажмите «Продолжить».
- Компьютер с процессором Intel: сразу после включения компьютера Mac нажмите и удерживайте клавиши Command (⌘) и R, пока на экране не появится логотип Apple или другое изображение.
- Возможно, вам потребуется выбрать пользователя, для которого вы знаете пароль. Выбрав пользователя, нажмите «Далее» и введите пароль администратора.
- В окне «Утилиты» в режиме восстановления macOS выберите «Дисковая утилита» и нажмите «Продолжить».

Выберите нужный диск в приложении «Дисковая утилита»
Выберите «Вид» > «Показывать все устройства» (если такая команда доступна) в строке меню или на панели инструментов приложения «Дисковая утилита».
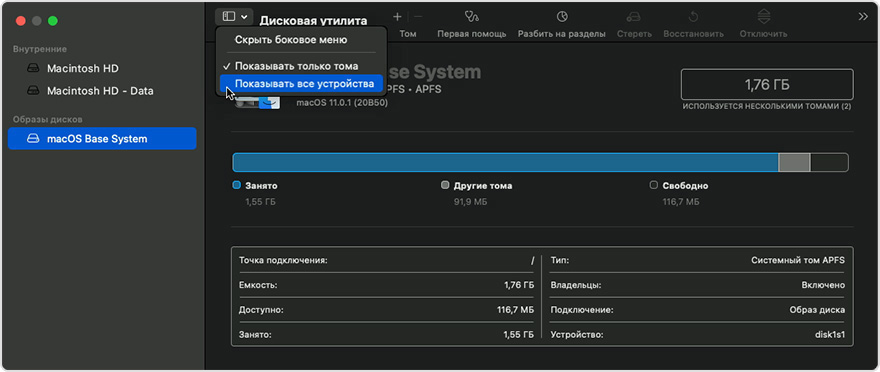
Теперь на боковой панели приложения «Дисковая утилита» должны отображаться все доступные диски или другие устройства хранения, начиная с загрузочного диска. Под каждым диском представлены все контейнеры и тома на этом диске. Не видите нужный диск?

В этом примере на загрузочном диске (APPLE HDD) имеется один контейнер и два тома (Macintosh HD, Macintosh HD — Data). На вашем диске может не быть контейнера, количество томов также может отличаться.
Восстанавливайте сначала тома, затем контейнеры, затем диски
Для каждого диска, для которого требуется выполнить восстановление, выберите последний том на этом диске и нажмите кнопку или вкладку «Первая помощь» .
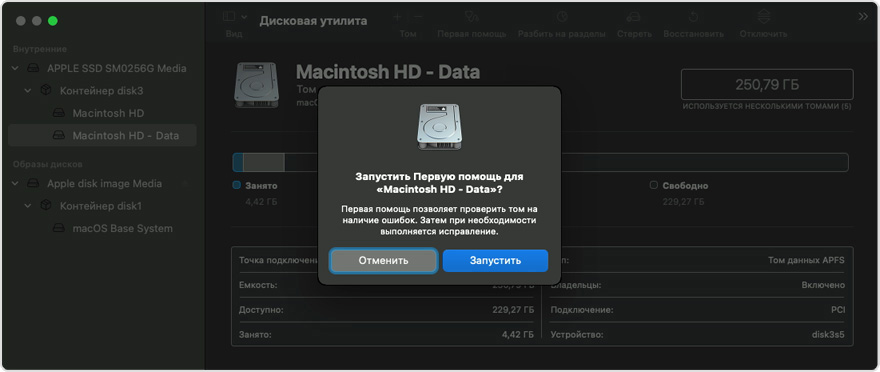
В этом примере имя последнего тома на диске — Macintosh HD — Data.
Нажмите «Запустить», чтобы начать проверку выбранного тома на наличие ошибок.
- Если кнопка «Запустить» отсутствует, нажмите кнопку «Восстановить диск».
- Если кнопка неактивна и вы не можете ее нажать, пропустите данный шаг для выбранного диска, контейнера или тома.
- Если предложено ввести пароль для разблокировки диска, введите пароль администратора.
После того как приложение «Дисковая утилита» закончит проверку тома, выберите следующий элемент над ним на боковой панели, затем снова запустите функцию «Первая помощь». Продолжайте двигаться вверх по списку, запуская функцию «Первая помощь» для всех томов на диске, затем для всех контейнеров на диске и, наконец, для самого диска.
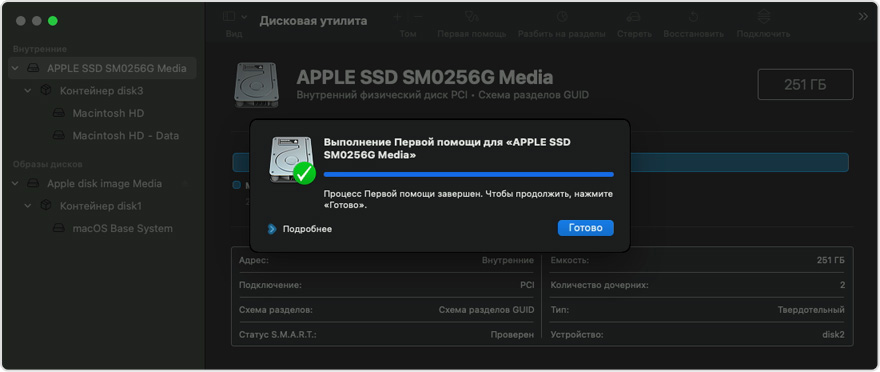
В этом примере порядок восстановления будет следующим: Macintosh HD — Data, Macintosh HD, Container disk3 и APPLE HDD.
Если приложение «Дисковая утилита» обнаружило ошибки, которые не может исправить
Если приложение «Дисковая утилита» обнаружит ошибки, которые не может исправить, сотрите (отформатируйте) диск с помощью приложения «Дисковая утилита».
Если диск не отображается в приложении «Дисковая утилита»
Если приложение «Дисковая утилита» не может обнаружить диск, оно также не сможет обнаружить контейнеры или тома на этом диске. В этом случае выполните следующие действия:
- Выключите компьютер Mac, а затем отсоедините от него все вспомогательные устройства.
- При попытке восстановления внешнего диска убедитесь, что он подключен непосредственно к компьютеру Mac с помощью предположительно исправного кабеля. Выключите диск и включите его снова.
- Если диск по-прежнему не отображается в приложении «Дисковая утилита», возможно, ваш компьютер Mac нуждается в обслуживании. Если вам требуется помощь, обратитесь в службу поддержки Apple.
Источник
Blackmagic Disk Speed Test 4+
Blackmagic Design Inc
Screenshots
![]()
Description
Disk Speed Test is an easy to use tool to quickly measure and certify your disk performance for working with high quality video! Simply click the start button and Disk Speed Test will write test your disk using large blocks of data, and then display the result. Disk Speed Test will continue to test writes and reads from your disk so you can evaluate both performance and readability over time.
What’s New
Add support for M1 powered Macs.
Ratings and Reviews
Almost Perfect, Great Price
Disk Speed Test is a very useful product and one cannot complain about the price point.
However, a few enhancements would make this program truly wonderful.
Ability to Specify Number of Runs
Instead of just running forever, it would be nice to be able to specify that Disk Speed Test is to run some user specified number of times.
Ability to specify the pause period between runs
At the default values, it is hard to stop the program after it has totally finished one test, and before it has started another. It would be nice to be able to specify a pause between runs.
Log File
It would be nice if Disk Speed Test had an option to save a log file with the test results for each run. Something that one could import into Excel or some other spreadsheet would be idea.
Command Line Run
The ability to run Disk Speed Test from the command line would allow for automation. And also for remote collection of such data by admins, who could use this feature with ARD or other secure command line login.
Blackmagic is now faster enough to rate internal SSD speeds, even the Startup Disk
Blackmagic has been updated to adequately report the speed of SSD devices.
When Blackmagic tries to read the Startup Disk, you get the message that the device is not writeable, hence you cannot rate the the transfer rates of the drive.
I found a workaround that will report the rates of the Startup Disk. Its quite simple. Create a disk image (.dmg) using the disk utility specifying file->new image->blank image. Make it big enough for Blackmagic to work with (7+ GB) and name it what you will. Mount the volume (if it is not already mounted).
In Blackmagic select the disk image mounted. Since the “volume” is on your Startup Disk, you will see how fast it drive is. On my 2016 MacBook Pro, I am seeing speeds like 1,000+ MB/s write, and 1100+ MB/S read. I have tried this on my older mackbooks with SSD and they do scale down as the device is older. On an older MacBook Pro the rates I see are 500 MB/S both read and write, as you would expect.
I have run Blackmagic on USB 2, thumb drives, USB 3, and USB C devices to see if I’m getting my money’s worth. You can easily detect when a device is performing subpar and, and with the spinning disk, you can see is transfer speeds deteriorates over time.
Nice FREE Utility
I use this often and appreciate it. The update (3.1) seems to provide much more stable speed readings than the 2.x version I’ve been using (where the guage is all over the map). One issue I have is that it seems to have issues with NTFS formatted drives. I’m using Paragon’s NTFS for Mac, and BMDST writes to it well (430 to my SSD) but on the read test it often (though not always) fails with «Error reading the test file». Aside from this niche case it’s an awesome tool.
App Privacy
The developer, Blackmagic Design Inc , has not provided details about its privacy practices and handling of data to Apple. For more information, see the developer’s privacy policy.
No Details Provided
The developer will be required to provide privacy details when they submit their next app update.
Источник


