- Стирание данных на компьютере Mac c процессором Intel
- Перед стиранием данных на компьютере Mac
- Стирание данных с компьютера Mac с помощью приложения «Дисковая утилита»
- Если том Macintosh HD не отображается в приложении «Дисковая утилита»
- Дополнительная информация
- File system formats available in Disk Utility on Mac
- Apple File System (APFS)
- Mac OS Extended
- Windows-compatible formats
- Форматирование диска для компьютеров Windows в приложении «Дисковая утилита» на Mac
- Top 5 Disk Formatting Tool for Windows and Mac OS
- Top 5 Disk Formatting Tool for Windows/Mac
- How to Format USB Flash Drive to FAT32 on Mac without Data Loss
- How to Format a USB Flash Drive with Mac to FAT32
- Method 1. Format FAT32 on Mac [Disk Utility]
- To format the USB drive to FAT32, follow the next steps:
- Method 2. Format FAT32 on Mac [Terminal Command Line]
- To format FAT32 on Mac with Terminal, follow the next steps:
- Bonus Tip: How to Recover Data from Formatted USB
Стирание данных на компьютере Mac c процессором Intel
В этой статье описано, как стереть (отформатировать) встроенный загрузочный диск компьютера Mac с процессором Intel.
Перед стиранием данных на компьютере Mac
- Создайте резервную копию любых файлов, которые требуется сохранить. При стирании данных с компьютера Mac навсегда удаляются все файлы.
- Если вы планируете продать, передать или обменять компьютер Mac и хотите восстановить его заводские настройки, сначала узнайте, что нужно перед этим сделать. Затем сотрите данные с компьютера Mac в качестве последнего шага.
Стирание данных с компьютера Mac с помощью приложения «Дисковая утилита»
- Запустите компьютер Mac из раздела восстановления macOS: нажмите кнопку питания, затем сразу нажмите и удерживайте клавиши Command (⌘) и R, пока не появится логотип Apple или другое изображение.
- Если потребуется, выберите пользователя, пароль которого вы знаете, а затем введите его пароль администратора.
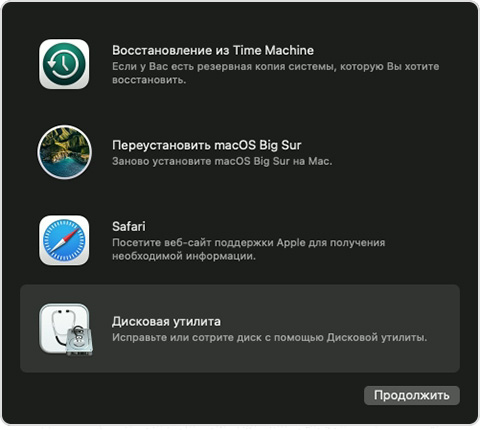
- В окне утилит выберите «Дисковая утилита» и нажмите «Продолжить».

- Выберите том Macintosh HD в боковом меню приложения «Дисковая утилита». Не видите том Macintosh HD?
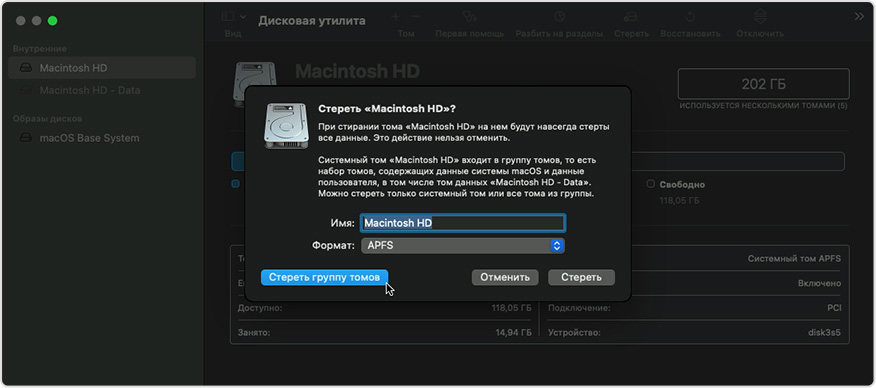
- Нажмите кнопку «Стереть» на панели инструментов, затем введите запрашиваемые данные:
- Имя: Macintosh HD
- Формат: APFS или Mac OS Extended (журналируемый) в соответствии с рекомендациями приложения «Дисковая утилита»
- Нажмите «Стереть группу томов». Если этой кнопки нет, нажмите кнопку «Стереть».
- Если потребуется, введите свой идентификатор Apple ID. Узнайте, что делать, если вы забыли свой идентификатор Apple ID.
- По завершении стирания выберите все остальные внутренние тома в боковом меню и удалите каждый из них с помощью кнопки удаления (–) на панели инструментов.
На этом этапе игнорируйте любые внутренние тома с названием Macintosh HD или Macintosh HD — Data, а также тома, указанные в разделах «Внешние» и «Образы дисков» в боковом меню. - Выйдите из приложения «Дисковая утилита» для возврата к окну утилит.
- Если требуется выполнить запуск с только что стертого диска, выберите «Переустановить macOS» в окне утилит, затем нажмите «Продолжить» и следуйте инструкциям на экране, чтобы переустановить macOS.
Если том Macintosh HD не отображается в приложении «Дисковая утилита»
Встроенный загрузочный диск должен быть первым элементом в боковом меню приложения «Дисковая утилита». Он называется Macintosh HD, если только вы не изменили его имя. Если в списке нет этого диска, перейдите в меню Apple > «Выключить», затем отсоедините все вспомогательные устройства от компьютера Mac и проверьте список еще раз.
Если диск по-прежнему не отображается в приложении «Дисковая утилита» или процесс стирания завершается сбоем, возможно, компьютеру Mac требуется обслуживание. Если вам необходима помощь, обратитесь в службу поддержки Apple.
Дополнительная информация
Дополнительную информацию об использовании приложения «Дисковая утилита» см. в руководстве пользователя Дисковой утилиты.
Источник
File system formats available in Disk Utility on Mac
Disk Utility on Mac supports several file system formats:
Apple File System (APFS): The file system used by macOS 10.13 or later.
Mac OS Extended: The file system used by macOS 10.12 or earlier.
MS-DOS (FAT) and ExFAT: File systems that are compatible with Windows.
Apple File System (APFS)
Apple File System (APFS), the default file system for Mac computers using macOS 10.13 or later, features strong encryption, space sharing, snapshots, fast directory sizing and improved file system fundamentals. While APFS is optimised for the Flash/SSD storage used in recent Mac computers, it can also be used with older systems with traditional hard disk drives (HDD) and external, direct-attached storage. macOS 10.13 or later supports APFS for both bootable and data volumes.
APFS allocates disk space within a container (partition) on demand. When a single APFS container has multiple volumes, the container’s free space is shared and automatically allocated to any of the individual volumes as needed. If desired, you can specify reserve and quota sizes for each volume. Each volume uses only part of the overall container, so the available space is the total size of the container, minus the size of all the volumes in the container.
Choose one of the following APFS formats for Mac computers using macOS 10.13 or later.
APFS: Uses the APFS format. Choose this option if you don’t need an encrypted or case-sensitive format.
APFS (Encrypted): Uses the APFS format and encrypts the volume.
APFS (Case-sensitive): Uses the APFS format and is case-sensitive to file and folder names. For example, folders named “Homework” and “HOMEWORK” are two different folders.
APFS (Case-sensitive, Encrypted): Uses the APFS format, is case-sensitive to file and folder names and encrypts the volume. For example, folders named “Homework” and “HOMEWORK” are two different folders.
You can easily add or delete volumes in APFS containers. Each volume within an APFS container can have its own APFS format — APFS, APFS (Encrypted), APFS (Case-sensitive) or APFS (Case-sensitive, Encrypted).
Mac OS Extended
Choose one of the following Mac OS Extended file system formats for compatibility with Mac computers using macOS 10.12 or earlier.
Mac OS Extended (Journaled): Uses the Mac format (Journaled HFS Plus) to protect the integrity of the hierarchical file system. Choose this option if you don’t need an encrypted or case-sensitive format.
Mac OS Extended (Journaled, Encrypted): Uses the Mac format, requires a password, and encrypts the partition.
Mac OS Extended (Case-sensitive, Journaled): Uses the Mac format and is case-sensitive to folder names. For example, folders named “Homework” and “HOMEWORK” are two different folders.
Mac OS Extended (Case-sensitive, Journaled, Encrypted): Uses the Mac format, is case-sensitive to folder names, requires a password, and encrypts the partition.
Windows-compatible formats
Choose one of the following Windows-compatible file system formats if you are formatting a disk to use with Windows.
MS-DOS (FAT): Use for Windows volumes that are 32GB or less.
ExFAT: Use for Windows volumes that are over 32GB.
Источник
Форматирование диска для компьютеров Windows в приложении «Дисковая утилита» на Mac
С помощью Дисковой утилиты можно отформатировать внешний диск таким образом, чтобы он поддерживался как компьютерами на базе Microsoft Windows, так и компьютерами Mac. Это может потребоваться, например, если у Вас есть флеш-накопитель для хранения файлов данных, которые Вам нужно использовать на компьютере Mac дома и на компьютере Windows в школе или библиотеке.
ПРЕДУПРЕЖДЕНИЕ. При форматировании с диска или из тома стираются все файлы. Перед форматированием сохраните все нужные файлы в другом томе.
В приложении «Дисковая утилита»  на компьютере Mac выберите пункт меню «Вид» > «Показать все устройства».
Если Дисковая утилита еще не открыта, нажмите значок Launchpad  в панели Dock, введите «Дисковая утилита» в поле поиска, затем нажмите значок Дисковой утилиты .
В боковом меню выберите диск, который нужно отформатировать для использования с компьютерами Windows.
Нажмите кнопку «Стереть»  на панели инструментов.
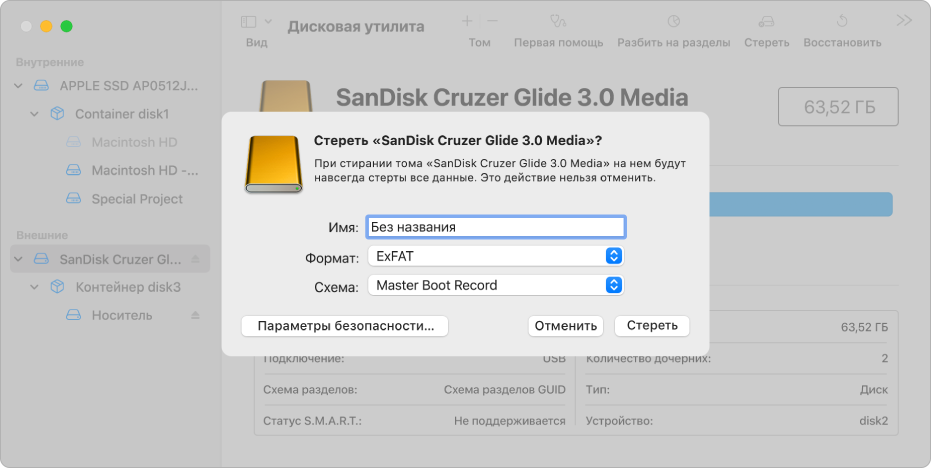
В диалоговом окне «Стереть» нажмите всплывающее меню «Схема», затем выберите схему разделов.
Нажмите всплывающее меню «Формат», затем выберите один из следующих вариантов.
MS-DOS (FAT). Выбирайте этот формат для дисков размером 32 ГБ или меньше.
ExFAT. Выбирайте этот формат для дисков размером более 32 ГБ.
Введите имя тома.
Максимальная длина имени тома составляет одиннадцать символов.
Источник
Top 5 Disk Formatting Tool for Windows and Mac OS

updated on 2017-12-06 to Data Erasure
If you want to format a hard drive or USB flash drive on your computer, disk formatting tool is the best choice. In this article, we will introduce 5 disk formatting tools for Windows and Mac to help you securely format hard drive/USB flash drive or memory card on a PC or a Mac. Just read on.
Top 5 Disk Formatting Tool for Windows/Mac
When you format a hard drive, you may worry about two things: 1. whether the formatting process takes very long time to complete; 2 whether the formatting operation would cause damage or shorten the service life of the hard drive. Don’t worry, the top 5 disk formatting tools below are 100% safe disk formatting tool for Windows or Mac OS. They will efficiently format hard drive or external device under Windows or Mac OS. And they will never cause any damage to your hard drive or shorten the service life of the hard drive/SSD/USB flash drive, etc.
No.1 disk formatting tool for Windows and Mac – Built-in Formatting tool
Both Windows and Mac OS offer built-in disk formatting tool. For Windows, it offers quick format feature when you right-click the hard drive on the computer. If you are using a Mac, you can run the built-in Disk Utility to quickly format a hard drive or external hard drive under Mac OS. However, the formatted data can be recovered by data recovery software.
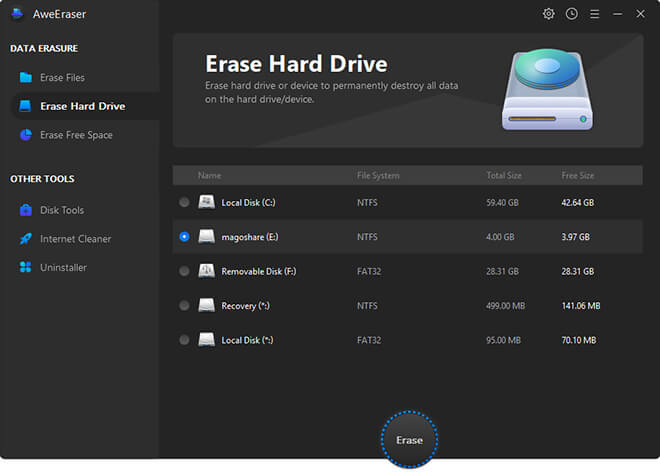
No.2 disk formatting tool for Windows and Mac – AweEraser
AweEraser is a secure data eraser. It can help you format a hard drive and permanently erase all data on the hard drive, beyond the scope of data recovery. Two versions are available: AweEraser for Windows, AweEraser for Mac. Just free download it here:
If you are going to sell/donate or recycle your hard drive/storage media device, you can run AweEraser on a PC or Mac. Then use this tool «Erase Hard Drive» to format and erase the hard drive/storage media. Once the hard drive is formatted by AweEraser, the data is permanently lost, can’t be recovered by data recovery software.
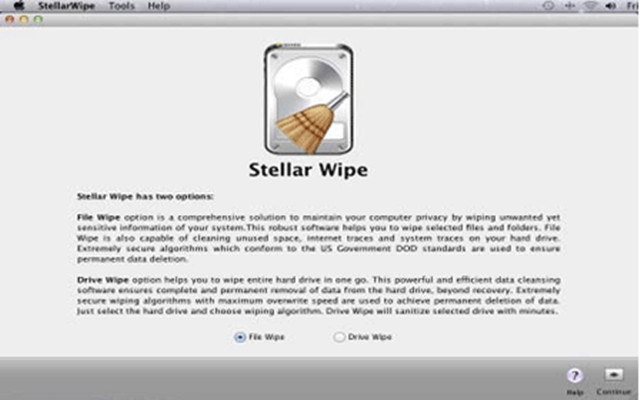
No.3 disk formatting tool for Windows and Mac – Stellar Disk Wipe
This tool can help in formatting hard drive, USB flash drive, memory card and other storage media under Windows or Mac OS. This hard disk formatting software can help you format/wipe your entire hard drive in a single step. The software includes powerful as well as fast wiping algorithms that erase unwanted data from the hard drive permanently.
No.4 disk formatting tool for Windows and Mac – Super Eraser
Super Eraser is another data eraser for Windows/Mac. It also can help you format the hard drive and permanently erase data from the formatted hard drive. It also can selectively erase data from a hard drive or external device.

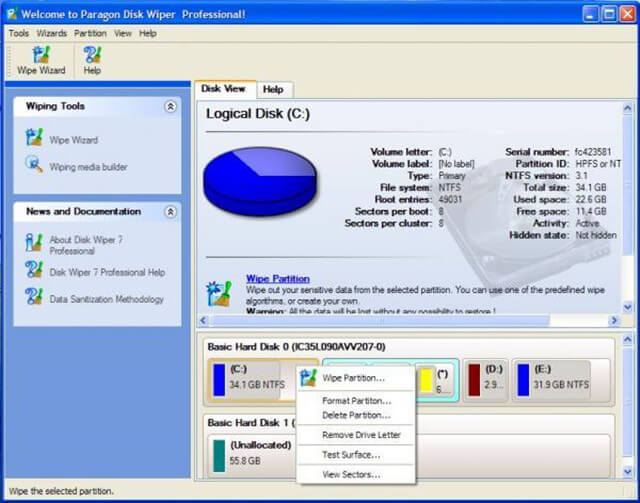
No.5 disk formatting tool for Windows and Mac – Paragon Disk Wiper
Paragon Disk Wipe allows you to create a bootable USB-flash drive or external hard drive that will help you to completely erase a whole hard disk, a separate partition or just clean free space. It is the reliable disk formatting tool for Windows/Mac. After formatting, the data will be permanently lost.
The top 5 disk formatting tools for Windows and Mac can help you securely format hard drive or external device under Windows/Mac OS. AweEraser is the outstanding one among the 5 disk formatting tools. It will securely format the hard drive and permanently erase the data. Then your hard drive is able to donated, resold, lent, or abandoned.
Источник
How to Format USB Flash Drive to FAT32 on Mac without Data Loss
For Apple Mac users, there are two ways to format USB flash drive to FAT32, including Disk Utility and Terminal command line. Refer to detailed steps of using both tools for FAT32 format. Formatting would erase data completely, make sure that you have a data backup. Otherwise, you can use data recovery software to recover data from a formatted USB drive.
Table of Contents
About the Author
Reviews and Awards
Are you looking for a secure way to format USBВ to FAT32 on Mac? You are at the right place. Follow here, you can find two methods that will assist you in doing so on your storage device. And if you lost data during the formatting, reliable Mac file recovery software is ready to help anytime:
| Workable Solutions | Step-by-step Troubleshooting |
|---|---|
| Method 1. Use Disk Utility | Connect USB to Mac > Go to Applications > Utilities > Disk Utility > Select USB and click «Erase». Full steps |
| Method 2. Use Terminal Command | Connect USB to Mac > Hit cmd + spaceВ keys > Type terminal and hit Enter. Full steps |
| Bonus Tip. Recover Formatted Data | If you lost data due to formatting, run EaseUS file recovery software > Scan and recover formatted data. Full steps |
How to Format a USB Flash Drive with Mac to FAT32
Computer users who use a USB might have the demand for formatting it to the FAT32 file system. Compare with the other commonly used NTFS file system on a flash drive, FAT32 has a compatibility advantage across many operating systems.
It’s a universal format that is compatible with Mac OS X/macOS, Windows, Linux, and DOS systems. So, if users anticipate using the flash drive with more than one operating system, they will definitely benefit from the FAT32 file system.В For Apple Mac users, there are two ways to format a USB flash drive to FAT32, namely Disk Utility and Terminal command line. Below are the detailed steps of the FAT32 format with both methods.
Method 1. Format FAT32 on Mac [Disk Utility]
To format USB to FAT32 with Disk Utility will erase all data on the flash drive, so before you doing so, please do remember to check whether you have saved useful data to another secure device in advance.
To format the USB drive to FAT32, follow the next steps:
Step 1. Connect the USB flash drive to your Mac computer.
Step 2. Go to Applications > Utilities > Double click and open Disk Utility.
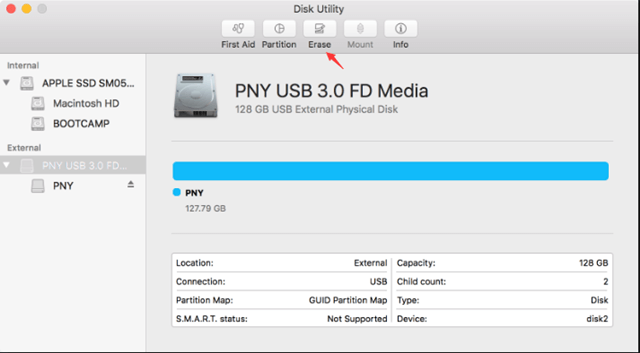
Step 3. Select your USB flash drive on the sidebar, choose Erase.
Step 4. Rename the USB flash drive (optional).
Step 5. Choose the format as MS-DOS (FAT) for Format, Master Boot Record for Scheme. Then click Erase.
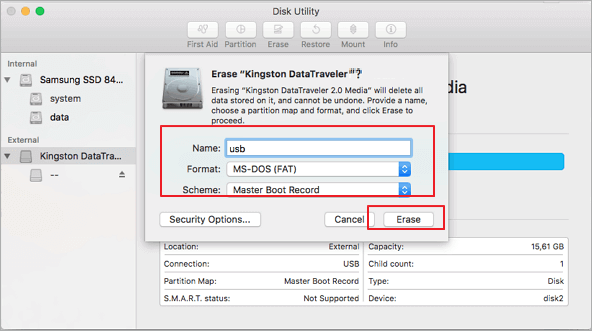
Wait for the process to complete, then you’ll get an empty new USB flash drive with FAT32 as the file system. You can use it for saving data again.
Method 2. Format FAT32 on Mac [Terminal Command Line]
The command-line behavior does the same way to erase data with the Disk Utility. Again, create a backup before taking this action.
To format FAT32 on Mac with Terminal, follow the next steps:
Step 1. Connect theВ USB flash drive to your Mac computer.
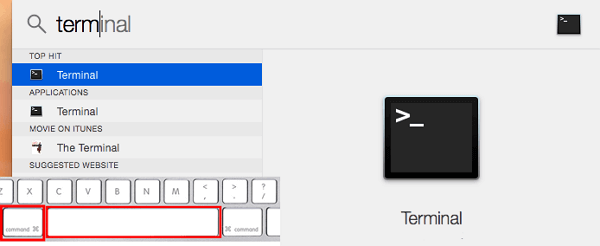
Step 2. Hit cmd + space to run Spotlight, type: terminal, and hit Enter.
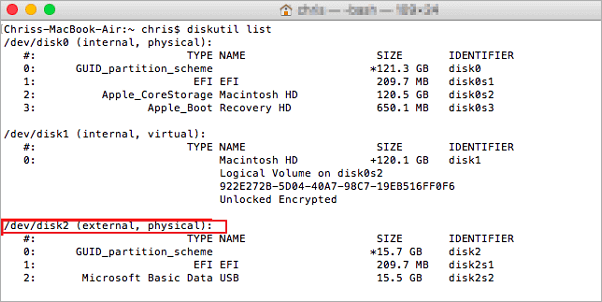
Step 3. Type: diskutil list and find out which disk is your USB drive.В
Step 4. Type: sudo diskutil eraseDisk FAT32 MBRFormat /dev/disk2.
- sudo gives you user right.
- Diskutil calls disk utility program.
- eraseDisk commands to format.
- FAT32 sets the file system.
- MBRFormat tells disk utility to format with a Master Boot Record.
- /dev/disk2 is the location of the USB drive.
Wait for the process to complete. After this, you can type «diskutil list»В in the command again to check if the formatting has been successful.В
Bonus Tip: How to Recover Data from Formatted USB
Formatting the USB would erase the data on it completely, so please make sure that you have a backup. If you don’t, you can count on data recovery software to retrieve the lost data.
EaseUS Data Recovery Wizard has both Windows and Mac versions, so it’s a goodВ choice for data recovery, no matter you’re using a PC or Mac. For Mac users, it only takes a few clicks for the software to scan and display the formatted data. To guarantee an effective data recovery without spending money to no avail, you can install the Mac data recovery free version for the first trial. You can preview all the found data before the final recovery.
To recover data from a formatted USB flash drive on Mac, follow the next steps:
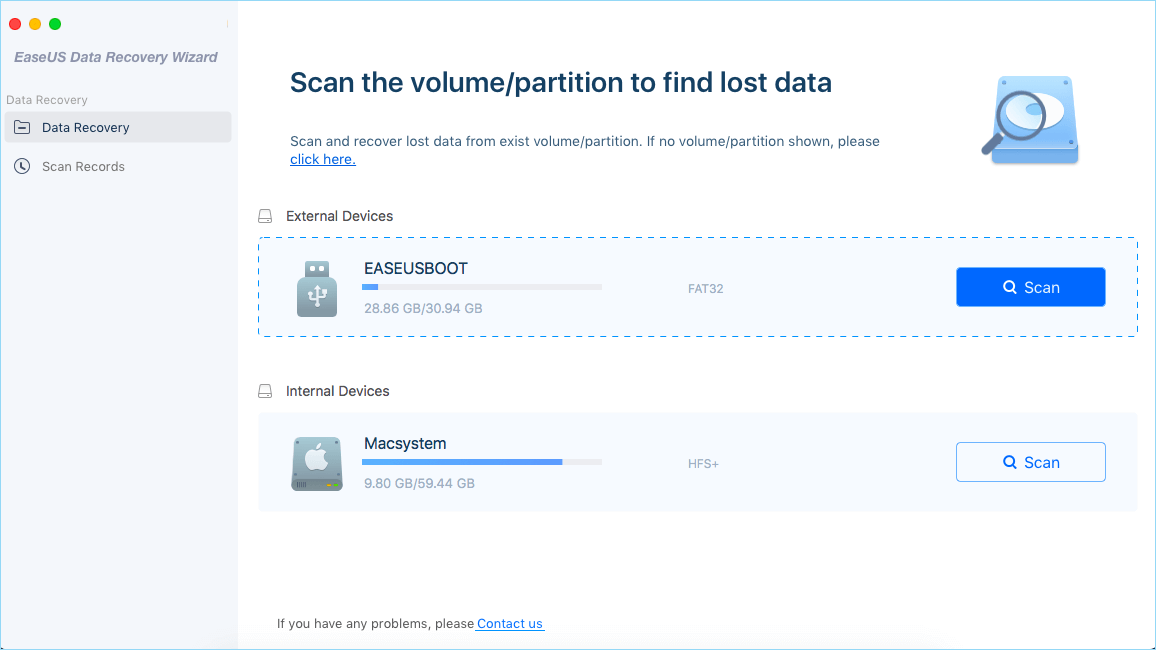
Step 1. Correctly connect your USB flash drive to your Mac. Launch EaseUS Data Recovery Wizard for Mac. Start selecting the flash drive and click «Scan» to let the software search lost files on it.
Step 2. After a quick scan and deep scan, all files will be presented in the left panel in the scan results.
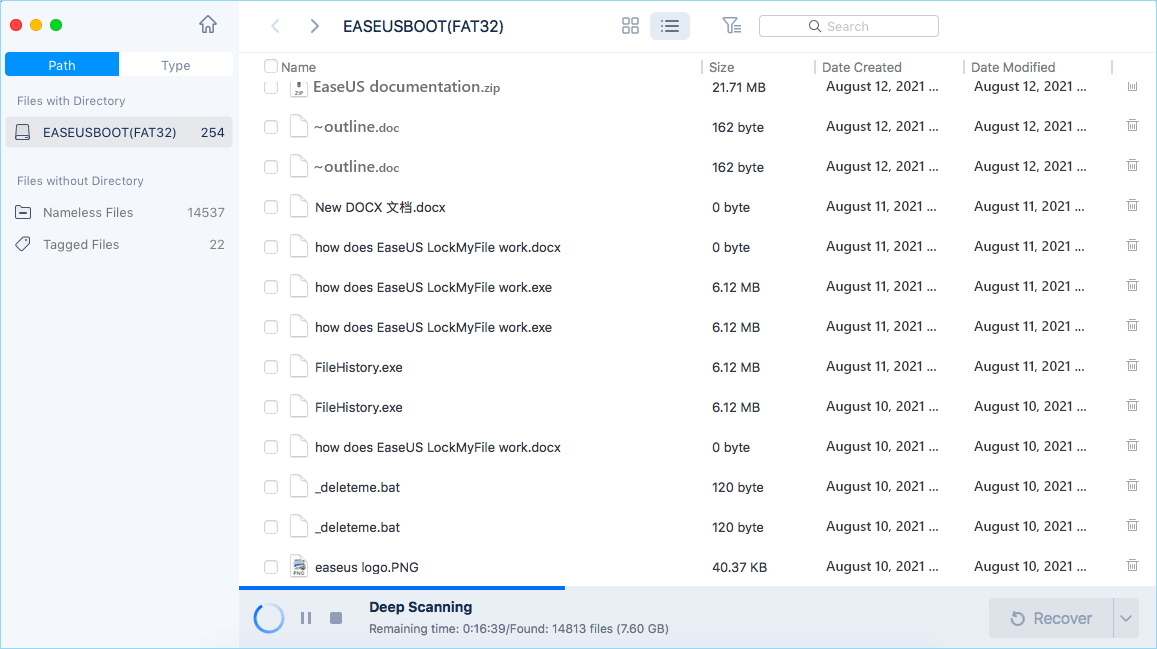
Step 3. Select files you want to recover and click the «Recover» button. Don’t save the recoverable files to the USB drive itself in case of data overwriting.
Источник


