- Change icons for files or folders on Mac
- Use your own picture or a picture from the web
- Use an icon from another file or folder
- Restore the original icon for an item
- Как изменить иконки жёстких дисков на рабочем столе Mac
- Зачем менять иконки на Mac?
- Как поменять иконку жёсткого диска Mac
- Как автоматически конвертировать изображения в ICNS
- Create a disk image using Disk Utility on Mac
- Create a blank disk image for storage
- Create a disk image from a disk or connected device
- Create a disk image from a folder or connected device
- Create a secure disk image
Change icons for files or folders on Mac
You can choose a custom icon for any file or folder using your own pictures, icons downloaded from the web or the icon from another file or folder.
Use your own picture or a picture from the web
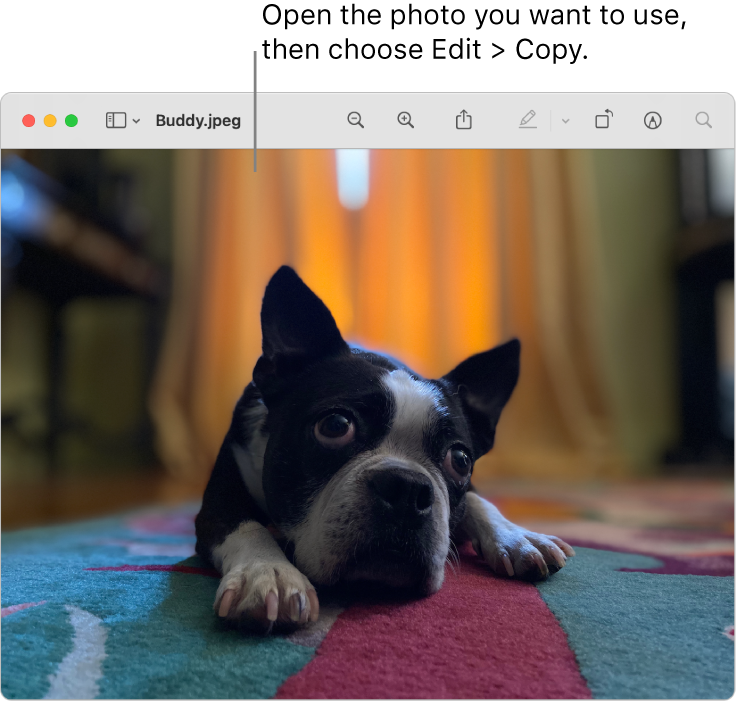
On your Mac, copy the picture you want to use to the Clipboard.
One way to do this is to double-click the picture file, which opens it in the Preview app  , then choose Edit > Copy.
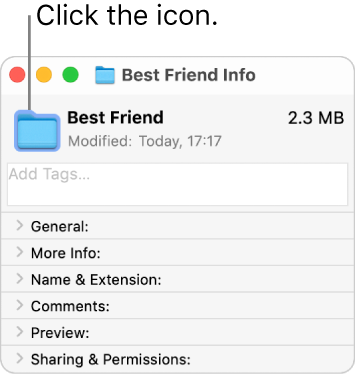
Select the file or folder whose icon you want to replace, then choose File > Get Info.
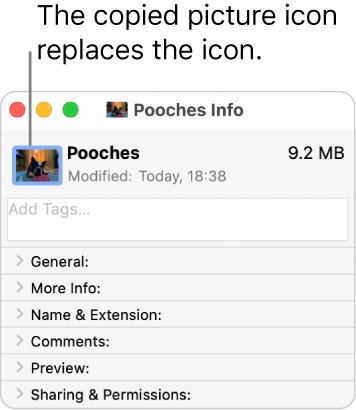
At the top of the Info window, click the icon.
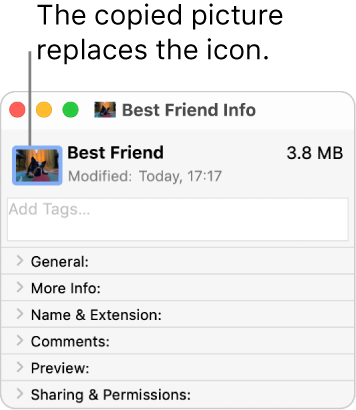
Choose Edit > Paste.
If Edit > Paste isn’t available, make sure you click the icon at the top of the Info window.
After you paste, if you see a generic JPEG or PNG image instead of your own picture, make sure you choose Edit > Copy before pasting.
Use an icon from another file or folder
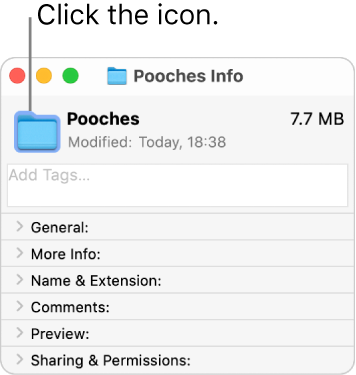
On your Mac, select the file or folder whose icon you want to use, then choose File > Get Info.
At the top of the Info window, click the icon, then choose Edit > Copy.

Select the other file or folder, then choose File > Get Info.
Click the icon at the top of the Info window.
Choose Edit > Paste.
The folder icon is replaced with the picture you chose.
If Edit > Paste isn’t available, make sure you click the icon at the top of the Info window.
After you paste, if you see a generic JPEG or PNG image instead of your own picture, make sure you click the icon in the Info window before choosing Edit > Copy.
Restore the original icon for an item
On your Mac, select the file or folder, then choose File > Get Info.
At the top of the Info window, select the custom icon, then choose Edit > Cut.
Источник
Как изменить иконки жёстких дисков на рабочем столе Mac
В macOS можно менять иконки программ, папок и файлов на рабочем столе Mac. О функции знают далеко не все. Можно поменять и иконки жёстких дисков. Ниже мы расскажем, как это делается.

Зачем менять иконки на Mac?
Если вам непонятно, зачем вообще менять иконки жёстких дисков и других подключенных устройств, мы вам расскажем. Далеко не всем нравится стандартная иконка жёсткого диска в macOS. Он всё ещё в виде жёсткого диска, хоть большинство современных Mac и используют флэш-накопители.
Возможно, вы купили себе USB-накопитель или внешний жёсткий диск для своего Mac, и для него есть кастомная иконка от производителя. Возможно, выглядит она лучше стандартной. В любом случае, меняются иконки всего в пару кликов.
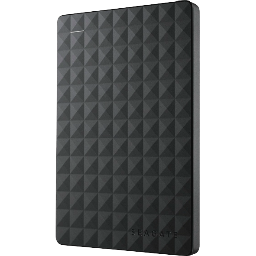 У производителей часто есть свои иконки для жёстких дисков, на которые можно заменить стандартные.
Изменение иконки никак не влияет на функциональность, меняется только внешний вид самой иконки на рабочем столе, в Finder, в Доке и т.д. Ниже мы расскажем, как поменять иконки жёстких дисков Mac и внешних носителей.
Как поменять иконку жёсткого диска Mac
- С помощью своего любимого браузера и поисковика найдите и скачайте изображение, которое хотите использовать в качестве иконки. Также можно самостоятельно создать иконку в Pixelmator или Photoshop и сохранить её в виде прозрачного PNG-файла.

- Откройте изображение в программе Просмотр от Apple.
- В меню Править выберите Выбрать всё или зажмите клавиши Command(⌘) +A, чтобы выделить всё изображение. Изображение будет обведено движущимся пунктиром.
- Теперь в меню Править выберите Копировать или зажмите клавиши Command(⌘) +C, чтобы скопировать изображение в буфер обмена.

- Теперь правой кнопкой мыши нажмите на иконку жёсткого диска, которую хотите поменять, и выберите опцию Свойства. Также можно зажать клавиши Command (⌘) + I.
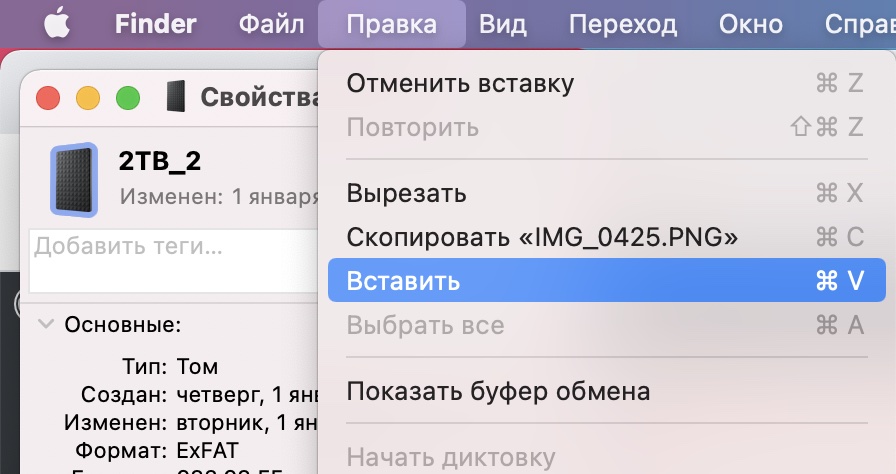
- Откроется окно Свойства с миниатюрной версией иконки в левом верхнем углу. Нажмите на неё, а затем выберите опцию Вставить в меню Правка или же зажмите клавиши Command(⌘) +V. Возможно, вам придётся ввести пароль.

Вот как легко и просто меняются иконки на рабочем столе Mac!
Не стоит просто перетягивать найденную иконку на мини-иконку в окне Get Info, поскольку это поменяет местами иконки диска и файла изображения, а не заменит иконку диска на новую.
Возможно, вам также придётся отключить функцию защиты системы, но после изменения иконок не забудьте её включить! Если по какой-то причине новая иконка не отображается в Finder, попробуйте выйти и снова зайти в свой аккаунт или использовать команду «killall Dock» в Терминал (без кавычек).
Способ выше касается изменения любых иконок. К примеру, таким образом можно менять иконки папок, системных программ и др.
Как автоматически конвертировать изображения в ICNS
В macOS для иконок используется формат «Apple Icon Image Format».
Он содержит несколько размеров иконки для разных целей, и все они хранятся в одном файле с расширением «.icns». Формат поддерживает иконки размеров 16×16, 32×32, 48×48, 128×128, 256×256 и 512×512. Также есть иконки 1024×1024 для экранов Retina. Кроме того, формат ICNS также поддерживает по несколько изображений для разных состояний. К примеру, открытая и закрытая папка.
Лучше всего использовать именно этот формат. Если вы нашли иконку формата JPG или PNG, то лучше конвертировать её в формат ICNS.
Это можно делать прямо в программе Просмотр, но есть и более быстрый автоматический способ. Это действие Automator, которое добавляет опцию «PNG в ICNS» в контекстное меню macOS, которое появляется при нажатии правой кнопки мыши.
Чтобы опция работала исправно, нужно использовать изображения размером 1024×1024. Это действительно удобный способ.
Если вы предпочитаете конвертировать файлы в формат ICNS вручную, то вам нужен размер минимум 512×512. Чем выше разрешение, тем лучше. Только при наличии такого файла вы можете использовать опцию Файл → Экспорт в программе Просмотр.
Источник
Create a disk image using Disk Utility on Mac
You can use Disk Utility to create a disk image, which is a file that contains other files and folders.
Note: You can burn information to a CD or DVD using the Burn command in the Finder. See Burn CDs and DVDs.
Create a blank disk image for storage
You can create an empty disk image, add data to it, then use it to create disks, CDs or DVDs.
In the Disk Utility app  on your Mac, choose File > New Image > Blank Image.
Enter a filename for the disk image, add tags if necessary, then choose where to save it.
This is the name that appears in the Finder, where you save the disk image file before opening it.
In the Name field, enter the name for the disk image.
This is the name that appears on your desktop and in the Finder sidebar, after you open the disk image.
In the Size field, enter a size for the disk image.
Click the Format pop-up menu, then choose the format for the disk:
If the disk image will be used with a Mac that has a solid state drive (SSD) and uses macOS 10.13 or later, choose APFS or APFS (Case-sensitive).
If the disk image will be used with a Mac with macOS 10.12 or earlier, choose Mac OS Extended (Journaled) or Mac OS Extended (Case-sensitive, Journaled).
If the disk image will be used with a Mac or Windows computer and is 32GB or less, choose MS-DOS (FAT); if it’s over 32GB, choose ExFAT.
To encrypt the disk image, click the Encryption pop-up menu, then choose an encryption option.
Click the Partitions pop-up menu, then choose a partition layout.
Click the Image Format pop-up menu, then choose an option:
Sparse bundle disk image: Same as a sparse disk image (below), but the directory data for the image is stored differently. Uses the .sparsebundle file extension.
Sparse disk image: Creates an expandable file that shrinks and grows as needed. No additional space is used. Uses the .sparseimage file extension.
Read/write disk image: Allows you to add files to the disk image after it’s created. Uses the .dmg file extension.
DVD/CD master: Changes the size of the image to 177MB (CD 8cm). Uses the .cdr file extension.
Click Save, then click Done.
Disk Utility creates the disk image file where you saved it in the Finder and mounts its disk icon on your desktop and in the Finder sidebar.
In the Finder, copy your files to the mounted disk image, then eject it.
For more information about disk image types, see the manual (man) page for hdiutil.
Create a disk image from a disk or connected device
You can create a disk image that includes the data and free space on a physical disk or connected device, such as a USB device. For example, if a USB device or volume is 80GB with 10GB of data, the disk image will be 80GB in size and include data and free space. You can then restore that disk image to another volume.
In the Disk Utility app on your Mac, select a disk, volume or connected device in the sidebar.
Choose File > New Image, then choose “Image from [device name]”.
Enter a filename for the disk image, add tags if necessary, then choose where to save it.
This is the name that appears in the Finder, where you save the disk image file before opening it.
Click the Format pop-up menu, then choose an option:
Read-only: The disk image can’t be written to, and is quicker to create and open.
Compressed: Compresses data, so the disk image is smaller than the original data. The disk image is read-only.
Read/write: Allows you to add files to the disk image after it’s created.
DVD/CD master: Can be used with third-party apps. It includes a copy of all sectors of the disk image, whether they’re used or not. When you use a master disk image to create other DVDs or CDs, all data is copied exactly.
To encrypt the disk image, click the Encryption pop-up menu, then choose an encryption option.
Click Save, then click Done.
Disk Utility creates the disk image file where you saved it in the Finder and mounts its disk icon on your desktop and in the Finder sidebar.
Important: Don’t create a disk image of a disk that you believe to be failing or that contains corrupted information. The disk image may not serve as a reliable backup.
For technical information about creating a restore disk image, see the Apple Software Restore (ASR) manual (man) page.
Create a disk image from a folder or connected device
You can create a disk image that contains the contents of a folder or connected device, such as a USB device. This method doesn’t copy a device’s free space to the disk image. For example, if a USB device or volume is 80GB with 10GB of data, the disk image will be 10GB in size and include only data, not free space. You can then restore that disk image to another volume.
In the Disk Utility app on your Mac, choose File > New Image, then choose Image from Folder.
Select the folder or connected device in the dialogue that appears, then click Open.
Enter a filename for the disk image, add tags if necessary, then choose where to save it.
This is the name that appears in the Finder, where you save the disk image file before opening it.
To encrypt the disk image, click the Encryption pop-up menu, then choose an encryption option.
Click the Image Format pop-up menu, then choose an option:
Read-only: The disk image can’t be written to, and is quicker to create and open.
Compressed: Compresses data, so the disk image is smaller than the original data. The disk image is read-only.
Read/write: Allows you to add files to the disk image after it’s created.
DVD/CD master: Can be used with third-party apps. It includes a copy of all sectors of the disk image, whether they’re used or not. When you use a master disk image to create other DVDs or CDs, all data is copied exactly.
Hybrid image (HFS+/ISO/UDF): This disk image is a combination of disk image formats and can be used with different file system standards, such as HFS, ISO and UDF.
Click Save, then click Done.
Disk Utility creates the disk image file where you saved it in the Finder and mounts its disk icon on your desktop and in the Finder sidebar.
For technical information about creating a restore disk image, see the Apple Software Restore (ASR) manual (man) page.
Create a secure disk image
If you have confidential documents that you don’t want others to see without your permission, you can put them in an encrypted disk image.
Note: If you want to protect the contents of the system disk, turn on FileVault using the FileVault pane of Security & Privacy Preferences.
In the Disk Utility app on your Mac, choose File > New Image > Blank Image.
Enter a filename for the disk image, add tags if necessary, then choose where to save it.
This is the name that appears in the Finder, where you save the disk image file before opening it.
In the Name field, enter the name for the disk image.
This is the name that appears on your desktop and in the Finder sidebar, after you open the disk image.
In the Size field, enter a size for the disk image.
Click the Format pop-up menu, then choose a format:
If you’re using the encrypted disk image with a Mac computer using macOS 10.13 or later, choose APFS or APFS (Case-sensitive).
If you’re using the encrypted disk image with a Mac computer using macOS 10.12 or earlier, choose Mac OS Extended (Journaled) or Mac OS Extended (Case-sensitive, Journaled).
Click the Encryption pop-up menu, then choose an encryption option.
Enter and re-enter a password to unlock the disk image, then click Choose.
WARNING: If you forget this password, you won’t be able to open the disk image and view any of the files.
Use the default settings for the rest of the options:
Click the Partitions pop-up menu, then choose Single partition — GUID Partition Map.
Click the Image Format pop-up menu, then choose “read/write” disk image.
Click Save, then click Done.
Disk Utility creates the disk image file where you saved it in the Finder and mounts its disk icon on your desktop and in the Finder sidebar.
In the Finder  , copy the documents you want to protect to the disk image.
If you want to erase the original documents so they can’t be recovered, drag them to the Trash, then choose Finder > Empty Trash.
When you’ve finished using the documents on the secure disk image, be sure to eject the disk image. As long as it’s available on your desktop, anyone with access to your computer can use the documents on it.
To access the data in a disk image, double-click it. It appears on your desktop, and you can add, remove and edit files on it just as you would with a disk.
Источник


