- Create and format a hard disk partition
- How to Manage Partitions with Disk Partition CMD in Windows 10?
- Content
- Overview of disk partition cmd
- How to open Windows cmd
- What is Diskpart
- How to use disk partition cmd in Windows 10
- How to manage partitions with EaseUS Partition Master
- How to Partition a Hard Drive
- Hard drives must be partitioned before being formatted in Windows
- What to Know
- What Is Partitioning?
- How to Partition a Hard Drive in Windows
- Advanced Partitioning
Create and format a hard disk partition
To create a partition or volume (the two terms are often used interchangeably) on a hard disk, you must be logged in as an administrator, and there must be either unallocated disk space or free space within an extended partition on the hard disk.
If there is no unallocated disk space, you can create some by shrinking an existing partition, deleting a partition, or by using a third-party partitioning program.
Open Computer Management by selecting the Start button. The select Control Panel > System and Security > Administrative Tools, and then double-click Computer Management.
In the left pane, under Storage, select Disk Management.
Right-click an unallocated region on your hard disk, and then select New Simple Volume.
In the New Simple Volume Wizard, select Next.
Enter the size of the volume you want to create in megabytes (MB) or accept the maximum default size, and then select Next.
Accept the default drive letter or choose a different drive letter to identify the partition, and then select Next.
In the Format Partition dialog box, do one of the following:
If you don’t want to format the volume right now, select Do not format this volume, and then select Next.
To format the volume with the default settings, select Next.
Review your choices, and then select Finish.
Note: When you create new partitions on a basic disk, the first three will be formatted as primary partitions. Beginning with the fourth, each one will be configured as a logical drive within an extended partition.
How to Manage Partitions with Disk Partition CMD in Windows 10?
«Unable to select a drive, as it is showing 0 MB while installing Windows 10, I tried to check-in cmd, but I don’t know its instructions. Can I get the cmd guide or other software?»
Are you confused about how to use disk partition cmd? Don’t worry. We know what you want to know. In the following, this page lists many practical tips about cmd. And we recommend a third party software — EaseUS Partition Master that can replace the cmd function.
Content
Overview of disk partition cmd
Cmd, the abbreviation for command, is a Microsoft Windows command that opens the Windows command line window.
Notes: Windows 95 & 98 users can only enter the command line by entering command; other Windows users can enter command or cmd to use.
How to open Windows cmd
Method 1: You can input cmd in the Start Menu search bar to open the Windows Command Prompt.
Method 2: You can press Win+R to open the Run box, type cmd, and press Enter.
What is Diskpart
After open cmd, you need to type ‘diskpart’ for disk partitioning. Diskpart is a command-line utility in Windows 10, which enables you to operate disk partition by using Diskpart command prompt, including create, merge, extend, shrink, format, delete, wipe disk partition, and other features.
How to use disk partition cmd in Windows 10
Steps to create a partition in Windows 10 using command prompt.
Warning: Do not use the Diskpart until a full backup.
Step 1: You can use the two methods mentioned above to open the command prompt or Run window.
Step 2: Enter Diskpart
Steps about essential partition functions are as follows:
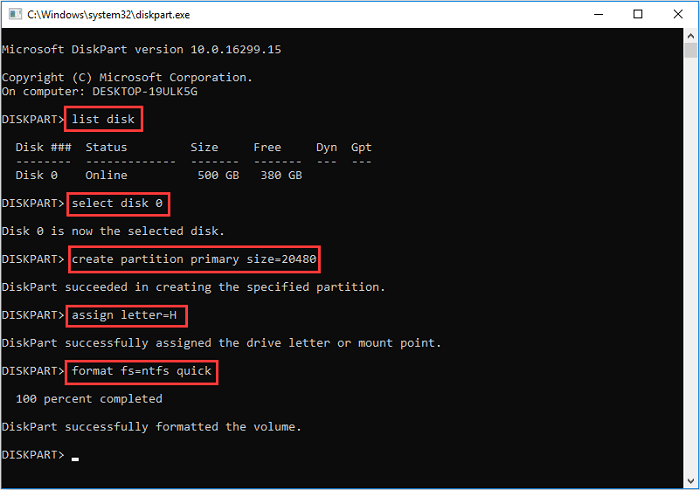
- Create a partition using Diskpart
1. At the Diskpart prompt, type: List DiskВ
2. Input: Select Disk * (* represents the disk number)
3. Type: Create partition primary size=*(* means the partition size.)В
4. Input: Assign letter=* (* represents Choose a drive letter not already being used.)
5. Type: Exit (Exit is the Esc on the top left of the keyboard.)
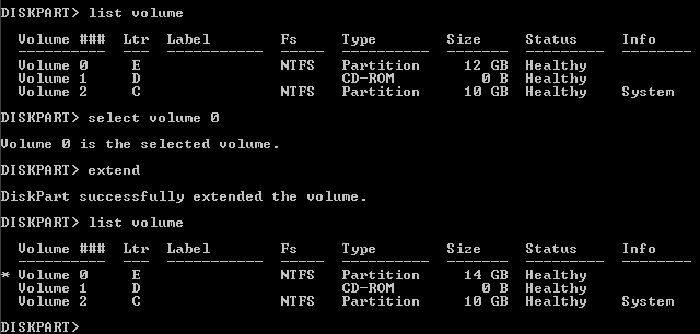
- Extending a partition using Diskpart
Note: If you try it or any other method, make sure you have a full backup.
1. Verify that contiguous free space is available on the same drive and that free space is next to the partition you intend on extending, with no partitions in between.
2. Type: Select Disk * (Selects the disk.)
3. Type: Select Volume *(Selects the volume.)
4. Type: Extend Size=*
5. Type: Exit
- Deleting a partition using Diskpart
Note: You cannot delete an active system or boot partition or a partition with a dynamic page file.
1. Input: Diskpart.exe
2. Select disk *
3. Select Partition *
4. Delete partition
5. Exit
- Wiping a disk using Diskpart
This operation deletes all data on the disk.
1. Type: Select disk *
2. Type: Clean all(The CLEAN ALL command removes all partition and volume information from the hard drive being focused on.)
3. Exit
The diskpart also has other features, such as assign drive letters, shrink partition, mark partition as active, convert MBR/GPT. If you want to learn these parts, FAQ, at the end of the article, will bring you the right answer.
After reading the above guide, I believe you have a specific understanding of how to use cmd via Diskpart in Windows 10. Cmd is a powerful tool, but it is not suitable for a beginner. Misoperations can easily cause partition problems. There is a better software — EaseUS Partition Master.
How to manage partitions with EaseUS Partition Master
EaseUS Partition Master is an all-in-one partition manager, whichВ helps you create, resize, clone, move, merge, and format partitions. The following video tutorial shows you how to create, deleted, shrink, and resize a partition with this powerful disk management program.
Favored by millions of users. It contains all features Diskpart has and many other superior functions like the two demonstrated below.В
1. Disk migration and cloning
Nowadays, for better performance of computer disk, you may want to migrate the operating system and clone disk to the target one. It saves the user’s time to download programs. It only takes a few steps to get remarkable results. For example, there is a guide about «transfer Windows 10 to a new hard drive(HDD/SSD)».
Steps to migrate OS to HDD/SSD:
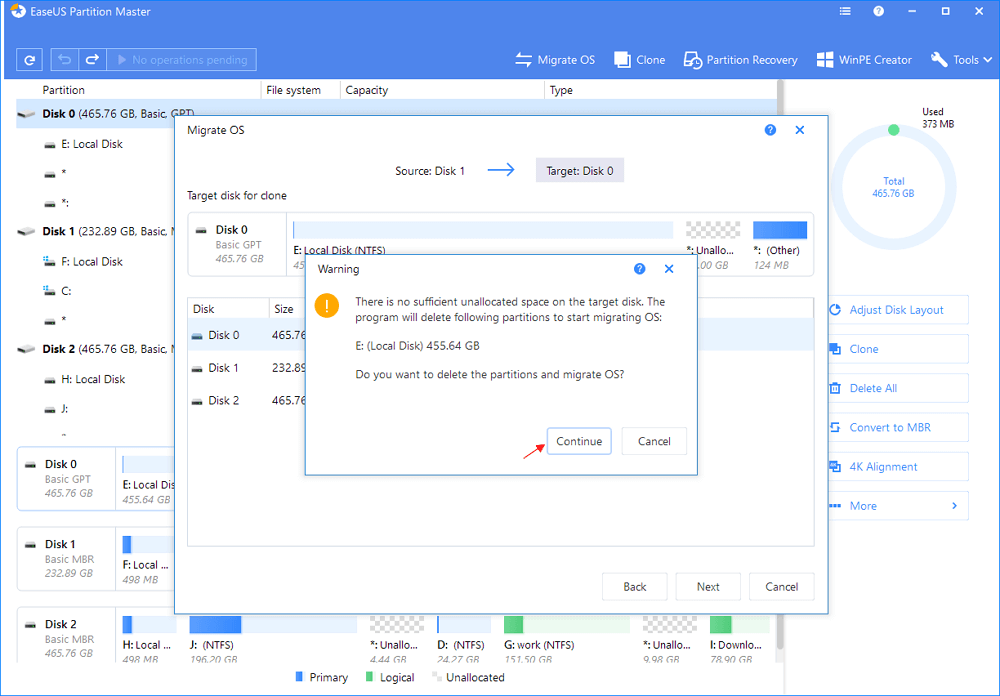
- Run EaseUS Partition Master, select Migrate OSВ from the top menu.
- Select the SSD or HDD as the destination disk and click Next.
- Check Warning: the data and partitions on the target disk will be deleted. Make sure that you’ve backed up important data in advance. If not, do it now.
- Then click Continue.
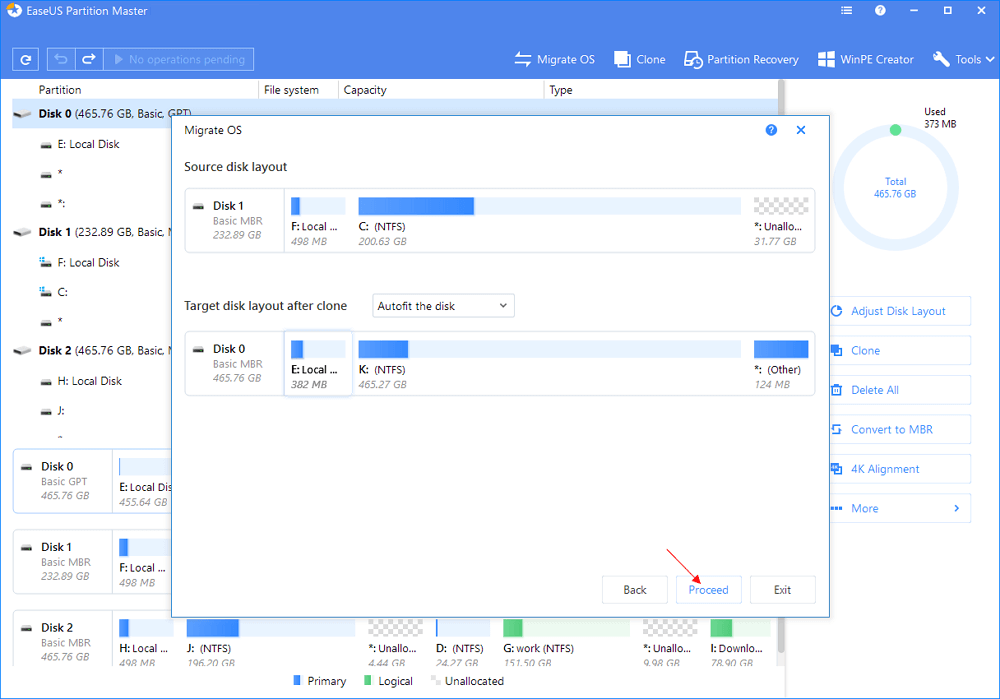
- Preview the layout of your target disk.В Then click Proceed to start migrating your OS to a new disk
Note: The operation of migrating OS to SSD or HDD will delete and remove existing partitions and data on your target disk when there is not enough unallocated space on the target disk. If you saved important data there, back up them to an external hard drive in advance.
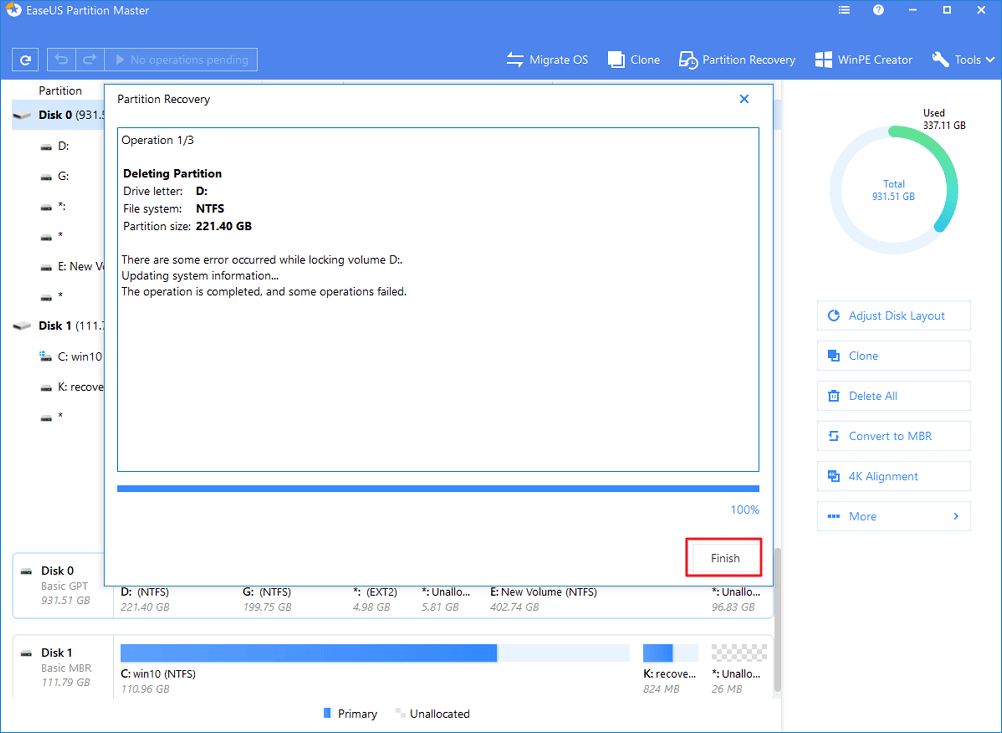
2. Partition Recovery
Partition Recovery is a practical feature targeting your lost partitions.
It is worth trying to scan your selected disk. The spending time of a deep scan may in line with your disk volume.
You can check the related article about «recover unallocated space in Windows 10» to get further learning.
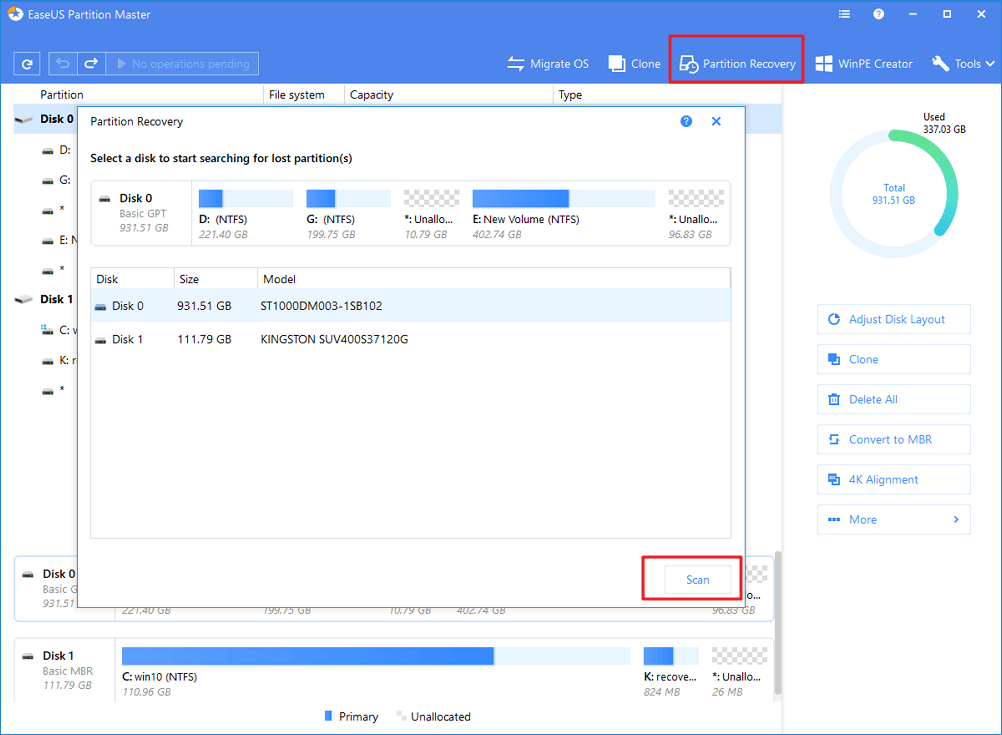
Step 1. Open EaseUS Partition Master and click «Partition Recovery» on the top menu. A new window will pop up and ask you to select a disk to start searching for lost partition(s). So choose the desired disk and click «Scan«.
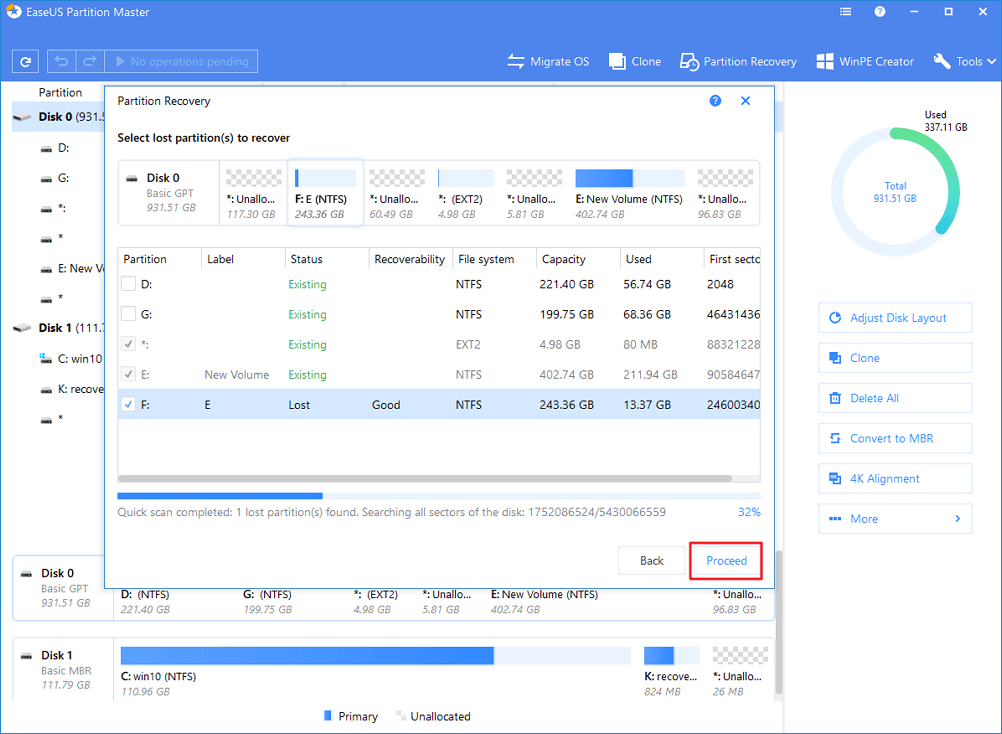
Step 2.В A quick scan will immediately start. You can pause the scanning process by clicking «Proceed» at any timeВ when the lost partition shows up to start recovery.
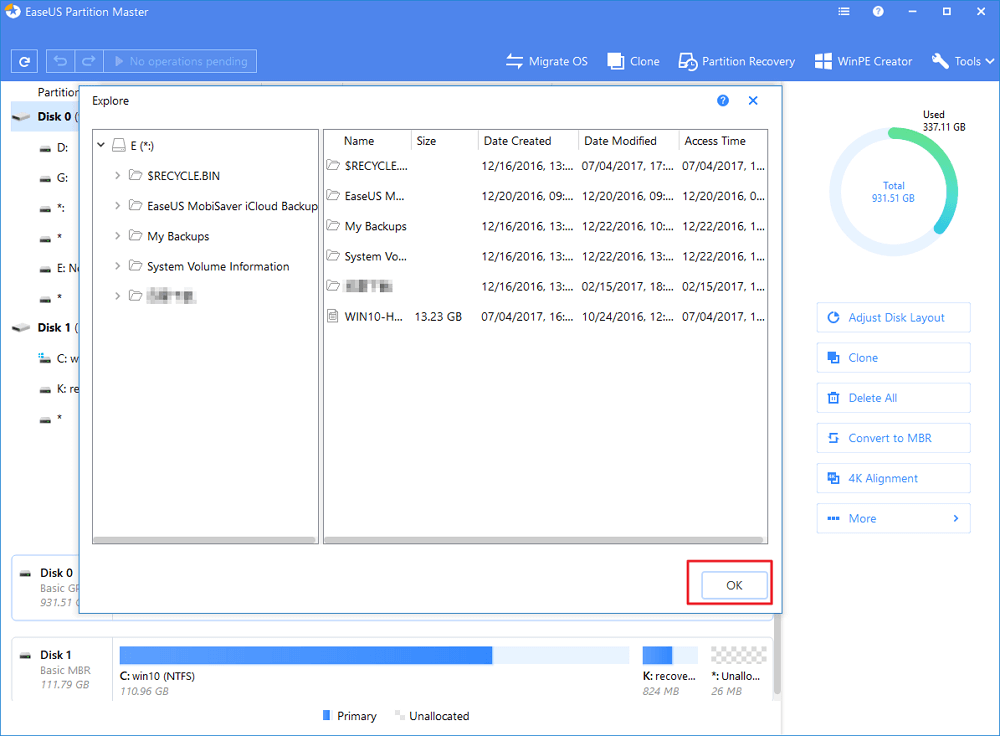
You can also double click on the partition you’re looking for to preview content.
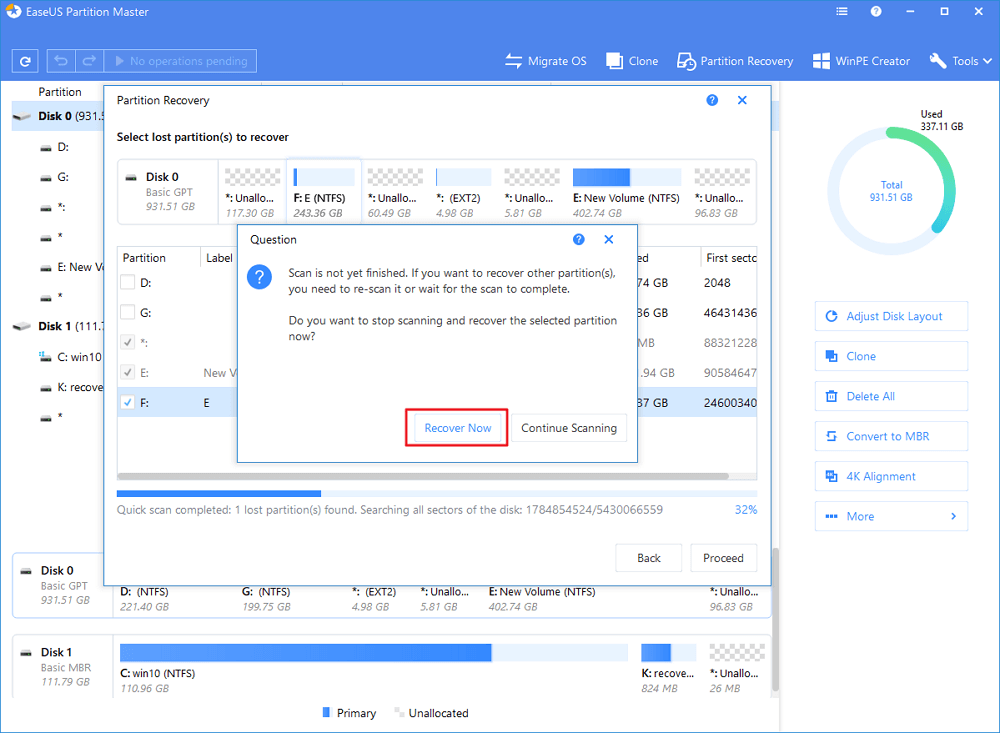
Step 3. As soon as the lost partition and data has been found, click «Recover Now«. Or else, go on with «Continue Scanning» for more lost data recovery.
Step 4. After the recovery process, click «Finish«. Your lost partition should reappear in your drive.
1. How do I use diskpart command in Windows 10?
-Boot into Windows 10
-Press the Windows key and C to open the charm bar.
-Type cmd
-Click Command Prompt
-When Command Prompt opens, type diskpart
-Press Enter
2. How to assign drive letter via Diskpart?
—Type «assign letter=F» (F can be replaced with another letter that has not been used yet).
—And then, you will receive a message that says: DiskPart successfully assigned the drive letter or mount point.
3. How to shrink partition via Diskpart
Type shrink directly will automatically shrink the partition by Windows, and you can also type shrink desired=*** to define your partition size.
(Such as: Type «shrink desired=10240». And then, you will receive a message that says: DiskPart successfully shrunk the volume by 10GB.)
Note: You can reduce the size of a volume only if it is formatted using the NTFS file system.
4. How to mark a partition as active via Diskpart?
—Type active.
—And then, you will receive a message that says: DiskPart marked the current separation as active.
5. How to clean Disk/convert a disk to GPT/ convert a disk to MBR?
-Type: list disk.
-Type: select disk 1.
-Type: clean.
-Type: convert gpt or convert mbr.
How to Partition a Hard Drive
Hard drives must be partitioned before being formatted in Windows
:max_bytes(150000):strip_icc()/tim-fisher-5820c8345f9b581c0b5a63cf.jpg)
What to Know
- The first thing to do after installing a hard drive is to partition it.
- To partition a drive, open Disk Management, select the drive, create a volume at the size you want, and select a drive letter.
- You’ll want to format the drive next unless you have advanced plans for the partition but that’s not very common.
This article describes how to partition a hard drive in Windows 10, Windows 8, 7, Vista, and XP.
What Is Partitioning?
To partition a hard drive in Windows means to section off a part of it and make that part available to the operating system.
In other words, a hard drive isn’t useful to your operating system until it’s partitioned. Additionally, it’s not available to you to store files on until you format it (which is another, just as simple process).
Most of the time, this «part» of the hard drive is the entire usable space, but creating multiple partitions on a hard drive is also possible so that you can store backup files in one partition, movies in another, etc.
Manually partitioning (as well as formatting) a hard drive is not necessary if your end goal is to install Windows onto the drive. Both of those processes are included as part of the installation procedure, meaning you don’t need to prepare the drive yourself. See How to Clean Install Windows for more help.
How to Partition a Hard Drive in Windows
Don’t worry if this process sounds a bit more complicated than you thought because it’s not. Partitioning a hard drive in Windows isn’t at all hard and usually only takes a few minutes to do.
Here’s how to do it:
These instructions apply to Windows 10, Windows 8, Windows 7, Windows Vista, and Windows XP.
Open Disk Management, the tool included in all versions of Windows that lets you partition drives, among a number of other things.
:max_bytes(150000):strip_icc()/009_how-to-partition-a-hard-drive-2626081-5c82c5dc46e0fb0001cbf4cc.jpg)
In Windows 10 and Windows 8/8.1, the Power User Menu is the easiest way to start Disk Management. You can also start Disk Management via command-line in any version of Windows, but the Computer Management method is probably best for most people.
When Disk Management opens, you should see an Initialize Disk window with the message «You must initialize a disk before Logical Disk Manager can access it.»
:max_bytes(150000):strip_icc()/001_how-to-partition-a-hard-drive-2626081-5c82ad7c4cedfd000190b160.jpg)
In Windows XP, you’ll see an Initialize and Convert Disk Wizard screen instead. Follow that wizard, making sure to not select the option to «convert» the disk, unless you’re sure you need to. Skip to Step 4 when done.
Don’t worry if this window doesn’t appear. There are legitimate reasons you may not see it—we’ll know soon if there’s a problem or not. Skip down to Step 4 if you don’t see this.
On this screen, you’re asked to choose a partition style for the new hard drive. Choose GPT if the new hard drive you installed is 2 TB or larger. Choose MBR if it’s smaller than 2 TB.
Choose OK after making your selection.
Locate the hard drive you want to partition from the drive map at the bottom of the Disk Management window.
You might need to maximize the Disk Management or Computer Management window to see all the drives on the bottom. An unpartitioned drive will not show up in the drive list at the top of the window.
If the hard drive is new, it will probably be on a dedicated row labeled Disk 1 (or 2, etc.) and will say Unallocated. If the space you want to partition is part of an existing drive, you’ll see Unallocated next to existing partitions on that drive.
If you don’t see the drive you want to partition, you may have installed it incorrectly. Turn off your computer and double-check that the hard drive is properly installed.
Once you’ve found the space you want to partition, tap-and-hold or right-click anywhere on it, and choose New Simple Volume.
:max_bytes(150000):strip_icc()/002_how-to-partition-a-hard-drive-2626081-5c82c62d46e0fb00010f10b6.jpg)
In Windows XP, the option is called New Partition.
Choose Next > on the New Simple Volume Wizard window that appeared.
:max_bytes(150000):strip_icc()/003_how-to-partition-a-hard-drive-2626081-5c82adb846e0fb0001a0be31.jpg)
In Windows XP, a Select Partition Type screen appears next, where you should choose Primary partition. The Extended partition option is useful only if you’re creating five or more partitions on a single physical hard drive. Select Next > after making the selection.
Choose Next > on the Specify Volume Size step to confirm the size of the drive you’re creating.
:max_bytes(150000):strip_icc()/004_how-to-partition-a-hard-drive-2626081-5c82add546e0fb0001a0be33.jpg)
The default size that you see in the Simple volume size in MB: field should equal the amount shown in the Maximum disk space in MB: field. This means that you’re creating a partition that equals the total available space on the physical hard drive.
You’re welcome to create multiple partitions, that will eventually become multiple, independent drives in Windows. To do so, calculate how many and how large you want those drives to be and repeat these steps to create those partitions. For example, if the drive is 61437 MB and you want to partitions, specify an initial size of 30718 to partition only half the drive, and then repeat the partitioning again for the rest of the Unallocated space.
Select Next > on the Assign Drive Letter or Path step, assuming the default drive letter you see is OK with you.
:max_bytes(150000):strip_icc()/005_how-to-partition-a-hard-drive-2626081-5c82adf64cedfd000190b164.jpg)
Windows automatically assigns the first available drive letter, skipping A & B, which on most computers will be D or E. You’re welcome to set the Assign the following drive letter option to anything that’s available.
You’re also welcome to change the letter assigned to this hard drive later on if you want. See How to Change Drive Letters in Windows for help doing that.
Choose Do not format this volume on the Format Partition step, and then select Next >.
:max_bytes(150000):strip_icc()/006_how-to-partition-a-hard-drive-2626081-5c82ae1c46e0fb000113662e.jpg)
If you know what you’re doing, feel free to format the drive as part of this process. However, since this tutorial focuses on partitioning a hard drive in Windows, we’ve left the formatting to another tutorial, linked in the last step below.
Verify your choices on the Completing the New Simple Volume Wizard screen, which should look something like this:
:max_bytes(150000):strip_icc()/007_how-to-partition-a-hard-drive-2626081-5c82ae48c9e77c0001a3e4f4.jpg)
- Volume Type: Simple Volume
- Disk selected: Disk 1
- Volume size: 61437 MB
- Drive letter or path: F:
- File system: None
- Allocation unit size: Default
Because your computer and hard drive are unlikely exactly like mine, expect your Disk selected, Volume size, and Drive letter or path values to be different than what you see here. File system: None just means that you’ve decided not to also format the drive right now.
Choose Finish and Windows will partition the drive, a process that will only take a few seconds on most computers.
You might notice that your cursor is busy during this time. Once you see the new drive letter (F: in our example) appear in the listing at the top of Disk Management, then you know the partitioning process is complete.
Next, Windows will try to open the new drive automatically. However, since it’s not yet formatted and can’t be used, you’ll see this message instead: «You need to format the disk in drive F: before you can use it. Do you want to format it?»
This only happens in Windows 10, Windows 8, and Windows 7. You won’t see this in Windows Vista or Windows XP and that’s perfectly fine. Just skip to the last step below if you’re using one of those versions of Windows.
Select Cancel and then proceed to Step 14 below.
:max_bytes(150000):strip_icc()/008_how-to-partition-a-hard-drive-2626081-5c82ae75c9e77c0001a6761a.jpg)
If you’re familiar with the concepts involved with formatting a hard drive, feel free to choose Format disk instead. You can use our tutorial linked in the next step as a general guide if you need to.
Continue to our How to Format a Hard Drive in Windows tutorial for instructions on formatting this partitioned drive so you can use it.
Advanced Partitioning
Windows doesn’t allow for anything but very basic partition management after you create one, but a number of software programs exist that can help if you need them.
See our Free Disk Partition Management Software for Windows list for updated reviews on these tools and more information on what exactly you can do with them.


