6 утилит для восстановления данных с поврежденных жестких дисков в Linux
Оригинал: 6 Linux Tools to Help Recover Data from Corrupted Drives
Автор: MTE Staff
Дата публикации: 11 сентября 2018 года
Перевод: А. Кривошей
Дата перевода: октябрь 2019 г.
Ваш экран просто стал черным или ваш ноутбук завис без предупреждения? Может быть, ваш жесткий диск начал барахлить. Хуже того, может быть, вы вдруг не можете сохранить данные в свой домашний раздел?
Все эти признаки поврежденного или неисправного диска, но нет причин немедленно выбрасывать компьютер. Прочитайте эту статью, чтобы узнать о шести утилитах Linux, которые могут помочь вам восстановить ваши данные и вернуть вашу цифровую жизнь в обычное русло.
1. Testdisk
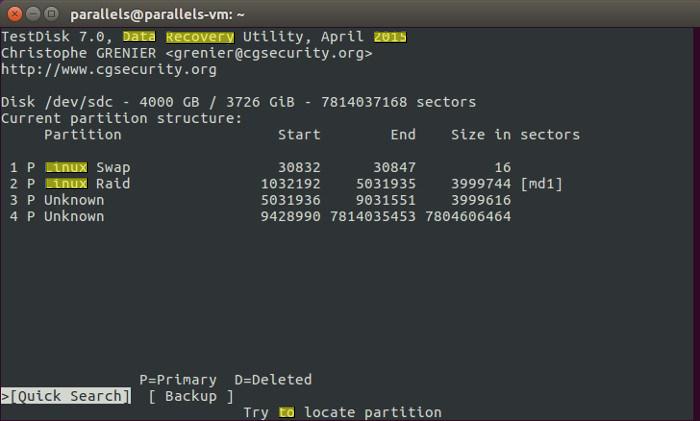
Некоторые инструменты восстановления Linux пытаются сохранить ваши данные, копируя все, что можно извлечь из поврежденного раздела. Это может сработать, но не гарантированно, так как проблемы с самим разделом могут скрывать данные, которые вы хотите получить.
Testdisk очень удобен, поскольку он может на самом деле исправлять ошибки на уровне раздела, упрощая восстановление данных с помощью самого Testdisk или другого инструмента восстановления данных. Он может даже исправить поврежденный жесткий диск и снова заставить ваш ПК с Linux работать, чтобы вы могли получить прямой доступ к данным.
Помимо выполнения глубоких операций, таких как восстановление загрузочных секторов и таблиц файловой системы, Testdisk также способен восстанавливать данные,даже удаленные, с жестких дисков с файловыми системами NTFS, FAT, exFAT и ext.
Чтобы установить Testdisk в Linux, перейдите в терминал и введите:
Если вы хотите узнать больше об использовании Testdisk, вы можете прочитать руководство по Testdisk здесь .
2. ddrescue
Хотя ddrescue не является инструментом восстановления данных, он должен стать вашим первым шагом на пути к извлечению ваших файлов. Ddrescue создает образ вашего поврежденного диска или раздела, чтобы вы могли проанализировать копию вашего сломанного диска.
Всегда копируйте свой диск в отдельный образ, прежде чем начинать операции восстановления файлов с помощью инструментов, перечисленных ниже. Чем дольше вы используете неисправный диск, тем больший ущерб вы можете причинить.
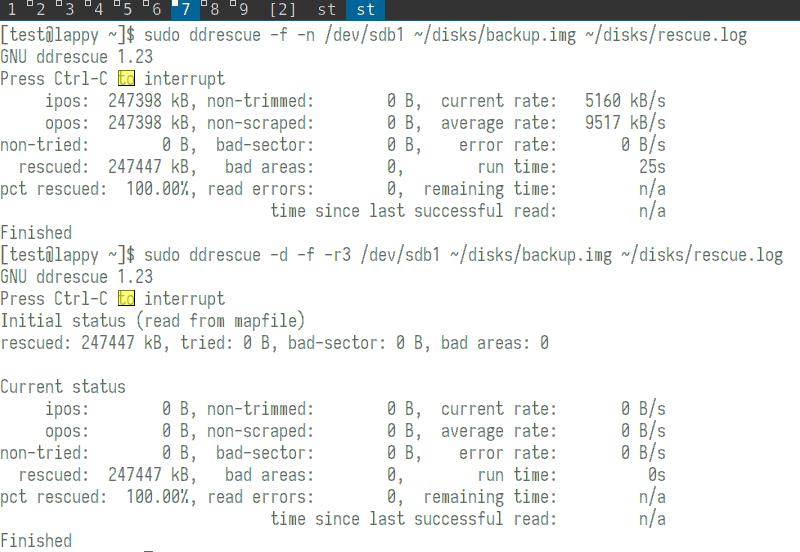
Здесь вы видите некоторые результаты ddrescue в действии. В первой команде он копирует весь диск в образ с именем «backup.img». Вторая команда затем копирует в тот же образ только плохие блоки, проходя каждый раз по этим блокам, чтобы попытаться их прочитать.
Когда вы запускаете эти команды, всегда используйте файл журнала. Резервное копирование может занять несколько часов или дней, и без лог-файла любые прерывания заставят вас начать процесс заново с самого начала.
Когда этот процесс завершен, вы можете смонтировать скопированный образ и использовать приведенные далее утилиты для извлечения из него файлов. Дальнейшее использование других инструментов восстановления Linux из этой статьи позволит получить данные из того же «backup.img», созданного здесь.
3. Foremost
Foremost использует структуры данных общих типов файлов для извлечения данных. Вы можете просканировать весь образ диска для всех его файлов или указать определенные типы файлов, которые вам наиболее интересны.
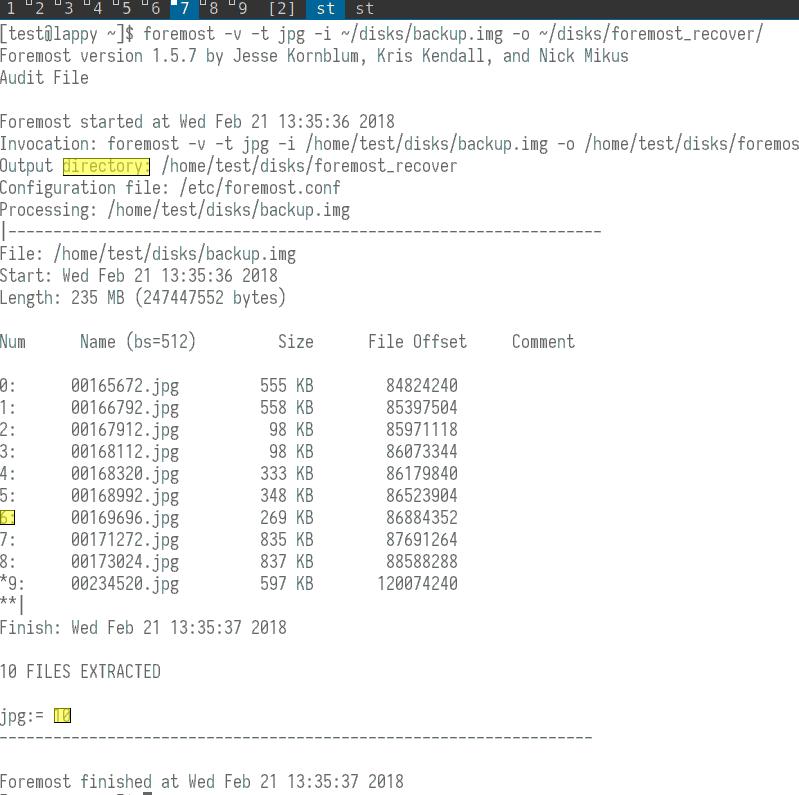
Здесь вы можете увидеть вывод Foremost в подробном режиме (опция -v). Опция -t ищет типы файлов jpg, а опции -i и -o отмечают соответствующий входной файл и выходной каталоги.
Вы можете видеть, что Foremost анализирует образ, созданный на предыдущем шаге; этот образ содержит несколько JPEG-файлов. Foremost смог найти десять таких файлов, и когда он закончил сканирование образа, он скопировал эти десять файлов в указанную выходную папку.
4. scalpel
Scalpel , изначально основанный на Foremost, стремится быть экономным в своей работе. Он использует многопоточность и асинхронный ввод/вывод для эффективного поиска.
Пользователи также могут указать типы файлов, которые они хотят восстановить, отредактировав файл конфигурации Scalpel. Конфигурация по умолчанию производит много выходных данных, даже без подробного режима (параметр -v).

На этом снимке экрана вы можете увидеть окончательный результат анализа Scalpel для «backup.img». Базовая команда (приведенная в нижней части снимка экрана) требует только выходной каталог и образ для анализа.
5. PhotoRec
PhotoRec отстает от своих конкурентов, сосредоточившись на восстановлении фотографий, видео и текстовых документов. Он также работает как интерактивная утилита внутри консоли.
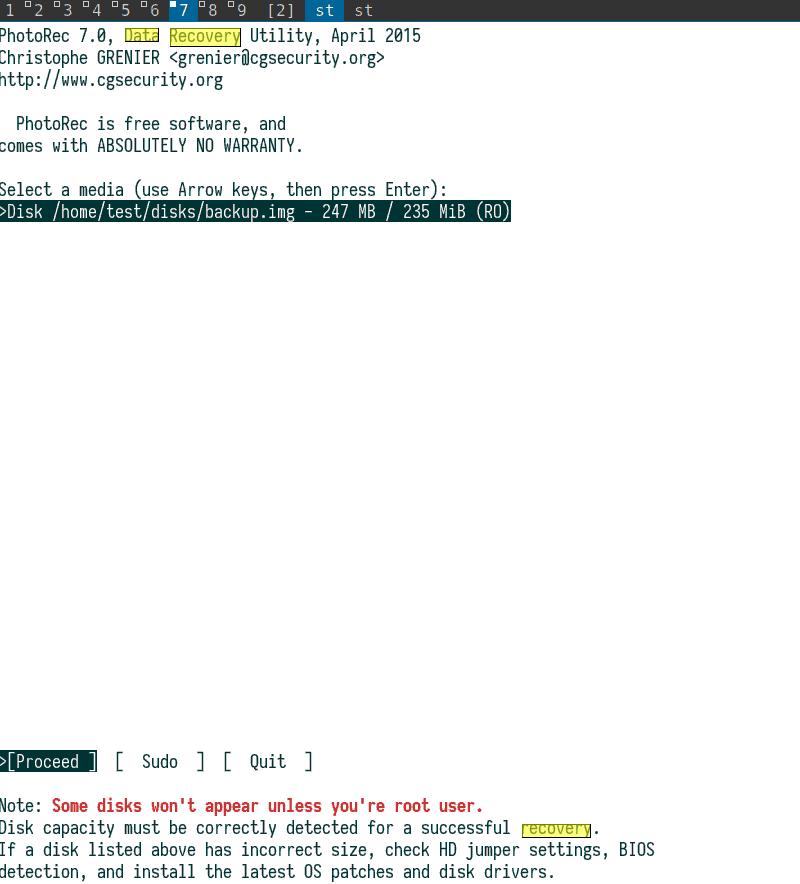
В команде PhotoRec должен быть указан желаемый образ (наш backup.img) и выходная папка. Затем PhotoRec помещает пользователя в графическое окружение. Скриншот здесь показывает размер образа. На следующих экранах запрашивается тип раздела диска и хотите ли вы искать файлы по всему образу.
6. grep
Наконец, мы подошли к grep . Он может показаться не самым простым вариантом восстановления, но grep может находить удаленные или потерянные текстовые файлы путем поиска строк, присутствующих на блочном устройстве или образе диска.
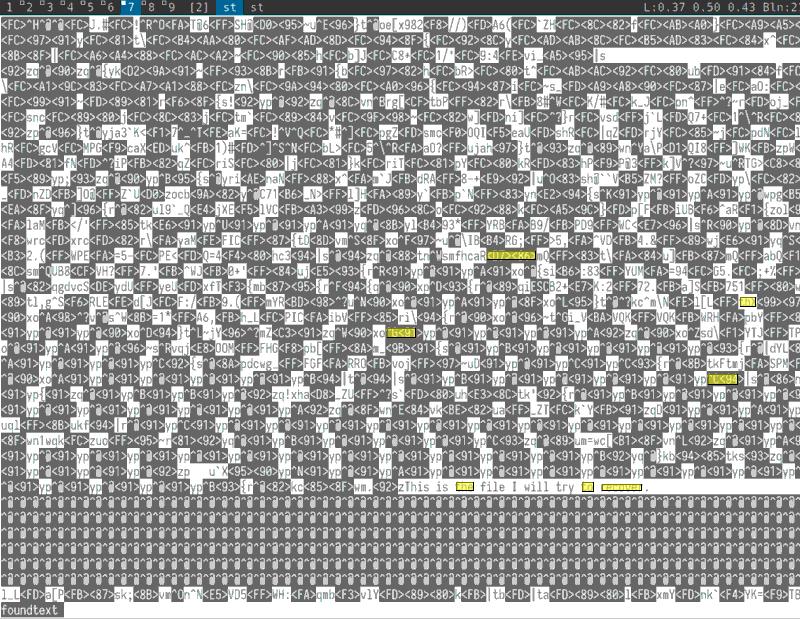
В образе backup.img существует файл с именем «myfile». Он содержит только одну строку текста: «This is the file I will try to recover.»
Grep использует эту строку в качестве отправной точки для восстановления файлов. Помимо нескольких других параметров, вы можете видеть, что в этом примере он выводит найденную строку в новый двоичный файл с именем «foundtext».
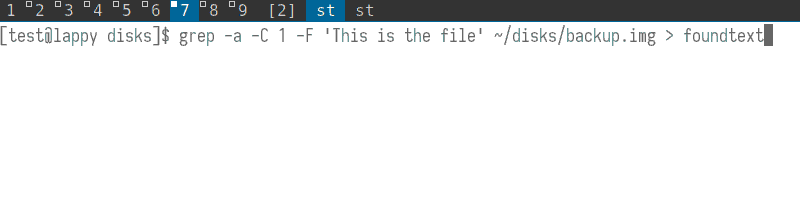
Также, вы можете изменить параметр -C, который печатает дополнительный контекст, окружающий строку в исходной команде. В этом примере команда указывает grep найти одну строку текста до и одну после указанной строки.
Начиная с -C 200, grep найдет 200 строк как до, так и после строки. Такой охват здесь не нужен, но он может быть важен для больших текстовых файлов с сотнями строк. Конечно, вам нужно знать содержимое ваших файлов, чтобы у grep была отправная точка для начала поиска.
Grep создаст в качестве вывода двоичный файл. Тем не менее, некоторые части будут удобочитаемыми, например желаемая строка текста этого примера в нижней части этого снимка экрана. Ваша задача — вручную выбрать нужные данные. Конечно, это тяжелая работа, но она лучше альтернативы отсутствия файлов.
Заключение
Итак, сначала скопируйте ваш диск или раздел с помощью ddrescue, а затем работайте с этой копией с помощью любых инструментов восстановления Linux, которые вам нужны. Не бойтесь попробовать более одного инструмента, особенно если ваш первый выбор не нашел данных, которые вы хотели найти. Будьте терпеливыми. Если вам повезет, вы вернете свои драгоценные файлы еще до того, как узнаете об этом.
Источник
7 of the Best Data Recovery Tools for Linux

Did your screen just turn black or your laptop freeze without warning? Maybe your hard drive has started chirping. Worse yet, maybe you suddenly can’t save to your home partition.
All these signs of a corrupted or failing drive can cause you to sweat, but there’s no reason to immediately throw away your computer. Keep reading to learn about six Linux tools that can help you retrieve your data and get your digital life back on track.
1. Trinity Rescue Kit
This live Linux distro made specifically for data recovery seemed to have been left for dead years ago, but a couple of years ago its developer turned up with an update out of nowhere that makes it run more effectively on modern computers.

So what is Trinity Rescue Kit? Essentially, if your main Linux OS (or Windows or macOS for that matter) becomes unusable due to hard drive failure or some other catastrophe, you can create a TRK USB drive, then boot to it to pull data from your main OS using a command line. It’s a rescue disk, and a really rather good one that has extra features like password recovery and virus scanning.
There is, of course, a bulk-undelete utility here too that scours your damaged or inaccessible hard drives for anything that can be recovered, and a couple of options for master boot record repair too. Be warned though, that there’s quite a steep learning curve to really take advantage of all these features.
2. Testdisk
Certain Linux recovery tools attempt to save your data by copying whatever is retrievable from a damaged partition. This can work, but isn’t guaranteed as issues with the partition itself may be obscuring the data you want to retrieve.

Testdisk comes in handy as it can actually fix partition-level errors, making it easier to recover data using Testdisk itself or another data recovery tool. It may even outright fix a corrupted hard drive and make your Linux PC work again, so you can access the data directly.
As well as carrying out deep-diving operations like restoring boot sectors and filesystem tables, Testdisk is also capable of recovering data – even deleted data – from hard drives in the NTFS, FAT, exFAT and ext formats.
To install Testdisk on Linux, go to the Terminal and enter
If you want to know more about using Testdisk, you can read our Testdisk guide here.
3. ddrescue
While ddrescue isn’t a data recovery tool in title, it should stand as your first step in the journey to retrieving your files. Ddrescue creates an image of your corrupt drive or partition so you can analyze a copy of your broken disk.
Always copy your disk to a separate image before you begin file recovery operations with the tools listed below. The more you use your actual failing drive, the more damage you can cause it.

What you see here is some output of ddrescue in action. In the first command, it copies the entire disk to an image named “backup.img.” The second command then copies only the bad blocks to that same image, passing over those blocks three times each to try to read them.
When you run these same commands, always use a logfile. Backups can take hours or days to complete, and without a logfile, any interruptions will make you start the process again from the beginning.
When this process is complete for your own disk or partition, you can mount the copied image and use the following utilities to retrieve files from it. Further use of our other Linux recovery tools in this article will grab data from the same “backup.img” created here.
4. Foremost
Foremost uses the data structures of common file types to retrieve data. You can either scrape an entire disk image for all its files or specify certain file types you’re most interested in.

What you can see here is the output of Foremost in verbose mode (the -v option). The -t option searches for file types of jpg, and the -i and -o options mark the respective input file and output directory.
You can see that Foremost analyzes the image ddrescue created in the previous step; that image has a number of JPEGs in it. Foremost was able to find ten such files, and when it was done scraping the image, it copied those ten files to the stated output folder.
5. scalpel
Scalpel, originally based on Foremost, aims to be frugal in its operation. It uses multi-threading and asynchronous input/output to search through images in an efficient manner. Moreover, it gives users the power to specify the number of footers and headers they wish to use for file recovery.
Users can also specify the types of files they want to recover by editing scalpel’s configuration file. The default configuration produces a lot of output, even without verbose mode (-v parameter) turned on.

In that screenshot you can see the final output of scalpel’s analysis of “backup.img.” The basic command (listed at the bottom of the screenshot) requires only an output directory and an image for analysis.
6. PhotoRec
PhotoRec strays away from its competitors by focusing on the recovery of photographs, videos, and text documents. It also works as an interactive utility within the console itself. Check out all its majesty

The initial PhotoRec command must specify a desired image (our backup.img) and output folder. PhotoRec then drops the user into its graphical environment. The screenshot here shows the image size. In further screens it asks for the disk’s partition type and whether or not you want to search the entire image for files.
7. grep
Finally, we come to grep. This may also not seem like the most straightforward of recovery options, but grep has the power to find deleted or lost text files by searching for strings present on a block device or disk image.
A file exists in backup.img called “myfile.” It contains only one line of text: “This is the file I will try to recover.”
Grep uses that string as its starting point for file recovery. Alongside a few other parameters, you can see that, in this example, it dumps the found string into a new binary file named “foundtext.”

In particular, you will want to pay attention to – and modify – the -C parameter which prints extra context surrounding the string in the initial command. This example command tells grep to find one line of text before and one after the provided string.
Starting at -C 200 , grep would find 200 lines both before and after a string. Such reach is unnecessary here, but it could be important for larger text files with hundreds of lines. You will, of course, need to know the text of your own files so grep has a starting point to begin its search.
Grep will generate a binary file as its output. Still, some parts will be human-readable, such as this example’s desired line of text near the bottom of this screenshot. It will be your job to manually scrape out the data you need. It’s tough work, for sure, but it beats the alternative of having no file at all.

Conclusion
In summary, be sure to first copy your drive or partition with ddrescue, then work on that copy with any of the other Linux recovery tools you need. Don’t be afraid to try more than one tool, especially if your first choice didn’t find the data you wanted.
Be patient. With any luck, you’ll have your precious files back before you know it.
This article was first published in Feb 2018 and was updated in March 2019.
Источник


