- Правильная Очистка Папки Temp Windows XP 7 8 10 Три Метода
- Можно ли удалить папку Temp и для чего она необходима?
- Где находится папка Temp?
- Открываем скрытые файлы
- Как очистить папку Temp?
- Чистим ручным методом
- Утилита очистка диска
- Очищаем диск программой оптимизатором
- Видео Ускоритель компьютера
- Free up drive space in Windows 10
Правильная Очистка Папки Temp Windows XP 7 8 10 Три Метода

Добрый день, друзья. Очистка папки Temp windows, так ли она необходима, или без этого можно обойтись? Я в своих статьях уже много раз упоминал про эту системную папку, но статью именно про эту папочку ещё ни разу не писал и для чего именно она создана, также не упоминал. В этой статье мы восполним данный пробел.
Мы уже упоминали про разные средства освобождения места на системном диске, так как этот диск, особенно если на нём мало места, очень быстро может забиться системным хламом, и вам компьютер, насколько бы он не был новым, начнёт медленно работать.
Я уже говорил, и повторю ещё раз, в любом разделе системы Windows должно быть по крайней мере 20% свободного пространства, иначе могут начаться проблемы с этим разделом. Особенно это касается системного диска. Всем системным файлам нужно свободное место для бесперебойного функционирования. Иначе, говоря русским языком, файлам негде будет развернуться, и могут начаться различные сбои и ошибки.
Можно ли удалить папку Temp и для чего она необходима?
Скорее всего, вы её удалить не сможете, так как в ней будут присутствовать программы, функционирующие на данный момент. Но, давайте вначале разберёмся, для чего она нужна?
Итак, в системе Windows все папочки с файлами разделяются по определённым параметрам. Их можно разделить на папочки системы, и папочки пользователя.
Папочки и файлы системы, это те из них, которыми пользуется только сама ОС Виндовс для своего нормального функционирования. Когда человек вмешивается в работу таких файлов, к примеру, удаляет их, для общей работы компьютера это действие может кончиться плачевно. Компьютер начнёт работать со сбоями, или вообще перестанет запускаться.
Но, а если человек деинсталлирует пользовательскую папочку, на саму систему это никоим образом не повлияет. Просто у вас перестанет работать программа, папку которой вы удалили. Или же в ней начнутся ошибки и сбои. В таком случае, данную программу лучше полностью удалить, и установить заново, если у вас остался её дистрибутив.
По поводу папочки Temp, хочу сказать, что она папка относится именно к системным. Её название является сокращением слова «temporary». Перевести её можно как «Временная», каковой, по сути, она и является. Она в себе хранит именно временную информацию.
Что значит временная информация? В этом есть свою нюансы. Первый основан на том, что, когда вы инсталлируете любой софт, ОС применяет данную папочку для сохранности промежуточной информации. Другими словами, переносит в неё элементы устанавливаемого софта, которые затем начинают формировать специальные модули, нужные для инсталляции данной программы на ПК. Затем после того, как вы полностью установили софт, эти модули становятся уже не нужными, и система их оставляет в папочке Temp.
Отчего так получается, что данные файлы Windows не всегда удаляет на автомате, тема для другой статьи. Но, главное, системный хлам остаётся в этой папочке. Затем, с течением времени его становится всё больше. И, если вы не будете проводить его удаление хотя бы раз в месяц, это может плохо кончиться для системы.
Другой нюанс основан на том, что даже Windows в процессе своего функционирования постоянно добавляет в нашу папочку определённую информацию. Но, к этим системным файлам, ОС старается закрыть доступ пользователям.
Где находится папка Temp?
Данная папочка, начиная с ОС Виста и до Windows 10 содержится по следующему адресу:
Что интересно, в ОС Виндовс есть те только системная папочка Temp, но также присутствует папка пользователя. Она также называется Temp. Данная папочка принадлежит к учётной записи определённого пользователя ПК, и содержится внутри другой папки, называющейся также, как названа ваша учетная запись. От имени этой учетной записи вы на данный момент вошли в систему.
В данную папочку ОС сбрасывает информацию, относящуюся непосредственной к вашей работе на ПК в это время.
Когда вы включаете ПК и происходит запуск основного софта, данный софт отсылает некоторые свои элементы и различные вычисления в данную папочку. Позже, когда потребуется, система забирает из этой папки необходимую информацию, чтобы выполнять различные функции.
Зачем это нужно? Для экономии места на оперативной плате ПК, которая и так всегда загружена. Обычно, созданную временную информацию за день система при завершении работы – удаляет. Если же ваш компьютер иногда виснет, то информация из папки Temp становится лишним хламом.
Если на вашем компьютере несколько учётных записей, то и число папочек Temp тоже несколько. Для каждой учетки существует собственная папочка Темп. Так как хозяин компьютера по умолчанию получает полный доступ к собственным папочкам с файлами, создатели Windows решили, чтобы уйти от многих проблем, которые могут появиться у новичков , скрыть эту папочку. Другими словами, вы её в каталоге папок не увидите.
Если же вы очень хотите посмотреть на эту папочку и убрать из неё ненужный хлам, есть возможность на время создать из этой папки видимую. Также, если вы уверены в своих компьютерных знаниях, можете таковой её и оставить.
Открываем скрытые файлы
Итак, чтобы увидеть подобные файлы, перейдём в «Панель управления». Выбираем «Крупные значки», внизу «Параметры проводника».

В новом окошке выбираем меню «Вид». В этом окне прокручиваем ползунок вниз, и над самой нижней строкой ставим чикбокс «Показывать скрытые файлы…». Затем, нажимаем «Применить», далее Ок.
После этого, вы сможете рассмотреть скрытые папочки с файлами. Теперь нам нужно отыскать папочку Темп. Она содержатся по адресу:
User_name – это папка с вашей учётной записью. Первая папочка может называться «Пользователи». Проходим по данному адресу через проводник.
Как очистить папку Temp?
Итак, как мы выяснили, данные папочки нужно время от времени очищать. Я имею в виду, что должна быть очищена не только пользовательская папочка, но и системная. Проводить эту чистку есть возможность 3 способами:
- Ручной;
- Утилитой Windows;
- Сторонним софтом.
Все 3 метода очищают примерно на одинаковом уровне. Отсюда, решать вам, какой из-них применять.
Чистим ручным методом
Итак, сейчас мы очистим вашу учётную папочку Темп. Системную папку вы очистите аналогичным методом.
- Итак, входим в данную папочку методом, описанным выше;

- Далее, нам нужно выделить всё содержимое. Можно, конечно, выделять по одной папке, но, я советую выделить их все, так как папочек и файлов очень много. Для этого, нажимаем кнопки Ctrl+A. У нас все элементы на странице выделяются;
- Затем, нажимаем на кнопку Del, и начинает происходить удаление файлов с папками.
Удаление начнётся, но папки будут удаляться не все. У вас начнут всплывать окна, в которых будет говориться, что какая-то папочка или файл не желают удаляться. Это показывает то, что на данный момент Windows использует эту папку. В этом случае просто в появившемся окошке нажимаем «Пропустить», и продолжаем удаление. Таких сообщений может появиться много. На всех них нажимаем «Пропустить» и удаляем оставшиеся элементы.
Но, это немного муторно, особенно, если вы давно не удаляли элементы из этой папки. Поэтому, в открывшемся окошке нужно поставить галочку «Выполнить для всех…» и ОС перестанет вам надоедать подобными вопросами.
Удаление временных папок продолжается. Чем дольше вы не удаляли подобные элементы, тем их удаление займёт больше времени. В итоге, после удаления, у меня осталось несколько файлов от множества. Это нормально. Не забываем после этого очистить корзину самостоятельно, или с помощью нижнего метода.
Утилита очистка диска
Я уже писал, как пользоваться этой утилитой, поэтому, я не стану во всех подробностях сообщать, как это делать. Напишу вкратце:
Кликнем по ярлыку «Компьютер» и войдём в проводник. В открывшемся окошке выбираем системный диск и кликнем по нему правой клавишей мышки. В контекстном меню выберем «Свойства».
В появившемся окошке нам нужна вкладка «Общие». В этом окошке мы видим информацию о системном разделе. Сколько пространства свободно, сколько занято. Но, нас интересует кнопочка «Очистка диска». Не нужно бояться на неё нажимать. Утилита очистить только хлам, и не тронет нужные файлы. Нажимаем «Очистка диска».
Программа начинает сканировать диск.
После этого, появляется окошко с результатом проведённого сканирования. На моём диске может быть очищено 424 Мб. Было бы больше, если бы я перед этим не очистил папочку Temp. Вы думаете, какие файлы нужно очищать (поставить галочки)?
Смело можете очищать все файлы, над которыми система сама поставила галочки. Также, я поставил галки над строкой «Загрузки» (советую перед очисткой посмотреть, есть ли в это папке нужная информация), также «Корзина», чтобы удалить с неё все элементы, которые мы поместили в неё при прошлой очистке. Но, самое главное из темы нашей статьи, поставьте галку над строкой «Временные файлы». Нажимаем «Очистить системные файлы».
Программа начала оценивать объём освобождаемого места. После этого, в новом окошке, опять ставим галочки над нужными элементами. Нажимаем Ок.
Программа у нас спрашивает:
Нажимаем «Удалить файлы». Это делается для того, чтобы дать нам время подумать, действительно ли мы собираемся удалить данные файлы? Наши файлы удалены.
Очищаем диск программой оптимизатором
Таких программ много, как платных, так и бесплатны, вы можете выбрать любую, например, CCleaner. Я предлагаю для тщательной очистки диска программу, созданную Российскими специалистами под названием «Ускоритель компьютера». Программа может, кроме качественной очистки диска, очищать реестр, удалять из него ошибки, удалять лишние программы из автозагрузки. Можно наладить планирование поиска и удаления подобных ошибок и прочее.
Я не хочу сейчас подробно рассказывать про эту уникальную программу, так как я о ней уже написал подробную статью: — Ускоритель компьютера. В статье вы найдёте большинство ответов на ваши вопросы. Кроме того, у данного софта есть своя служба поддержки, которая качественно ответит на все ваши вопросы. Также, ответы на ваши вопросы вы можете узнать из видео, которое я также прилагаю.
Видео Ускоритель компьютера
Вывод: — Очистка папки Temp Windows дело необходимое, иначе данная папочка может сильно забиться системным хламом. В результате, компьютер начнёт сильно тормозить. Советую для лучшей очистки применять все три способа! Успехов!
Free up drive space in Windows 10
If your PC is running low on free space, you might not be able to install important Windows updates, and your PC’s performance may be affected. Here are some ways to free up space so you can keep your PC up to date and running smoothly. These suggestions are listed in order, so start with the first one, see if that helps, and then continue to the next one if it doesn’t.
To check the total disk space left on your Windows 10 device, select File Explorer from the taskbar, and then select This PC on the left. The available space on your drive will appear under Devices and drives.
Note: If you follow the steps below and continue to have trouble updating Windows because of low disk space, resetting or reinstalling Windows might help. For more info, see Reinstall Windows 10.
If you used Disk Cleanup to free up space on your device and then see a Low Disk Space error, it’s possible that your Temp folder is quickly filling up with application (.appx) files that are used by Microsoft Store. For more info, see Low Disk Space error due to a full Temp folder.
Storage Sense can automatically free up drive space for you by getting rid of items that you don’t need, like temporary files and items in your Recycle Bin. For more info, see Manage drive space with Storage Sense.
If your system doesn’t have Storage sense, you can use the Disk Cleanup tool to delete temporary files and system files from your device.
In the search box on the taskbar, type disk cleanup, then select itfrom the results.
Select the check box next to the type of files you want to delete. (To view a description of each type of file, select the name.) By default, Downloaded Program Files, Temporary Internet Files, and Thumbnails are selected. Be sure to clear those check boxes if you don’t want to delete those files.
To free up even more space, select Clean up system files, and then select the type of system files you want to delete. Disk Cleanup will take a few moments to calculate the amount of space that can be freed up.
Note: If it’s been fewer than 10 days since you upgraded to Windows 10, your previous version of Windows will be listed as a system file you can delete. If you need to free up drive space, you can delete it, but keep in mind that you’ll be deleting your Windows.old folder, which contains files that give you the option to go back to your previous version of Windows. If you delete your previous version of Windows, this can’t be undone. (You won’t be able to go back to your previous version of Windows.)
After you’ve selected the types of files you want to delete, select OK, and then select Delete files in the confirmation window to start the cleanup.
There’s also an option in Disk Cleanup to Compress your OS drive. Selecting this option compresses the drive on which Windows is installed, helping you gain extra space to install important updates. This action does not delete the contents of this drive, and you shouldn’t experience problems opening and saving files from the compressed drive.
After you install the update, you can manually decompress the OS drive at any time. To do this, select File Explorer from the taskbar, and in the left pane, select This PC. Right-click or tap and hold the OS drive (usually disk C), and then select Properties on the shortcut menu. Clear the Compress this drive to save disk space check box, and then select Apply > OK.
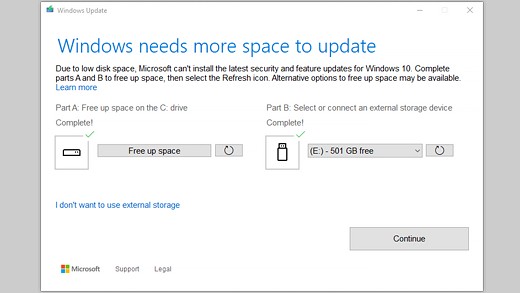
Windows 10 may indicate that it needs more space to get the latest Windows 10 feature update. You can use an external storage device to help you complete the update.
Note: You may need to use a micro-USB adapter if your device doesn’t have a standard USB port.
Personal files such as videos, music, photos, and documents can take up a lot of space on your device. To see which files are using the most space:
Select File Explorer from the taskbar and find the files you want to move.
Under This PC in the menu on the left, select a folder to see what files are saved in it. The Videos, Music, Pictures, and Downloads folders usually contain the largest files that you’ve saved to your device.
To see the size of the files in a folder, select View > Details. Right-click in the open space and then select Sort by > Size to show the largest files at the top of the list.
If there are files you no longer need on your device, you can either delete them or move them to an external storage device like a USB drive or an SD card.
Note: If you delete any files, remember to empty the Recycle Bin to completely remove them from your device and free up space.
To move photos, music, videos, or other files that you want to keep but don’t use very often, consider saving them to an external storage device like a USB drive or an SD card. You’ll still be able to use them when the drive is connected, but they won’t take up space on your PC.
Connect an external storage device like a USB drive or SD card to your PC.
Select File Explorer from the taskbar and go to the folder that contains the files you want to move.
Select the files, select the Home tab, and then select Move to > Choose location.
Select the external storage device you connected in the location list, and then select Move.
Saving new files to another drive will help prevent low space problems on that drive in the future, so you won’t have to move your files to another drive repeatedly. Instead of saving all your new files to the default drive, you can save some of them to a different drive that has more free space.
Under More storage settings, select Change where new content is saved.
For each content type, select a drive from the drop-down menu. If the drive you want to use isn’t listed there, make sure it’s connected to your PC.
Note: OneDrive Files On-Demand requires Windows 10 version 1709 or later and OneDrive client version 17.3.7064.1005 or later. To see which version of Windows you’re running, select Start > Settings > System > About . To see which version of the OneDrive client you have installed, see Which version of OneDrive am I using?
Open About settings
You can save space by turning on OneDrive Files On-Demand, which stores a smaller placeholder file on your hard drive instead of the full-size file that’s stored in your OneDrive account in the cloud. You’ll be able to get to your OneDrive files from your PC without having to use up hard-drive space downloading full-size versions of them all. See Learn about OneDrive Files On-Demand for more info.
Sometimes a virus or other malware can consume significant hard-drive space by corrupting your system files. If you suspect your PC is infected with malware, use an antivirus program like Windows Defender to run a virus scan and cleanup. If this doesn’t fix the problem, you might need to reset your PC.
If you’ve followed the instructions here but still need help freeing up space on your device, you can contact Microsoft support to chat with a support agent. This is also recommended if your attempts to free up drive space trigger particular error codes that you need help resolving.
The following questions concern low disk space and Windows Update specifically. Learn more about Windows Update.
When there isn’t enough free space available to install an update, a pop-up notification will prompt you that additional space is required to install the update.
When you select Fix issues, you’ll be informed about how much additional space is needed. You’ll also be notified that you can use an external storage device so that you don’t need to free up quite as much space on your system drive. Learn how to free up space to install Windows updates.
The total free disk space your device requires to complete an update varies. Typically, feature updates require 6 GB–11 GB or more of free space, while quality updates require 2 GB–3 GB or more. Learn about the difference between a feature update and a quality update.
You need disk space to download the update, download new versions of any optional features and languages that are currently installed, and to apply the update. Additional space is temporarily required to support removal of the update (typically for 10 days). This space can be reclaimed after the update is completed. To do this, Select Start > Settings > System > Storage > Free up space now.
Open Storage settings
The update is compressed to reduce download size.
Note: For devices with reserved storage, an update will first use the reserved storage space before using other disk space. For more info, see How reserved storage works in Windows 10.
The space required to complete a feature update depends on two factors: which update path is followed and the size of optional content and other updates that apply to your PC when the feature update is installed.
Note: For devices with reserved storage, an update will first use the reserved storage space before using other disk space. For more info, see How reserved storage works in Windows 10.
Windows follows three different feature update paths, depending on the amount of disk space currently available.
1. For PCs with plenty of free disk space
Windows automatically tries to complete more of the update process in the background while you use your PC. This significantly reduces the time your PC will be offline (or unusable) during the update, although it might temporarily use more disk space to complete the update. Learn more about our efforts to reduce offline time during updates (English only at this time).
2. For PCs with limited free space but still enough to complete the update automatically
Windows will automatically optimize for reducing the amount of free disk space required to install the update. This will result in a longer offline install time.
3. For PCs that don’t have enough space to automatically install the update
Windows will prompt you to free up disk space or use external storage to temporarily extend the storage on your PC. If you use an external storage device, Windows won’t need as much free space on the system drive as it temporarily uses your external storage.
Across each of these update paths, the total amount of free disk space required will vary, depending on the optional content installed and other updates that apply to your PC. For example:
Optional features. Many optional features available for Windows are pre-installed or acquired on demand by the system, or manually by you. You can see which ones are installed on your PC by going to Settings > Apps > Apps & features > Manage optional features.
Open Optional features settings
These features range in size from less than 1 MB to almost 2 GB for the Windows Mixed Reality portal. You can reduce the amount of space required to install a feature update on your PC by uninstalling optional features you aren’t using.
Languages installed. Windows is localized into many languages. Although many people only use one language at a time, some people switch between two or more languages. You can see which languages are installed on your PC by selecting Start > Settings > Time & Language > Language .
Open Language settings
During each update, all language resources and any associated typing, text-to-speech, speech-to-text, and handwriting recognition resources must be updated. The content for each language can range from about 175 MB to more than 300 MB. You can reduce the amount of space required to install a feature update on your PC by uninstalling languages you aren’t using.
Driver updates. OEMs and other hardware partners sometimes publish new graphics, networking, audio, and other drivers in conjunction with the new OS update. The size of these drivers can vary significantly, depending on your PC and on which drivers have been updated.
OS quality updates. During a feature update, Windows tries to download and automatically install the latest quality update so that your PC is fully up to date when you start using it. Shortly after the feature update is released, the quality update for that feature update could be as small as a few hundred MB, but as more quality and security changes are implemented, the quality update can increase in size to 1 GB or more.If your PC is short on disk space, you can download and install the quality update after the feature update is complete.
Finally, Windows Update will temporarily disable hiberfile.sys, pagefile.sys, and other system files in order to use the space these files typically consume to apply the feature update. Any files that are disabled to apply the update will be automatically re-enabled when the update is complete. Because these files vary in size depending on how you use your PC and the amount of RAM your PC has, even in cases where two different PCs have the exact same OS image, the amount of free disk space required to complete an update may vary.
The combination of update path and features means there’s a wide range of free disk space required to complete an update. Here are a few examples for PCs updating to Windows version 1803:
Optimized for reduced offline time
Optimized for minimal disk space
Optimized for minimal disk space with external storage
Minimal optional features, languages, and updates


