- Free up storage space on your Mac
- Find out how much storage is available on your Mac
- Manage storage on your Mac
- Store in iCloud
- Optimize Storage
- Empty Trash Automatically
- Reduce Clutter
- Where to find the settings for each feature
- Other ways that macOS helps automatically save space
- How to free up storage space manually
- 3 Ways To Visualize Mac Disk Usage
- OmniDiskSweeper
- GrandPerspective
- DaisyDisk
- Wrapping Up
Free up storage space on your Mac
Save space by storing your content in iCloud or using built-in tools to find and remove large or unneeded files.
The Optimized Storage features of your Mac help you save storage space by storing your content in iCloud and making it available on demand:
- When storage space is needed, files, photos, movies, email attachments, and other files that you seldom use are stored in iCloud automatically.
- Each file stays right where you last saved it, and downloads when you open it.
- Files that you’ve used recently remain on your Mac, along with optimized versions of your photos.
If you haven’t yet upgraded to macOS Sierra or later, learn about other ways to free up storage space.
Find out how much storage is available on your Mac
Choose Apple menu > About This Mac, then click Storage. Each segment of the bar is an estimate of the storage space used by a category of files. Move your pointer over each segment for more detail.
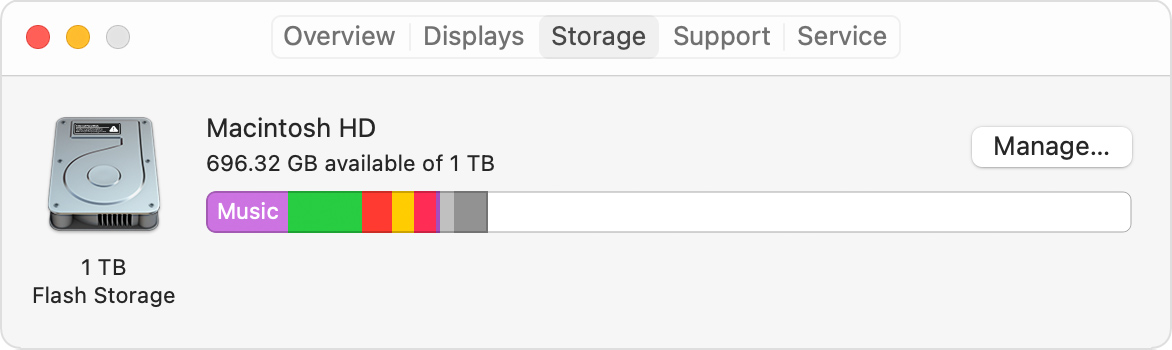
Click the Manage button to open the Storage Management window, pictured below.
Manage storage on your Mac
The Storage Management window offers recommendations for optimizing your storage. If some recommendations are already turned on, you will see fewer recommendations.
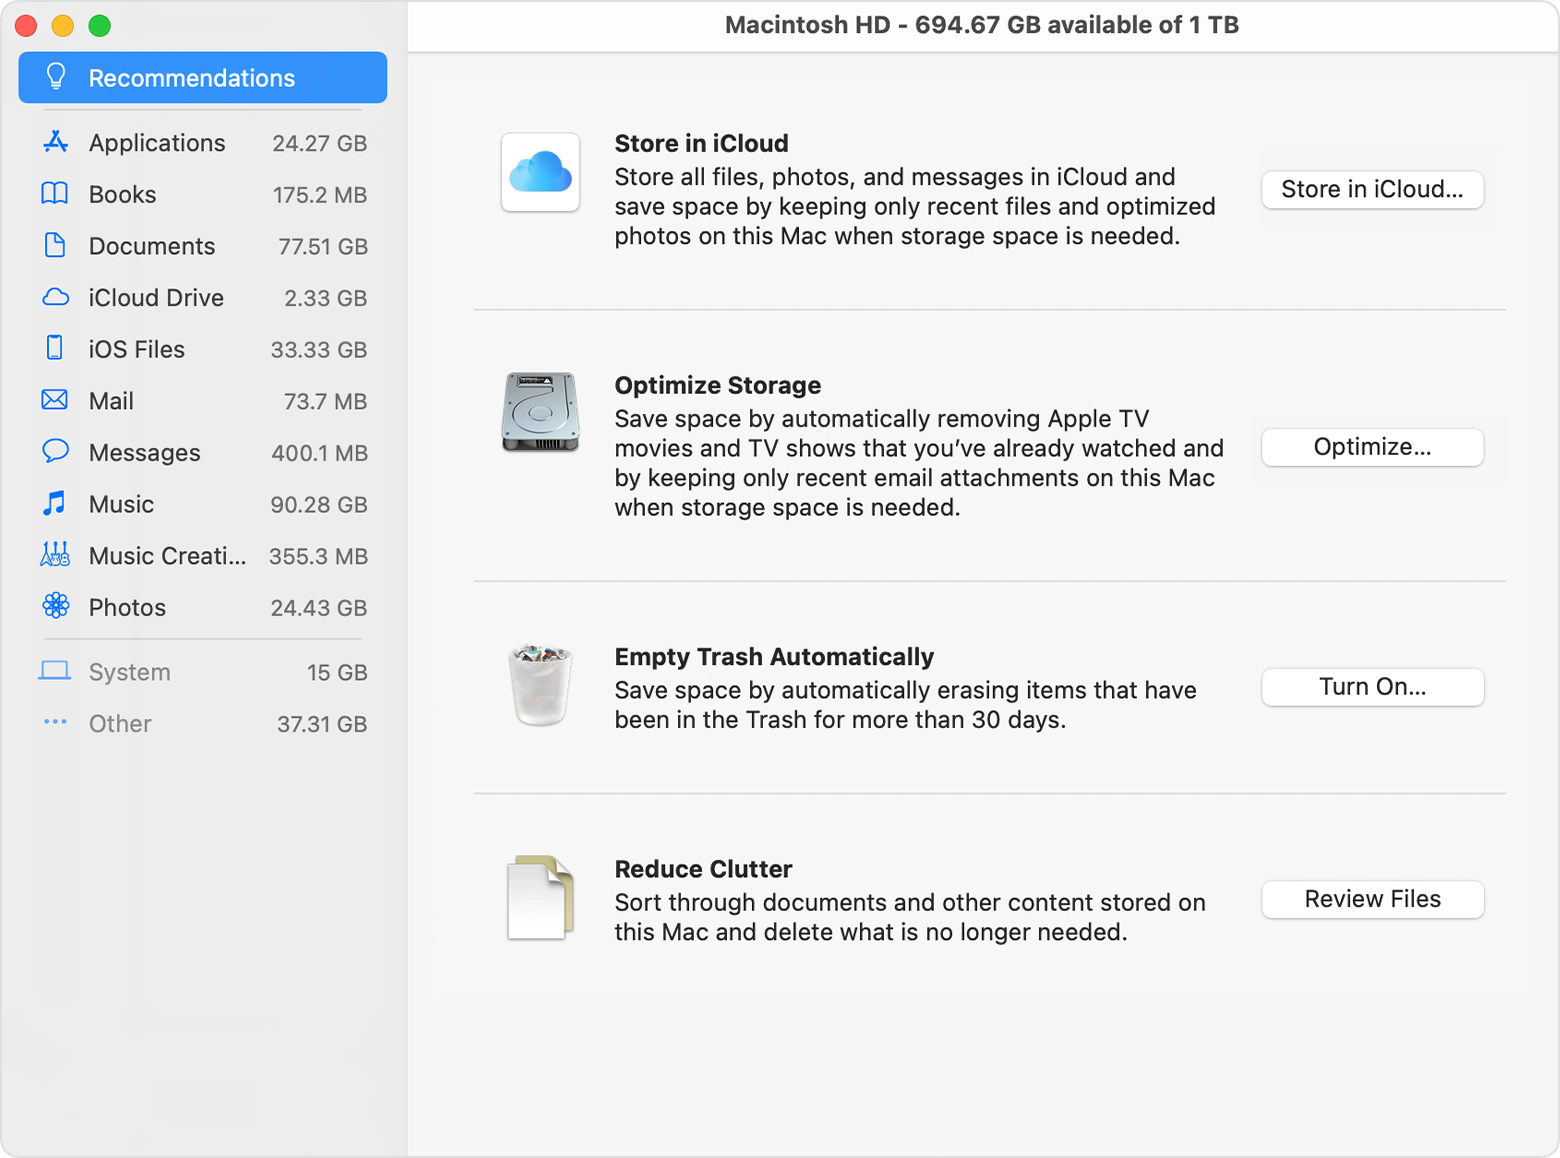
Store in iCloud
Click the Store in iCloud button, then choose from these options:
- Desktop and Documents. Store all files from these two locations in iCloud Drive. When storage space is needed, only the files you recently opened are kept on your Mac, so that you can easily work offline. Files stored only in iCloud show a download icon , which you can double-click to download the original file. Learn more about this feature.
- Photos. Store all original, full-resolution photos and videos in iCloud Photos. When storage space is needed, only space-saving (optimized) versions of photos are kept on your Mac. To download the original photo or video, just open it.
- Messages. Store all messages and attachments in iCloud. When storage space is needed, only the messages and attachments you recently opened are kept on your Mac. Learn more about Messages in iCloud.
Storing files in iCloud uses the storage space in your iCloud storage plan. If you reach or exceed your iCloud storage limit, you can either buy more iCloud storage or make more iCloud storage available. iCloud storage starts at 50GB for $0.99 (USD) a month, and you can purchase additional storage directly from your Apple device. Learn more about prices in your region.
Optimize Storage
Click the Optimize button to save space by automatically removing watched movies and TV shows. When storage space is needed, movies or TV shows that you purchased from Apple and already watched are removed from your Mac. Click the download icon next to a movie or TV show to download it again.
Your Mac will also save space by keeping only recent email attachments on this Mac when storage space is needed. You can manually download any attachments at any time by opening the email or attachment, or saving the attachment to your Mac.
Optimizing storage for movies, TV shows, and email attachments doesn’t require iCloud storage space.
Empty Trash Automatically
Empty Trash Automatically permanently deletes files that have been in the Trash for more than 30 days.
Reduce Clutter
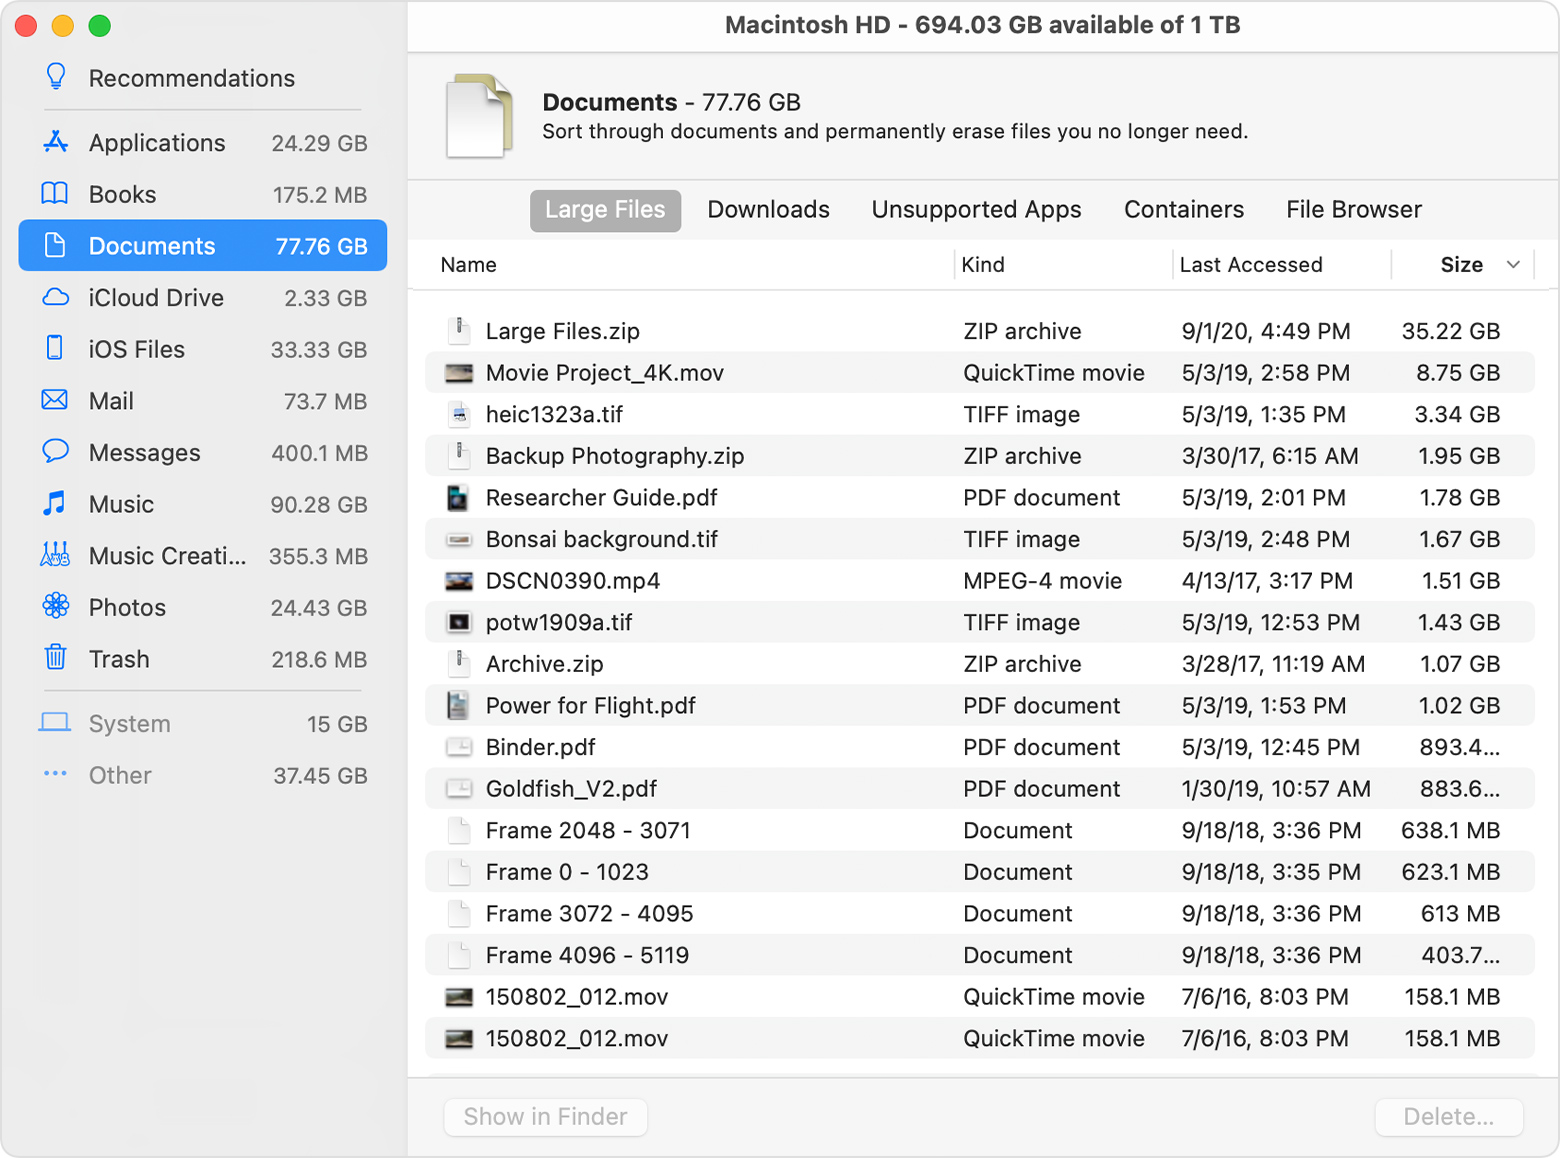
Reduce Clutter helps you identify large files and files you might no longer need. Click the Review Files button, then choose any of the file categories in the sidebar, such as Applications, Documents, Music Creation, or Trash.
You can delete the files in some categories directly from this window. Other categories show the total storage space used by the files in each app. You can then open the app and decide whether to delete files from within it.
Where to find the settings for each feature
The button for each recommendation in the Storage Management window affects one or more settings in other apps. You can also control those settings directly within each app.
- If you’re using macOS Catalina or later, choose Apple menu > System Preferences, click Apple ID, then select iCloud in the sidebar: Store in iCloud turns on the Optimize Mac Storage setting on the right. To turn off iCloud Drive entirely, deselect iCloud Drive.
- If you’re using macOS Mojave or earlier, choose Apple menu > System Preferences, click iCloud, then click Options next to iCloud Drive. Store in iCloud turns on the Desktop & Documents Folders and Optimize Mac Storage settings.
- In Photos, choose Photos > Preferences, then click iCloud. Store in iCloud selects iCloud Photos and Optimize Mac Storage.
- In Messages, choose Messages > Preferences, then click iMessage. Store in iCloud selects Enable Messages in iCloud.
- If you’re using macOS Catalina or later, open the Apple TV app, choose TV > Preferences from the menu bar, then click Files. Optimize Storage selects “Automatically delete watched movies and TV shows.”
- In you’re using macOS Mojave or earlier, open iTunes, choose iTunes > Preferences from the menu bar, then click Advanced. Optimize Storage selects “Automatically delete watched movies and TV shows.”
- In Mail, choose Mail > Preferences from the menu bar, then click Accounts. In the Account Information section on the right, Optimize Storage sets the Download Attachments menu to either Recent or None.
Empty Trash Automatically: From the Finder, choose Finder > Preferences, then click Advanced. Empty Trash Automatically selects “Remove items from the Trash after 30 days.”
Other ways that macOS helps automatically save space
With macOS Sierra or later, your Mac automatically takes these additional steps to save storage space:
- Detects duplicate downloads in Safari, keeping only the most recent version of the download
- Reminds you to delete used app installers
- Removes old fonts, languages, and dictionaries that aren’t being used
- Clears caches, logs, and other unnecessary data when storage space is needed
How to free up storage space manually
Even without using the Optimized Storage features described in this article, you can take other steps to make more storage space available:
- Music, movies, and other media can use a lot of storage space. Learn how to delete music, movies, and TV shows from your device.
- Delete other files that you no longer need by moving them to the Trash, then emptying the Trash. The Downloads folder is good place to look for files that you might no longer need.
- Move files to an external storage device.
- Compress files.
- Delete unneeded email: In the Mail app, choose Mailbox > Erase Junk Mail. If you no longer need the email in your Trash mailbox, choose Mailbox > Erase Deleted Items.
Источник
3 Ways To Visualize Mac Disk Usage
Ever needed to track down all of the files that are clogging your hard drive? Using Finder for cleanup assumes that you already know where the big files are stored. The three tools we’re taking a look at today will assist you in finding the files visually so that you can pinpoint what’s hogging your hard drive.
A visual approach to scouring the hard drive is much more intuitive than finding large files one at a time.
Files easily get lost or orphaned. We store projects in temporary spots that we’re sure that we will remember, but hundreds of gigabytes later, it’s impossible to keep up. A visual approach to scouring the hard drive is much more intuitive than finding large files one at a time. Each of the three tools below feature different ways of visualizing and cleaning up your hard drive. Let’s take a look.
Tip: Make sure that you tread lightly as you delete files! Many of these programs will remove files in a way that does not allow for them to be recovered. Also, be sure to make backups of your Mac regularly.
OmniDiskSweeper


OmniDiskSweeper lets you browse your file folders and puts file sizes next to every directory.
A free app from OmniGroup, OmniDiskSweeper lets you view your file storage in a much more powerful way than Finder. After scanning a drive for several minutes, the program returns a file tree complete with content sizes for all of the folders.
When using this on my own Mac, it was helpful for a number of directories. I expect folders like my Dropbox to be packed with files. However, temp folders with gigabytes of project files are not something I need to keep, so finding them with OmniDiskSweeper can help quickly clear off some space on your drive.


Choosing delete on a file brings up the option to «destroy» it from within OmniDiskSweeper.
OmniDiskSweeper will scan a drive and then require you to browse the folders. Although it’s a big improvement over Finder, the other tools below will offer a truly visual view of how your hard drive is divided up.
GrandPerspective


The free and open source tool GrandPerspective is another way of visualizing the usage of your drive.
Grand Perspective is another app that takes a visual approach to disk management. The free and open source software is a tool that will scan a folder or drive to build a rectangular representation of your file storage.


Hovering over a file displays the path and size of that file or directory.
After the program has built a chart of your chosen folder or drive, your storage is divided up into rectangles. The size of these rectangles are proportional to the size of the file represented, so it’s easy to identify the largest files. Clicking a file displays information about it, and then you can delete it or open it up in Finder to manage it further.
The size of these rectangles are proportional to the size of the file represented, so it’s easy to identify the largest files.
GrandPerspective also helps to visualize your storage by keeping together the files that are in the same folder. As you can see in my above screenshot, the rectangles can become so small that its hard to select individual files, particularly for drives packed full of files.
GrandPerspective is an extremely powerful tool, but it may overwhelm some beginner users. Let’s take a look at one more application that might be more user-friendly.
DaisyDisk
DaisyDisk is the most polished and intuitive tool on this list. This program can really help you get your hard drive cleaned up and help you find the files that are hogging your disk space with its unique approach to visualizing the drive.
The DaisyDisk difference is defined by the visual experience of using the application.
The DaisyDisk difference is defined by the visual experience of using the application. The program can be set to scan either an entire hard drive, or any directory on your computer. I frequently will use the application to clean out my Dropbox or tidy up my video projects folder.
After the scan completes, DaisyDisk prepares a circular representation of how your disk space is being used. As you explore the directories more, new circles are rendered. The circle in its entirety represents the total files scanned, and then is split up by directory or file.


Browsing your Mac’s folder structure causes DaisyDisk to continually build circular representations of the folder at hand.
The big advantage with DaisyDisk is that you can continually browse and whittle down your hard drive. The other tools require starting a new scan to explore folders, but DaisyDisk builds the whole tree while you work, without delay. Each click into a directory displays what the developer calls a «sunburst map» of how the files make up the folder.
Another perk for DaisyDisk is that the cleanup process is built directly into the application as well. In the lower part of the application is a circular cleanup area to drop files or folders into while browsing your drive or folder. After depositing all of your unwanted files, the program will permanently delete them following a short countdown.
DaisyDisk is also the only tool on this list that isn’t free. It normally retails for $19.95, but is currently on sale for $9.95. With DaisyDisk, it’s really easy to both search out the files that are taking up your disk space and clean them up in one sweep. This is definitely my preferred application when I’m doing a system cleanup.
Wrapping Up
Keeping your hard drive clean is important in making sure that your Mac stays performing at its peak. However, it’s not always easy to remember where you stored your files or understand where your storage space went. Visualizing your drive’s usage is the best way to quickly recover space and delete unused files. Any of the three tools mentioned above are a huge improvement over blindly browsing the drive hunting for the disk hogs.
Источник


