- Disk Management From the Command-Line, Part 1
- Terminology
- Benefits of the Command-Line
- Disk Information with diskutil
- Partition Information
- Verifying and Repairing Volumes
- Erasing Disks
- Filesystem
- Disk Identifier
- Erasing Volumes
- Reformatting Volumes
- Renaming Volumes
- Wrapping Up
- Список всех подключенных дисков и их разделов из терминала
- Как вывести список всех подключенных дисков, разделов и томов на Mac через командную строку
- Pro Terminal Commands: Using diskutil
- Getting Acquainted with diskutil
- Using verbs
- Unmounting and Ejecting with diskutil
- Fixing Problems with diskutil
- Format and Erase Drives with diskutil
- Partition Drives with diskutil


Disk Management From the Command-Line, Part 1
Disk Utility within Mac OS X provides a range of disk management tools, from erasing and repartitioning hard disks to restoring images and repairing volumes. It’s a simple way of interacting with attached storage on your Mac.
Beyond this graphical front-end are some powerful command-line tools that we can use directly. In this series, we’ll look at how to replicate the functionality of Disk Utility at the command-line.
The following guide will require the use of an external hard drive which will be erased and partitioned.
Terminology
A partition is a logical storage unit located on a hard disk. A hard disk can contain a single partition, making use of all the space it contains, or it can be split into multiple partitions.
In order to store data on a partition, it needs a filesystem. Once a partition has been formatted, this combination of partition and filesystem is known as a volume.
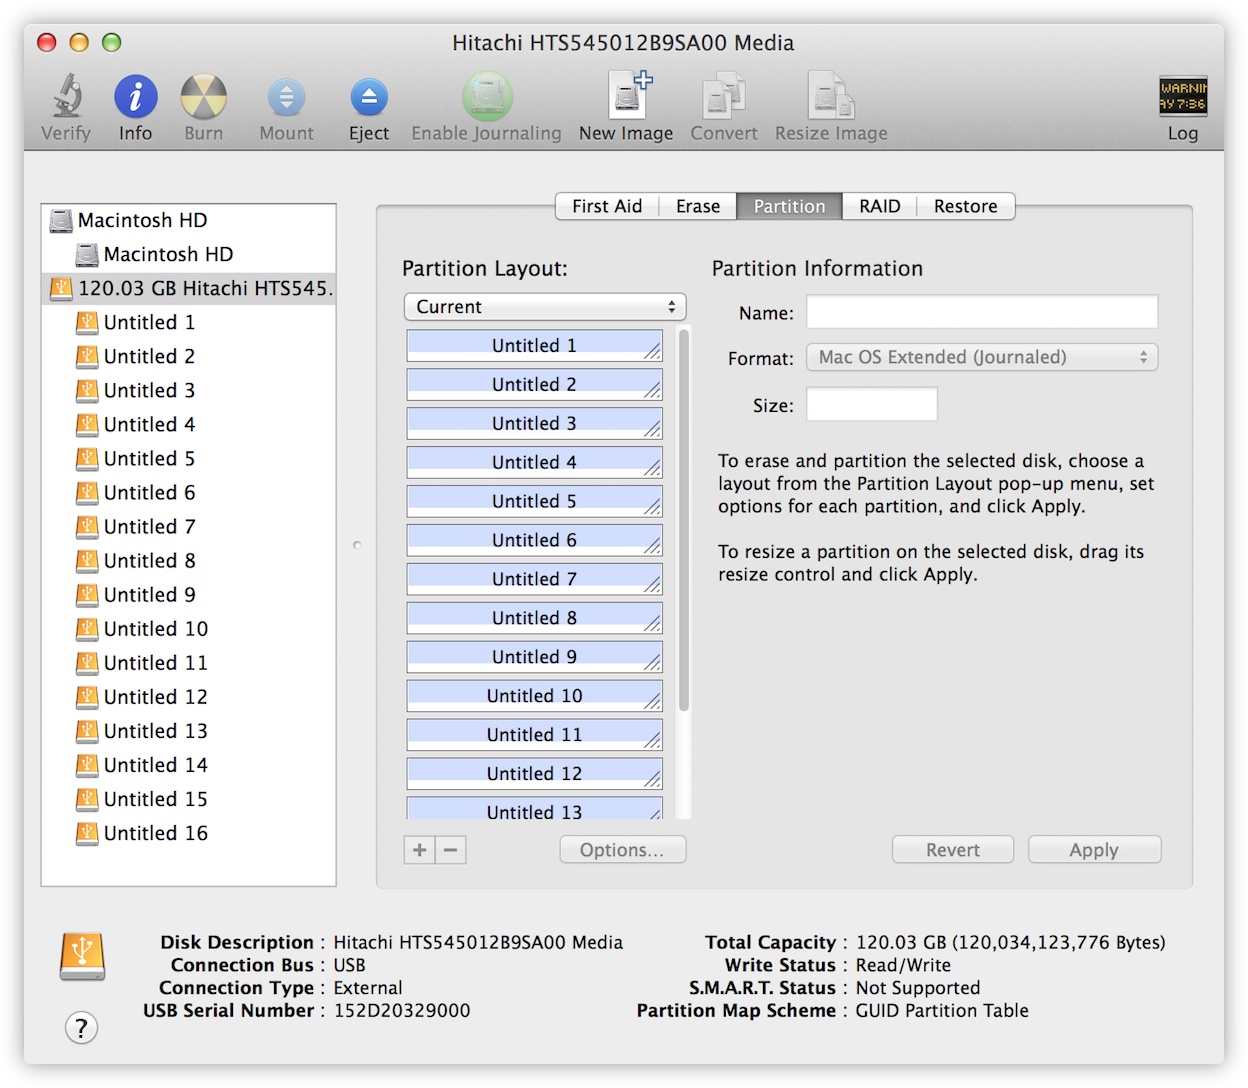
Here’s a USB hard drive that has been split into 16 partitions, all of which will display separately on the Mac as separate volumes since they’ve been formatted, though they are all on the same drive.
Imagine you have a loft apartment that’s just four outer walls. Think of partitioning as putting up dividing walls to create additional rooms. The more walls you put up, the more rooms you’ll have, but all limited to the total amount of space you first had available.
But these rooms can’t be used yet, not until you decide what each room will be. Formatting a disk partition is no different than deciding which room will be the bedroom or kitchen. At that point, it becomes a volume.
With the introduction of OS X Lion, your Mac’s hard disk is split into two partitions with two corresponding volumes. The first is hidden and named Recovery HD for OS X Recovery, allowing you to reinstall OS X without needing any physical media. The second is the more familiar Macintosh HD.
Benefits of the Command-Line
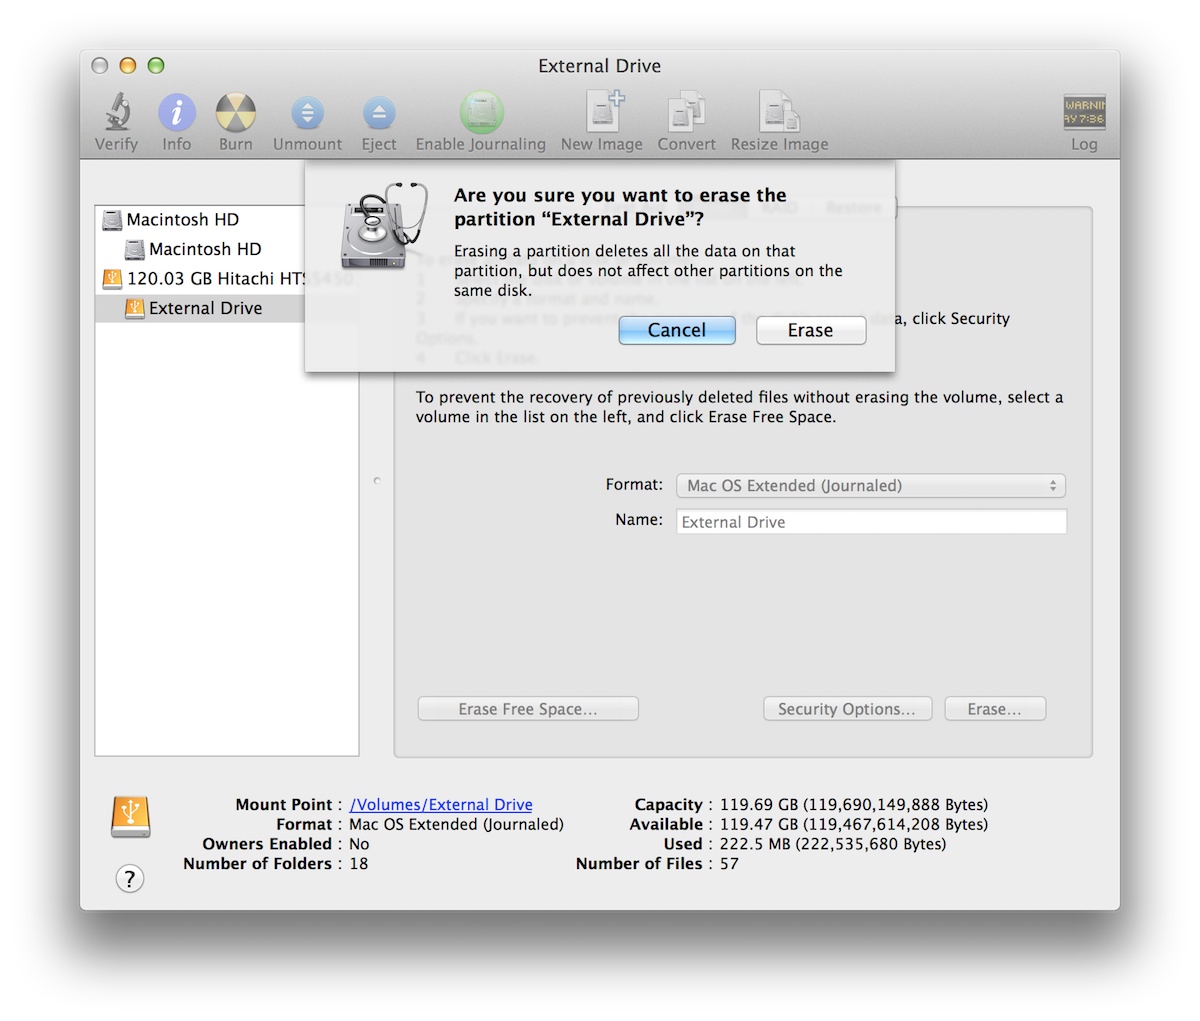
Disk Utility is more than adequate to perform any form of disk management for most users. It’s also safer than the command-line, displaying warning dialogs before proceeding with any potentially destructive functions.
For more experienced users, the command-line offers a greater level of flexibility and control so that what would normally require several different interactions and mouse clicks can be done with just one command.
Disk Information with diskutil
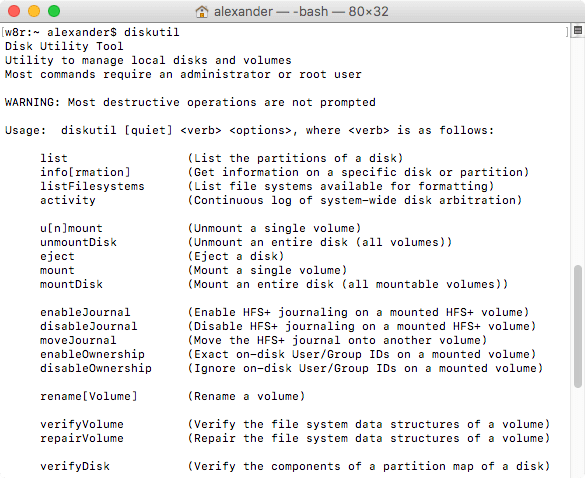
The diskutil command provides many of the features of Disk Utility, from verifying and repairing volumes to changing partition information.
To view the full list of available options for the command, enter the command diskutil .
Partition Information
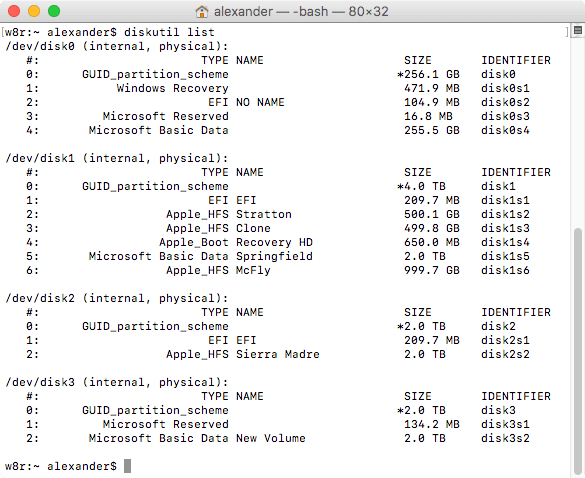
Using the list option will display some basic information about all available volumes and drives attached. Within Terminal, enter:
In the following screenshot, you can see both the Recovery HD and Macintosh HD, both partitions contained on the Mac’s internal hard disk. An external hard disk is also connected with a volume labeled Untitled.
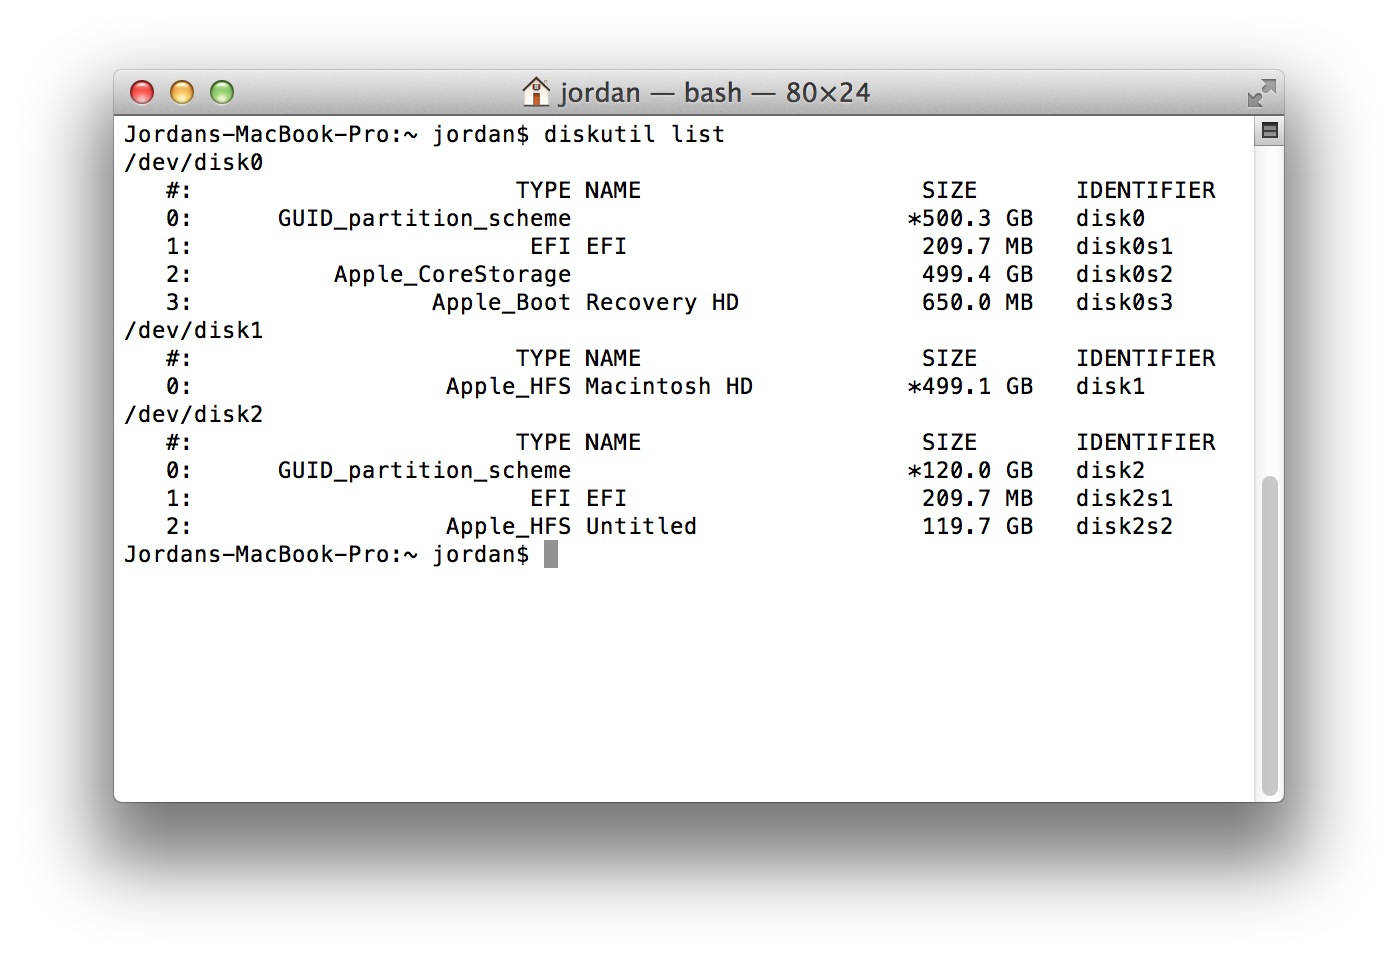
There are some hidden partitions (such as EFI) used for the purposes of providing drivers and settings during boot. These aren’t volumes since they cannot be mounted.
Depending on whether you have features such as FileVault 2 or Fusion Drive, your partition layout might differ slightly to what is pictured above.
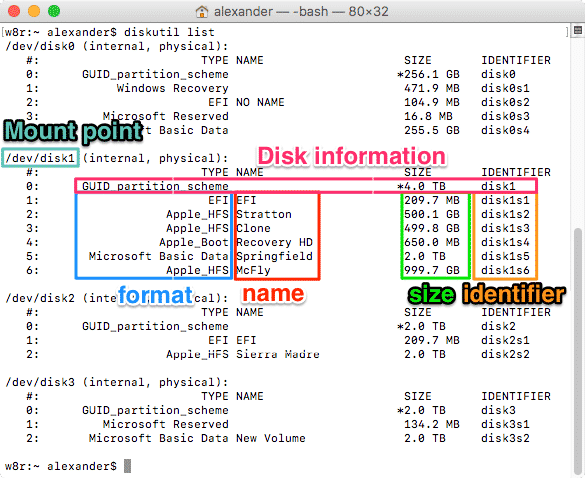
For many of the options within diskutil , it’s necessary to use the disk or partition’s Identifier. Using list will provide you with this information.
Should you have a number of disks and only want to view information about a specific one, you can append the disk identifier to the command:
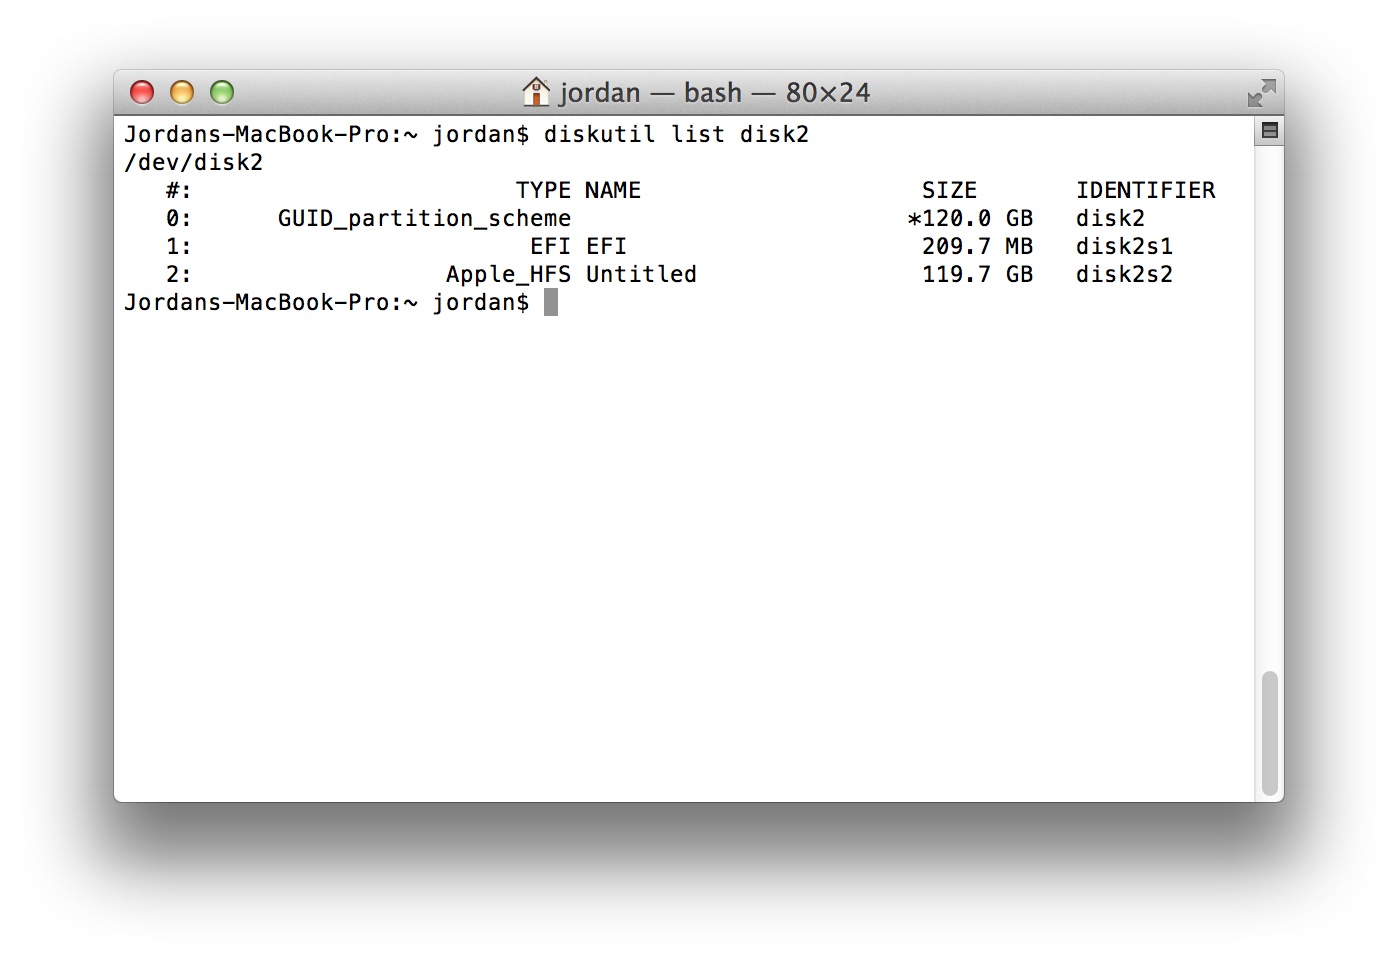
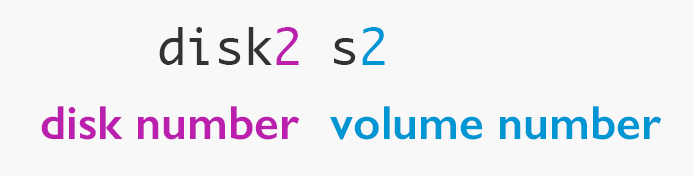
The first number represents the physical disk identifier. The number following the letter «s» represents the partition number. If a disk has three partitions, it would follow this convention:
In addition to list , you can also use info with the corresponding identifier to display even further information, like so:

Verifying and Repairing Volumes
As within Disk Utility, the diskutil command can be used to verify or repair volumes of any errors and is very straightforward to do using either verifyVolume or repairVolume . These options don’t need the disk identifier, just the volume’s name:
If the feedback within Terminal looks familiar, that’s because it’s the same information Disk Utility provides.

Disk permissions can also be verified and repaired using two similar commands:
Erasing Disks
Erasing disks from the command-line can be a dangerous process as there aren’t any warnings or confirmations. One typo could lead to irreversible data loss if there’s no backup to restore from. If you’re not familiar with the command-line, Disk Utility is just as capable.
You can either erase a whole disk which will remove any partitions stored upon it, or individual volumes without affecting others.
To erase an entire disk, you’ll need the disk identifier, enter the following, adjusting the disk identifier to suit:
You’ll notice this command has a little more going on than previous ones. The structure of the command is:
Erasing a whole disk will clear any partitions and create a new, single partition, before formatting it as a volume.

Filesystem
You can specify the filesystem to format the partition in by using any that are supported. The most common would be JHFS+ which is more commonly known as Mac OS Extended (Journaled).
To find out which filesystems you can use, enter:

This simply refers to the name of the volume that will be created. In this instance, I’ve just labelled the volume as «Test».
Disk Identifier
Only the primary part of the identifier (i.e. disk1, disk2, disk3. ) is needed. The additional segment indicating the partition number is omitted.
Erasing Volumes
Erasing volumes doesn’t erase or affect the entire disk, only the volume you specify.
Here is an external drive that’s partitioned with two volumes, FirstVolume and SecondVolume. To erase SecondVolume, the command is:
The command’s structure is almost identical to using eraseDisk , only that you specify the volume rather than disk. Should a disk contain multiple volumes, only the one you specify is altered.
Reformatting Volumes
You’ll notice that erasing a volume requires specifying the filesystem and name. This can be a bit tedious if you don’t actually want to change either of these, but simply want to erase the contents.
Instead, the reformat option will erase the contents of the volume without requiring the filesystem or name, provided these are to remain unchanged.
Now, the volume will be erased but retain the existing filesystem and name.
Renaming Volumes
Within the Finder, you can quite easily rename the volume by selecting it on your desktop and pressing the Return key, just like you would any file or folder.
Renaming volumes within the Terminal uses a different method than the renaming of files and folder, something accomplished by using the command:
Wrapping Up
We’ve only scratched the surface of diskutil yet covered quite a lot. While the graphical interface of Disk Utility can be easier to interact with, a task that would involve several steps can be accomplished with just one single command.
In the next part of this series, we’ll cover how to manage partitioning and modify volumes.
You can purchase the complete guide to Disk Management From the Command-Line that includes Building an OS X Triage Drive as an ebook in ePub and PDF format for just $0.99.
Источник
Список всех подключенных дисков и их разделов из терминала

Чтобы перечислить все подключенные диски и соответствующие разделы из Терминала в Mac OS X, вы можете использовать команду diskutil с флагом списка. При таком подходе будут отображаться все диски, диски, тома и контейнеры на любом диске, подключенном к Mac, включая загрузочные тома, скрытые тома (например, раздел восстановления), пустые тома, неформатированные диски и все другие диски.
Как вывести список всех подключенных дисков, разделов и томов на Mac через командную строку
Это легко сделать в командной строке, набрав следующую команду:
Нажмите Return, чтобы увидеть результаты, показывающие все подключенные тома, диски и их соответствующие разделы.
Это даст вам обратную связь, отображаемую следующим образом, со списком подключенных дисков, их именами томов, размером диска и разделов, их типами разделов и местоположением их идентификаторов:
$ diskutil list
/dev/disk0
#: TYPE NAME SIZE IDENTIFIER
0: GUID_partition_scheme *121.3 GB disk0
1: EFI 209.7 MB disk0s1
2: Apple_HFS Macintosh HD 120.5 GB disk0s2
3: Apple_Boot Recovery HD 650.0 MB disk0s3
/dev/disk1
#: TYPE NAME SIZE IDENTIFIER
0: Apple_partition_scheme *21.0 MB disk1
1: Apple_partition_map 32.3 KB disk1s1
2: Apple_HFS Sample-OSXDaily-Drive 1.2.6 20.9 MB disk1s2
Это также продемонстрировано на скриншоте, показанном выше, с гораздо более точным представлением форматирования: когда он распечатан в вашем собственном терминале, он будет красиво отображаться в таблицах, что делает его легко сканированным и читаемым.
Обратите внимание, что все контейнеры и / или показаны все разделы с помощью этой команды, включая скрытые разделы, такие как Recovery HD, раздел EFI, перезагрузку, а также информацию о карте разделов и схеме.
Кроме того, вы можете использовать команду «df -h» в терминале для вывода списка смонтированных разделов файловой системы.
Если вам известен другой удобный способ перечисления всех дисков и томов, подключенных к Mac, поделитесь с нами в комментариях ниже!
Источник
Pro Terminal Commands: Using diskutil

diskutil is the command line version of Disk Utility, the macOS application used to manage hard drives. Just like Disk Utility, you can use the command to format disks, erase drives and more. Once you’re familiar with it, you’ll find that the command is often more powerful and faster than Disk Utility, with more features to boot.
Getting Acquainted with diskutil
If you simply type diskutil into the command line and press Enter, you’ll receive a list of “verbs” that diskutil can operate on.
Just like in the English language, these verbs are things that diskutil can accomplish. The most basic verb for diskutil is list , which you’ll enter like so:
This command will list all the disks attached to your machine. It indicates information like partitions, format and, importantly, mount points. The mount points start with /dev/disk and are used to specify disk operations in diskutil. Partitions (called “volumes” in diskutil parlance) are specified by their identifier on the right.
Disk identifiers follow the format disk_s_, where the underscores are replaced with identifying numbers.
Using verbs
We can use the other verbs to get more information about our drives and run specific operations.
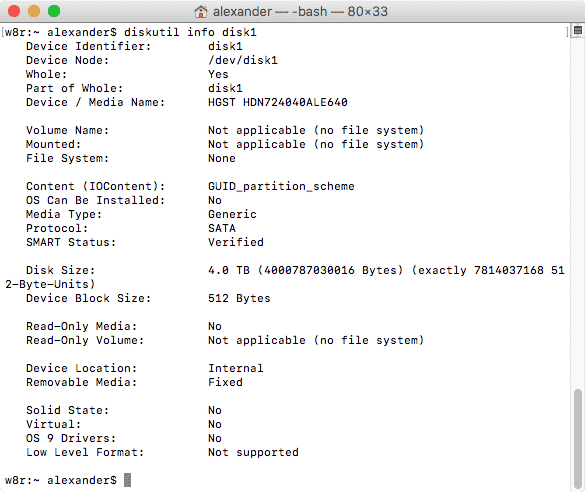
The info verb gets more information about a specific disk (disk1, in this case). Use the mount point to specify the target disk to grab information on. You’ll see tons of stuff you might care about and a lot of stuff you won’t. This is the most information you can get about your disk in one place, and it’s helpful when troubleshooting drive problems.
Unmounting and Ejecting with diskutil

The umount verb unmounts a specified volume. Unmounting is just like ejecting a volume from Finder, but it can be done to internal disks. In this example, I’ve specified the volume I want to unmount with the disk identifier. You can also specify the volume using the partition name. Unmounted disks become inaccessible via Finder, but they can still be seen via diskutil list and manipulated with other diskutil commands. Also, note the command is umount , with no “n”.

The unmountDisk verb is similar to umount , but it unmounts an entire disk instead of one volume. Disks are specified with their mount point, as seen above. You can’t unmount your boot disk or volume, and you’ll get an error if you try to unmount a disk or drive that’s currently in use.
The eject verb is a lot like unmounting a drive, but only for removable disks. Removable disks are things like USB hard drives and flash drives. If it connects through an interface on the outside of your computer, it qualifies as a removable drive. Once a drive is ejected, it won’t appear in Finder or diskutil list until it’s physically unplugged and plugged in to its interface again.
The mount verb is the inverse of the umount verb. It mounts volumes on internal disks manually. Only unmounted volumes can be mounted, obviously. To mount all volumes on a disk, use diskutil mountDisk disk1 , for example.
Fixing Problems with diskutil
 The verifyVolume verb will run a verification pass on a specific volume. Verification involves checking the contents of the disk against the expected values. If any mismatches are found, the disk will be identified as in need of repair.
If it turns out that your volume needs to be repaired after you’ve verified it, you can run the repairVolume verb. This will run a repair pass on the volume and attempt to fix any problems found in the verification process.
Format and Erase Drives with diskutil
 The eraseDisk verb handles reformatting disks, which erases all data and volumes on a single disk. The verb takes as inputs the format, new disk name and disk identifier, in that order. This example will erase disk2 and reformat it as journaled HFS+. The new disk will have one volume named
The reformat verb will erase a single volume on the disk while keeping the same name and format. It rewrites the same file system that the volume started with, resetting the volume to a blank state.
Partition Drives with diskutil
The partitionDisk verb runs an command-line version of Disk Utility, allowing you to create multiple partitions on a single disk. It’s a little complicated, but it follows this format for it’s arguments:
diskutil partitionDisk MountPoint [numberOfPartitions] [APM|MBR|GPT] [part1Format part1Name part1Size part2Format part2Name part2Size part3Format part3Name part3Size . ]
Partition sizes can be specified in gigabytes with the G suffix (2 G) or terabytes with the T suffix (2 T). My favorite way to specify partition sizes, however, is with percentages (25%, for example). The size of the final partition can be specified with “R” to indicate that it should take up the remainder of the disk.
For example, the following command will create three partitions:
They’ll be formatted with JHFS+, APFS and ExFAT, and named Volume1, Volume2 and Volume3 respectively. Volume1 and Volume2 will each take up 25 percent of the disk, and Volume3 will occupy the remainder. It will also use the GUID Partition Table (GPT) which is one of the more flexible partition table options.

You can see the results of the operation at the end of the Terminal window to determine everything went okay. Using partionDisk isn’t the easiest way to partition a disk, but if Disk Utility is complaining, its a good alternative.
Источник


