- How to use multiple monitors in Windows 10
- Video: Connecting a monitor
- Before you start
- Rearrange your displays
- Identify a display
- Detect a display
- Arrange your displays
- Change display options
- Change orientation
- Choose a display option
- Related topics
- How to Change the Primary Monitor on Windows 10
- For Windows 7
- For Windows 10
- How to Fix a Computer That Turns on but Displays Nothing
- What to do when your computer starts but the screen is black
- How to Fix a Computer That Turns on but Displays Nothing
How to use multiple monitors in Windows 10
After you’ve connected your Windows 10 PC to external displays, you can adjust the settings for each one.
Video: Connecting a monitor
Here’s a video on the basics of connecting to an external monitor.

Before you start
Before changing settings for your external displays, make sure everything is connected properly. Here’s what you can do:
Make sure your cables are properly connected to your PC or dock.
Check for Windows updates. To check for updates, select Start > Settings > Updates & Security > Windows Update > Check for updates.
Tip: If you’re using a wireless display adapter, connect to an HDMI port on newer TVs, then wirelessly connect your PC to it. After connecting your wireless display adapter to your TV, go to your Windows 10 PC and select Start > Settings > System > Display, then select Connect to a wireless display.
Rearrange your displays
You’ll see this option when Windows detects more than one display. Each display will be numbered to help you identify them more easily.
Identify a display
To see which number corresponds to a display, select Start > Settings > System > Display > Rearrange your displays, then select Identify. A number appears on the screen of the display it’s assigned to.
Detect a display
If you connected another display and it isn’t showing in Settings, select Start > Settings > System > Display > Rearrange your displays, then select Detect.
Arrange your displays
If you have multiple displays, you can change how they’re arranged. This is helpful if you want your displays to match how they’re set up in your home or office. In Display settings, select and drag the display to where you want. Do this with all the displays you want to move. When you’re happy with the layout, select Apply. Test your new layout by moving your mouse pointer across the different displays to make sure it works like you expect.
Change display options
After you’re connected to your external displays, you can change settings like your resolution, screen layout, and more. To see available options, select Start > Settings > System > Display.
Change orientation
Windows will recommend an orientation for your screen. To change it in Display settings, go to Scale and Layout, then choose your preferred Display orientation. If you change the orientation of a monitor, you’ll also need to physically rotate the screen. For example, you’d rotate your external display to use it in portrait instead of landscape.
Choose a display option
To change what shows on your displays, press Windows logo key + P. Here’s what you can choose.
See things on one display only.
See the same thing on all your displays.
See your desktop across multiple screens. When you have displays extended, you can move items between the two screens.
See everything on the second display only.
Second screen only
Related topics
Simply Windows on Youtube — These videos are only available in English
How to Change the Primary Monitor on Windows 10
All versions of the Windows Operating System that are currently supported by Microsoft have dual monitor and even multiple monitor support. This means that you can have more than one monitor not only connected to your computer but also display whatever you want it to display in order to increase productivity and improve ease of use. Windows 10, the latest and greatest in a long line of Windows Operating Systems, also has multiple monitor support. In fact, Windows 10 is rather good at handling more than one monitor. Multiple monitor support is a godsend for power users as most power users out there have more than one monitors connected to their computers.
When you connect more than just one monitor to a computer running on the Windows Operating System, Windows makes one of the monitors the primary monitor (in almost all cases, this is the monitor that was connected to the computer first) and the rest of the monitors the secondary, tertiary and so on monitors. The primary monitor is the default monitor Windows displays everything on, which is why being able to determine which monitor connected to your computer you want to be the primary monitor is immensely important. Thankfully, Windows 10 not only allows users with multiple monitors to choose their primary monitor at any given time but the process used to do so is also pretty simple.
For Windows 7
To change the primary monitor on a computer running on Windows 7 with more than one monitor connected to it, you need to simply:
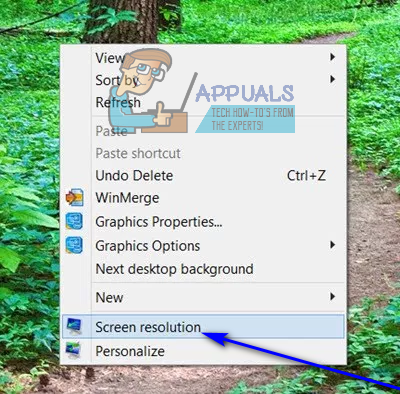
- Right-click on an empty space on your Desktop.
- Click on Screen resolution.

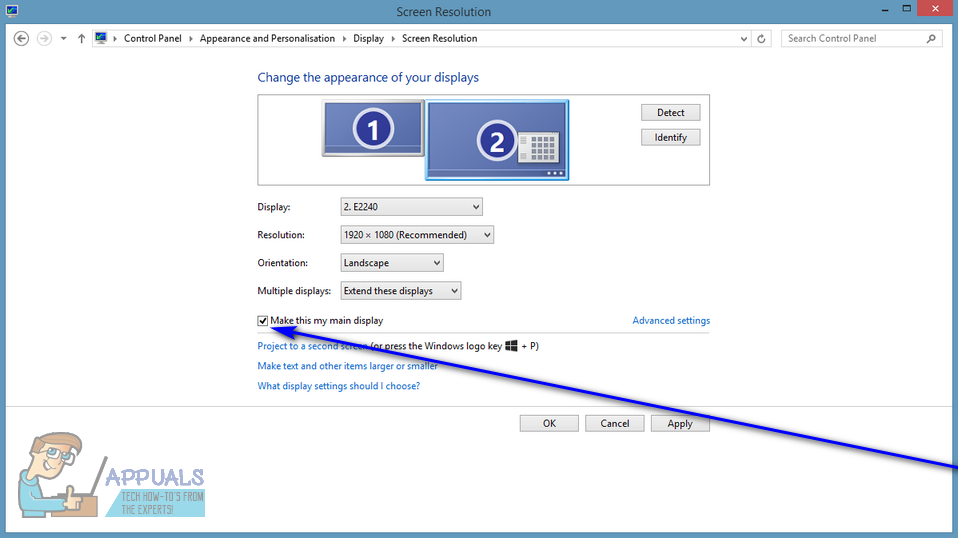
- In the space underneath Change the appearance of your display, all of the computers connected to your computer will be visible, each represented as a screen with a number in the middle. The screen that has the number 1 at its center is the monitor that is currently configured as your computer’s primary monitor. Click on the monitor that you would like to make your computer’s primary monitor to select it.
- Check the checkbox beside the Use this device as the primary monitor option (or the Make this my main display option, depending on the iteration of Windows you are using) to enable it. Doing so will tell Windows 10 to change the primary display to the monitor you have just chosen.
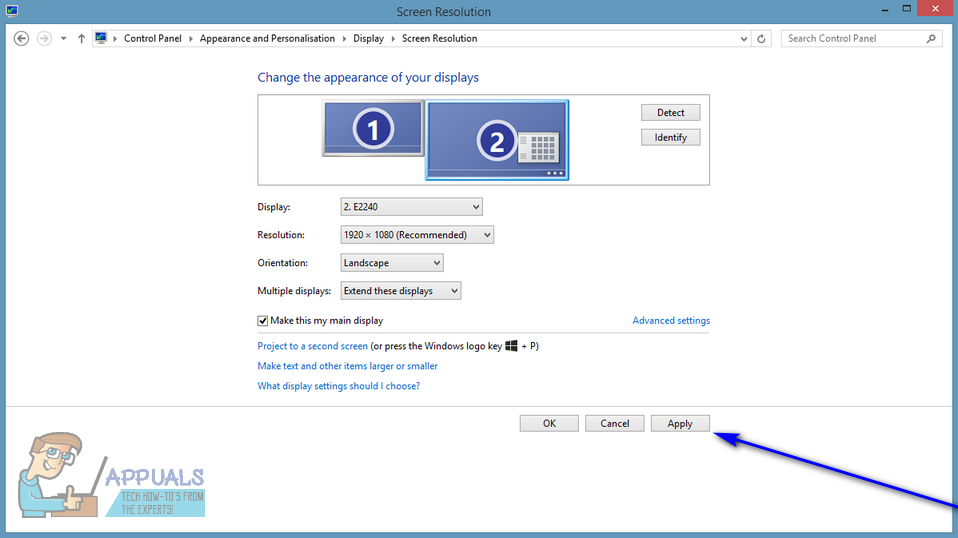
- Click on Apply, and the change you have made to your computer’s display configuration will be applied.
- Click on OK and close the Screen Resolution window.
For Windows 10
In Windows 10, the steps are slightly a little different. Some names are changed here and there but the main method is the same.
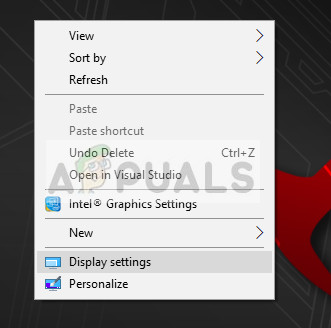
- Right-click anywhere in the Desktop and select Display Settings.
 Display Settings – Win 10 home screen
- Here all the displays will be shown in graphical shapes. You can easily distinguish the screens from one another. Now select the display which you want to set as the primary display. Now navigate down at the screen and select Make this my main display.
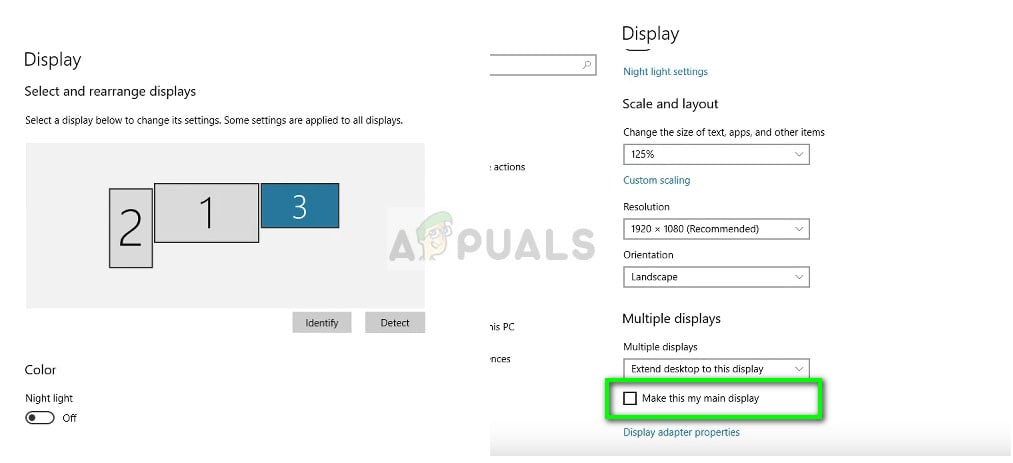 Settings screen as the primary display
- If you see the Make this main display greyed out, it probably means that the current monitor which you are trying to set as the primary display is set already.
Note: If you have graphics hardware installed on your computer, it is likely that the graphical application’s settings are overriding the system’s default display settings. In that case, open the application and select the primary display from there in the settings.
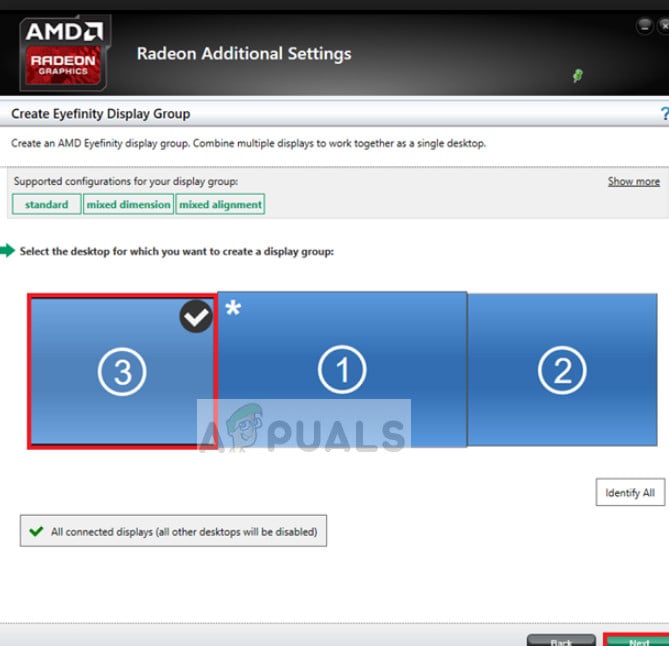 Primary display in graphic settings – AMD
Furthermore, you should also make sure that the displays are extended. If you have not extended the displays, there will be no option of making a primary monitor as all monitors will be treated alike. You can change the setting to Extend these displays from the display settings in Windows 10.
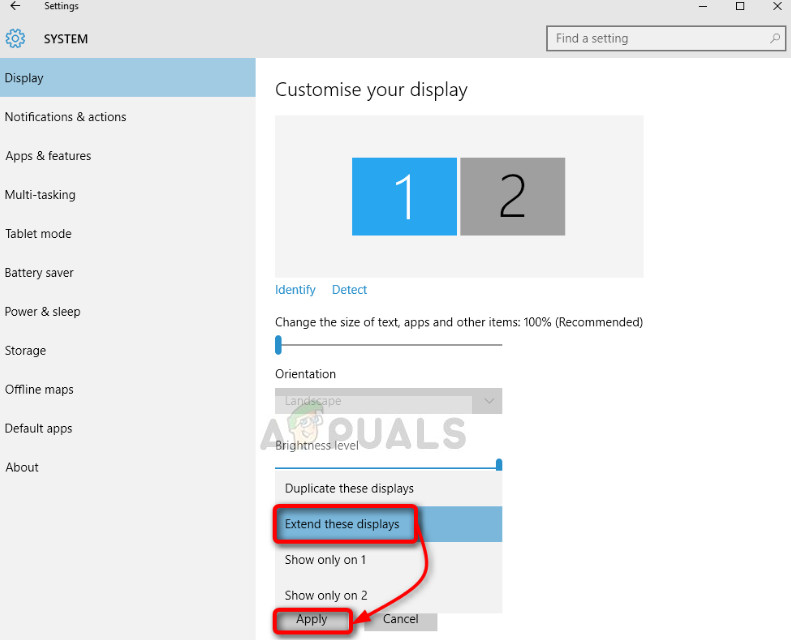 Extending screen – Win 10 settings
Note: Try to Connect your HDMI cable to the monitor which you want to use as primary because some users have reported that the monitor that is connected using the HDMI cables is actually recognized as the primary monitor. This might not be the case with all of you but it might still help some people.
How to Fix a Computer That Turns on but Displays Nothing
What to do when your computer starts but the screen is black
:max_bytes(150000):strip_icc()/tim-fisher-5820c8345f9b581c0b5a63cf.jpg)
:max_bytes(150000):strip_icc()/WorkBadgePhoto-61c0b98ef5a74e4a85851a8f706dbd65.jpg)
The most common way that a computer «won’t turn on» is when the PC actually does power on but doesn’t display anything on the monitor.
You see lights on the computer case, probably hear fans running from inside, and may even hear sounds, but nothing at all shows up on your screen.
If your computer is, in fact, showing information on the monitor, but is still not booting fully, see How to Fix a Computer That Won’t Turn On for a better troubleshooting guide.
How to Fix a Computer That Turns on but Displays Nothing
Try these common fixes in the order we present them:
Test your monitor. Before you begin more complicated and time-consuming troubleshooting with the rest of your computer, make sure your monitor is working properly.
With the monitor disconnected from your computer, turn it on and off. If the display shows diagnostic information of any kind, you know the display is powered and is capable of displaying content.
Verify that your PC has completely restarted and is powering up from a completely powered off state.
A computer may appear to «not be on» when actually it’s just having problems resuming from either the Standby/Sleep or Hibernate power saving mode in Windows.
Power off your computer while in a power saving mode by holding the power button down for 3 to 5 seconds. After the power is completely off, turn on your PC and test to see if it will boot normally.
A beep code will give you a very good idea of exactly where to look for the cause of your computer turning off.
Clear the CMOS. Clearing the BIOS memory on your motherboard will return the BIOS settings to their factory default levels. A BIOS misconfiguration could be why your PC won’t start up all the way.
If clearing the CMOS does fix your problem, make sure any changes you make in BIOS are completed one at a time so if the problem returns, you’ll know which change caused your issue.
Verify that the power supply voltage switch is set correctly. If the input voltage for the power supply isn’t correct then your computer might not turn on completely.
There’s a good possibility that your PC wouldn’t power on at all if this switch is wrong, but an incorrect power supply voltage might also prevent your computer from starting properly in this way, too.
Reseat everything possible inside your PC.
:max_bytes(150000):strip_icc()/technology-1396677_1280-5c4263c2c9e77c0001be18e4.jpg)
Reseating will reestablish the various connections inside your computer and is very often a «magic» fix to problems like this one.
Verify that all the cables are connected correctly. For example, if the onboard video card has been disabled, plugging a VGA cable into it will result in nothing on the monitor even if the computer is powered on. In this case, you’d want to plug the VGA cable into the correct video card.
Try reseating the following components and then test if your computer displays something on screen:
Reseat the CPU only if you suspect that it might have come loose or might not have been installed properly.
We address this component separately only because the chance of a CPU coming loose is very slim and because installing one is a sensitive task.
Check for signs of electrical shorts inside your computer. If you find then, then you’ll need to investigate the causes of those electrical shorts.
Test your power supply. Just because your computer’s fans and lights are working doesn’t mean that the power supply is functioning properly. The PSU tends to cause more problems than any other hardware and is often the cause of a computer’s components to work selectively or intermittently.
Replace your power supply immediately if it fails any test you perform.
After replacing the power supply, assuming you do, keep your PC plugged in for 5 to 10 minutes prior to turning it on. This delay provides time for some recharging of the CMOS battery, which may have been drained.
Do not skip a test of your power supply thinking that your problem can’t be the PSU because «things are getting power.» Power supplies can work in varying degrees—one that isn’t fully functional needs to be replaced.
Start your computer with essential hardware only. The purpose here is to remove as much hardware as possible while still maintaining your PC’s ability to power on.
If your computer starts normally with only essential hardware installed, proceed to Step 11.
If your computer still isn’t displaying anything on your monitor, proceed to Step 12.
This step is easy enough for a novice to complete, takes no special tools, and could provide you with a lot of valuable information. This isn’t a step to skip if, after all the steps above, your computer is still not turning on completely.
Reinstall each piece of hardware that you removed in Step 10, one piece at a time, testing after each installation.
Since your computer powered on with only the essential hardware installed, those components must work properly. This means that one of the hardware components you removed is causing your PC to not turn on properly. By installing each device back into your PC and testing them each time, you’ll eventually find the hardware that caused your problem.
Replace the defective hardware once you’ve identified it.
Test your computer’s hardware using a Power On Self Test card. If your PC still isn’t displaying information on your monitor with anything but essential computer hardware installed, a POST card will help identify which piece of remaining hardware is causing your computer to not come on completely.
If you don’t have and are unwilling to purchase a POST card, skip to Step 13.
Replace each piece of essential hardware in your computer with an identical or equivalent spare piece of hardware that you know is working, one component at a time, to determine which piece of hardware could be at fault. Test after each hardware replacement to determine which component is defective.
If you don’t have a POST card or spare parts to swap in and out, you’re left not knowing which piece of your essential PC hardware is faulty. In these cases, you have little option than to rely on the help of individuals or companies that do offer these resources.


