- Notifications and the Notification Area
- Notification and Notification Area Guidelines
- Creating and Displaying a Notification
- Add a Notification Icon
- Define the NOTIFYICONDATA Version
- Define the Notification Look and Contents
- Check the User Status
- Display the Notification
- Removing an Icon
- SDK Sample
- Icons are not displayed for certain files in Windows 7
- Summary
- Method 1: Delete the cache file
- Method 2: Restore file associations
Notifications and the Notification Area
The notification area is a portion of the taskbar that provides a temporary source for notifications and status. It can also be used to display icons for system and program features that have no presence on the desktop, such as battery level, volume control, and network status. The notification area has been known historically as the system tray or status area.
This topic contains the following sections:
Notification and Notification Area Guidelines
See the Notifications and Notification Area sections of the Windows User Experience Interaction Guidelines for best practices in the use of notifications and the notification area. The goal is to provide user benefit through appropriate use of notifications, without being annoying or distracting.
The notification area is not for critical information that must be acted on immediately. It is also not intended for quick program or command access. As of WindowsВ 7, much of that functionality is best accomplished through an application’s taskbar button.
WindowsВ 7 allows a user to suppress all notifications from an application if they choose, so thoughtful notification design and use will incline the user to allow your application to continue to display them. Notifications are an interruption; ensure that they are worth it.
WindowsВ 7 introduces the concept of «quiet time». Quiet time is defined as the first hour after a new user logs into his or her account either for the first time or for the first time after an operating system upgrade or clean installation. This time is set aside to allow the user to explore and familiarize themselves with the new environment without the distraction of notifications. During this time, most notifications should not be sent or shown. Exceptions include feedback that the user would expect to see in response to a user action, such as when he or she plugs in a USB device or prints a document. API specifics of regarding quiet time are discussed later in this topic.
Creating and Displaying a Notification
The remaining sections in this topic outline the basic procedure to follow to display a notification from your application to the user.
Add a Notification Icon
To display a notification, you must have an icon in the notification area. In certain cases, such as Microsoft Communicator or battery level, that icon will already be present. In many other cases, however, you will add an icon to the notification area only as long as is needed to show the notification. In either case, this is accomplished using the Shell_NotifyIcon function. Shell_NotifyIcon allows you to add, modify, or delete an icon in the notification area.
When an icon is added to the notification area on WindowsВ 7, it is added to the overflow section of the notification area by default. This area contains notification area icons that are active, but not visible in the notification area. Only the user can promote an icon from the overflow to the notification area, although in certain circumstances the system can temporarily promote an icon into the notification area as a short preview (under one minute).
The user should have the final say on which icons they want to see in their notification area. Before installing a non-transient icon in the notification area, the user should be asked for permission. They should also be given the option (normally though its shortcut menu) to remove the icon from the notification area.
The NOTIFYICONDATA structure sent in the call to Shell_NotifyIcon contains information that specifies both the notification area icon and the notification itself. The following are those items specific to the notification area icon itself that can be set through NOTIFYICONDATA.
- The resource from which the icon is taken.
- A unique identifier for the icon.
- The style of the icon’s tooltip.
- The icon’s state (hidden, shared, or both) in the notification area.
- The handle of an application window associated with the icon.
- A callback message identifier that allows the icon to communicate events that occur within the icon’s bounding rectangle and balloon notification with the associated application window. The icon’s bounding rectangle can be retrieved through Shell_NotifyIconGetRect.
Each icon in the notification area can be identified in two ways:
- The GUID with which the icon is declared in the registry. This is the preferred method on WindowsВ 7 and later.
- The handle of a window associated with the notification area icon, plus an application-defined icon identifier. This method is used on WindowsВ Vista and earlier.
Icons in the notification area can have a tooltip. The tooltip can be either a standard tooltip (preferred) or an application-drawn, pop-up UI. While a tooltip is not required, it is recommended.
Notification area icons should be high-DPI aware. An application should provide both a 16×16 pixel icon and a 32×32 icon in its resource file, and then use LoadIconMetric to ensure that the correct icon is loaded and scaled appropriately.
The application responsible for the notification area icon should handle a mouse click for that icon. When a user right-clicks the icon, it should bring up a normal shortcut menu. However, the result of a single click with the left mouse button will vary with the function of the icon. It should display what the user would expect to see in the form best suited to that content—a popup window, a dialog box or the program window itself. For instance, it could show status text for a status icon, or a slider for the volume control.
The placement of a popup window or dialog box that results from the click should be placed near the coordinate of the click in the notification area. Use the CalculatePopupWindowPosition to determine its location.
The icon can be added to the notification area without displaying a notification by defining only the icon-specific members of NOTIFYICONDATA (discussed above) and calling Shell_NotifyIcon as shown here:
You can also add the icon to the notification area and display a notification all in one call to Shell_NotifyIcon. To do so, continue with the instructions in this topic.
Define the NOTIFYICONDATA Version
As Windows has progressed, the NOTIFYICONDATA structure has expanded to include more members to define more functionality. Constants are used to declare which version of NOTIFYICONDATA to use with your notification area icon, to allow for backward compatibility. Unless there is a compelling reason to do otherwise, it is strongly recommended that you use the NOTIFYICON_VERSION_4 version, introduced in WindowsВ Vista. This version provides the full available functionality, including the preferred ability to identify the notification area icon though a registered GUID, a superior callback mechanism, and better accessibility.
Set the version through the following calls:
Note that this call to Shell_NotifyIcon does not display a notification.
Define the Notification Look and Contents
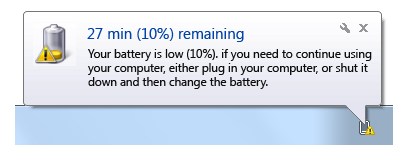
A notification is a special type of balloon tooltip control. It contains a title, body text, and an icon. Like a window, it has a Close button in its upper right corner. It also contains a Options button that opens the Notification Area Icons item in the Control Panel, which allows the user to show or hide the icon or show only notifications without an icon.
The NOTIFYICONDATA structure sent in the call to Shell_NotifyIcon contains information that specifies both the notification area icon and the notification balloon itself. The following are those items specific to the notification that can be set through NOTIFYICONDATA.
- An icon to display in the notification balloon, which is specified by the notification type. The size of the icon can be specified, as well as custom icons.
- A notification title. This title should be a maximum of 48 characters long in English (to accommodate localization). The title is the first line of the notification, and set apart through the use of font size, color, and weight.
- Text for use in the body of the notification. This text should be a maximum of 200 characters in English (to accommodate localization).
- Whether the notification should be discarded if it cannot be displayed immediately.
- A timeout for the notification. This setting is ignored in WindowsВ Vista and later systems in favor of a system-wide accessibility timeout setting.
- Whether the notification should respect quiet time, set through the NIIF_RESPECT_QUIET_TIME flag.
The IUserNotification and IUserNotification2 interfaces are Component Object Model (COM) wrappers for Shell_NotifyIcon. However, at this time, they do not provide the full NOTIFYICON_VERSION_4 functionality available through Shell_NotifyIcon directly, including the use of a GUID to identify the notification area icon.
Check the User Status
The system uses the SHQueryUserNotificationState function is used to check whether the user is in quiet time, away from the computer, or in an uninterruptable state such as Presentation mode. Whether the system displays your notification depends on this state.
If your application is using a custom notification method that does not use Shell_NotifyIcon, IUserNotification, or IUserNotification2, it should always explicitly call SHQueryUserNotificationState to determine whether it should display notification UI at that time.
Notifications sent when the user is away are queued for display, but because you cannot know when the user will return or whether the notification will still be valid at that time, you might consider resending the notification later.
Notifications sent during quiet time are discarded unshown. Design guidelines ask that all notifications be ignorable. They should not require immediate user action. Therefore, no notification is so important that it should override quiet time.
Display the Notification
Once you have set the NOTIFYICONDATA version and defined the notification in a NOTIFYICONDATA structure, call Shell_NotifyIcon to display the icon.
If the notification area icon is not present, call Shell_NotifyIcon to add the icon. Do this for both transient and non-transient icons.
If the notification area icon is already present, call Shell_NotifyIcon to modify the icon.
The following code shows an example of setting NOTIFYICONDATA data and sending it through Shell_NotifyIcon. Note that this example identifies the notification icon through a GUID (preferred in WindowsВ 7).
Removing an Icon
To remove an icon—for instance, when you have only added the icon temporarily to broadcast a notification—call Shell_NotifyIconas shown here. Only a minimal NOTIFYICONDATA structure that identifies the icon is needed in this call.
When an application is uninstalled, its notification area icon can still appear to the user as an option in the Notification Area Icons page in the Control Panel for up to seven days. However, any changes made there will have no effect.
SDK Sample
See the NotificationIcon Sample sample in the Windows Software Development Kit (SDK) for a full example of the use of Shell_NotifyIcon.
Icons are not displayed for certain files in Windows 7
Summary
This article describes how to resolve the problems of visualization of icons, including where icons are not displayed for certain types of files in Windows 7.
Method 1: Delete the cache file
To resolve these problems, remove the file cache with the icons in Windows 7. To do this, follow these steps:
Click Start  , type windows explorer in the search box, and then press the ENTER key.

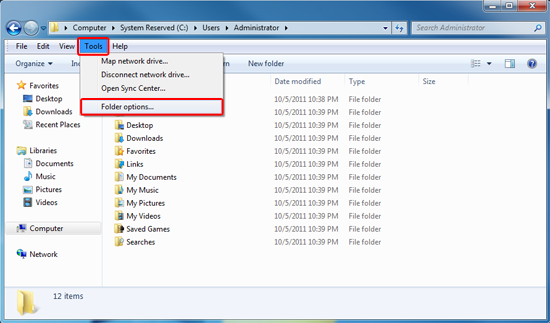
On the Tools menu, click Folder options.
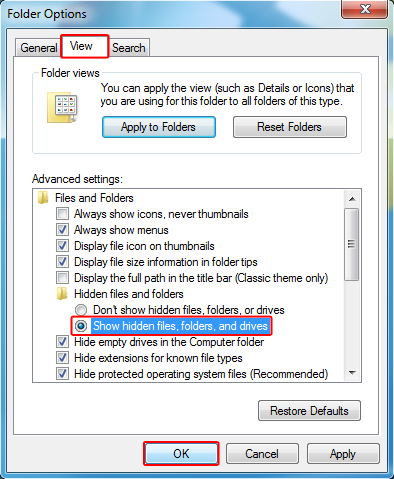
On the View tab, select the Show hidden files, folders, and drives check-box, and then click OK.
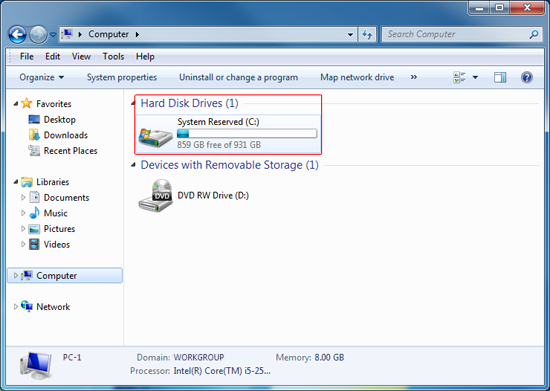
Return to Windows Explorer, expand Computer in the left pane.

Click Local disk (C):, and then open the Users folder.
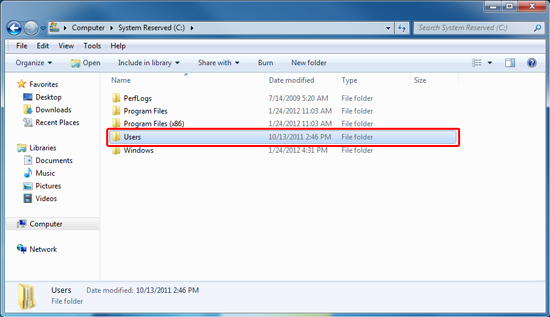
Double-click your user name, open the AppData folder, and then open the Local folder.

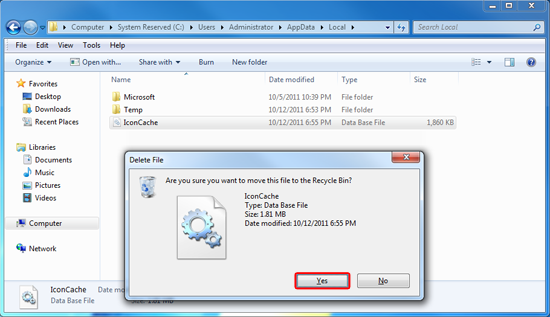
Select the file IconCache.db, and press DELETE on your keyboard. When you are prompted, click Yes. Close all processes and restart the computer.
Method 2: Restore file associations
If the problem persists after you remove the cache file or if the problem occurs because the uninstallation of the program associated with a file type, follow these steps to restore file associations:
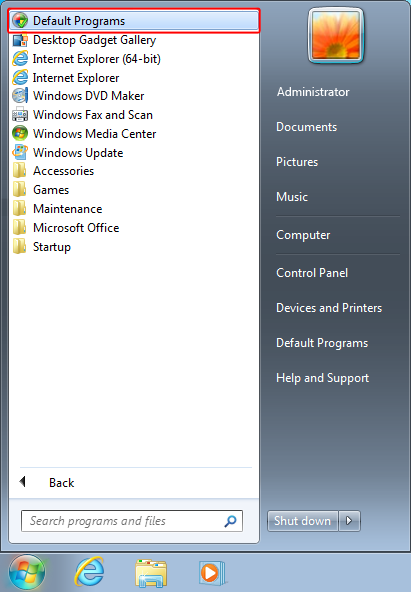
Click Start , click All programs , and then click Default Programs.

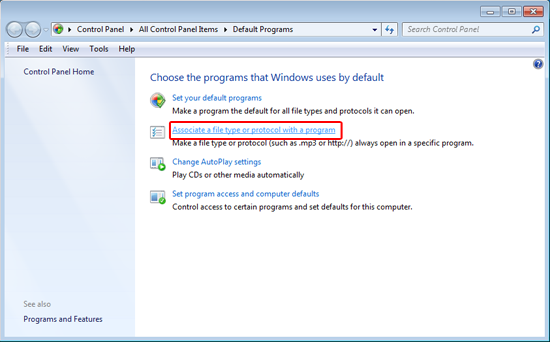
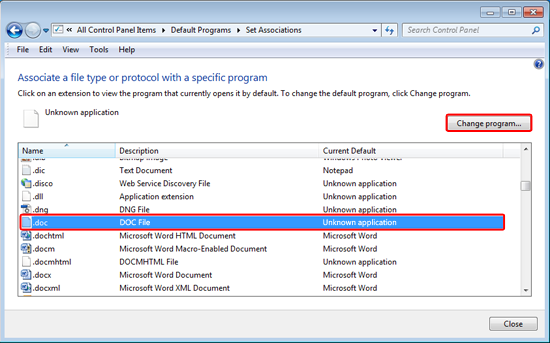
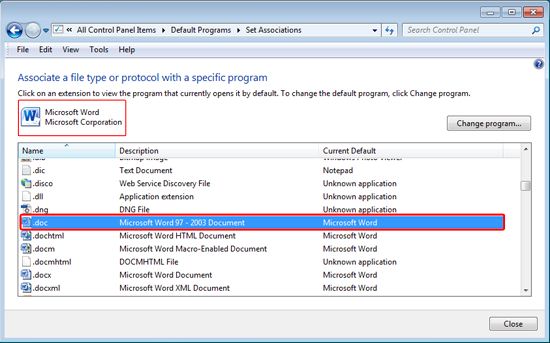
Click Associate a file type or protocol with a program.
A list of the different types of files, a brief description and the program configured to open are displayed. In this example, the file type whose icon is missing is the file with the .doc extension. To correct this error, click Change program.
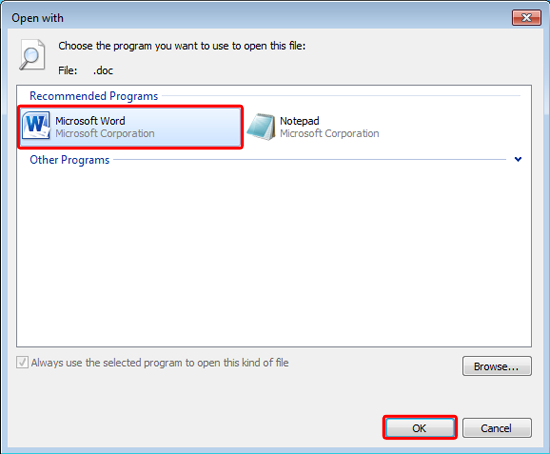
In the Open with windows, select the program that corresponds to the list, and then click OK.
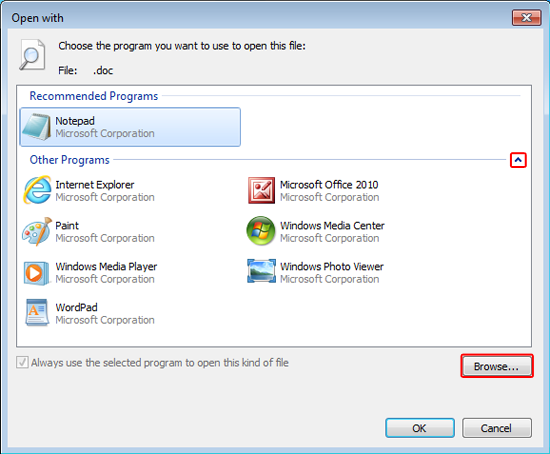
Note: If the program you want is not in the «Recommended programs» list, click the arrow in the box Other programs to see other options. If the program still does not appear, click Browse and locate the file you want then click Open.
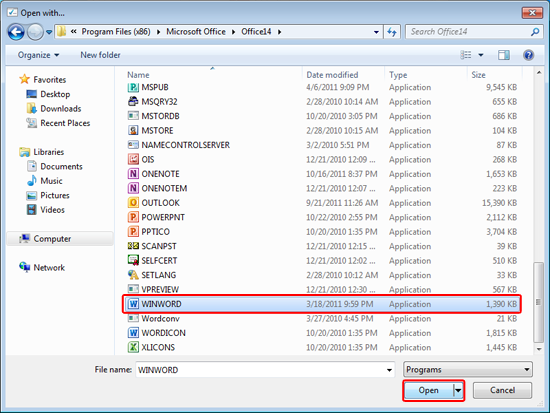
The file type is associated with the selected program, close the window, and the problem is solved.
Your opinion interests us : do not hesitate to tell us what you think of this article using the comment field located at the bottom of the document. This will allow us to improve the content. Thank you in advance!


