- How to configure DisplayLink displays on Mac OS X
- Setting the Display Resolutions
- Setting the Position of Displays
- Setting the Display to Mirror mode
- Setting the Display to Extend mode
- Using both extended and mirrored displays
- Changing the main display
- DisplayLink macOS Software
- Dear Mac users:
- DisplayLink macOS Software
- Issue with MacBook 2018 models with 10.14 Mojave
- Information about macOS 10.13.4 to 10.13.6
- DisplayLink Manager Updated With Native Support for M1 Macs and More
- Top Rated Comments
- Как подключить два или более внешних дисплея к Mac Apple Silicon M1
- Внешние дисплеи: большая проблема M1 Mac
- Подключите MacBook M1 к более чем одному внешнему дисплею
- Эффективно, но не поддерживается
- How to Fix Displaylink Not Working on macOS 10.14
- Why Does Displaylink Not Work on macOS 10.14
- Resolving The Mac OS X 10.14 Displaylink Issue
How to configure DisplayLink displays on Mac OS X
When attaching a display that the software has not seen before, the display will default to being extended to the right of the main display.
To configure the settings for each of your USB attached displays, select ‘Displays’ from the ‘System Preferences’ menu. This will open a ‘Display Preferences’ window on each of your attached displays allowing you to configure each display as required.
It is possible to use the ‘Gather Windows’ button to bring all the ‘Display Preferences’ windows onto the main display.

Setting the Display Resolutions
To change the display’s resolution, select an available resolution from the Display Preferences window of the display you wish to change: 
The resolutions available depend on both the DisplayLink enabled product and the capabilities of the connected display.
If you wish to rotate your display, you can configure the orientation using the ‘Rotate’ drop down. Select the appropriate angle of rotation to match your display’s set up.
Setting the Position of Displays
If your computer is connected to more than two displays, you can specify that some are mirrored displays and others show the extended desktop. A mirrored display shows the same content as the main display whereas an extended display will be an extension to your existing desktop. You can arrange your displays so that they match the physical layout of your displays by selecting the ‘Arrangement’ pane within Display Preferences. This ensures that you can easily navigate between all connected displays.

To move the position of a display, click and hold the display you wish to move then drag it to the desired position. The display will be highlighted with a red border whilst you are moving the display to its new position.
Setting the Display to Mirror mode
Setting the Display to Extend mode
Using both extended and mirrored displays
Changing the main display
Новые и зарегистрированные пользователи могут войти
Источник
DisplayLink macOS Software
Dear Mac users:
(displaylink series adopters And docking only)
Unlike «windows» upgrade, all firmware are backward compatible.
MacBook user with MAC OS 10.13.3 version need to renew your device driver from following links with perspective model you purchase.
| WL-UG69DK1 | WL-UG69DK7 |
| WL-UG39DK1 | WL-UG39DK1V |
| WL-UG39DK2D | WL-UG39DK3 |
| WL-UG39DK4 | WL-UG39DK4V |
| WL-UG39DK7 | WL-UG17D1 |
| WL-UG17V3 | WL-UG3501H |
| WL-UG3501D | WL-UG5501H |
| WL-UG5501D |
Please turn off automatic updates to remain on 10.13.3, 10.13.4 no longer supports Displaylink
DisplayLink macOS Software
From this page you can download a driver for your DisplayLink® enabled USB graphics device that is incorporated in your dock, adapter or monitor. This software provides support for the DisplayLink enabled video outputs. The audio and Ethernet support is provided by native macOS drivers from OS version 10.11.
Issue with MacBook 2018 models with 10.14 Mojave
MacBook 2018 models (based on the Intel Coffee Lake chipset) running macOS 10.14 or 10.14.1 can experience black extended display(s) with only mouse cursor. DisplayLink driver v4.3 Beta 6 stays available to force an AirPlay extended display on these machines. This is fixed by the macOS 10.14.2 public beta .
Information about macOS 10.13.4 to 10.13.6
Users of 10.13.4-10.13.6 should use v4.3.x as it contains a workaround to enable one extended USB display . An FAQ details how to enable Apple AirPlay with DisplayLink display for extend or mirror mode.
Источник
DisplayLink Manager Updated With Native Support for M1 Macs and More
Over the weekend, the DisplayLink Manager app was updated with native support for Macs with the M1 chip, additional Retina resolutions for 4K displays, and a fix for an issue where screen tearing may occur in some high-load cases.

DisplayLink Manager provides a convenient way to enable your DisplayLink dock, adapter, or monitor on macOS. The app combines DisplayLink’s latest driver with features that streamline the setup of mutliple displays with up to 4K resolution. Version 1.3 of the app can be downloaded from the DisplayLink website, and requires macOS Big Sur 11.2 or any version of macOS Catalina, according to the release notes.
DisplayLink adapters have proven popular with M1 Macs, as they allow for multiple external displays to be connected. Officially, Apple says M1 Macs only support one external display (excluding the Mac mini, which can support a second display via HDMI).
Top Rated Comments
![]()
I’ve been trumpeting the M1+DisplayLink combo a few times, might as well do it once more. In short, it’s fantastic. Coming from an MBP16 + eGPU combo, it’s so much more responsive overall. Completely silent. Nothing to eject, just pop the M1 off when done. Three ext monitors connected via one TB3 cable that includes power. One more TB3 port (and bus) free for other peripherals. Performs just as fast as a «real» GPU for my graphics/design-related workflows. Clamshell works fine. The native M1 app is just icing on the cake.
Trade-offs, which I consider minor compared to the upsides, are:
[LIST=1]
* Log in with Apple Watch doesn’t work when ext monitors are active (due to screen recording API being active); it works when undocked in laptop mode.
* NightShift/Flux doesn’t work on DisplayLink monitors, only on the primary 5k TB3 monitor that is direct-connected, and also works as a USB-C hub for DisplayLink daisy-chaining, for 2 more WQHD monitors.
* Can’t think of #3.
I sold my 1-year old setup second hand and got enough money to get the M1, the dock, AirPods Max, and still had money left over. It’s been 13 years since I had a Mac setup that worked as well as the current one does. That was a well-equipped «cheesegrater» Mac Pro with a 32″ Cinema Display.
Источник
Как подключить два или более внешних дисплея к Mac Apple Silicon M1
Последняя линейка MacBook от Apple, в которых используется собственный новый процессор Silicon M1, не может изначально подключать более одного внешнего монитора, что является серьезным ограничением для предыдущего поколения ноутбуков Mac на базе Intel, которые могли работать с двумя дисплеями при подключении к USB-C. док-станцию или концентратор Thunderbolt 3.
Однако есть обходной путь для запуска двух внешних дисплеев на MacBook M1, который мы здесь опишем.
Это связано с некоторыми рисками, поскольку вам потребуется установить сторонние драйверы, которые позже могут не поддерживаться будущими обновлениями macOS.
Внешние дисплеи: большая проблема M1 Mac
Новые Mac mini, MacBook Air и MacBook Pro 13 дюймов от Apple — первые компьютеры Mac с процессором M1, разработанным Apple. Они получили восторженные отзывы об их улучшении скорости по сравнению с ноутбуками на базе Intel, в том числе здесь, на Macworld.
Посмотрите наше сравнение 13-дюймового MacBook Pro (M1) с MacBook Pro (Intel) и MacBook Air (M1 Silicon) с MacBook Air (Intel). Мы также рассмотрели различия между Mac mini (M1) и Mac mini (Intel).
Но если ваш MacBook включает в себя работу более чем одного внешнего дисплея, у вас серьезная проблема. Чип Apple M1 просто не будет его рассматривать.
M1 Mac Mini изначально поддерживает до двух внешних мониторов — один через порт HDMI, а второй через USB-C. Но последние модели MacBook Air и MacBook Pro поддерживают только один внешний дисплей.
Производитель док-станций Plugable предлагает использовать комбинацию технологий отображения, чтобы обойти ограничение MacBook M1 на один монитор.
Его док-станции с несколькими дисплеями используют комбинацию альтернативного режима USB-C (собственный видеовыход «альтернативного режима») и технологии DisplayLink. Эта комбинация служит обходным решением для платформы M1, поддерживающей только один внешний дисплей через USB-C.
Обратите внимание, что DisplayLink требует, чтобы на Mac был установлен драйвер стороннего производителя. Существуют разные версии драйвера DisplayLink, и некоторые из них приносят свои компромиссы.
Подключите MacBook M1 к более чем одному внешнему дисплею
1. Сначала загрузите последнюю версию драйвера DisplayLink для Mac.
Приложение DisplayLink Manager Graphics Connectivity версии 1.1.0 совместимо с macOS Catalina 10.15 и macOS 11 Big Sur. Им можно управлять с помощью значка DisplayLink в строке меню Apple.
Установка проста, но обратите внимание, что эта версия не поддерживает режим закрытого дисплея / раскладушки ноутбука.
Другие ограничения включают несовместимость с поворотом дисплея.
В диспетчере DisplayLink есть опция «запускать при запуске», или вы можете перетащить DisplayLink Manager в элементы входа в «Пользователи и группы».

2. Затем подключите MacBook к док-станции, такой как Plugable UD-ULTC4K Triple Display 4K Docking Station или Caldigit TS3 Plus. Узнайте больше о лучших док-станциях Thunderbolt 3 для получения более подробной информации, или вы можете подключиться через более простой концентратор USB-C.
3. Для первого экрана вы можете подключиться через порт DisplayPort или HDMI док-станции, и это будет обрабатываться изначально MacBook M1.
Вы также можете подключить первый внешний дисплей через адаптер Thunderbolt 3 или USB-C к HDMI или DisplayPort.
Выход HDMI или DisplayPort использует альтернативный режим (альтернативный режим), и, поскольку это, по сути, конвейер непосредственно к собственному графическому процессору системы, он будет вести себя так же, как если бы вы подключили ключ USB-C к HDMI к своему ноутбуку. Для этого не требуется установка пользовательского драйвера.
4. MacBook M1 не поддерживает работу с дополнительными дисплеями.
Вам необходимо подключить второй или третий дисплей через один или несколько портов USB-A док-станции или концентратора, используя адаптер, например StarTech.com Адаптер USB 3.0 — HDMI / DVI.
Этот адаптер превращает доступный порт USB-A 3.0 в один порт DVI-I или VGA (адаптер DVI-VGA входит в комплект) и один выход HDMI. Каждый дисплей может одновременно поддерживать максимальное разрешение 2048×1152 при 60 Гц.
Обязательно используйте активный адаптер HDMI DisplayLink, который может поддерживать 4K при 60 Гц, так как некоторые из них ограничены до 4K при 30 Гц.
DisplayLink использует установленный драйвер, а также системные CPU и GPU для преобразования графических данных в системе в пакеты данных USB. Затем эти USB-данные отправляются по USB-кабелю в виде пакетов данных, конвертируются обратно в видеоинформацию и выводятся на мониторы через микросхему DisplayLink в док-станции.
Эффективно, но не поддерживается
Обратите внимание, что ни Plugable, ни Caldigit официально не поддерживают такую настройку DisplayLink для Mac. Решение работает, но они предупреждают, что это может перестать работать в будущих версиях macOS.
Каждый раз, когда появляется новое обновление ОС, может потребоваться обновление драйверов каждый раз.
Plugable не рекомендует обходной путь для игр, редактирования видео, цифровых аудио рабочих станций (DAW) и воспроизведения защищенного контента (HDCP). Для этих рабочих нагрузок пользователям потребуется полная пропускная способность «чистого» собственного подключения графического процессора, например, обеспечиваемая портом DisplayPort или HDMI на док-станции с использованием альтернативного режима.
Caldigit настоятельно рекомендует не использовать DisplayLink, так как считает его ненадежным и не будет синергии между драйвером и док-станцией. Поскольку для этого требуется драйвер стороннего производителя, пользователи зависят от Apple и стороннего разработчика для поддержки более поздних версий.
Однако такое сочетание технологий отображения позволяет M1 MacBook работать с более чем одним внешним монитором, а M1 Mac mini — с более чем двумя.
Единственный риск состоит в том, что он может перестать работать в любой момент, хотя в этом случае это не повредит вашей системе.
Таким образом, это обходной путь с потенциально ограниченным временным интервалом, но есть вероятность, что совместимость будет восстановлена на каком-то этапе, если произойдет худшее, и вы вернете свою настройку с несколькими мониторами.
Источник
How to Fix Displaylink Not Working on macOS 10.14

Elise Williams
2021-07-14 11:55:48 • Filed to: macOS 10.14 Solutions • Proven solutions
DisplayLink furnishes support for display, ethernet and a range of USB ports. As such, when DisplayLink ceases to work in 10.14, the Mac user’s productivity might wind down and fears for the cost of remedies might come lurking.In most instances, the user sees all the indications that DisplayLink is fully functioning as a USB utility, but the connected screen do not respond accordingly. But regardless how eerie this issue might seem to be, the simple troubleshooting techniques for 10.14 Displaylink no longer working issue outlined in this article can help you nib it in the bud.
Why Does Displaylink Not Work on macOS 10.14
DisplayLink enriches a Mac’s user experience by providing support for a wide range of USB ports. But users may be dazed to find that a macOS Mojave update negates the operations of DisplayLink. Users who’re facing this difficulty think to themselves «my displaylink device does not work at all when connecting on macos 10.14» probably without a clue as to why macOS Mojave, which is presupposed to enhance user experience, actually negates a vital vehicle for optimal user experience. This issue has been a rock that has pressed many-a macOS Mojave users on a hard place, compelling them to either do without USB ports and displays, or to revert back to the previous OS wherein the issue is non-existent.

This issue emerges upon a macOS Mojave update, as the new macOS update disables the DisplayLink USB driver’s capacity to support display output. The latest macOS update limits the usage of software that uses kernel extensions (kexts) due to a number of security reasons. Because of its system extension (DisplayLinkDriver.kext), DisplayLink is consequently negated by the operating system’s limitations on kernel extension. Nonetheless, the user has been given explicit prerogatives to regulate their Mac’s behaviors as per kernel extensions. Users can activate system extensions after installation in order to enable DisplayLink to run unrestrained.
Nonetheless, when 10.14 Displaylink is no longer working in a business setting, the corporate environment is fraught with a serious impediment. Businesses deploying Macs in their enterprise ecosystem might need to expend a proportionate amount of resources — human and otherwise— to implement troubleshooting steps for this issue across the board. Some business see this issue as all the more reason why Macs are less ideal for the corporate ecosystem. But be that as it may, you can resolve the Mac os x 10.14 displaylink issue without making changes to the hardware or software of docking station or DisplayLink drivers.
Resolving The Mac OS X 10.14 Displaylink Issue
As noted earlier, users are given control over the behavior of their Macs towards kernel extensions. In the first place, at some point during the installation of DisplayLink, a warning message appears prompting about the automatic disabling of Kernel extensions.
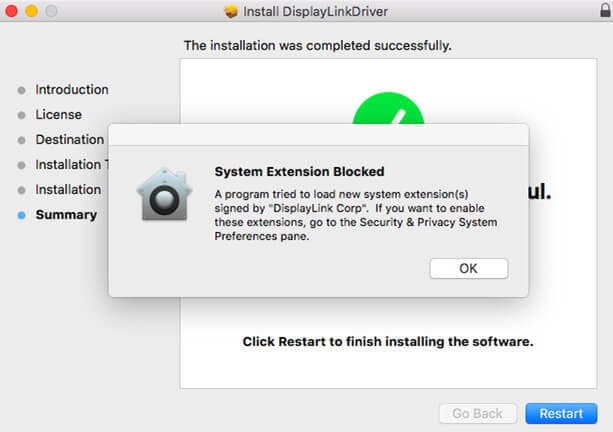
But in many cases, this warning message does not appear. So users who’re not prompted to prevent the automatic disabling of system extensions will have to deal with the issue manually. If your Displaylink 4.1 not working on macOS 10.14 because you were not appropriately informed about the automatic limitation placed on system extensions by the OS, you can revert the settings in your Mac’s Security & Privacy menu. Open the Apple Menu, and then select the “Security and Privacy” option. On the next page, enter your admin login credentials.
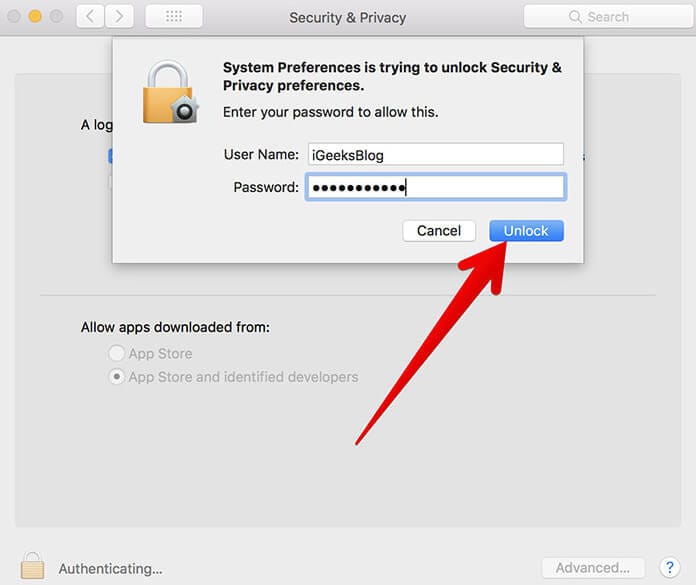
Around the lower section of the screen, you’ll find a note that states «System Software from developer «DisplayLink Corp» was blocked from loading», with an «Allow» button next to it. Here is where you can effect changes to your system’s limitations on system extensions.
Источник


