- IT Blog. Code Inside
- Самая простая установка Home Assistant на Debian сервер
- Виды установки Home Assistant
- Home Assistant
- Контейнер с Home Assistant
- Home Assistant Supervised
- Home Assistant Core
- Установка Home Assistant Supervised
- Linux
- Install Home Assistant Operating System
- Download the appropriate image
- Create the Virtual Machine
- Hypervisor specific configuration
- Start up your Virtual Machine
- Install Home Assistant Container
- Platform Installation
- Restart Home Assistant
- Docker Compose
- Exposing Devices
- Optimizations
- Install Home Assistant Core
- Install dependencies
- Create an account
- Create the virtual environment
- Install Home Assistant Supervised
- Установка Home Assistant Supervised на Debian Linux
- Установка Docker
- Установка дополнительного софта
- Установка Home Assistant
- Проблемы при установке
IT Blog. Code Inside

Самая простая установка Home Assistant на Debian сервер
Home Assistant — это бесплатное программное обеспечение для создания умного дома с разнообразными автоматизациями. Еще буквально несколько лет назад его использование было уделом гиков, знающих Python и пишущих конфиги руками, но теперь в конце 2020 большая часть стандартных вещей делается через веб интерфейс.
Чаще всего к использованию Home Assistant приходят те, кто уже сталкивался с умным домом на примере, например, Mi Home, и остался недоволен его быстродействием, танцами с бубном при добавлении китайских и европейских версий устройств, или же тем, что все данные в нем идут через сервера в Китае.
Мне удалось «разгрузить» Mi Home, перенеся все датчики, автоматизации и правила в Home Assistant, но, к сожалению, избавиться от него полностью не получилось. Рекомендации ниже не являются окончательной и исчерпывающей инструкцией, и определенно могут подойти не всем, это всего лишь метод, который подошел мне и показал свою эффективность в частном случае.
Виды установки Home Assistant
Home Assistant
В более ранних инструкциях такая система называлась «Hass.io» Это полная установка системы домашней автоматизации, не требующая наличия пользовательской ОС, поскольку уже включает в себя операционную систему (HassOS), Supervisor и надстройки. Такую систему предполагается запускать на различных одноплатных компьютерах или на виртуальной машине.
Контейнер с Home Assistant
Включает только приложение Home Assistant Core (ядро) в собственной системе контейнеризации, например, Docker. Он не обеспечивает полную функциональность супервизора и, следовательно, не предоставляет панель супервизора и надстройки. Ранее в официальной инструкции этот метод назывался «Home Assistant Core на Docker».
Home Assistant Supervised
Home Assistant устанавливается на пользовательский Linux. Раньше такой подход назывался «Hass.io в обычном Linux» и устанавливался поверх, например, Debian.
Home Assistant Core
Запускает ядро Home Assistant Core на Python. Такой метод не обеспечивает полную функциональность супервизора и лишает пользователя возможности автоматически обновляться или ставить плагины.
Из этих методов наиболее перспективным показался Home Assistant Supervised, потому что:
- ставится прямо на существующую систему, где уже крутятся другие сервисы (OwnCloud, Bind, Squid и прочие).
- конфиги доступны к редактированию через консоль
- есть возможность обновлений с помощью супервизора
- аддоны и плагины, они особенно пригодятся при настройке Zigbee координатора
Установка Home Assistant Supervised
1. Установить обновления системы
sudo su apt update && apt dist-upgrade -y && apt autoremove -y reboot
2. Установить нужные пакеты. Если что-то уже стоит, не страшно.
sudo su apt-get install -y software-properties-common apparmor-utils apt-transport-https avahi-daemon ca-certificates curl dbus jq network-manager socat
3. Отключить ModemManager
systemctl disable ModemManager ssystemctl stop ModemManager
4. Установить Docker
curl -fsSL get.docker.com | sh
5. Установить Home Assistant Supervised
curl -sL https://raw.githubusercontent.com/home-assistant/supervised-installer/master/installer.sh | bash -s
Этот скрипт можно запускать с ключами:
| Аргумент | Значение по умолчанию | Описание |
|---|---|---|
| -m | —machine | Тип платформы, на которую производится установка | |
| -p | —prefix | /usr | Префикс папки, где будет установлен ассистент |
| -d | —data-share | $PREFIX/share/hassio | Путь относительно prefix папки |
| -s | —sysconfdir | /etc | Конфигурационная папка |
Заявлена поддержка таких платформ:
- intel-nuc
- odroid-c2
- odroid-n2
- odroid-xu
- qemuarm
- qemuarm-64
- qemux86
- qemux86-64
- raspberrypi
- raspberrypi2
- raspberrypi3
- raspberrypi4
- raspberrypi3-64
- raspberrypi4-64
- tinker
После того, как скрипт выполнится, вы можете перейти в браузере по адресу http://server-ip:8123 (замените server-ip на IP адрес машины, куда производилась инсталляция) и увидеть логотип Home Asistant. Через некоторое время вам будет предложено создать пользователя и впервые войти в систему.
PS: По умолчанию, конфиги в формате YAML будут храниться здесь:
Источник
Linux
Install Home Assistant Operating System
Download the appropriate image
Follow this guide if you already are running a supported virtual machine hypervisor. If you are not familiar with virtual machines we recommend installation Home Assistant OS directly on a Raspberry Pi or an ODROID.
Create the Virtual Machine
Load the appliance image into your virtual machine hypervisor. (Note: You are free to assign as much resources as you wish to the VM, please assign enough based on your add-on needs)
Minimum recommended assignments:
All these can be extended if your usage calls for more resources.
Hypervisor specific configuration
- Create a new virtual machine
- Select “Other Linux (64Bit)
- Select “Use an existing virtual hard disk file”, select the VDI file from above
- Edit the “Settings” of the VM and go “System” then Motherboard and Enable EFI
- Then “Network” “Adapter 1” Bridged and your adapter.
- Create a new virtual machine in virt-manager
- Select “Import existing disk image”, provide the path to the QCOW2 image above
- Choose “Generic Default” for the operating system
- Check the box for “Customize configuration before install”
- Select your bridge under “Network Selection”
- Under customization select “Overview” -> “Firmware” -> “UEFI x86_64: …”.****
- Create a new virtual machine
- Select “Custom”, make it compatible with the default of Workstation and ESX
- Choose “I will install the operating system later”, select “Linux” -> “Other Linux 5.x or later kernel 64-bit”
- Select “Use Bridged Networking”
- Select “Use an existing virtual disk” and select the VMDK file above,
After creation of VM go to “Settings” and “Options” then “Advanced” and select “Firmware type” to “UEFI”.
Start up your Virtual Machine
- Start the Virtual Machine
- Observe the boot process of Home Assistant Operating System
- Once completed you will be able to reach Home Assistant on homeassistant.local:8123. If you are running an older Windows version or have a stricter network configuration, you might need to access Home Assistant at homeassistant:8123 or http://X.X.X.X:8123 (replace X.X.X.X with your ’s IP address).
With the Home Assistant Operating System installed and accessible you can continue with onboarding.
Install Home Assistant Container
These below instructions are for an installation of Home Assistant Container running in your own container environment, which you manage yourself. Any OCI compatible runtime can be used, however this guide will focus on installing it with Docker.
This guide assumes that you already have an operating system setup and a container runtime installed (like Docker).
If you are using Docker then you need to be on at least version 19.03.9, ideally an even higher version, and libseccomp 2.42 or newer.
Platform Installation
Installation with Docker is straightforward. Adjust the following command so that /PATH_TO_YOUR_CONFIG points at the folder where you want to store your configuration and run it.
Once the Home Assistant Container is running Home Assistant should be accessible using http:// :8123 (replace with the hostname or IP of the system). You can continue with onboarding.
Restart Home Assistant
If you change the configuration you have to restart the server. To do that you have 3 options.
- In your Home Assistant UI go to the Configuration panel ->Server management and click the “Restart” button.
- You can go to the Developer Tools ->Services, select the service homeassistant.restart and click “Call Service”.
- Restart it from a terminal.
Docker Compose
In order to use docker-compose you first need to install docker-compose on your system.
As the Docker command becomes more complex, switching to docker-compose can be preferable and support automatically restarting on failure or system restart. Create a docker-compose.yml file:
Start it by running:
Exposing Devices
In order to use Z-Wave, Zigbee or other integrations that require access to devices, you need to map the appropriate device into the container. Ensure the user that is running the container has the correct privileges to access the /dev/tty* file, then add the device mapping to your container instructions:
Optimizations
The Home Assistant Container is using an alternative memory allocation library jemalloc for better memory management and Python runtime speedup.
As jemalloc can cause issues on certain hardware, it can be disabled by passing the environment variable DISABLE_JEMALLOC with any value, for example:
The error message : Unsupported system page size is one known indicator.
Install Home Assistant Core
This guide assumes that you already have an operating system setup and have installed Python 3.8 (including the package python3-dev ) or newer.
Install dependencies
Before you start make sure your system is fully updated, all packages in this guide are installed with apt , if your OS does not have that, look for alternatives.
Install the dependencies:
Create an account
Add an account for Home Assistant Core called homeassistant . Since this account is only for running Home Assistant Core the extra arguments of -rm is added to create a system account and create a home directory.
Create the virtual environment
First we will create a directory for the installation of Home Assistant Core and change the owner to the homeassistant account.
Next up is to create and change to a virtual environment for Home Assistant Core. This will be done as the homeassistant account.
Once you have activated the virtual environment (notice the prompt change to (homeassistant) [email protected]:/srv/homeassistant $ ) you will need to run the following command to install a required Python package.
Once you have installed the required Python package it is now time to install Home Assistant Core!
Start Home Assistant Core for the first time. This will complete the installation for you, automatically creating the .homeassistant configuration directory in the /home/homeassistant directory, and installing any basic dependencies.
You can now reach your installation via the web interface on http://homeassistant.local:8123 .
If this address doesn’t work you may also try http://localhost:8123 or http://X.X.X.X:8123 (replace X.X.X.X with your machines’ IP address).
When you run the hass command for the first time, it will download, install and cache the necessary libraries/dependencies. This procedure may take anywhere between 5 to 10 minutes. During that time, you may get “site cannot be reached” error when accessing the web interface. This will only happen for the first time, and subsequent restarts will be much faster.
Install Home Assistant Supervised
This way of running Home Assistant will require the most of you. It also has strict requirements you need to follow.
Unless you really need this installation type, you should install Home Assistant OS (this can also be a virtual machine), or Home Assistant Container.
- First make sure you understand the requirements.
- Then head over to home-assistant/supervised-installer to set it up.
Once the Home Assistant Supervised installation is running and Home Assistant accessible you can continue with onboarding.
Источник
Установка Home Assistant Supervised на Debian Linux
Есть много разных способов как можно установить Home Assistant (список).
Один из способов — это установка Home Assistant с супервизором на компьютер на котором уже работает Linux. Это официально поддерживаемый способ установки, но нужно очень точно следовать всем рекомендациям. Если что-то сделать не совсем так, то Home Assistant переходит в режим «You are running an unsupported installation.» или даже в «Your installation is running in an unhealthy state», а в этом режиме Home Assistant работает исключительно плохо.
Главное требование — операционная система Linux обязательно должна быть Debian 10 aka Buster. Другие операционные системы не поддерживаются.
Этот способ установки называется «Home Assistant Supervised».
В этом тексте рассказывается как установить Home Assistant на компьютер на котором уже установлена операционная система Debian Linux.
Установка Docker
Первое что нужно сделать — это установить Docker.
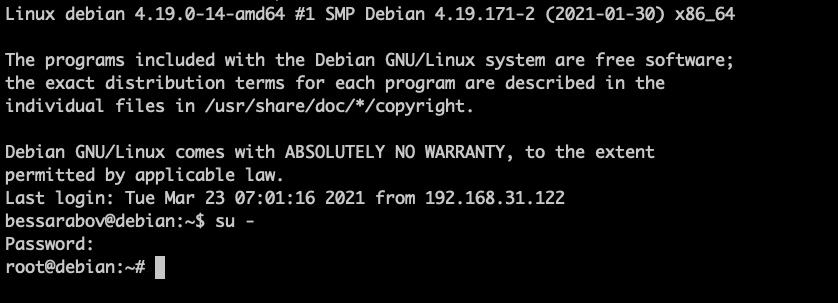
Для этого нужно перейти в режим суперпользователя (для этого нужно набрать команду ‘su -‘ в консоли и ввести пароль).
Дальше нужно выполнить команду, которая обновит информацию про пакеты и установит компоненты которые нужны для установки и работы докера:
Эта команда работает несколько минут — она скачивает из интернета указанные пакеты и устанавливает их на систему.
Дальше нужно запустить команду которая добавит нужный ключ в систему:
Результат команда должна быть строчка «OK».
Следующее действие — нужно добавить добавить в систему новый репозиторий в котором находятся пакеты докера:
(команда должна отработать практически мгновенно, ничего на экран не выведет)
А дальше нужно запустить команду которая обновит информацию про пакеты и установит докер:
После того как эта команда отработала можно проверить что докер успешно установлен с помощью команды
На экране должна появиться строчка которая начинается с «CONTAINER ID»:

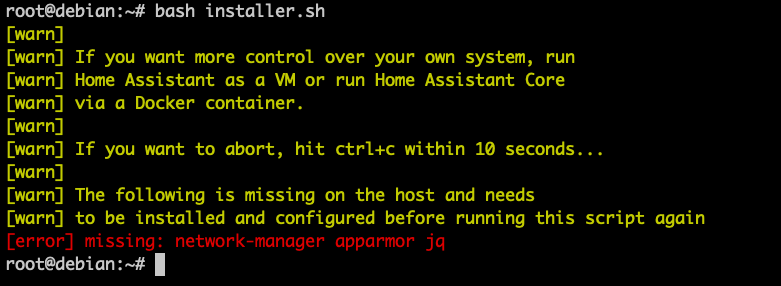
Установка дополнительного софта
В режиме суперпользователя нужно выполнить команду:
Это установит программы. Если это не сделать, то при установке Home Assistant будет ошибка вида:
Установка Home Assistant
Это нужно делать в режиме суперпользователя.
Сначала нужно скачать файл в котором прописаны команды для установки:
А дальше нужно запустить этот файл:
Программа задаст вопрос
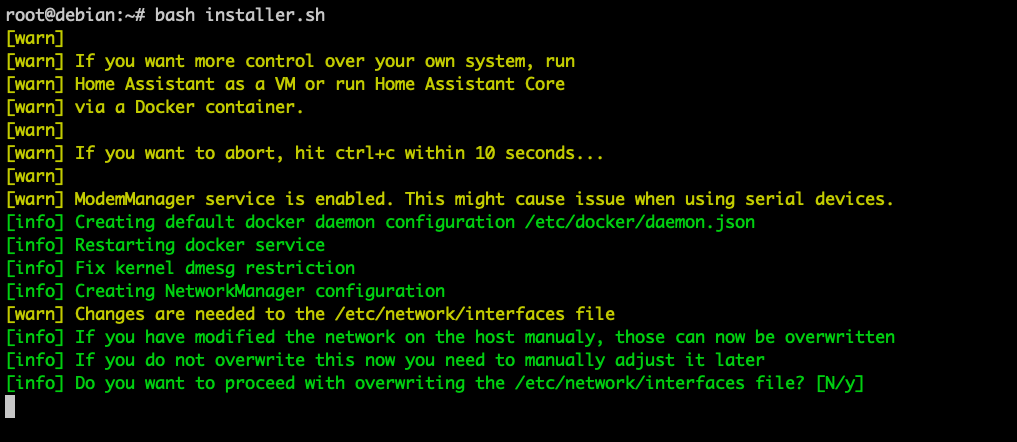
Нужно на клавиатуре нажать клавишу «y» и нажать Enter.
Установка происходит несколько минут. Вот что показывается на экране после успешной установки:

После этого можно зайти браузером на указанный адрес (в моем случае это был http://192.168.31.93:8123 )
Сразу после установки будет показываться ошибка (в фоне происходит скачивание и установка нужных частей Home Assistant), но если зайти на эту же страницу через несколько минут, то будет уже текст «Preparing Home Assistant»:
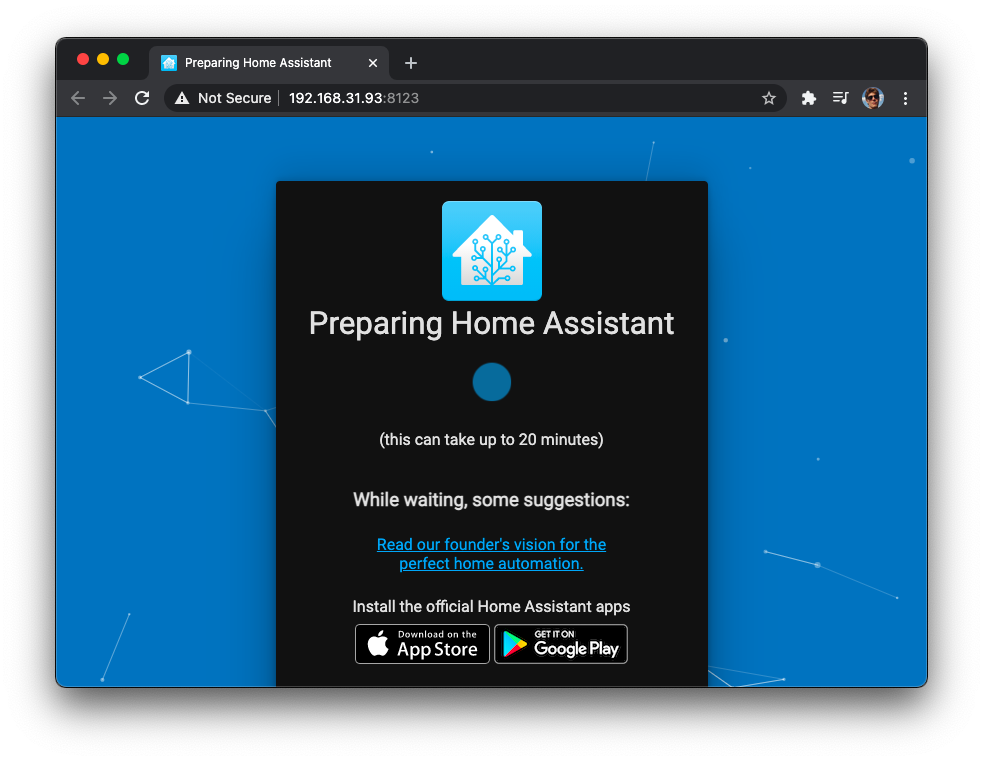
А еще через несколько минут появится окно первичной настройки Home Assistant.
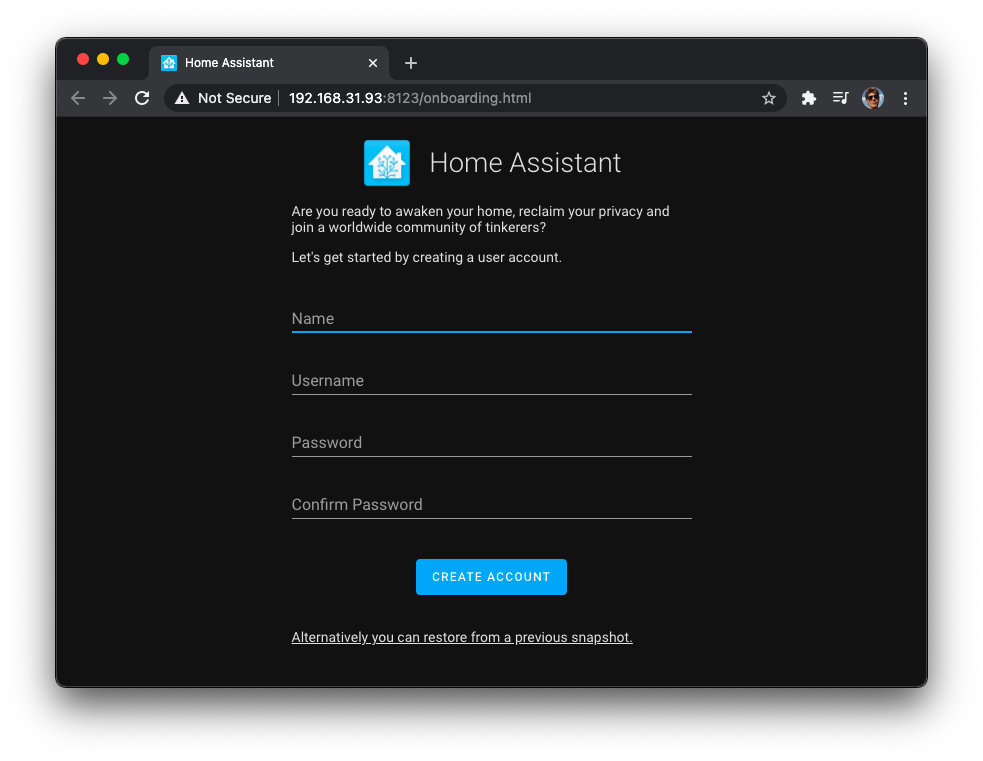
На этом установка Home Assistant завершена.
Проблемы при установке
Если вы поставили все нужные пакеты, но все равно при запуске установки получаете ошибку:
Это значит что вы неправильно перешли в режим суперпользователя. Например, вы использовали команду «su», вместо правильной «su -«. (технические подробности — при использовании «su» в $PATH не добавляется путь /sbin в котором лежит программа apparmor_parser)
Источник


