- How to install dlib library for Python in Windows 10
- Preparation
- Install
- Sasiwut Chaiyadecha — Senior Consultant — EY | LinkedIn
- Sasiwut is a Senior Consultant working on Performance Improvement (PI) at EY Thailand. Currently, the main focus is on…
- Analytics Vidhya
- Dlib python install windows
- Ответы (8)
- Установите Dlib из .whl
- Установите Dlib из источника
- Install OpenCV 3 and Dlib on Windows ( Python only )
- Step 1: Install Anaconda (a python distribution)
- Step 2 : Create Virtual Environment
- Step 3 : Install OpenCV
- 3.1. Activate the environment
- 3.2. Install OpenCV and other important packages
- 3.3. Test your installation
- Subscribe & Download Code
- How to install Dlib for Python 3 on Windows
- Install Dlib for Python 3.6:
- Install Dlib on Windows
- Step 1: Install Visual Studio 2015
- Step 2: Install CMake v3.8.2
- Step 3: Install Anaconda 3
- Step 4: Download Dlib
- Step 5: Build Dlib library
- Step 6: Update user environment variable – dlib_DIR
- Step 7: Build Dlib examples
- Step 8: Test Dlib’s C++ example
- Step 9: Install Dlib’s Python module (Only Anaconda 3)
- Step 10: Test Dlib’s Python example
- Subscribe & Download Code
How to install dlib library for Python in Windows 10

Hi! This is my first blog (or article depending on what you call) in English. Anyway, I am writing this blog because I have been facing with the trouble of this package for a while. I was trying to google it for the solution but I could not find the alternative one. So! this is my solution to install dlib library in Windows 10.
Some people might say that why don’t you just use conda install which is already complied. It is much easy to install. Well… I agree and I could do it. However, other packages, such as face_recognition could not leverage dlib when you used conda install . Hence, we need to use pip install .
Preparation
First thing first, there are two things required (really need it indeed!).
- CMake: This is because dlib was developed in C based programming language, so it needs this program to use it. It can be found in the link https://cmake.org/download/. To make sure matching with your operation system, in our case is Windows 10 64-bit version.

Sometimes we need manage the Windows PATH environment for CMake. (If you already added during installation, you can skip this section).
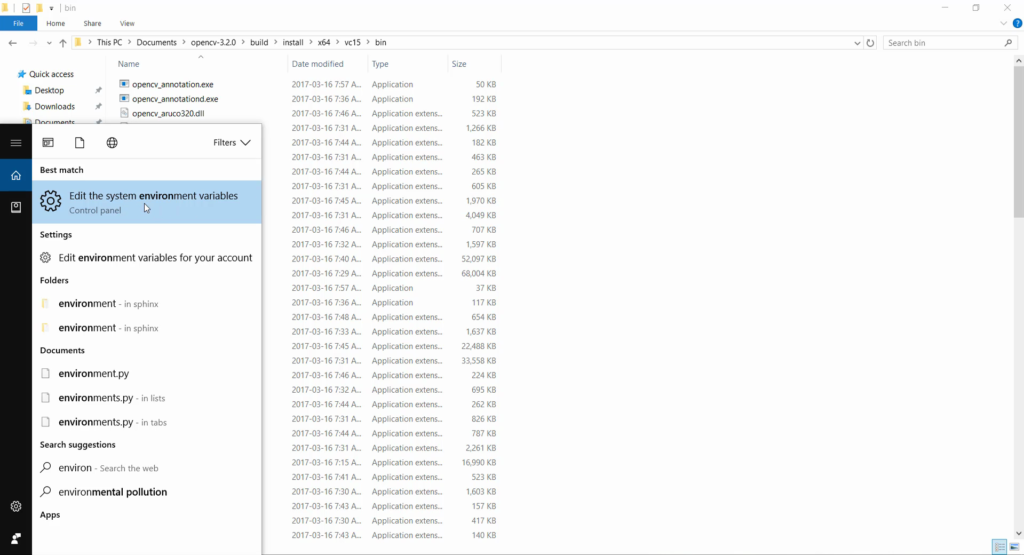
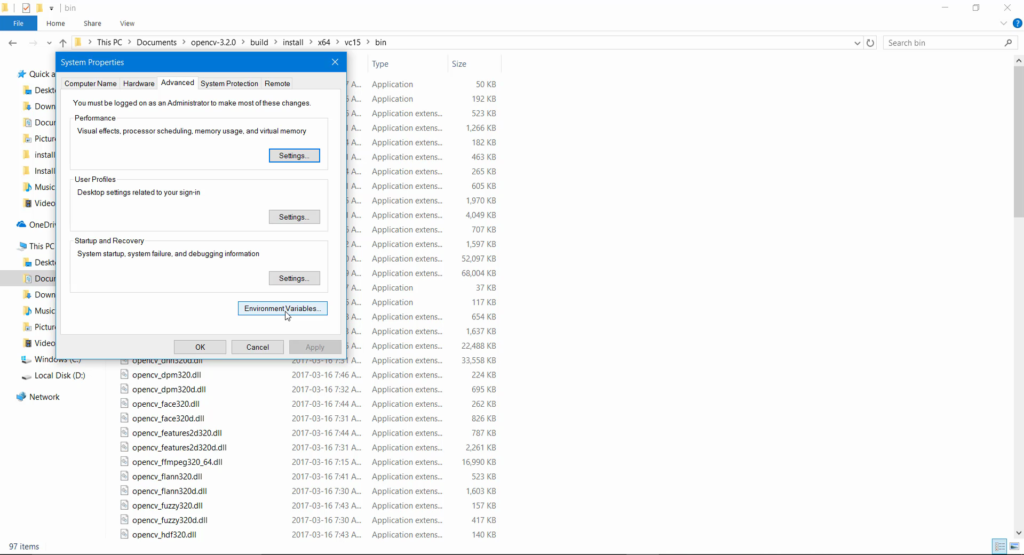
For checking whether the PATH already added or not, you can go to Environment Variables on Windows by go to This PC > Properties > Advance system settings. Then, go to Tab Advanced and click on Environment Variables.
Another windows will pop-up and click Edit…

If you are unable to find CMake path, you should add the CMake installed directory like image below.

Install
Everything is looking good so far. Now we can install dlib into our python environment. First of all, you need to install CMake library.
Then, you can install dlib library using pip install .
After passing enter, you laptop or desktop will run the C, C++ Compiler. If you got something like image below, you would be fine.


After these all, you will get dilb installed on your Windows 10 by not using conda install compiler.
For further discussion or anyone would like to contact me. We could do it over the LinkdIn below.
Sasiwut Chaiyadecha — Senior Consultant — EY | LinkedIn
Sasiwut is a Senior Consultant working on Performance Improvement (PI) at EY Thailand. Currently, the main focus is on…
See you next time!
Analytics Vidhya
Analytics Vidhya is a community of Analytics and Data…
Dlib python install windows
28910 просмотра
8 ответа
Я хочу использовать dlib с Python для распознавания изображений. У меня есть приложение питона работает большой с OpenCV на Windows 10, но когда я хочу установить dlib с cmd ней дает мне это следующее сообщение об ошибке:
ошибка: не удается найти cmake, убедитесь, что он установлен и находится в пути. Вы можете установить cmake, используя инструкции по адресу https://cmake.org/install/. Вы также можете указать его путь с параметром —cmake.
Что я должен делать?

Ответы (8)
18 плюса
Установите Dlib из .whl
Dlib 19.7.0
Вы можете проверить его, загрузив пример с сайта, например SVM_Binary_Classifier.py, и запустив его на своем компьютере.
Установите Dlib из источника
Dlib > 19.7.0
- Загрузите исходный код (.tar.gz) из индекса пакетов Python: https://pypi.python.org/pypi/dlib
- Запустите setup.py: sudo python setup.py install (Linux) или python setup.py install (Windows)
примечание: эта процедура предполагает, что у вас установлен CMake .
9 плюса
Следуй этим шагам:
- pip install cmake
- Установите инструменты сборки Visual Studio отсюда .
- В Visual Studio 2017 перейдите на вкладку «Отдельные компоненты», «Инструменты Visual C ++ для Cmake» и установите флажок в разделе «Компиляторы, инструменты сборки и среды выполнения».
- pip install dlib
Автор: Rajat Bhatt Размещён: 20.09.2018 04:01
2 плюса
Вам необходимо установить Cmake .
dlib — это библиотека c ++ с привязками к python. Это должно быть построено сначала. Я думаю, это произойдет автоматически после установки Cmake
1 плюс
Вы должны установить cmake, как об ошибке говорит вам.
или напрямую установите cmake отсюда https://cmake.org/download/
После установки cmake pip install dlib должен работать.
У меня были установлены инструменты для сборки vstudio, когда я делал свой тест.
Автор: Dedalo Размещён: 14.10.2018 05:16
0 плюса
Установите dlib в Windows
Извлеките cmake и настройте его как переменную среды для извлеченного пути, где он был C: \ Users \ admin \ Downloads \ cmake-3.8.1-win32-x86 \ cmake-3.8.1-win32-x86 \ bin
Теперь распакуйте zip-файл dlib и перейдите в папку dlib
Следуйте этой команде
Теперь перейдите в папку Release, которая будет находиться в каталоге dlib \ test \ build \ Release, и выполните эту команду dtest.exe —runall
Этот процесс занимает время, так как cmake компилирует все файлы C ++, поэтому будьте спокойны. Наслаждаться.
0 плюса
Выберите файл .lib dlib в соответствии с установленной версией Python. Например , если установлена версия 3.6.7 питон, система 64 — битной или если питон 3.5.0 32 бит затем выбрать dlib-19.5.1- cp36 -cp36m-win_ amd64 .whl и dlib-18.17.100- cp35 -отсутствует- win32 . соответственно
Текст, выделенный полужирным шрифтом, говорит о поддержке Python.
Скачайте файл колеса отсюда или скопируйте адрес ссылки
для вышеуказанного метода .whl файл должен находиться в рабочем каталоге
Ниже ссылка для python3.6 с поддержкой dlib link, для python 3.5 u можно заменить на dlib 35.whl link
0 плюса
тогда вы можете установить пакет face_recognition
Автор: vaas Размещён: 23.02.2019 12:08
-2 плюса
это может помочь !!
загрузите whl, используйте shift + щелчок правой кнопкой мыши в загруженной папке и нажмите здесь, чтобы открыть окно powershell, и используйте команду
Install OpenCV 3 and Dlib on Windows ( Python only )
November 30, 2017 By 59 Comments
This is an old blog and some information might be obsolete. We have published new instructions. You can find them here:
We already have a post for installing OpenCV 3 on Windows which covers how to install OpenCV3 from source for working with both C++ and Python codes. However, many readers have faced problems while installing OpenCV 3 on Windows from source. This post is for those readers who want to install OpenCV on Windows for writing Python code only.
If you are still not able to install OpenCV on your system, but want to get started with it, we suggest using our docker images with pre-installed OpenCV, Dlib, miniconda and jupyter notebooks along with other dependencies as described in this blog.
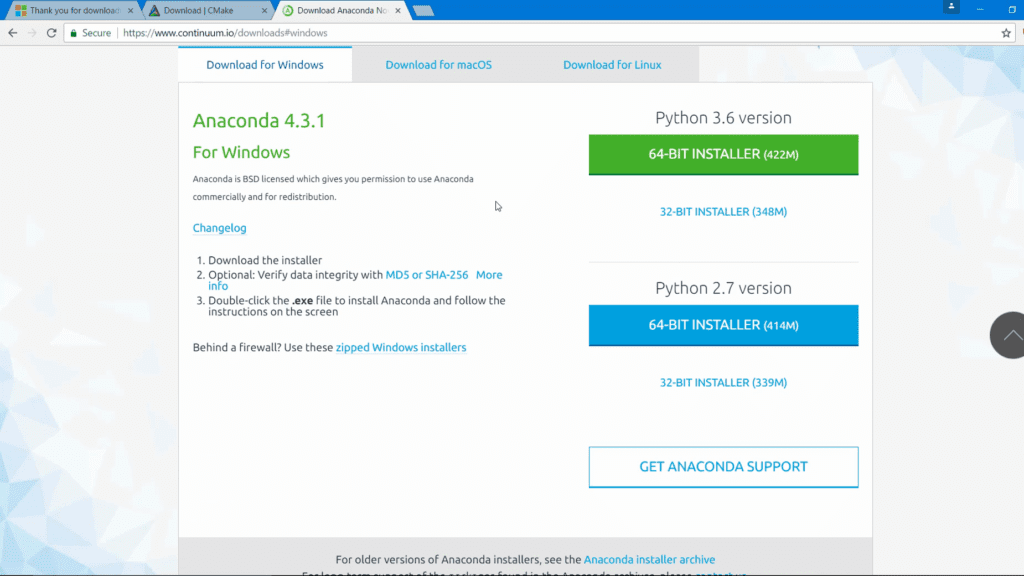
Step 1: Install Anaconda (a python distribution)
Download and install Anaconda 64-bit version from https://www.continuum.io/downloads.
It is advised to install Anaconda for Python 3.
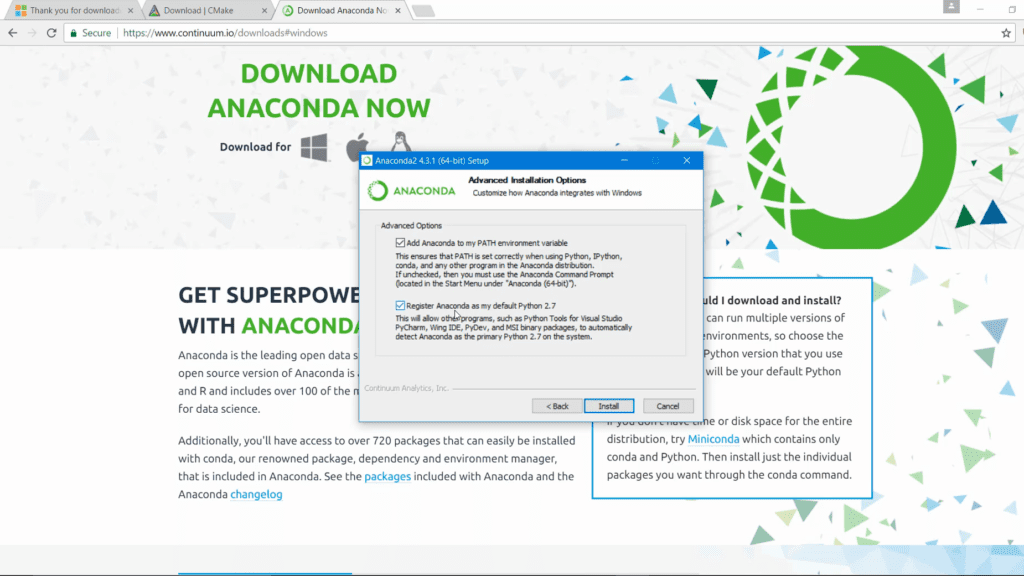
While installing Anaconda make sure that you check both options:
- Add Anaconda to my PATH environment variable
- Register Anaconda as my default Python
Step 2 : Create Virtual Environment
Open the command prompt and execute the following command.
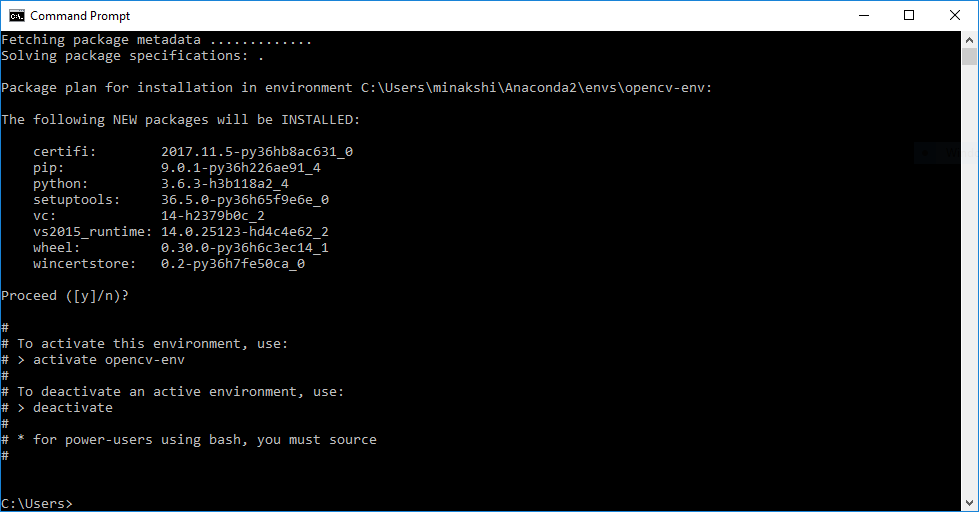
You should get an output as shown below:
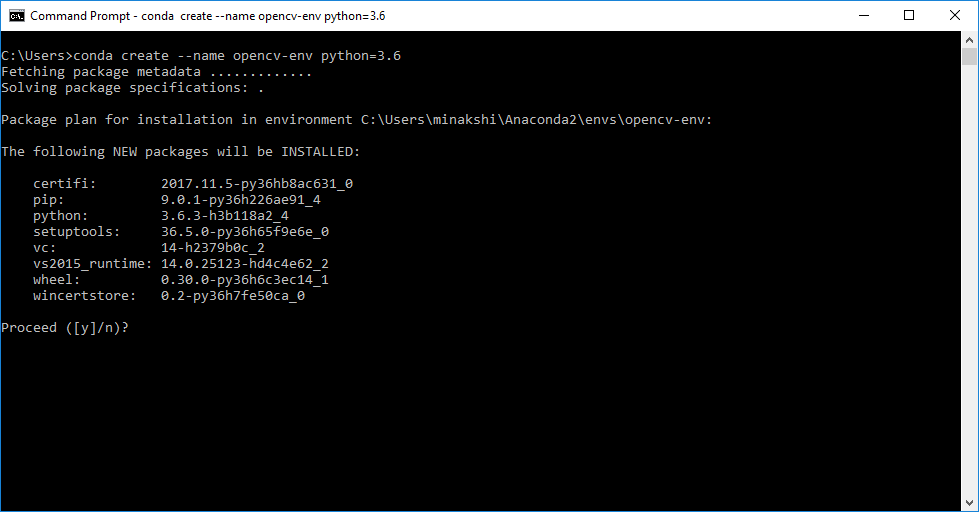
Press Enter and the environment will be installed and you should get an output as shown below :
Step 3 : Install OpenCV
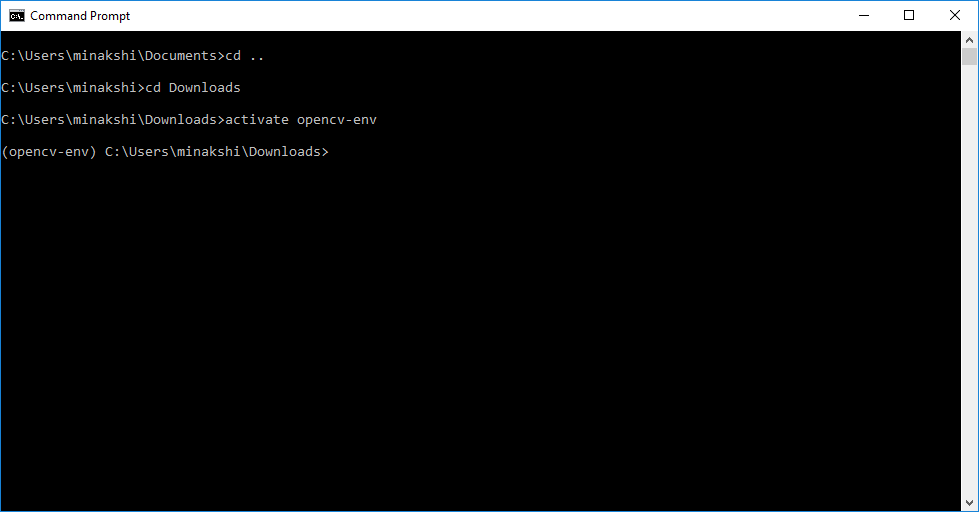
3.1. Activate the environment
3.2. Install OpenCV and other important packages
Continuing from the above prompt, execute the following commands
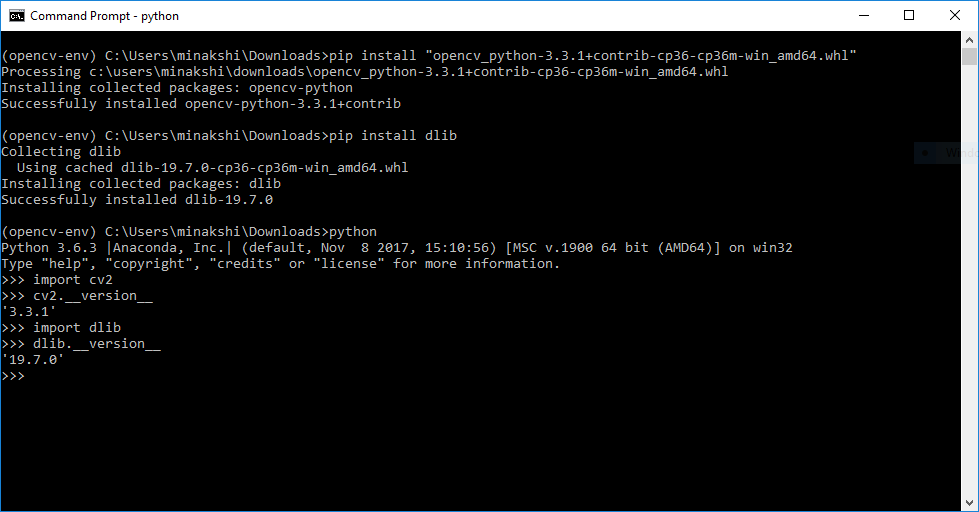
3.3. Test your installation
Open the python prompt on the command line by typing python on the command prompt
You should get the following output
Subscribe & Download Code
If you liked this article, please subscribe to our newsletter. You will also receive a free Computer Vision Resource Guide. In our newsletter, we share OpenCV tutorials and examples written in C++/Python, and Computer Vision and Machine Learning algorithms and news.
How to install Dlib for Python 3 on Windows
In this video we will see how to install the Dlib library for Python 3 on Windows.
In this specific tutorial we are going to install Dlib 19.8 for Python 3.6 (64 bit version). We choosed this specific version as it’s the latest one (March 2019 the moment I’m writing this post) which has ready binaries for windows.
In other words is the one that is really easy to install.
In this website you find all the binaries available at the moment:
https://pypi.org/simple/dlib/
If you don’t have Python and Opencv installed yet, go first with Python and Opencv installation following this tutorial.
Install Dlib for Python 3.6:
- Python 3.6 (64 bit) has to be already installed.
- Run Windows Prompt Command. You can type on the search bar “CMD”.

Remember to click with right button of the mouse and then “Run it as administrator”, otherwise you might not have the permission to install the library. - Type on the prompt command:
- Once you see the message “Successfully installed dlib“, it means that the installation has been completed.

You can now run Python, try importing the dlib library. If you don’t get any error, it means that the installation was done correctly.

Hi there, I’m the founder of Pysource.
I help Companies, Freelancers and Students to learn easily and efficiently how to apply visual recognition to their projects.
For Consulting/Contracting Services, check out this page.
Install Dlib on Windows
June 12, 2017 By 45 Comments
In this post, we will provide step by step instructions on how to install Dlib on Windows.
Compiling Python modules such as NumPy, SciPy etc. is a tedious task. Anaconda is a great Python distribution which comes with a lot of pre-compiled Python packages. So we will use Anaconda as our Python distribution.
An alternative to Anaconda is that you install official Python library and use Christoph Gohlke’s awesome repository to install pre-compiled Python modules.
This tutorial is based on using Anaconda so we may not be able to help if you choose to use Gohlke’s precompiled binaries or if you compile Python libraries from source.
If you intend to use Dlib only in C++ projects, you can skip Python installation part.
Now let’s go through the steps to install Dlib. Follow our previous post Install OpenCV3 on Windows to complete Step 1, 2 and 3.
Step 1: Install Visual Studio 2015
Step 2: Install CMake v3.8.2
Step 3: Install Anaconda 3
Step 4: Download Dlib
Step 5: Build Dlib library
Extract this compressed file. Open Windows PowerShell or Command Prompt and move to the directory where you have extracted this file.
If you are running these commands on Command Prompt replace ` (backtick) with ^ (caret).
Dlib will be installed within dlib-19.6\build\install directory. We will use CMake to build Dlib examples but you can use Visual Studio too. This directory (dlib-19.6\build\install) contains include and library folders which you can specify in Visual Studio to build projects using Dlib.
Step 6: Update user environment variable – dlib_DIR
This environment variable is needed for CMake to find out where Dlib is installed. CMake looks for a file named dlibConfig.cmake within directory dlib_DIR to find Dlib’s include and library directories.
- Press Windows Super key, search for “environment variables”.
- Click Environment Variables in System Properties window.
- Click New in “User Variables” (in upper half of window).
- Under variable name write dlib_DIR and under variable value write full path to directory dlib-19.6\build\install\lib\cmake\dlib
On my machine path is: D:\programming\dlib-19.6\build\install\lib\cmake\dlib
This directory contains file “dlibConfig.cmake”. This is used by CMake to configure dlib_LIBS and dlib_INCLUDE_DIRS variables to generate project files. Before assigning the value to variable dlib_DIR make sure that this path has file dlibConfig.cmake. - Now click ok to save and close environment variables window.
Note: If you have an open Command Prompt/Power Shell window before these values were updated, you have to close and open a new Command Prompt/Power Shell window again.
Step 7: Build Dlib examples
We will use our CMakeLists.txt file instead of one which is shipped with Dlib.
Download modified CMakeLists.txt file and put it in dlib-19.6\examples directory and replace the default one with this one. Then follow the steps given below:
Once build is complete, it will generate executables for all examples in examples\build\Release folder.
Step 8: Test Dlib’s C++ example
We will test Face Landmark Detection demo to check whether we have installed Dlib correctly.
Download trained model of facial landmarks from Dlib’s website. Extract this file (shape_predictor_68_face_landmarks.dat.bz2) to Dlib’s root directory (dlib-19.6).
Step 9: Install Dlib’s Python module (Only Anaconda 3)
Compiling Python bindings for Dlib from source is non-trivial. You have to compile Boost.Python from scratch and configure some environment variables (such as BOOST_ROOT and BOOST_LIBRARYDIR) before you can compile Python module of Dlib. We are skipping that part for now. A complete tutorial on how to build Dlib Python bindings from source will be released in future.
To save time and efforts it is suggested to use Anaconda 3. You can install a compiled binary of dlib v19.4 from Anaconda. At the time this article was updated Dlib’s latest available version on Anaconda’s conda-forge repository is 19.4. So we will install v19.4 instead of 19.6
Step 10: Test Dlib’s Python example
Subscribe & Download Code
If you liked this article and would like to download code (C++ and Python) and example images used in all posts in this blog, please subscribe to our newsletter. You will also receive a free Computer Vision Resource Guide. In our newsletter, we share OpenCV tutorials and examples written in C++/Python, and Computer Vision and Machine Learning algorithms and news.


