DLNA клиент
В последней прошивке в телефон добавили функцию передачи контента по DLNA, чем мне весьма хочется воспользоваться. Посему вопрос — какие есть адекватные DLNA клиенты под линуксы? Пробовал Rygel, он молча не работает — т.е телефон клиент видит, но работать с ним не хочет

Контент теперь транслируют с мобильных устройств на стационарные. В этом мире что-то пошло не так.


Такого монстра громоздить ради просто транслирования музыки.. Ну и на клиенте нет иксов

Rygel непонятная штука, сам для DLNA с плазмы на Ubuntu пользуюсь minidlna, довольно шустрая и всегда работает, что актуально для устройств подключенных через домашний WiFi-роутер. Правда если чего в папке новое закачал то я так понял необходимо каждый раз делать sudo minidlna -R. Правда иногда не понимает без sudo service minidlna stop/start, но это мелочи. При этом устройство должно воспроизводить кодеки, например для DivX на телевизоре мне пришлось вначале проиграть с флешки регистрирующий ролик, хоть с флешки всё и так играло, но вот по DLNA без этого мало что передавалось.
в качестве клиента пробуй XBMC, VLC. в качестве сервера рекомендую minidlna.
Правда если чего в папке новое закачал то я так понял необходимо каждый раз делать sudo minidlna -R
minidlna использует inotify и на лету подхватывает новый контент.
minidlna использует inotify и на лету подхватывает новый контент
я никакого лёта не увидел, хоть inotify и включен, поэтому только так
я никакого лёта не увидел, хоть inotify и включен, поэтому только так
УМВР искаропки. закинул файло, тут же проиндексировалось и стало доступно.
Если все же хочется на телефоне смотреть контент, а не передавать с него, то трудно представить что-то лучше Mediatomb.
Крутой, но не я один такой дурак, см. тут. А версия minidlna какая?
у меня 60, боюсь менять

minidlna
а шо, в репах демьяна его нету чоле?
а шо, в репах демьяна его нету чоле?
а откуда я его ставил епт? =]
адекватные DLNA клиенты под линуксы?
Главное чётко резличать, что в DLNA нет клиентов, а то запутаться легко. Есть три сущности:
— DLNA server (который раздаёт контент)
— DLNA player (который воспроизводит контент)
— DLNA control point (которая связывает произвольно первые со вторыми и упавляет вторыми)
Они могут сочетаться в разных вариантах. Скажем, Windows media player — это control + server. Телевизор часто внутри себя player + control. Я часто смотрю в варианте, когда control на коммуникаторе с Андроидом (предпочитаю BubbleUPnP), сервер — домашняя файлопомойка, проигрыватель — телевизор или тот же коммуникатор (когда ночью сериалы смотрю).
Под Linux более-менее (но не идеально) с серверами. Со всем остальным, особенно с control’ами — всё плохо :-/
я никакого лёта не увидел, хоть inotify и включен, поэтому только так
У меня прекрасно работает. Скопировал новый файл в положенное место или кинул симлинк на ведущуюся ещё раздачу — и файл мгновенно в списке MiniDLNA.
Источник
Linux Mint 17 и DLNA
Зачем это все надо
Linux Mint — отличная домашняя ОС. Богатый выбор графических сред на любой вкус, простая и понятная даже новичку установка, сразу после установки имеем основной набор необходимого софта, удобный менеджер приложений, основные мультимедийные кодеки. В общем, отличная система для перехода и ознакомления с Linux.

Но возникает проблема для тех, у кого нет дома NAS или чего-то подобного, а смотреть контент с ПК на других устройствах, поддерживающих DLNA хочется. Под Linux существует множество различных DLNA-серверов, но оптимальным, все же, является MiniDLNA. И тому есть несколько причин. Во-первых, это типичный Unix-way: этот сервер является именно DLNA-сервером, а не комбайном с кучей свистелок, при этом контент без проблем воспринимается на любом устройстве. Даже телевизоры Samsung со своим AllShare прекрасно подключаются к нему. Также можно отметить и замечательную скорость работы и нетребовательность к ресурсам этого сервера.
И все бы было хорошо, но вот в с помощью команды
установить его не получится — нет его в репозитарии.
Существуют разные варианты устранения этого недоразумения, но самый правильный путь — установка из исходников.
Чтобы не отвратить возможных новоиспеченных линуксоидов с этого пути и, возможно, помочь кому-то, напишу как обойти подводные камни, ибо информации много, но в начале пути людям нужно попроще.
Подготовка
Если будете выполнять команды в консоли, запущенной с правами root, команду sudo писать не нужно.
Для начала нужно установить необходимые библиотеки:
И устанавливаем сами библиотеки:
Самая свежая версия MiniDLNA на данный момент — 1.1.3, ее можно скачать здесь, либо загрузить из консоли: ключ перед адресом нужен, чтобы сохранилось оригинальное имя, с выхдом новой версии имя файла будет отличатся. После этого архив нужно распаковать:
Теперь перейдем в распакованную папку с исходниками
Если вы хотите, чтобы на устройстве отображались сразу папки с файлами, нужно немного подправить код:
Для отключения запроса способа отображения файлов нужно в папке с исходниками (minidlna-1.1.3, мы в нее уже должны были перейти) подправить файл upnpsoap.c, но сначала сделаем его резервную копию:
и откроем в редакторе поиском (F6), ищем процедуру:
В начале процедуры выполняется разбор SOAP/XML-запроса, затем его обработка и возврат результата. Разбор запроса завершается формированием отладочного сообщения:
Далее реализован выбор корневого контейнера в зависимости от конфигурационного параметра root_container:
Сразу после этого блока и перед блоком с запросами к БД добавляем код перенаправления папок для видео, музыки и изображений:
В итоге правленный фрагмент должен выглядеть следующим образом:
Чтобы упростить процедуру последующего обновления, сохраним патч с внесенными изменениями:
Теперь вместо редактирования файла, достаточно применить патч:
Теперь можно переходить к конфигурированию.
Если вам это не нужно, переходите сразу к конфигурированию:
Установка
1) Для тех, кто в дальнейшем захочет обновить версию, предыдущую можно удалить (конфигурационные файлы при этом сохраняются), если этого не сделать, то в случае, если в новой версии состав установочных файлов изменится, в /usr/local могут остаться старые файлы, при первой установке — переходим сразу к пункту 2.
Для удаления заходим в папку с предыдущей установкой и выполняем команду: 2) Запускаем установку (в комментариях предложили более правильный путь, чем make install):
Ключ -D указывает, что должен быть создан Debian-пакет
3)Если мы производим первоначальную установку, нужно создать init-скрипт: , если мы обновляем версию, больше ничего делать не нужно, при первоначальной установке у нас откроется пустой файл, в который нужно внести следующий код:
, сохранить комбинацией клавиш Ctrl+O и выйти из редактора — Ctrl+X.
4) После этого даем права на запуск скрипта:5) И активируем запуск init-скрипта: 6) Так как по умолчанию служба запускается под пользователем minidlna, нам нужно создать соответствующую учетную запись:
7) Правим файл конфигурации сервера: В нем нам нужно следующее содержимое (здесь подправлен интервал, с которым сервер себя анонсирует, так как не все телевизоры опрашивают сервер, также вам надо прописать путь к папке с медиа, к примеру так: «media_dir=V,/mnt/sdb6/Video/Alex/» в соответствующем разделе файла):
Обычно после этого не требуется дополнительных настроек, но если есть проблемы с доступом к медиа (или хотите перестраховаться), можно настроить права доступа:
Поскольку служба работает под пользователем с ограниченными правами, публикуемые папки и файлы должны быть доступны на чтение для всех пользователей, следовательно, иметь разрешения 644: «rw- r— r—», для файлов и 755: «rwx r-x r-x», для папок.
Проверяем доступность для каждой папки, заданной в minidlna.conf, командой:Если папка недоступна, задаем права доступа:Вышестоящие папки также должны быть доступны на чтение всем пользователям. Проверяем доступность на чтение каждой папки, указанной в пути. Для вышестоящих папок используем chmod без ключа -R, если не требуется сброс разрешений для всех дочерних файлов и папок.
В качестве альтернативы смене разрешений, можно запустить MiniDLNA от имени пользователя или группы-владельца файлов. Для этого необходимо задать параметры USER и GROUP в /etc/default/minidlna, и сменить владельца папки /var/lib/minidlna командой:
Запуск сервера
Проверяем, работает ли служба, также смотрим параметры запуска:
Проверяем, слушается ли порт:
В случае успешного старта, лог должен быть примерно следующим:
Если видим: «WARNING: Inotify max_user_watches [8192] is low.», необходимо увеличить число дескрипторов слежения inotify до 100 000. Для этого в файл /etc/sysctl.conf добавим строки:
Или копипастом команды:
Изменение параметра вступит в силу после перезагрузки системы.
Открываем в браузере адрес.сервера:8200, видим количество файлов в библиотеке, начиная с версии 1.1.2, также отображается список подключенных клиентов.
Настройка DLNA/UPnP-AV сервера завершена.
При появлении ошибок в каталоге, необходимо выполнить повторное сканирование файлов.
При использовании приведенного выше init-скрипта, для запуска сканирования медиа-библиотеки используем команду:
Служба при этом будет перезапущена, подключенные клиенты будут отключены.
Для сканирования медиа-библиотеки при каждом старте системы можно задать ключ запуска: «-R» в параметре DAEMON_OPTS в файле /etc/default/minidlna. Сканирование большой медиа-библиотеки существенно нагружает диск, что может замедлить загрузку системы.
Полное формирование каталога может занять несколько минут. Сканирование папок выполняется в порядке их объявления в конфиге. Файлы из небольших папок, объявленных в конфиге выше, появятся в каталоге в самом начале процесса сканирования. Крупные папки с редко воспроизводимым контентом имеет смысл размещать в конфиге последними.
Все это опробовано на своей системе, пользуйтесь на здоровье. Надеюсь, количество пользователей Linux будет постоянно увеличиваться.
Источник
Просмотр видео с DLNA-сервера в Linux
Организовать DLNA-сервер на Linux можно множеством способов. Например можно использовать uShare или MiniDLNA. Но что если встала обратная задача? И если для прослушивая музыки с DLNA-сервера для Linux есть большое количество ПО, то с просмотром видео ситуация немного сложнее. Но определённый набор решений есть и тут. Именно они и будут рассмотрены далее.
Totem
Медиаплеер Totem, известный так же как GNOME Video, имеет поддержку DLNA, однако включение этой поддержки не совсем очевидно. Например на Ubuntu 18.04 после установки пакетов «totem», «totem-plugins» и «totem-plugins-extra» поддержки DLNA в Totem не обнаружилось. Оказалось что она реализована с использованием фреймворка grilo, для которого и нужно устанавливать модули. В итоге чтобы получить Totem с поддержкой DLNA необходимо выполнить команду:
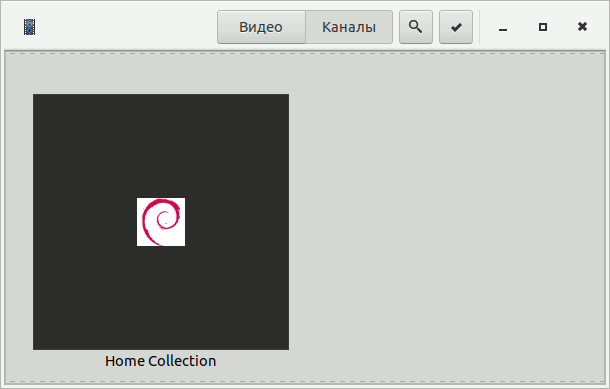
Чтобы смотреть видео с DLNA-сервера нужно зайти в меню «Каналы», найти свой DLNA сервер, кликнуть по нему и выбрать нужный файл для просмотра. При воспроизведении видео можно ставить на паузу и перематывать. Всё стандартно. Единственное неприятное ограничение: все файлы на сервере отображаются единым списком без разбивки по папкам.
С видеоплеером VLC немного проще и без неожиданностей. В Ubuntu 18.04 его можно установить командой:
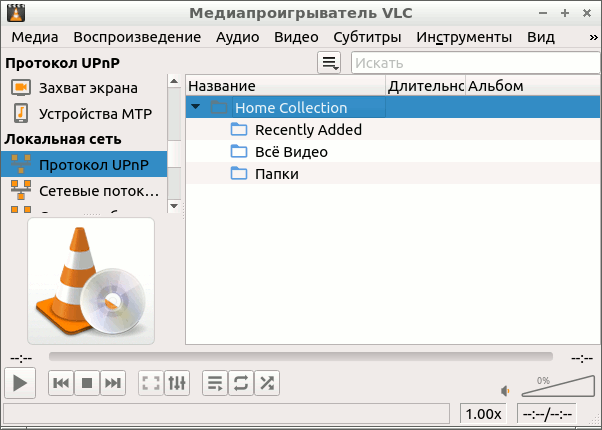
После запуска плеера нужно в меню «Вид» выбрать пункт «Плейлист», затем в списке слева выбрать «Протокол UPnP». После этого в Плейлисте отобразится список доступных медиа-серверов, кликая по которым можно перейти к выбору конкретного видео.
Поддерживается поиск на сервере и группировка медиафайлов по папкам. При просмотре видео всё также обычно и предсказуемо: работает перемотка и постановка видео на паузу. Как будто просмотр идёт с локального диска.
djmount
Интересным вариантом является использование djmount: утилиты, позволяющей монтировать медиасервер как обычную файловую систему. Для просмотра видео можно использовать любой Медиаплеер. В Ubuntu 18.04 можно djmount устанавливается командой:
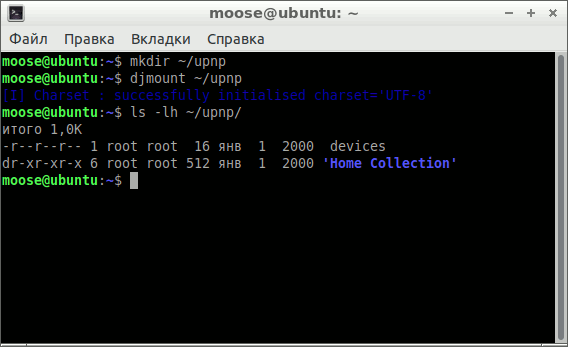
После установки надо создать директорию и смонтировать в неё виртуальную файловую систему с помощью djmount:
В этой директории будет отображаться список всех доступных в локальной сети медиа-серверов. Медиа-сервера отображаются в виде поддиректорий, по которым можно перемещаться с помощью файлового менеджера. Файлы можно открывать с помощью соответствующих приложений. Таким образом для просмотра видеофайлов можно использовать любой привычный видеоплеер.
Источник
realmike.org

Live Desktop Streaming via DLNA on GNU/Linux
Many modern TVs (and set-top boxes, gaming consoles, etc.) support DLNA streaming. Suppose you have a PC that stores all your music, downloaded podcasts, video podcasts, photos, and so on. You can run some DLNA media server software on your PC and stream your entire media collection to your TV over your home network. No more carrying around USB sticks, it’s all in your home cloud.
On GNU/Linux, I am using MediaTomb as my DLNA server. It’s nothing fancy (it’s a file server, after all), and it just works.
Okay, this takes care of media files stored on your PC. But can we do more? Is it possible to stream a live capture of your desktop to the TV?
Let’s say you’re watching a Flash video in your browser, and there’s no way to download the video file. Or, you’re watching a live event being streamed via Flash or whatever. It would be kinda cool to be able to stream that to your TV via DLNA. And it’s possible—not trivial, mind you, but I’ve seen it working at least once…
The same approach that’s taken here for live streaming might also be useful for on-the-fly transcoding (e.g., an .ogg file needs to be transcoded to .vob for the player to be able to read it).
(I should mention that something like this isn’t unheard of. In fact, my Philips TV came with the Windows-only(!) WiFi MediaConnect software to do desktop streaming. I have never seen it in action, because I don’t use Windows. Of course, Philips based the TV’s firmware on the Linux kernel, like so many other manufacturers do. But, also unsurprisingly, they use it because it’s “free as in beer”, not because they care about users’ freedom. The fact that I could still get all this to work on GNU/Linux is thanks to the invaluable work of many free software projects: MediaTomb, FFmpeg, Matroska, FUSE, Python, to name just a few.)
What you can find here
I wrote a couple of scripts that allow you to capture your desktop and stream it to a DLNA-capable player. To use the code as-is, your player must support the Matroska (.mkv) file format.
I used the scripts in conjunction with MediaTomb, but other media servers should work just as well.
The scripts are very rough at the edges, and if you are afraid of the command line or of reading Python code, you shouldn’t attempt to use them.
What is missing / Invitation to contributors
As I mentioned, the scripts only work with devices that can play Matroska files via DLNA right now. The basic ideas and concepts should apply equally as well to MPEG-2 and other formats. I’m not sure about MPEG-4 files, though, and I would appreciate feedback from someone more familiar with the format.
The scripts could definitely use better error checking, a nicer command-line interface, and lots of testing. If anyone’s interested in helping with that, please contact me.
Usage Instructions
Note: I am in the process of updating the scripts to work on the newest Ubuntu and to be more user-friendly. You can follow my progress here.
- Make some changes to dlna_fuse.py to specify the temporary file, control the captured display region, set the output format, etc.
- Configure MediaTomb, as described below.
- Mount dlna_fuse.py with “python dlna_fuse.py -s -f fuse_mnt”. This automatically starts the capture.
- At this point, add the file “fuse_mnt/a/fuse_live.mkv” to MediaTomb’s database. (You only have to do this once.)
- Start playback.
- As this is more of a proof-of-concept than a polished tool, please read on below and let me know if you have any feedback.
The Basic Idea
First off, how do we capture the desktop? Someone named Verb3k explains this in “How to do Proper Screencasts on Linux Using FFmpeg“. Here’s an example:
ffmpeg -f alsa -ac 2 -i pulse -f x11grab -r 20 -s 1024×576 -i :0.0+128,224 -acodec ac3 -ac 1 -vcodec libx264 -vpre fast -threads 0 -f matroska
This command line takes sound from PulseAudio and screen images from X11 (at 20 fps) and combines them into a Matroska file using the H.264 codec for video and AC3 for audio. It grabs a rectangular area of 1024×576 pixels, 128 pixels from the left edge of the screen and 224 pixels from the top edge of the screen.
Now, what happens when we have MediaTomb serve up the file capture.mkv to the player while the file is still being captured? If you are luckier than I was, it might just work, and you’re done. Maybe you can find some other combination of video codec, audio codec, and container file format that your player likes better. (Before attempting to do live streaming, you should have ffmpeg convert an existing video file, and finish the conversion before starting playback, in order to find a format that your player understands.)
Starting the playback while the capture was still in progress didn’t work for me. Instead, when starting playback too soon after capturing had begun, the player would simply tell me the file was unplayable. When waiting for a few minutes, the player would play up until the point where I had started playback. That is, when I started playback after having captured for five minutes, playback would stop after five minutes, even if the captured file contained 10 minutes at that point.
You probably have an idea already why this might have failed. Let’s take a look at what the file contents might look like while the capture is in progress.
 A video file after 2 minutes of capturing, after 5 minutes, after it is complete
In the figure, you can see a hypothetical file format that stores the data length and video duration in the front, then the video data, then a table containing seek information and other stuff that’s only known after encoding has finished. This particular encoder seems to update the duration field periodically while encoding is in progress. On the other hand, it leaves the data size field blank until it has finished.
This hypothetical case shows many things that can go wrong when playback starts in the middle of encoding (which, in the case of live streaming, basically means at any time):
- The player might encounter the “unknown” size field and decide that the file is broken.
- Or, it takes the “unknown” size as an indication that it should seek to the end of the file and determine the size itself (which breaks, because the file has no end yet).
- The player might read the duration of 2:00 min. and never look at it again—playback will simply stop after 2:00 min., no matter what happens to the file in the meantime.
- The player might know that there’s supposed to be a seek table, a list of keyframes, a checksum, etc., at the end and fail when it tries to read it.
The scripts that I wrote try to circumvent these issues in two steps:
- Modify the file that ffmpeg produces during the capture so that the file appears to be a regular, albeit very, very long, video. Give the player all the information that it needs right away, so that it does not try to seek (through the media server) to various places in the file, searching for the information.
- For Matroska files, this is what “matroska_live_filter.py” does. Hopefully, it will be possible to write filters for other container file formats in the future.
- Intercept calls to the filesystem, so that when the player (through the media server) tries to access parts of the file that don’t exist yet, we can wait for ffmpeg to produce them (if it’s just video data for 5 seconds in the future, for example), or come up with fake data.
- This is what “dlna_fuse.py” does. This is a virtual (FUSE) filesystem that simply waits for ffmpeg to produce more data when the media server tries to prefetch more data than is available in the file.
Matroska is a container format that lends itself well to this kind of interception. Matroska has streaming support (i.e., it defines what should go into the headers so that players know it’s a live stream), but unfortunately, my particular player didn’t care much.
There are other container formats where I’m not sure that such a thing is possible. In MP4, for example, there are atoms like “stsz” (“sample table sizes”) and “stss” (“sample table sync samples”) that seem to go before the video stream and that contain information about the encoded sizes of frames—I’m not sure there’s a way to fake this data without waiting for the encoding to finish. If you are familiar with the MP4 or QuickTime formats and have an idea, please leave a comment!
Filtering Matroska for Live Streaming
The Matroska specification points out that a live stream is designated by setting the “Segment” size to “unknown”. ffmpeg does this, but it didn’t convince my TV to treat the file as a live stream. Instead, I ended up simply setting the size to a very large value and setting the duration of the video to 100 hours.
In addition, I suppress “SeekHead” elements (pointers to other sections of the file) and “Cues” elements (pointers to keyframes for fast-forwarding). This isn’t strictly necessary; ffmpeg only produces these elements when encoding finishes (which it never does with a live capture). However, this functionality was quite handy when testing out the DLNA streaming with existing .mkv files.
As a final hack, I output 128 KB of “Void” data after each “Cluster” (which appears to be a block of
5 seconds of audio/video data). The “Void” data doesn’t serve any purpose other than being able to send data to the player when it requests some. The player pre-fetches data. Without the “Void” blocks, there is sometimes not as much data as it requests, because ffmpeg hasn’t produced it yet. If the requested data can’t be delivered fast enough, though, the player appears to give up. By producing the “Void” data, there is always enough data to satisfy the player, even though the data doesn’t contain anything useful.—At least, that’s what I think is happening…
All this is done in the Python script “matroska_live_filter.py”.
- python matroska_live_filter.py : Output a pretty-printed tree of the Matroska file structure. (Similar to the mkvinfo tool from the mkvtoolnix package.)
- python matroska_live_filter.py — : Read a Matroska file from stdin (maybe the output of ffmpeg writing to stdout). Writes the modified Matroska file to stdout on-the-fly, i.e., it writes data as soon as it becomes available and doesn’t wait for the input to end.
As an example, to filter an ffmpeg-produced live stream, write this:
ffmpeg -f alsa -ac 2 -i pulse -f x11grab -r 30 -s 1024×768 -i :0.0 -acodec pcm_s16le -vcodec libx264 -vpre fast -threads 0 – | python matroska_live_filter.py – >
(I tried to use libebml and libmatroska in C++ first. However, documentation was hard to come by, and the code wasn’t quite self-explanatory. I found a Matroska tag reader written in Python by Johannes Sasongko and built the filter based on that.)
FUSE Filesystem to Fool the Media Server
When you’re using GNOME, chances are you’re using FUSE filesystems already. When you use “Places”→”Connect to Server” to connect to an FTP server, for example, the remote server appears as a local folder in
/.gvfs. This is a virtual filesystem that uses FUSE.
For the DLNA streaming, I decided to write a FUSE filesystem in Python. This filesystem would appear to MediaTomb as a regular directory containing a Matroska video file. Whenever MediaTomb would access the file or read parts of it, my Python code could intercept these calls and do its magic.
When the filesystem is mounted (i.e., when the Python script is started), the desktop capture is started and redirected to a temporary file. When MediaTomb (or any other program) requests some part of the file, the script can check whether there’s enough data in the file. If yes, it simply returns the data. If not, it blocks briefly until ffmpeg has written enough data. If the player tries to read too far ahead, this might indicate that the file isn’t suitable for live streaming yet, and the script will log an error. (This shouldn’t happen for Matroska files anymore, but it will be useful when trying to add support for more container formats later.)
The FUSE filesystem is in “dlna_fuse.py”. It requires the Python bindings for FUSE (package “python-fuse” on Ubuntu).
You should make a few changes to the file to adapt it to your needs:
- Change the variable TEMP_FILE. While ffmpeg captures the desktop, the resulting video is not kept in memory but written to this file. This means, you need some free memory on your hard disk while watching live streams. Of course, the whole purpose of the FUSE filesystem is that the file doesn’t need to exist physically. At a later point, I will change the FUSE script to keep only a part of the ffmpeg output in memory, and discard older parts once the player has read them. For now, the temporary file is used as a buffer.
- Change the ffmpeg command line. The current command corresponds roughly to this:
- MONITOR=$(pactl list | grep -A2 ‘^Source #’ | grep ‘Name: .*.monitor$’ | awk ‘
‘ | tail -n1)
parec -d «$MONITOR» | ffmpeg -f s16le -ac 2 -ar 44100 -i — -f x11grab -r 20 -s 1024×576 -i :0.0+128,224 -acodec ac3 -ac 1 -vcodec libx264 -vpre medium -threads 0 -f matroska — | python matroska_live_filter — >
/Videos/live.mkv
- MONITOR=$(pactl list | grep -A2 ‘^Source #’ | grep ‘Name: .*.monitor$’ | awk ‘
- mkdir fuse_mnt
python dlna_fuse.py -s -f fuse_mnt - “-s” means single-threaded (just in case my implementation isn’t entirely thread-safe), “-f” means foreground (so that you can see log output on stdout).
- ps aux | grep dlna_fuse.py
kill -9
Configuring MediaTomb
 MediaTomb web UI: Ugly but functional. And ugly.
Install MediaTomb via your package manager (package “mediatomb” in Ubuntu). In Ubuntu, MediaTomb is started automatically as a service. The configuration file is in /etc/mediatomb/config.xml.
I prefer to start mediatomb manually whenever I need it and place the configuration file in
Provided that the config.xml contains “ ”, you can open the MediaTomb GUI in a web browser at http://localhost:49152/ (or a subsequent port number). Once the FUSE filesystem is up and running, add the file fuse_mnt/a/fuse_live.mkv to the database. At this point, you should be able to find it and play it back on your DLNA player. (Of course, it can’t hurt to try a regular file first to check whether it works at all.)
How well does it work?
The image quality is astonishing, even with the “fast” encoding profile that I am using. The fonts and window details are very crisp. You have to look very closely to see the typical MPEG compression artifacts, if you can see them at all.
I am not trying to watch HD movies this way. I mostly use this for the TWiT live stream and similar talking-heads programs, so the 20 fps that my PC can deliver are good enough.
The latency is currently whatever it takes me to start the FUSE filesystem (which automatically starts the capture), walk over to the TV, and start playback there. I think if I would delay the capture until the file is actually accessed, I could reduce latency to just a few seconds (although I do think it’s a good idea to give the encoder a head start). Maybe it will be possible at some point to reduce the latency far enough to be able to remote-control the PC and get feedback almost instantly. We’ll see.
If the video hangs, try the obvious things: Reduce the frame rate, make the captured screen area smaller, lower the bitrate, etc.
Tested Hardware and Software
I tried all this on Ubuntu 10.10 (Maverick) with MediaTomb 0.12.1, FFmpeg 0.6, and Python 2.6.
The TV is a Philips PFL 7605H/12 with firmware 000.140.025.000. (As far as I can tell, models 8605 and 9705 use the same firmware, so they might work as well.)
If any of you can successfully replicate this on other player models and brands (or even if you can’t), please leave a comment.
Источник


