- How to create a macOS installation disk on Linux
- Install Dmg2Img
- Ubuntu
- Debian
- Arch Linux
- Fedora
- OpenSUSE
- Generic Linux
- Burn to USB – Dmg2Img
- Convert DMG to ISO or CDR
- Convert DMG to ISO (MacOS X, Windows or Linux)
- Convert DMG to ISO options
- MacOS X – Convert DMG to ISO using ApplePi-Baker
- MacOS X – Convert DMG to ISO using Disk Utility
- MacOS X – Convert DMG to ISO from the command line
- Windows – Convert DMG to ISO or IMG
- Download — Dmg2img
- Linux – Convert DMG to ISO or IMG
- Support Us .
- Related Articles
- Comments
- dmg2img
- dmg2iso
- makeimg
How to create a macOS installation disk on Linux
Feb 12, 2019
Comment
Have a broken Macbook or iMac? In need of a fresh macOS installation to fix it but only have access to a Linux PC? Don’t worry! Thanks to the Dmg2Img application, it’s possible to make a macOS installation disk on Linux.
Please keep in mind that the Dmg2Img application doesn’t work 100% of the time. Use at your own risk!
Install Dmg2Img
Before being able to create a new installation image, you must install the Dmg2Img application on your computer. In this section of the tutorial, we’ll go over how to install Dmg2Img on most Linux operating systems, including Ubuntu, Debian, Arch Linux, Fedora Linux, OpenSUSE and even from source.
Ubuntu
To install Dmg2Img on Ubuntu, you’ll need first to enable the “Universe” software repository. To enable it, open up a terminal window and enter the following command into it.
With Universe working, you’ll be able to install Dmg2Img with the Apt package manager.
Debian
Dmg2Img is available on Debian Linux in the “Main” software repository. To install it, launch a terminal window with Ctrl + Alt + T or Ctrl + Shift + T. Then, enter the following Apt-get command into the terminal window.
Arch Linux
Arch users can install Dmg2Img through the AUR. To get the app installed, launch a terminal. Then, once it’s opened up, use the Pacman packaging tool to install both the Base-devel and Git packages.
With the packages installed, it’s time to use the git clone tool to download the Dmg2Img snapshot from the Arch Linux AUR.
After the git clone command finishes up, move the terminal window into the new “dmg2img” folder on your computer.
Lastly, use the makepkg command to build and install Dmg2Img on your Arch Linux PC.
Fedora
Dmg2Img is available to Fedora Linux users through the traditional software sources. To install it, launch a terminal window via Ctrl + Alt + T or Ctrl + Shift + T. Then, enter the following Dnf packaging command.
OpenSUSE
Unlike a lot of other Linux distributions on this list, Dmg2Img isn’t available for OpenSUSE releases directly. Instead, if you’re looking to get the app working, you must download an RPM file from the internet and load it up.
According to our testing, Dmg2Img works fine on both OpenSUSE Tumbleweed and OpenSUSE Leap 15.0. To get the RPM downloaded, launch a terminal by pressing Ctrl + Alt + T or Ctrl + Shift + T. Then, use the wget command below.
OpenSUSE Tumbleweed
OpenSUSE Leap
With the RPM file downloaded, use the Zypper package manager to load up Dmg2Img onto your Linux PC.
Generic Linux
The source code for the Dmg2Img application is up on Github. Better yet, there are detailed instructions on how to compile it from the source code. If you’re using a Linux operating system that is lesser-known, follow this link, and you’ll be able to get it going!
Burn to USB – Dmg2Img
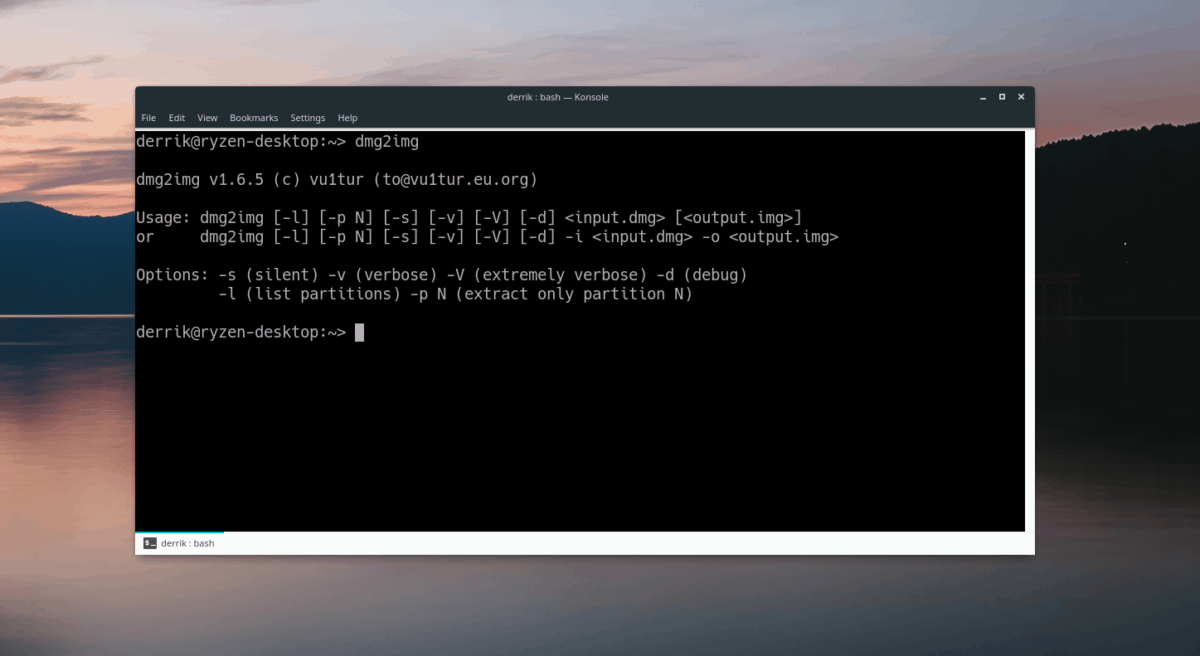
Now that the DMG2Img application is set up, we can use it to burn a DMG file. To start, place your macOS image file on the Linux computer. Then, follow the steps below to make a bootable disk.
Step 1: Plug in a compatible USB stick into the computer. Make sure that it’s large enough — at least 8 GB in size.
Step 2: Launch a terminal window on your Linux computer by pressing the Ctrl + Alt + T or Ctrl + Shift + T on the keyboard.
Step 3: Use the Dmg2Img program to convert your macOS DMG file to a burnable ISO file. Keep in mind that /path/to/image_file.dmg is the exact location of the DMG file on your Linux computer, and /path/to/image_file.iso is the location you’d like to save the new macOS ISO file. Be sure to change both of those lines in the command below.
Step 4: Once the Dmg2Img application is done converting your macOS DMG file to a Linux-compatible ISO file, run the lsblk command and determine what your USB’s drive label is. In this example, the drive label is /dev/sdd. Yours will differ.
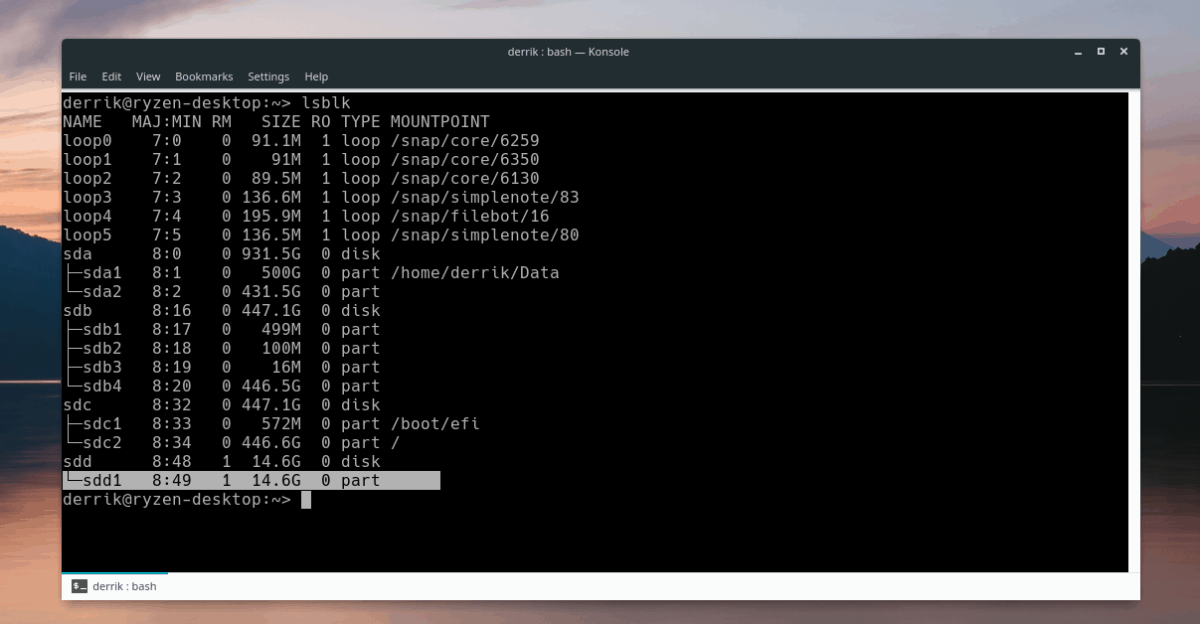
Need help finding out what your USB stick’s drive label is on Linux? Check out our post about finding hard drive information on Linux! It covers how to use lsblk in detail so that you can quickly find information about hard drives and other removable devices.
Step 5: Use the DD command to burn the new macOS ISO file to the USB drive. Keep in mind that this command needs to run with sudo or it will fail!
Remember, in this example that the USB is /dev/sdd. Please make sure to replace of=/dev/sdd in the command below to the drive label of the USB stick on your system.
When the DD command finishes writing, the terminal will be usable again. From here, unplug the USB stick from your computer and use it to re-install macOS on your Apple device!
Источник
Convert DMG to ISO or CDR
Convert DMG to ISO (MacOS X, Windows or Linux)
DMG files are very common on the MacOS X platform, used for Disk Images. With Disk Images we mean a full “copy” image of for example a CD, DVD or Harddisk. DMG‘s are typically used to distribute applications.
Some times however you’d prefer a ISO or a CDR image instead, for example for users on different platforms, or for offering other ways to burn an image to CD or DVD (if applicable).
In this article I’ll show you how you can convert a DMG file to either CDR or ISO under MacOS X, Windows or Linux.
Please consider disabling your ad blocker for our website.
We rely on these ads to be able to run our website.
You can of course support us in other ways (see Support Us on the left ).
Convert DMG to ISO options
When trying to convert a DMG to a ISO or CDR file for MacOS X, we have two options available.
The first one is by using just Disk Utility, a preferred method if you don’t like working with Terminal.
The second method is by using the command line by using Terminal.
To keep the article complete, I’ve added a method for Windows and Linux as well.
After converting a DMG to ISO, the ISO file can be burned on different platforms using popular burning applications like for example Nero under Windows.
Note : ISO images, just like DMG images, can be mounted as a drive as well under MacOS X – no special software needed, just double click the ISO file.
Please consider disabling your ad blocker for our website.
We rely on these ads to be able to run our website.
You can of course support us in other ways (see Support Us on the left ).
MacOS X – Convert DMG to ISO using ApplePi-Baker
My own little tool, ApplePi-Baker, originally intended for Raspberry Pi disk images, can assist in this as well.
Obviously you will need to download and install ApplePi-Baker first, and after that follow these steps:
- Mount the DMG file by double clicking it. The DMG should now appear as a “disk” in Finder.
- Start ApplePi-Baker and located the mounted disk. This can be done in two ways:Option 1: Click the “ Select a Disk ” in the “ Select Disk(s) ” section.
A list will appear, and you should see your “ Mounted Image ” – select it.
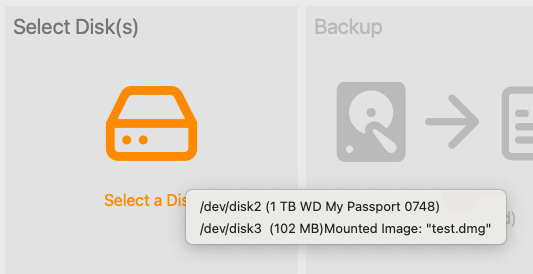
ApplePi-Baker – Select Mounted DMG
Option 2: Open the Advanced View and find the “ Mounted Disk Image ” disk.
When found double click the “ /dev/diskx ” line to select the disk.

ApplePi-Baker – Advanced View – Select Mounted DMG
MacOS X – Convert DMG to ISO using Disk Utility
When using Disk Utility you will have to keep in mind that Apple uses the extension CDR for ISO images. In the end CDR and ISO files are the same, they just have a different extension. Renaming a CDR file to ISO afterwards will fix that.
The steps are straight forward:
- Double click the DMG so it mounts.
- Open Disk Utility ( Utilities Disk Utility ).
- Right click the DMG Mount and select the “ Convert ” option.
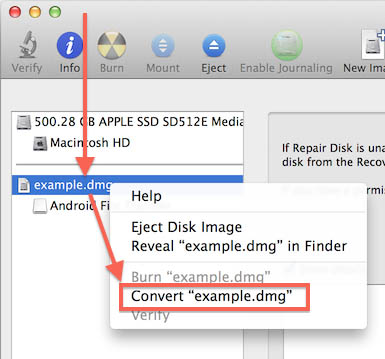
Disk Utility – Right click mounted GMD image and choose Convert

Disk Utility – Select format and click Save
Please consider disabling your ad blocker for our website.
We rely on these ads to be able to run our website.
You can of course support us in other ways (see Support Us on the left ).
MacOS X – Convert DMG to ISO from the command line
Some of us prefer the command line, I for one often forget the details of the particular thing I’d like to do so I find myself using the first option more often.
- Start Terminal ( Utilities Terminal ).
- Type:
Here / path / to / example.dmg and / path / to / example.iso are the paths to the files obviously.
Windows – Convert DMG to ISO or IMG
For Windows we need a little free tool called DMG2IMG, a successor of DMG2ISO.
As usual the file can be downloaded from Tweaking 4 All, but I strongly recommend going to the developers website to grab the latest version.
Download — Dmg2img
| Filename: | dmg2img.zip |
| Platform: | Microsoft Windows |
| Version: | 1.6.7 |
| File size: | 64.5 kB |
| Date: | 2017-02-09 |
| Download Now Send me a cup of Coffee | |
After downloading and unzipping the file, the usage in a DOS box is simple.
Please consider disabling your ad blocker for our website.
We rely on these ads to be able to run our website.
You can of course support us in other ways (see Support Us on the left ).
Linux – Convert DMG to ISO or IMG
A tool like DMG2IMG is also available under Linux, in Ubuntu for example, the easiest way to get it is:
The command line use again is simple:
Support Us .
Your support is very much appreciated, and can be as easy as sharing a link to my website with others, or on social media.
Support can also be done by sponsoring me, and even that can be free (e.g. shop at Amazon).
Any funds received from your support will be used for web-hosting expenses, project hardware and software, coffee, etc.
Thank you very much for those that have shown support already!
It’s truly amazing to see that folks like my articles and small applications.
Please note that clicking affiliate links, like the ones from Amazon, may result in a small commission for us — which we highly appreciate as well.
- Amazon — Anything you buy at Amazon will sponsor us! — You will not pay anything extra. — Keep shopping at Amazon and support us!» target=»_blank»>Do your shopping at Amazon Use PayPal to give me a cup of coffee (select: I like Coffee — Use PayPal to give me a cup of coffee ($5).» target=»_blank»>$5, I like Coffee — Use PayPal to give me two cups of coffee ($10).» target=»_blank»>$10, I like Coffee — Use PayPal to give me four cup of coffee ($20).» target=»_blank»>$20, or I like Coffee — Use PayPal to give me a custom amount of coffee.» target=»_blank»>custom amount)
Become a Patreon — Support us by becoming a Patreon!» target=»_blank»>Become a Patreon Support us by signing up with DropBox — We use DropBox for our website backup, extra space is always welcome. — By signing up we get an extra 500 Mb of storage space.» target=»_blank»>Sign up with DropBox BitCoin — We do accept donations in BitCoin (BTC) — Any amount is very welcome and much appreciated! — It will support webhosting and keep us motivated!» target=»_blank»>Donate in BitCoin (BTC) ( 16Ja1xaaFxVE4FkRfkH9fP2nuyPA1Hk7kR )
BitCoinCash (BCH) — We do accept donations in BitCoinCash — Any amount is very welcome and much appreciated! — It will support webhosting and keep us motivated!» target=»_blank»>Donate in BitCoin Cash (BCH) ( qzf4qwap44z88jkdassythjcnm54upacmvmvnzgddg )
Please consider disabling your ad blocker for our website.
We rely on these ads to be able to run our website.
You can of course support us in other ways (see Support Us on the left ).
Related Articles
Please consider disabling your ad blocker for our website.
We rely on these ads to be able to run our website.
You can of course support us in other ways (see Support Us on the left ).
Comments
There are 22 comments. You can read them below.
You can post your own comments by using the form below, or reply to existing comments by using the «Reply» button.
Hello
Thank you for your tutorial and it’s that the user can use with many OS’s
A new version from Dmg2img (dmg2img-1.6.7 – 09 February 2017 Peter Wu) is available, please check the website
Thanks NoName for the tip!
The Windows binary (and future versions) can be found at his website or through SoftPedia.
Источник
dmg2img
DMG2IMG is an Apple’s compressed dmg to standard (hfsplus) image disk file convert tool.
Changelog:
- dmg2img-1.6.7:
09 February 2017 Peter Wu- Fixed buffer underrun
- Avoid truncating .img file when run to list partition
- dmg2img-1.6.6:
06 February 2017 Peter Wu- Fixed a crash on invalid block signature
- dmg2img-1.6.5:
23 July 2013 vu1tur- Fixed a bug in handling some types of dmg files
- dmg2img-1.6.4:
25 April 2012 vu1tur- Compilation bugfix (Linux)
- dmg2img-1.6.3:
07 April 2012 vu1tur- Added option -l to list partitions
- Added option -p to extract only specific partition
- Added support for a rare case scenario of koly block being at the the beginning of the image (thanks to Friik)
- dmg2img-1.6.2:
24 March 2010 vu1tur- Fixed a bug in processing a terminal block type
- Added periodic flushing of debug log file
- dmg2img-1.6.1:
12 August 2009 vu1tur- Fixed a bug in handling large files on win32 systems
- dmg2img-1.6:
15 April 2009 vu1tur- Added support for dmg images that only have binary resource fork but no XML plist
- Refined koly block processing
- Fixed a bug in finding the offset for the next compressed block when offsets are defined relative to the current partition
- Fixed broken progress indicator
- Added detection of images with GUID Partition Table and respective mount commands in linux
- dmg2img-1.5.1:
11 April 2009 vu1tur- Added missing zero block type
- Small fixes and clean up
- dmg2img-1.5:
8 April 2009 vu1tur- Fixed a bug in parsing partition list from plist
- Added support for ADC-compressed DMG images
- dmg2img-1.4.1:
6 April 2009 vu1tur- Fixed a bug in writing the output file that caused some DMG images to convert to a broken unmountable IMG image
- dmg2img-1.4:
5 April 2009 Jean-Pierre Demailly- Applied patch from Vladimir ‘phcoder’ Serbinenko which brings correct handling of 64bit integers in koly signature and plist data, and should enable dmg2img to work on huge archives > 4GBytes (tested by ‘phcoder’)
- Added support for dmg archives involving bzip2 instead of zlib compression (this has not received much testing yet, as those archives are still unfrequent)
- Many thanks to Pierre Duhem for useful hints
- dmg2img-1.3:
19 September 2008 Jean-Pierre Demailly- Further fixes which (hopefully) enable dmg2img to work on dmg archives of arbitrary size, while reducing RAM usage a lot
- A lot of thanks to Alfred E. Hegge and Randy Broman for testing and reporting bugs
- dmg2img-1.2:
17 September 2008 Jean-Pierre Demailly- Fixed segfault bug due to buffer overflow (buffer sizes incorrectly set, resulting in insufficient memory allocation)
- Fixed most compilation warnings — remaining ones are irrelevant with standard compilers
- Big thanks to Alfred E. Hegge and Randy Broman for bug reports
- dmg2img-1.1:
4 August 2008 Jean-Pierre Demailly- Fixed segfault bug occurring when decompressing certain dmg files beyond the actual end of the file (due to not correctly setting the size of the compressed parts)
- Added slightly modified vfdecrypt utility from Weinmann-Appelbaum-Fromme in order to decrypt encrypted dmg files
- dmg2img-1.0:
7 August 2007 Jean-Pierre Demailly- Initial version
Usage: dmg2img [-s] [-v] [-V] [-d] [ ]
dmg2iso
Converts compressed (z-lib) dmg images to iso images.
Provided for historical reasons. You should use DMG2IMG above.
makeimg
Makes an emtpy file for disk image. Needs perl.
Источник


