- DNS-over-HTTPS заработает в Google Chrome для Linux
- Как включить DNS-over-HTTPS в Google Chrome. Использовать безопасный DNS-сервер
- Принцип работы DNS-over-HTTPS
- Как включить поддержку DNS-over-HTTPS в Chrome
- Использовать безопасный DNS-сервер
- Как проверить работу DNS-over-HTTPS
- Как послать провайдера подальше, и включить DNS по HTTPS в любом браузере
- Поддержка DoH уже встроена во все основные браузеры. Пользователям нужно её только включить и настроить.
- Как включить DoH в любом браузере
- Brave
- Chrome
- Firefox
- Opera
- Safari
- Vivaldi
- Set Up DNS over HTTPS (DoH) Resolver on Ubuntu with DNSdist
- What is DNS over HTTPS and Why It’s Important
- Why Run Your Own DoH Resolver?
- DoH vs DoT
- DoH Support in Major DNS Resolvers
- Prerequisites
- Step 1: Install DNSdist on Ubuntu Server
- Step 2: Install Let’s Encrypt Client (Certbot) on Ubuntu Server
- Step 3: Obtain a Trusted TLS Certificate from Let’s Encrypt
- Standalone Plugin
- Using webroot Plugin
- Apache
- Nginx
- Step 4: Enable DoH in DNSdist
- Step 5: Configure DoH in Firefox Web Browser
- network.trr.mode
- network.trr.allow-rfc1918
- network. trr. bootstrapAddress
- Testing
- Step 6: Configure DoH Client on Ubuntu Desktop
- Configure DoH on iOS
- Make DNSdist and web server use port 443 at the same time
- DNSdist Configuration
- Nginx Configuration
- Apache Configuration
- HAProxy Configuration
- Wrapping Up
DNS-over-HTTPS заработает в Google Chrome для Linux
Разработчики Google Chrome объявили о планах развернуть поддержку DNS-over-HTTPS (DoH) в браузере Chrome для Linux. DoH уже поддерживается на Windows, Mac, ChromeOS и Android.
 TechCrunch
Разработчики объявили о запуске проекта Chromium с открытым исходным кодом, который выпустит версию Chrome для Linux с поддержкой DNS-over-HTTP. Участники проекта ожидают, что это будет версия M91 или M92.
«Chrome никогда не поддерживал DoH в Linux, потому что для этого потребовался бы встроенный DNS-клиент Chrome, который в настоящее время отключен в Linux», — говорится в проектном документе. Кроме того, Chrome не поддерживал расширенную конфигурацию DNS Linux через файл конфигурации переключателя службы имен nsswitch.conf.
Чтобы встроенный DNS-преобразователь без проблем работал с Linux, Chrome необходимо проанализировать конфигурацию DNS Linux. Тогда Chrome мог бы соблюдать параметры конфигурации расширенного разрешения хоста, указанные в файле nsswitch.conf.
«Поскольку преобразователь Chrome не поддерживает изменение таких механизмов или их порядка, поддержка Chrome для соблюдения nsswitch.conf будет ограничиваться определением того, является ли конфигурация общей, совместимой с поведением Chrome», — поясняется в проектном документе. В противном случае браузер не переключится на DoH или не будет использовать встроенный DNS-преобразователь, если пользователь сам не выберет DoH-сервер в настройках.
Кроме того, разработчики Chrome напомнили, что при задержках в работе DoH-сервера это может отрицательно сказаться на производительности загрузки страницы. Однако там пояснили, что обновление затронет только серверы DoH того поставщика, которые, как ожидается, будут обеспечивать аналогичную производительность. При развертывании на других платформах DoH оказался лишь немного медленнее классического DNS и оказал «незначительное» влияние на общую производительность Chrome, подчеркивают они.
В феврале Microsoft отключала DNS-over-HTTPS во всех каналах Edge из-за проблем с производительностью. В марте доступ к DoH-серверам восстановили для всех предварительно стабильных каналов (Canary, Dev, Beta).
Ранее сообщалось, что хакеры, которые маскируют вредоносные программы в поддельных журналах ошибок Windows, научились использовать для этого DNS-через-HTTPS от Google.
Источник
Как включить DNS-over-HTTPS в Google Chrome. Использовать безопасный DNS-сервер
Пользователи Google Chrome (версия 83 и выше) могут включить поддержку защищенного протокола DNS-over-HTTPS (DoH) с помощью функции «Использовать безопасный DNS-сервер» в настройках браузера.
Принцип работы DNS-over-HTTPS
По умолчанию DNS-запросы передаются в незашифрованном виде, что открывает посторонним лицам возможности для отслеживания сетевых предпочтений и манипулирования DNS-трафиком, например при организации фишинг-атак.
Технология DNS over HTTPS позволяет решить данную проблему за счет шифрования DNS-запросов. Для повышения безопасности и приватности используется защищенный протокол HTTPS. Когда вы используете DoH, ваши DNS-запросы уже не могут отслеживаться третьими лицами, и не могут быть модифицированы злоумышленниками.
Компания Google приняла решение реализовать общедоступную поддержку DNS over HTTPS, начиная с Chrome 83. Разработчики посчитали, что данное изменение не помешает существующей системной конфигурации DNS. По умолчанию браузер будет использовать DNS over HTTPS для провайдера DNS, установленного в систему, при условии, что он поддерживает этот протокол.
Другими словами, системные настройки DNS не изменятся. Еще одним преимуществом этого подхода является то, фильтрация взрослого контента или вредоносного ПО на уровне DNS останется активной.
Chrome переключится на обычный (незашифрованный) DNS, если во время поиска будут обнаружены проблемы. Браузер не будет использовать безопасный DNS вообще, если в системах Windows активен родительский контроль или если установлены определенные корпоративные политики.
Как включить поддержку DNS-over-HTTPS в Chrome
Использовать безопасный DNS-сервер
Включение поддержки DNS-over-HTTPS доступно в настройках безопасности браузера Chrome:
- Введите в адресной строке chrome://settings/security (или перейдите в меню Настройки > Конфиденциальность и безопасность > Безопасность). Там вы найдете новую опцию Использовать безопасный DNS-сервер, которую необходимо включить.
- По умолчанию предлагается опция Использовать текущего поставщика услуг. Браузер будет использовать DNS over HTTPS для провайдера DNS, установленного в систему, при условии, что он поддерживает этот протокол. Google Public DNS, Cisco OpenDNS, Cloudflare, Quad9 и Comss.one DNS поддерживают DNS over HTTPS.
- В меню Использовать > Персонализированные вы можете указать любой другой безопасный DNS-сервер с поддержкой DNS-over-HTTPS – например, Comss.one DNS:
Как проверить работу DNS-over-HTTPS
Проверить работу DNS можно с помощью сервиса DNS Leak Test (нажмите кнопку Extended test). Убедитесь, что все найденные DNS-серверы относятся к указанному в настройках сервису, например Cisco OpenDNS:
Источник
Как послать провайдера подальше, и включить DNS по HTTPS в любом браузере
Поддержка DoH уже встроена во все основные браузеры. Пользователям нужно её только включить и настроить.
Все шесть производителей основных браузеров планируют поддерживать протокол DNS по HTTPS (DoH), шифрующий DNS-трафик и помогающий усилить конфиденциальность пользователя в сети.
Этот протокол является одной из самых обсуждаемых тем этого года. Он позволяет браузеру прятать DNS-запросы и ответы внутри обычного на первый взгляд HTTPS-трафика.
Это делает DNS-трафик пользователя невидимым для сторонних наблюдателей за сетью, например, провайдеров. Однако если пользователи обожают DoH и считают его благом для конфиденциальности, провайдеры и производители средств кибербезопасности его ненавидят.
Британский провайдер назвал Mozilla «интернет-злодеем» за планы компании по внедрению DoH, а группу лоббистов от Comcast уличили в подготовке документа касательно DoH, который они планируют представить законотворцам Британии, надеясь предотвратить более широкое распространение протокола.
Однако, время уже может быть упущено. Редакция в течение недели связалась с производителями основных веб-браузеров, чтобы узнать об их будущих планах касательно DoH, и все они планируют внедрять протокол в том или ином виде.
Как включить DoH в любом браузере
Вот, что нам известно на сегодня по поводу планов производителей браузеров, связанных с DoH, и о том, как пользователи могут включить DoH в любом браузере.
Brave
«Мы очень хотим реализовать его», — сказал нам Том Лоуэнталь, менеджер продукта из Brave for Privacy & Security.
Однако у команды Brave пока нет точных сроков внедрения DoH. Они занимаются другими улучшениями, связанными с приватностью. К примеру, на этой неделе компания выпустила обновление, улучшающее распознавание скриптов, отслеживающих действия пользователей. На горизонте маячит версия Brave 1.0, и команде нужно сконцентрироваться на её выходе. Но DoH в Brave будет.
«Реализация DoH – это гораздо больше, чем простая техническая задача. Нам нужно решить, какие разумные и защитные установки мы можем включить по умолчанию для большинства людей, не задумывающихся о настройке DNS – но так, чтобы мы ничего не сломали у тех людей и организаций, что тщательно подошли к подстройке своих программ», — сказал Лоуэнталь.
Поскольку Brave основан на открытом проекте Chromium, в нём есть поддержка DoH. Однако команда пока не настроила эту поддержку. В коде она есть, но включается так, как это придумала команда авторов Google Chrome. Включить DoH в Brave можно, перейдя на следующий URL:
Chrome
Google Chrome стал вторым браузером после Firefox, добавившим поддержку DoH. Её можно включить, перейдя по следующему URL:
По-умолчанию DoH не включено для всех. Сейчас Google проводит ограниченный эксперимент с небольшим количеством пользователей, чтобы проверить, как DoH покажет себя при реальном использовании.
Поддержка DoH в Chrome отличается от Firefox, по-умолчанию перенаправляющего DoH-трафик на Cloudflare. Браузер после включения протокола будет отправлять DNS-запросы на всё те же сервера, что и ранее. Если у выбранного сервера окажется интерфейс с поддержкой DoH, тогда Chrome зашифрует DNS-трафик и отправит его на тот же DNS-сервер по протоколу DoH.
Благодаря этому Chrome не перехватывает DNS-настройки ОС – это очень ответственный подход, поскольку браузер может использоваться в условиях больших предприятий.
На текущий момент DoH в Chrome работает так:
- Пользователь вводит URL сайта в браузере.
- Chrome получает данные по DNS-серверу ОС.
- Он проверяет, есть ли этот сервер в белом списке одобренных серверов с поддержкой DoH.
- Если да, Chrome отправляет зашифрованный DNS-запрос на интерфейс этого сервера.
- Если нет, Chrome отправляет обычный DNS-запрос к этому серверу.
Поэтому у пользователя существует риск так и не воспользоваться протоколом DoH. ОС пользователя обычно получает настройки DNS от авторитетного сетевого центра, коим обычно выступает провайдер. Если провайдер не хочет использовать DNS с поддержкой DoH, то у вас это и не будет работать.
Однако есть два способа обойти это и заставить Chrome использовать DoH постоянно и вне зависимости от настроек DNS вашего провайдера.
Во-первых, можно воспользоваться обучающим материалом по принудительному включению поддержки DoH в Chrome. Во-вторых, пользователь может настроить DNS-сервер с поддержкой DoH в своей ОС. Его можно выбрать из списка, и это гарантированно будет работать в Chrome.
В следующем году Microsoft планирует выпустить новую версию браузера Edge на основе кода Chromium. Представитель Microsoft сообщил нам, что компания поддерживает DoH, но точные планы не раскрывает. Однако, версия Edge на основе Chromium уже поддерживает DoH. Её можно включить, перейдя по URL:
Это включит поддержку DoH, но она будет работать только, если ваш компьютер использует DNS с поддержкой DoH – чего в 99% случаев не происходит. Чтобы принудительно включить DoH в Edge, вы можете воспользоваться инструкцией из следующего поста в блоге одного из программистов Edge. Адрес сервера Cloudflare можно заменить на любой другой сервер DoH, который можно выбрать по ссылке. После соответствующей настройки, Edge способен работать с DoH.
Firefox
Mozilla стала пионером этого протокола совместно с Cloudflare. Поддержка DoH уже есть в стабильных версиях Firefox. Её можно включить в настройках в разделе «Настройки сети».
Все критикуют реализацию DoH в Firefox потому, что браузер по умолчанию использует Cloudflare, перезаписывая настройки DNS.
Однако это значение можно поменять, прописав любой сервер с DoH. Из всех браузеров, поддержка протокола в Firefox реализована лучше всего, а настроить её легче всего – в основном потому, что разработчики имели с ней дело дольше остальных.
Сейчас браузер уже включает поддержку DoH по умолчанию для всех пользователей США. Поскольку британское правительство возражает против этого, для британских пользователей эта поддержка по умолчанию включена не будет.
В прошлом Mozilla не гарантировала включение DoH по умолчанию в других странах. Однако, поскольку поддержка протокола уже есть в стабильной версии браузера, пользователю остаётся лишь включить её, и всё будет работать.
Opera
Opera уже встроила поддержку DoH. По умолчанию она выключена, но её можно включить в любой момент, и всё будет работать без дополнительных шагов.
Разработчики Opera используют модуль для работы с DoH сходный с тем, что используется в Firefox, и не оставляют всё на откуп провайдерам, как Chrome. Весь трафик браузера сейчас идёт через резолвер 1.1.1.1 от Cloudflare.
Мы не нашли способа поменять его на другой, но, по крайней мере, DoH в Opera работает. Однако работать с VPN он не будет – если вам нужен DoH, то его придётся отключить.
Чтобы включить DoH в Opera, зайдите сюда:
Safari
Нет данных. Разработчики Safari обычно опаздывают на все вечеринки по добавлению новых возможностей, а Apple недавно вкладывалась в конфиденциальность пользователей, поэтому есть все шансы, что у Safari появится поддержка DoH.
Vivaldi
Представитель Vivaldi сказал, что поддержка DoH связана с реализацией Chrome. Пользователи могут включить её, перейдя по следующему URL:
Однако поскольку DoH в Vivaldi работает так же, как в Chrome, он не будет шифровать DNS-запросы, если пользователь использует DNS-сервер, указанный в ОС, и не поддерживающий шифрование.
Скорее всего, придётся добавить в настройки DNS вашей ОС один из серверов, поддерживающий DoH, чтобы эта функция заработала в Vivaldi, и использовать его постоянно. Мы смогли добиться этого, прописав в настройках DNS-сервер 1.1.1.1.
Представитель Vivaldi сказал, что в будущем поддержка DoH в браузере может поменяться, в зависимости от того, как Google будет изменять поддержку протокола в Chromium.
Источник
Set Up DNS over HTTPS (DoH) Resolver on Ubuntu with DNSdist
This tutorial will be showing you how to set up your own DNS over HTTPS (DoH) resolver on Ubuntu with DNSdist, so your DNS queries can be encrypted and protected from prying eyes.
What is DNS over HTTPS and Why It’s Important
DNS (Domain Name System) is responsible for translating domain names to IP addresses. It’s designed in 1987 with no security or privacy in mind. By default DNS queries are not encrypted. They are sent in plain text on the wire and can be exploited by middle entities. For example, the Great Firewall of China (GFW) uses a technique called DNS cache poison to censor the Chinese Internet. (They also use other methods, which are beyond the scope of this article.)
GFW checks every DNS query that is sent to a DNS server outside of China. Since plain text DNS protocol is based on UDP, which is a connection-less protocol, GFW can spoof both the client IP and server IP. When GFW finds a domain name on its block list, it changes the DNS response. For instance, if a Chinese Internet user wants to visit google.com, GFW returns an IP address located in China instead of Google’s real IP address, to the user’s DNS resolver. Then the DNS resolver returns the fake IP address to the user’s computer, so the user cannot visit google.com.
HTTPS is the standard way to encrypt plain text HTTP web pages. With DNS over HTTPS (DoH), your DNS queries will be encrypted, so no third parties can see your DNS queries.
Why Run Your Own DoH Resolver?
There are already some public DNS resolvers like 1.1.1.1 and 9.9.9.9 that support DNS over HTTPS, so you can use them if you don’t have the skill or time to run your own. Starting with Firefox version 61, you can enable DNS over HTTPS in the browser settings, which is a big progress for Internet security and privacy. Firefox uses Cloudflare resolvers (1.1.1.1) by default. However, some folks argue that this allows Cloudflare to gather information on Firefox users. They seem to have more trust in their ISP than Cloudflare. But I think if you are paranoid about privacy, you should run your own DoH resolver, so neither Cloudflare nor your ISP can spy on you.
DoH vs DoT
Besides DNS over HTTPS, there’s another protocol that also aims to encrypt DNS queries. It’s called DNS over TLS (DoT). Previously I wrote a guide to using DNS over TLS on Ubuntu desktop, but now I’m switching to DNS over HTTPS.
For people live in countries with severe Internet censorship like China, it’s more advantageous to use DoH.
- DoT operates on TCP port 853, which can be easily blocked by a national firewall.
- DoH operates on TCP port 443, which is the standard port for HTTPS websites, which makes DoH super hard to block, because if TCP port 443 is blocked, then nearly all HTTPS websites will also be blocked.
My DoH resolver is running on a VPS (virtual private server) located outside of China and the Great Firewall of China can’t intercept my DNS queries. I can even hide my DoH resolver’s IP address behind Cloudflare CDN (Content Delivery Network).
Another advantage of DoH is that it allows web applications to access DNS information via existing browser APIs, so no stub resolver is needed.
DoH Support in Major DNS Resolvers
- BIND will support DoH in version 9.17, which is still in development. Ubuntu 20.04 and 21.04 repository ship with BIND 9.16.
- Knotresolver supports DoH since version 4.0.0. The current latest version is 5.11. It has an official repository for Debian, Ubuntu, CentOS, Fedora.
- Unbound supports DoH since version 1.12.0.
- PowerDNS recursor doesn’t support DoH right now.
Actually, I prefer to run DoH resolver with DNSdist, which added DoH support in version 1.4.0. The current latest version is 1.5. It has an official repository for Debian, Raspbian, Ubuntu, and CentOS. DNSdist is a DNS load balancer that can forward DNS queries to a backend DNS resolver, so no matter what DNS resolver you are using, you can use DNSdist to run your own DoH server. DNSdist is developed by the PowerDNS team.
Prerequisites
It’s assumed that you have a DNS resolver running on your Ubuntu server. You can use any DNS resolver (BIND, Knot resolver, Unbound…) I personally use BIND.
Once your DNS resolver is up and running, follow the instructions below.
Step 1: Install DNSdist on Ubuntu Server
If you use a non-LTS Ubuntu, you have to install dnsdist from the default repository ( sudo apt install dnsdist ). If you use Ubuntu LTS, it’s recommended to install DNSdist from the upstream repository, so you will have the latest stable version. First, you need to create a source list file for DNSdist.
Ubuntu 20.04
Ubuntu 18.04
Ubuntu 16.04
Next, we create a preference file for DNSdist to pin the package, so we won’t be accidentally installing DNSdist from another repository.
Add the following lines into the file.
Save and close the file. Then run the following command to import the PowerDNS public key, so the APT package manager can verify the interity of software packages downloaded from this repository.
Next, update the repository list and install DNSdist.
By default, DNSdist tries to bind to port 53. Because you have an existing DNS resolver like BIND listening on port 53, the dnsdist.service would fail to start.

Since we are just deploying a DoH resolver and don’t care about DNS load balancing, we can configure DNSdist to listen on another port. Edit the DNSdist configuration file.
There’s no content in this file. For now, simply add the following line in this file, so DNSdist will listen on TCP and UDP port 5353, instead of port 53.
Save and close the file. Then restart DNSdist.
Check its status.
It should be active (running).

Step 2: Install Let’s Encrypt Client (Certbot) on Ubuntu Server
DNS over HTTPS requires installing a TLS certificate on the server-side. We will obtain and install Let’s Encrypt certificate. The advantage of using Let’s Encrypt certificate is that it’s free, easier to set up, and trusted by client software.
Run the following commands to install Let’s Encrypt client (certbot) from the default Ubuntu repository.
To check the version number, run
Step 3: Obtain a Trusted TLS Certificate from Let’s Encrypt
I recommend using the standalone or webroot plugin to obtain TLS certificate for dnsdist.
Standalone Plugin
If there’s no web server running on your Ubuntu server, you can use the standalone plugin to obtain TLS certificate from Let’s Encrypt. Create DNS A record for the subdomain (doh.example.com), then run the following command.
- certonly : Obtain a certificate but don’t install it.
- —standalone : Use the standalone plugin to obtain a certificate
- —preferred-challenges http : Perform http-01 challenge to validate our domain, which will use port 80.
- —agree-tos : Agree to Let’s Encrypt terms of service.
- —email : Email address is used for account registration and recovery.
- -d : Specify your domain name.
As you can see the from the following screenshot, I successfully obtained the certificate.

Using webroot Plugin
If your Ubuntu server has a web server listening on port 80 and 443, then it’s a good idea to use the webroot plugin to obtain a certificate because the webroot plugin works with pretty much every web server and we don’t need to install the certificate in the web server.
First, you need to create a virtual host for doh.example.com .
Apache
If you are using Apache, then
And paste the following lines into the file.
Save and close the file. Then create the web root directory.
Set www-data (Apache user) as the owner of the web root.
Enable this virtual host.
Reload Apache for the changes to take effect.
Once virtual host is created and enabled, run the following command to obtain Let’s Encrypt certificate using webroot plugin.
Nginx
If you are using Nginx, then
Paste the following lines into the file.
Save and close the file. Then create the web root directory.
Set www-data (Nginx user) as the owner of the web root.
Reload Nginx for the changes to take effect.
Once virtual host is created and enabled, run the following command to obtain Let’s Encrypt certificate using webroot plugin.
Step 4: Enable DoH in DNSdist
Edit the DNSdist configuration file.
Add the following lines into the file.
Save and close the file. DNSdist runs as the _dnsdist user, so we need to give the _dnsdist user permission to read the TLS certificate with the following commands.
Then check the syntax of the configuration file.
If the syntax is ok, restart DNSdist.
Note that if there’s a web server listening on TCP port 443, DNSdist would fail to restart. You can temporarily stop the web server. I will explain how to make the web server and DNSdist use TCP port 443 at the same time at the end of this article.
Step 5: Configure DoH in Firefox Web Browser
Go to Preferences -> General and scroll down to the bottom to configure Network Settings. Enable DNS over HTTPS, and set your own DoH resolver.
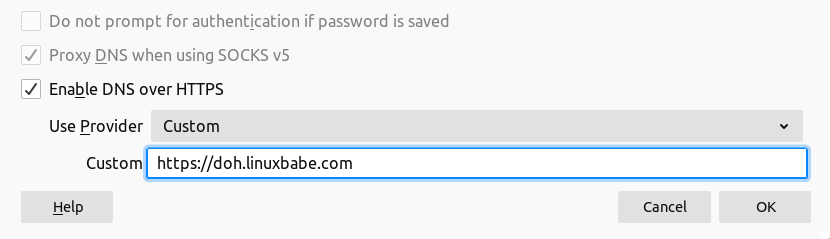
We can then fine-tune the DoH configurations by going to about:config tab in Firefox.
network.trr.mode
By default, The network. trr. mode parameter in Firefox is set to 2 , which means if DoH query fails, Firefox will pass the DNS query to the host system. I want to always use the DoH resolver, so change the network.trr.mode to 3 so the host resolver won’t be used. This allows us to have an easy way to test if your DoH resolver is working.
network.trr.allow-rfc1918
This is set to false by default, which means if the DNS response includes private IP addresses, then it will be considered a wrong reponse that won’t be used. If you use response policy zone in BIND, you probably have some hostnames pointing to private IP addresses, then set this value to true .
network. trr. bootstrapAddress
Firefox needs to look up the IP address of the DoH resolver in order to send DNS queries. You can put the IP address in this field to eliminate this initial query.
Testing
Now enter a domain name like linuxbabe.com in the Firefox address bar. If the web page loads normally, it’s a good sign your DoH resolver is working. Then go to the terminal console of your DNS server and check the DNS query logs. I use BIND, so I enter the following command to check the DNS query log.
As you can see from the BIND log below, Firefox queried the following domains.
- www.linuxbabe.com: my website
- fonts.gstatic.com: This serves Google fonts on my website
- cdn.shareaholic.net: a sharing widget on my website
- newsletter.linuxbabe.com: my self-hosted email marketing platform.
- translate.google.com: the Google translate widget on my website
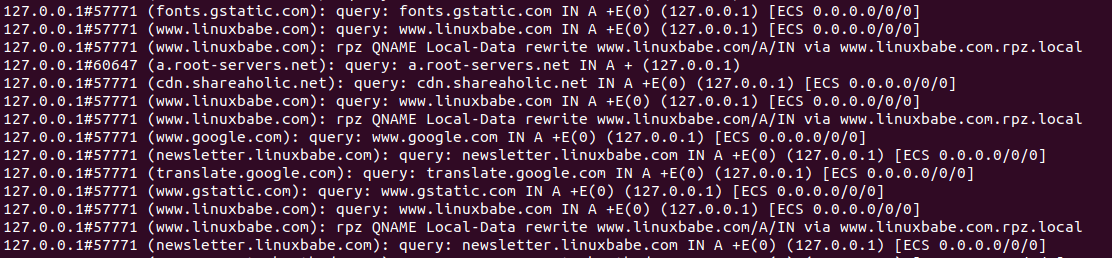
The above query log tells me that my DNS over HTTPS resolver is working. If I stop the BIND resolver ( sudo systemctl stop named ), Firefox tells me it can’t find that site. And when I start BIND, the web page loads again.
Step 6: Configure DoH Client on Ubuntu Desktop
I know there are 3 open-source DNS clients on Linux that support encrypted DNS.
Currently, dnscrypt-proxy is the best DoH client implementation on Linux, so I will show you how to use it. Run the following command to install dnscrypt-proxy on your Ubuntu desktop.
It will automatically start, as you can see with:
If it didn’t start, you can run the following command to start it.
Check the listening address.

On my computer, dnscrypt-proxy listens on 127.0.2.1:53 . There’s another systemd service ( dnscrypt-proxy-resolvconf.service ) installed by dnscrypt-proxy,
This is a service that sets 127.0.2.1 as the resolver on your computer. You can check the current DNS resolver for your computer with:
By default, dnscrypt-proxy uses Clouldflare as the upstream DoH resolver. To use your own DoH resolver, edit the configuration file.
Find the following line
Change it to your DoH resolver hostname. Note that the location of parameters is important. You should not put the server_names parameter in other places in this file.
Then comment out the [sources] section.
We need to add our own DoH resolver like below at the bottom of this file.
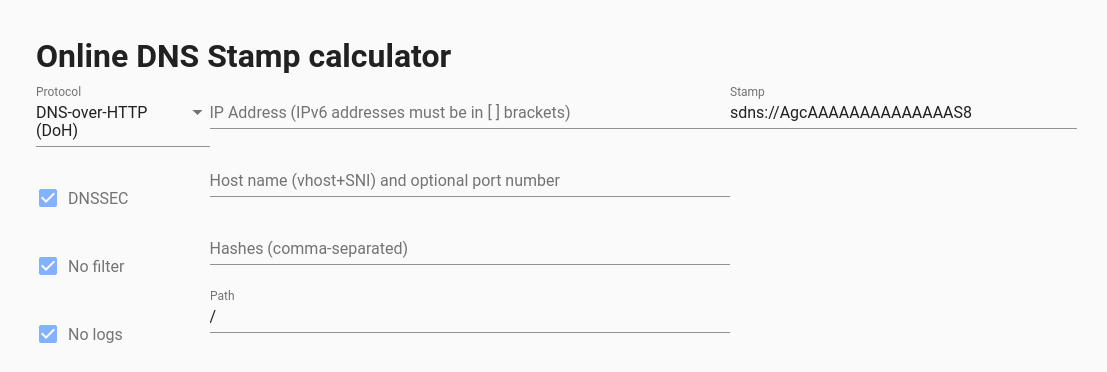
The stamp contains your DoH resolver hostname, IP address and query path. To get your own stamp, use the online DNS stamp calculator. Choose DNS-over-HTTPS as the protocol, and enter the IP address, hostname and query path. If you follow this tutorial to set up your own DoH resolver, the path should be set to just / . If you didn’t enable DNSSEC on your resolver, then untick the DNSSEC checkbox.
Once you added your DNS stamp, save and close the file. Then restart dnscrypt-proxy .
Check its status. Make sure it’s running.
Now you can test if dnscrypt-proxy is working.
If you don’t want to publish your DNS over HTTPS resolver to the world, you can delete the DNS A record of your DoH resolver hostname, because dnscrypt-proxy has the IP address in the DNS stamp.
Configure DoH on iOS
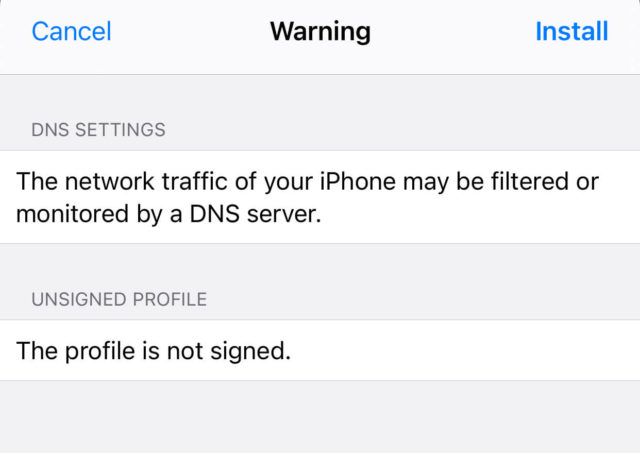
iOS supports DNS over HTTPS since iOS 14. However, there’s no a simple config option on iOS to set DoH resolver. You need to generate a .mobileconfig file and install it on iOS. It’s a little complicated to generate a signed iOS .mobileconfig file.
If your DoH resolver won’t be used publicly, you can generate a simple unsigned file. Use a text editor to create a file with .mobileconfig extension. Copy and paste the following text. Replace the IP ddress and server URL.
Save and close the file. Then you can send the file as an email attachment to your iOS. Open the email on iOS and tap on the attachment to download the config file. After that, go to iOS Settings -> Profile Downloaded . It will prompt you to install the profile.
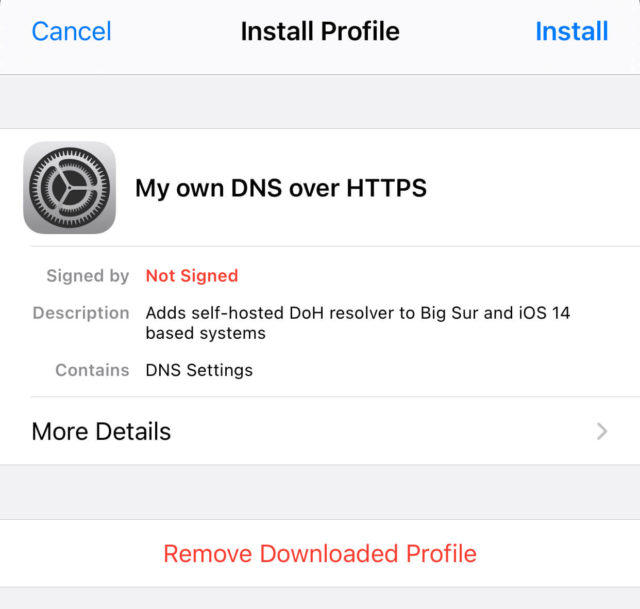
Tap on the Install button and enter your iOS password to install it. Tap on Install button again.
Once it’s installed, go to iOS Settings -> VPN & Network . Scroll down to the buttom to choose the DNS resolver for your iOS system. Note that this DoH resolver will override the DNS resolver provided by a VPN like ProtonVPN. Your iOS will always use your DoH resolver.
If you ever want to remove the .mobileconfig file from iOS, go to Settings -> General -> Profile .
Make DNSdist and web server use port 443 at the same time
A DNS over HTTPS resolver needs to bind to port 443. If you already have Apache/Nginx listening on port 443, then DNSdist can’t bind to port 443. Normally a port can only be used by one process. However, we can use HAproxy (High Availability Proxy) and SNI (Server Name Indication) to make DNSdist and Apache/Nginx use port 443 at the same time.
DNSdist Configuration
Edit the DNSdist configuration file.
Change the DoH listening address to 127.0.0.1 .
Save and close the file. Then restart DNSdist.
Nginx Configuration
If you use Nginx, edit the server block file.
In the SSL server block, find the following directive.
This time we make it listen on 127.0.0.2:443 because 127.0.0.1:443 is already taken by DNSdist. Save and close the file. The Nginx main configuration file /etc/nginx/nginx.conf and the default server block /etc/nginx/sites-enabled/default might include a default virtual host listening on 443, so you might need to edit this file too.
Then restart Nginx.
Apache Configuration
If you use Apache web server, edit your virtual host file.
In the SSL virtual host, change
This time we make it listen on 127.0.0.2:443 because 127.0.0.1:443 is already taken by DNSdist. Save and close the file. Then edit the /etc/apache2/ports.conf file.
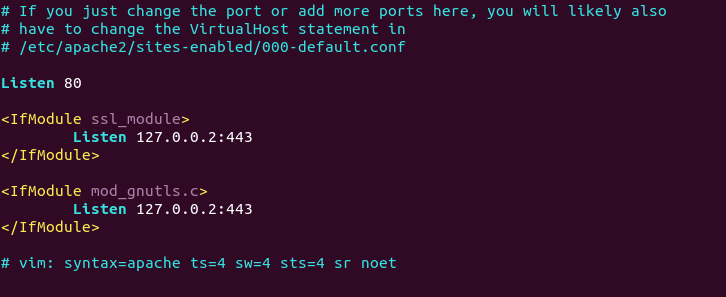
Save and close the file. Restart Apache.
HAProxy Configuration
Now install HAproxy.
Edit configuration file.
If you use Nginx, copy and paste the following lines to the end of the file. Replace 12.34.56.78 with the public IP address of your server. Replace doh.example.com with the domain name used by DNSdist and www.example.com with the domain name used by your web server.
If you use Apache, copy and paste the following lines to the end of the file. Replace 12.34.56.78 with the public IP address of your server. Replace doh.example.com with the domain name used by DNSdist and www.example.com with the domain name used by your web server.
Save and close the file. Then restart HAproxy.
In the configuration above, we utilized the SNI (Server Name Indication) feature in TLS to differentiate VPN traffic and normal HTTPS traffic.
- When doh.example.com is in the TLS Client Hello, HAProxy redirect traffic to the DNSdist backend.
- When www.example.com is in the TLS Client Hello, HAProxy redirect traffic to the apache/nginx backend.
- If the client doesn’t specify the server name in TLS Client Hello, then HAproxy will use the default backend (DNSdist).
You can test this setup with the openssl tool. First, run the following command multiple times.
We didn’t specify server name in the above command, so HAproxy will always pass the request to the default backend (DNSdist), and its certificate will be sent to the client. Next, run the following two commands.
Now we specified the server name in the commands, so HAproxy will pass requests according to the SNI rules we defined.
When renewing Let’s Encrypt certificate for your website, it’s recommended that you use the http-01 challenge instead of tls-alpn-01 challenge, because HAproxy is listening on port 443 of the public IP address, so it can interfere with the renewal process.
Wrapping Up
I hope this tutorial helped you set up a DNS over HTTPS resolver with Nginx on Ubuntu. As always, if you found this post useful, then subscribe to our free newsletter to get more tips and tricks. Take care 🙂
Источник


