- Что делать с ошибкой dns probe finished bad config?
- Что вызывает ошибку DNS?
- Способ 1: Перезапуск маршрутизатора
- Способ 2: Исправление dns probe finished bad config с использованием CMD
- Способ 3: исправить dns probe finished bad config с Google DNS
- Способ 4: Перезапуск DNS
- Способ 5: попробуйте отключить программное обеспечение VPN
- Выводы
- How to Fix DNS PROBE FINISHED BAD CONFIG Error
- 1. Running the Windows Troubleshooter.
- 2. Restarting Your Router.
- 3. Clear Your Web Browsers Cache.
- 4. Disable Specific Web Browser Extensions.
- 5. Refreshing Your IP Address.
- If You Are on Windows
- If You Are on Mac
- 6. Flush the DNS Cache.
- If You Are on Windows
- If You Are on Mac
- 7. Resetting TCP/IP to Default.
- If You Are on Windows
- If You Are on Mac
- 8. Change the DNS Servers.
- If You Are on Windows
- If You Are on Mac
- 9. Update Your Network Drivers.
- 10. Temporarily Disable Your Antivirus.
- If You Are on Windows 10 and Use Windows Defender
- If You Are on Windows 7, 8, or 10, and Use Your Own Antivirus
- If You Are on Mac
Что делать с ошибкой dns probe finished bad config?
Ошибки, возникающие из-за некоторых проблем или конфликтов с DNS, никогда не бывают простыми, потому что их трудно устранить. Ошибки, такие как dns_probe_finished_bad_config или DNS PROBE FINISHED BAD CONFIG, трудно устранить, потому что для них может быть несколько причин.
Это приводит к путанице среди тех, кто занимается устранением неполадок, так как нет никакого способа узнать, что не так с интернетом. Самый простой способ начать всю процедуру — убедиться, что ваш интернет действительно работает на других устройствах.
Это очень полезный совет, потому что он может сэкономить много времени на устранение неполадок. Если нет, то вы можете начать устранение неполадок самостоятельно, следуя всем приведенным ниже методам.
Что вызывает ошибку DNS?
За последние пару лет возникло много вопросов о происхождении печально известной ошибки. Я должен сказать вам, что эта ошибка довольно запутанная и существует под совершенно разными именами во многих браузерах.
Например, если вы получаете DNS PROBE FINISHED BAD CONFIG в Google Chrome, та же ошибка может выглядеть совершенно иначе в другом браузере. В одном я уверен, что эта ошибка связана с DNS. Сейчас многие люди не знают об этом, но DNS работает довольно простым для понимания способом.
Основная цель DNS — перевести название веб-сайта с нашего языка на язык, понятный для Интернета. Итак, для начала, если вы введете www.google.com, DNS должен будет преобразовать это в машиночитаемый IP-адрес.
Веб-сайтам может быть присвоено несколько IP-адресов одному имени, все зависит от того, насколько велик веб-сайт. Таким образом, с учетом этого ошибка DNS возникает, когда DNS не удается преобразовать введенный вами URL-адрес в машиночитаемый IP-адрес.
Хуже всего в этой ошибке является то, что существует много разных причин возникновения этой ошибки. Это может быть ваш браузер, это может быть VPN, который вы используете, это может быть сам маршрутизатор, неисправный кабель или интернет-соединение.
Методы исправления различных ошибок DNS в основном одинаковы. Тем не менее, чтобы сохранить актуальность и свежесть, я добавлю несколько различных методов, которые могут исправить Интернет, и исправить очень ужасную ошибку dns probe finished bad config .
Способ 1: Перезапуск маршрутизатора
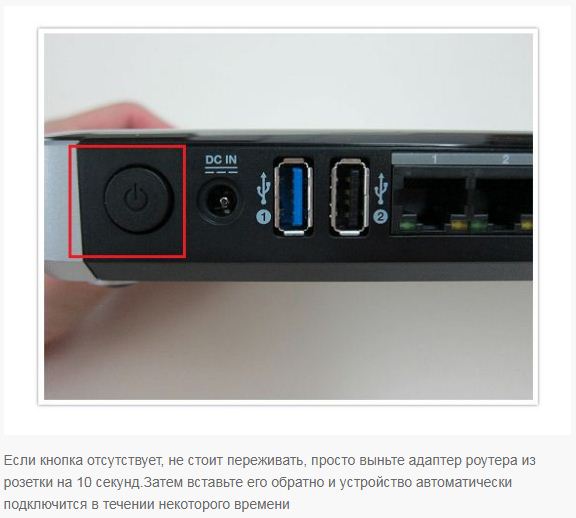
Это может быть неожиданностью, но не многие знают о том, что перезапуск маршрутизатора может исправить множество ошибок, связанных с DNS. Это связано с тем, что после перезапуска вы отключаете связь между маршрутизатором, Интернетом и вашим компьютером.
Таким образом, при повторном включении соединение снова устанавливается, что дает ему возможность легко подключаться. Это очень простой, но эффективный способ узнать, работает ли Интернет.
Способ 2: Исправление dns probe finished bad config с использованием CMD
Командная строка всегда была ответом на несколько проблем, возникающих в Windows. Хотя может показаться, что это только для сетевых проблем, командная строка может помочь вам с широким спектром проблем.
Одной из проблем является печально известная dns_probe_finished_bad_config. Шаги довольно просты, если вы знаете, как командную строку, и все они приведены ниже.
Откройте меню «Пуск» и введите cmd. Когда появится командная строка, щелкните ее правой кнопкой мыши и выберите « Запуск от имени администратора». Теперь вам нужно выполнить шесть разных команд, одну за другой. Начните с выполнения следующей команды.
ipconfig/release
ipconfig/all
ipconfig/flushdns
ipconfig /renew
netsh int ip set dns
netsh winsock reset

Теперь вам просто нужно перезагрузить компьютер. Как только это будет сделано, ошибка DNS PROBE FINISHED BAD CONFIG больше не будет возникать. Если по какой-либо причине ошибка не исчезла, вы можете попробовать другие методы.
Способ 3: исправить dns probe finished bad config с Google DNS
Если по какой-либо причине метод командной строки не работает, не отчаивайтесь. Это руководство рассматривает множество способов, которые пользователь может использовать для исправления ошибки DNS. Этот фокусируется на изменении адреса DNS на что-то другое.
Да, я знаю, это звучит пугающе, но это всего лишь несколько щелчков мышью. Маршрутизатор использует DNS по умолчанию, предоставляемый интернет-провайдерами, однако вы можете изменить его на публичный DNS-адрес.
Эти адреса доступны по всему Интернету, но важно, чтобы вы использовали доверенный. Изменяя свой DNS, ваша сеть будет подключаться к Интернету через серверы определенного DNS.
Для этого метода я собираюсь изменить свой DNS по умолчанию на Google DNS, которые известны как одни из лучших в Интернете. Это безопасно и на самом деле быстрее, чем большинство доступных по умолчанию DNS.
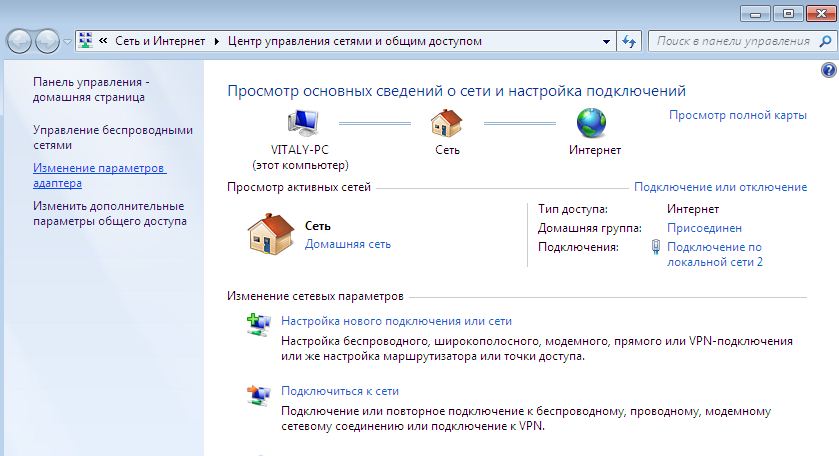
Щелкните правой кнопкой мыши значок сети, расположенный в правом нижнем углу, и выберите «Центр управления сетями и общим доступом».
На левой панели нажмите Изменить настройки адаптера.
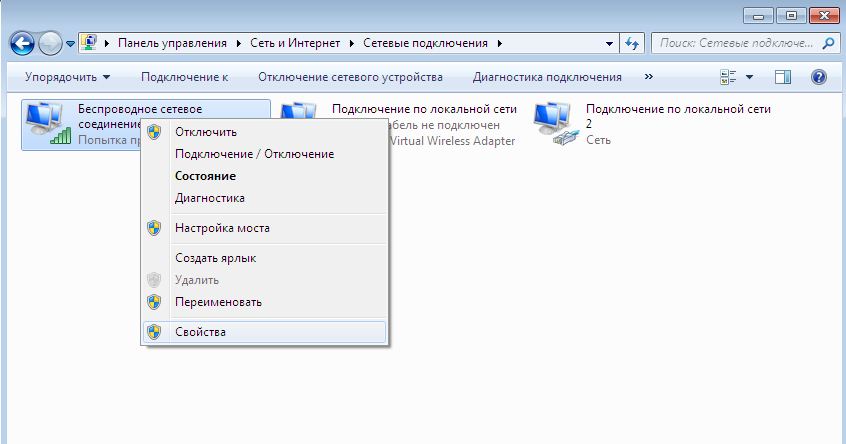
Как только откроется новое окно, щелкните правой кнопкой мыши на интернет-соединении по умолчанию и выберите Свойства.
В списке найдите параметр « Протокол Интернета версии 4» (TCP / IPv4) и дважды щелкните его.
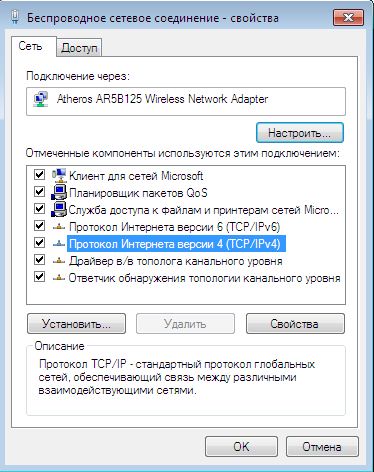
Теперь вам нужно будет нажать «Использовать следующие адреса DNS-серверов». После этого заполните оба поля следующим образом.
Предпочитаемый DNS-сервер: 8.8.8.8
Альтернативный DNS-сервер: 8.8.4.4
В левом нижнем углу поставьте галочку «Проверить настройки при выходе», а затем нажмите « ОК».
Как только окно закроется, может появиться новое окно, которое пытается диагностировать интернет-соединение, просто закройте его. После этого откройте браузер и посмотрите, не появляется ли у вас досадная ошибка dns_probe_finished_bad_config.
Если по какой-то причине ошибка все еще есть, не беспокойтесь. Есть и другие эффективные методы, которые вы можете использовать, чтобы увидеть, все ли работает так, как должно.
Способ 4: Перезапуск DNS
Многие люди обычно упускают перезапуск всей службы DNS-клиентов, потому что считают, что это не важно. Факт, однако, в том, во многих случаях перезапускает исправляет ваши проблемы с интернетом.
Это полезный метод, особенно для людей, которые сталкиваются с ошибками, связанными с DNS, и уже попробовали все возможные способы исправить интернет, а также ошибку DNS PROBE FINISHED BAD CONFIG.
Нажмите клавишу Windows + R.
Когда откроется диалоговое окно, введите services.msc и нажмите ОК.
Следующее меню может быть пугающим, если вы впервые. Просто найдите DNS Client и щелкните по нему правой кнопкой мыши.
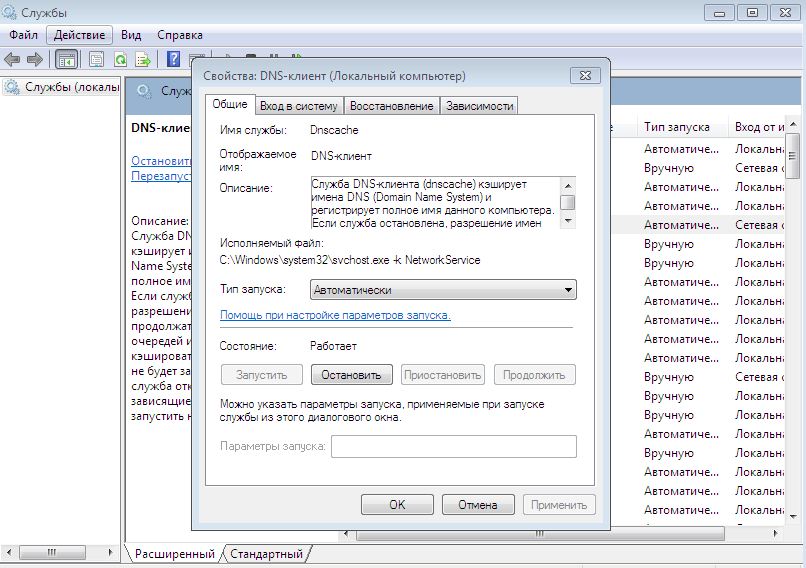
Выберите опцию Остановить и Запустить. Как только клиент пройдет через сброс, закройте меню.
Я не думаю, что перезагрузка компьютера необходима. Как только компьютер снова загрузится, убедитесь, что вы проверили интернет-браузер, чтобы убедиться, что ваш интернет снова работает.
Способ 5: попробуйте отключить программное обеспечение VPN
Поскольку dns_probe_finished_bad_config на самом деле относится к DNS, ошибка может иногда существовать и за пределами Google Chrome. Во время моего тестирования и исследования я понял, что VPN является одним из виновников этой ошибки.
Иногда, когда вы выключаете VPN или когда вы включаете его, то можете не получить интернет-услуги после того, как вы включили VPN или отключили его.
Здесь не нужно предпринимать никаких шагов, поэтому, имея это в виду, вы можете просто отключить VPN и посмотреть, начнет ли работать интернет после этого.
Выводы
Многие люди говорили мне, что им не нравится иметь дело с ошибками DNS только потому, что они случайные, спонтанные. Однако важно иметь дело с ошибками, потому что работающий интернет — это то, что каждый хочет иметь.
Конечно, ошибка DNS, с которой вы сталкиваетесь, может быть вызвана множеством разных причин. Но исправить ошибку довольно легко, когда вы знаете, что делаете. В статье есть все необходимые исправления и советы, которые могут быть очень полезны при исправлении dns_probe_finished_bad_config.
Источник
How to Fix DNS PROBE FINISHED BAD CONFIG Error

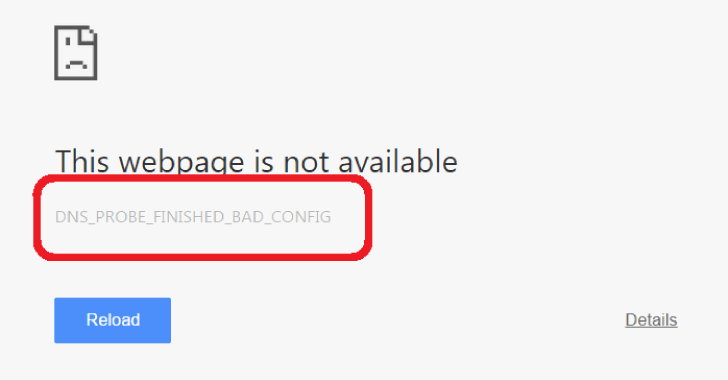
Do you find yourself attempting to browse the internet but instead receive a DNS_PROBE_FINISHED_BAD_CONFIG error?
No matter if you have a decent or poor internet connection, there is no escaping the DNS_PROBE_FINISHED_BAD_CONFIG error. This error happens when your internet is behaving weirdly, or most commonly when your web browser is acting up.
The error is mostly encountered when using Google Chrome but can also occur in other browsers, such as Firefox or Edge. The error can also occur on all sorts of devices, which include Androids, Windows devices, and Macs.
As you would expect, this error is quite common as other people have reported their encounters with it too.
Luckily, this error is easily fixable. Today we are going to show you how to fix the DNS_PROBE_FINISHED_BAD_CONFIG error on your device. 🙂
1. Running the Windows Troubleshooter.
Windows Troubleshooter is a useful tool when troubleshooting errors on Windows. It can find errors with most Windows applications and services, and as well as 3rd party software.
Within the Windows Troubleshooter, there is an option to troubleshoot your internet connection. This troubleshooter will look for errors in your internet connection. If it finds any, it will then fix them for you. Potentially this will fix the DNS_PROBE_FINISHED_BAD_CONFIG error!
If you are not on Windows, then skip to Method 2 below.
To run the Windows Troubleshooter on your internet connection, follow the following steps below:
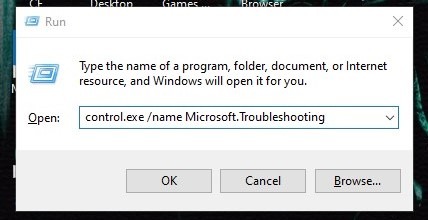
- First, press Windows Key + R on your computer. This will bring up the Run Dialogue .
- Then, type in ‘ control.exe /name Microsoft.Troubleshooting ’ and press the Enter key (as shown below).
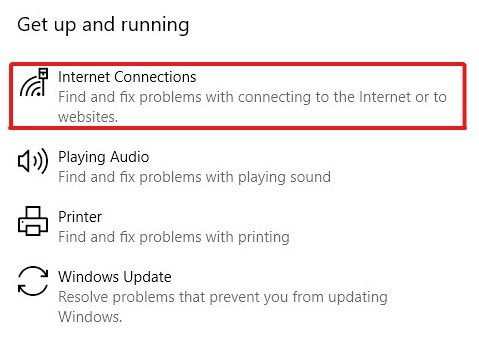
3. Now you should see the Windows Troubleshooter on your screen. Beneath Get up and running, you should see Internet Connections. Simply click on Internet Connections. Then, click on Run the troubleshooter.
If you are on Windows 7 or Windows 8, then you should see Network and Internet. Click on Network and Internet, then click on Internet Connections. Now the troubleshooter window should appear.
Once the Windows Internet Connections Troubleshooter is open, run it. When the troubleshooter finishes running, it will tell you whether or not it was successful in fixing any internet connection problems.
If it found any errors and fixed them, then attempt to browse the internet again.
2. Restarting Your Router.
An easy possible fix is restarting your router. If the error has to do with your router, then this will do the trick.
To restart your router, either press the power button on it to turn it off or unplug the power cord. Next, wait roughly 10-15 seconds. Then, turn your router back on.
Once your router has booted back up, try to browse the internet again on your device. If you still are receiving the DNS_PROBE_FINISHED_BAD_CONFIG error, then continue to the next step.
3. Clear Your Web Browsers Cache.
Your web browser caches websites to help speed up the performance of browsing the web. That way when you visit websites you already have visited, it doesn’t have to reload the entire web page again. Data cached consists of images and individual CSS (Cascading Style Sheet) elements of a web page, for instance.
However, sometimes this cached data can cause issues and prevent you from browsing the internet. Therefore, we should try clearing your browser’s cache.
If you are on Google Chrome, then check out this method from a previous article from us. In that method, we show you how to clear your browser’s cache on Google Chrome.
If you are on a different browser, such as Firefox, then try googling how to clear the cache of your particular web browser. However, this error is most common on Google Chrome.
After clearing your browser’s cache, try browsing the internet again.
4. Disable Specific Web Browser Extensions.
Some of us get tired of seeing advertisements on web pages and/or inappropriate words. If you are one of those people, then chances are you have installed web browser extensions to enhance your browsing experience.
While these types of extensions are a nice addition, they can also contribute to errors happening when browsing the internet.
If you are on Google Chrome, then go to ‘chrome://extensions/’ to turn off and on your installed browser extensions. Try disabling each extension one by one, then browse the internet to see if the error persists.
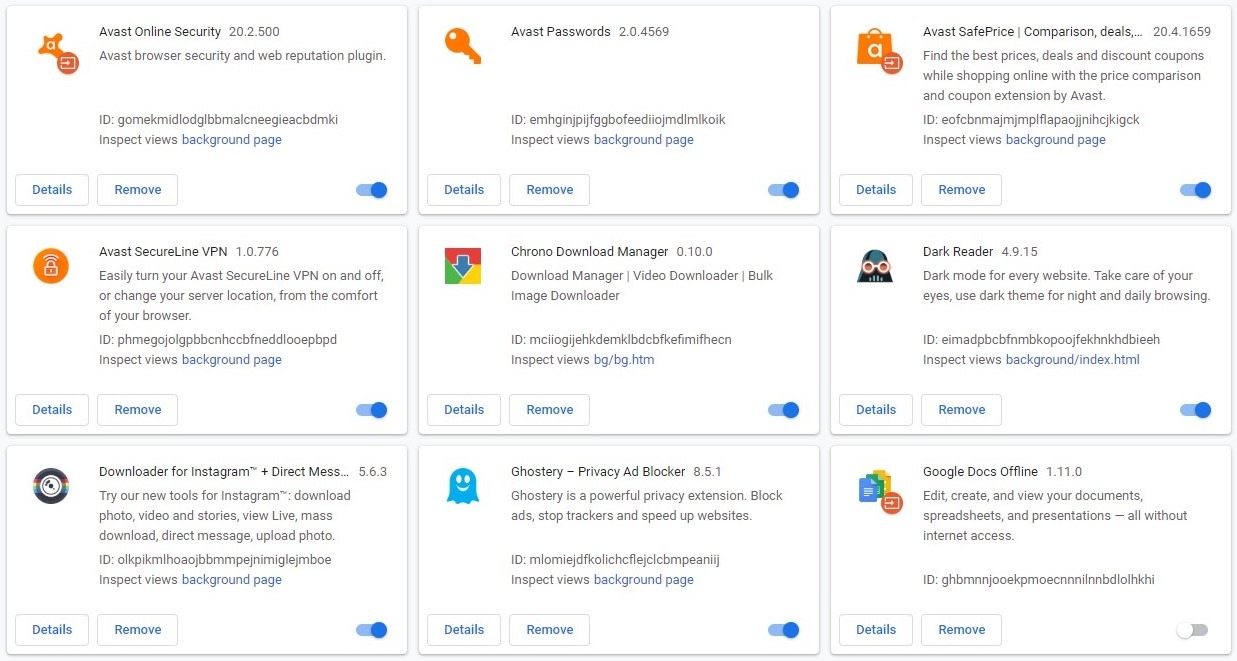
If you are not on Google Chrome, then google how to disable browser extensions for your current web browser.
Once you’ve determined the extension at fault, then remove the extension.
5. Refreshing Your IP Address.
The reason for the error may have to do with your IP address being invalid on your computer. For instance, if you have a dynamic IP address, then potentially your IP address is different currently from what is stored on your computer.
Therefore, we should try refreshing our IP address on our computer.
Here’s how you can refresh your IP address on both Windows and Mac:
If You Are on Windows
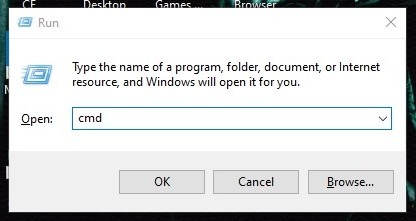
- First, press Windows Key + R on your computer. This will bring up the Run Dialogue .
- Then, type in ‘cmd’ and press the Enter key (as shown below).
3. Once Windows Command Prompt launches, type in the following commands and press the Enter key:
Now that you have refreshed your computer’s IP address on Windows, try to browse the internet again.
If You Are on Mac
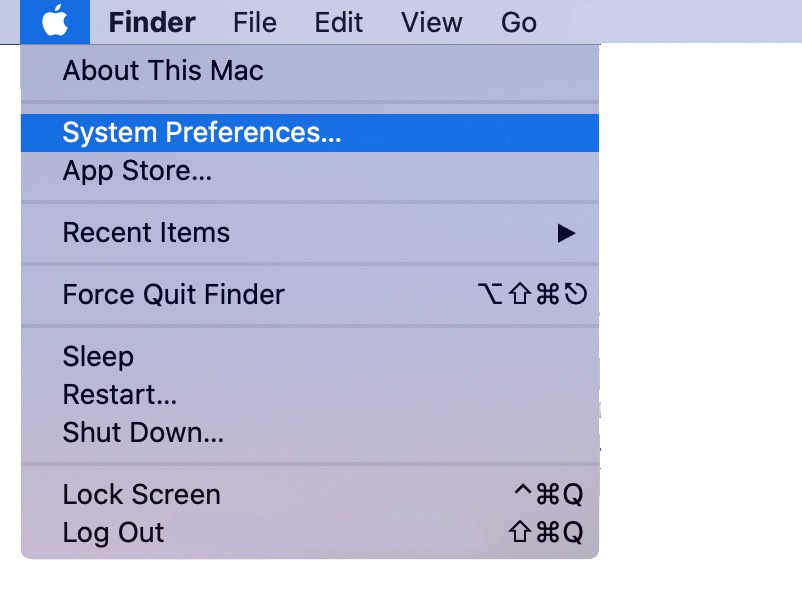
- On Mac, go to the top left and click on the Apple Logo .
- Then, click on System Preferences… (as shown below).
3. Once System Preferences launches, go to Network and select your Connected internet connection.
4. Then, press the Advanced button at the bottom right.
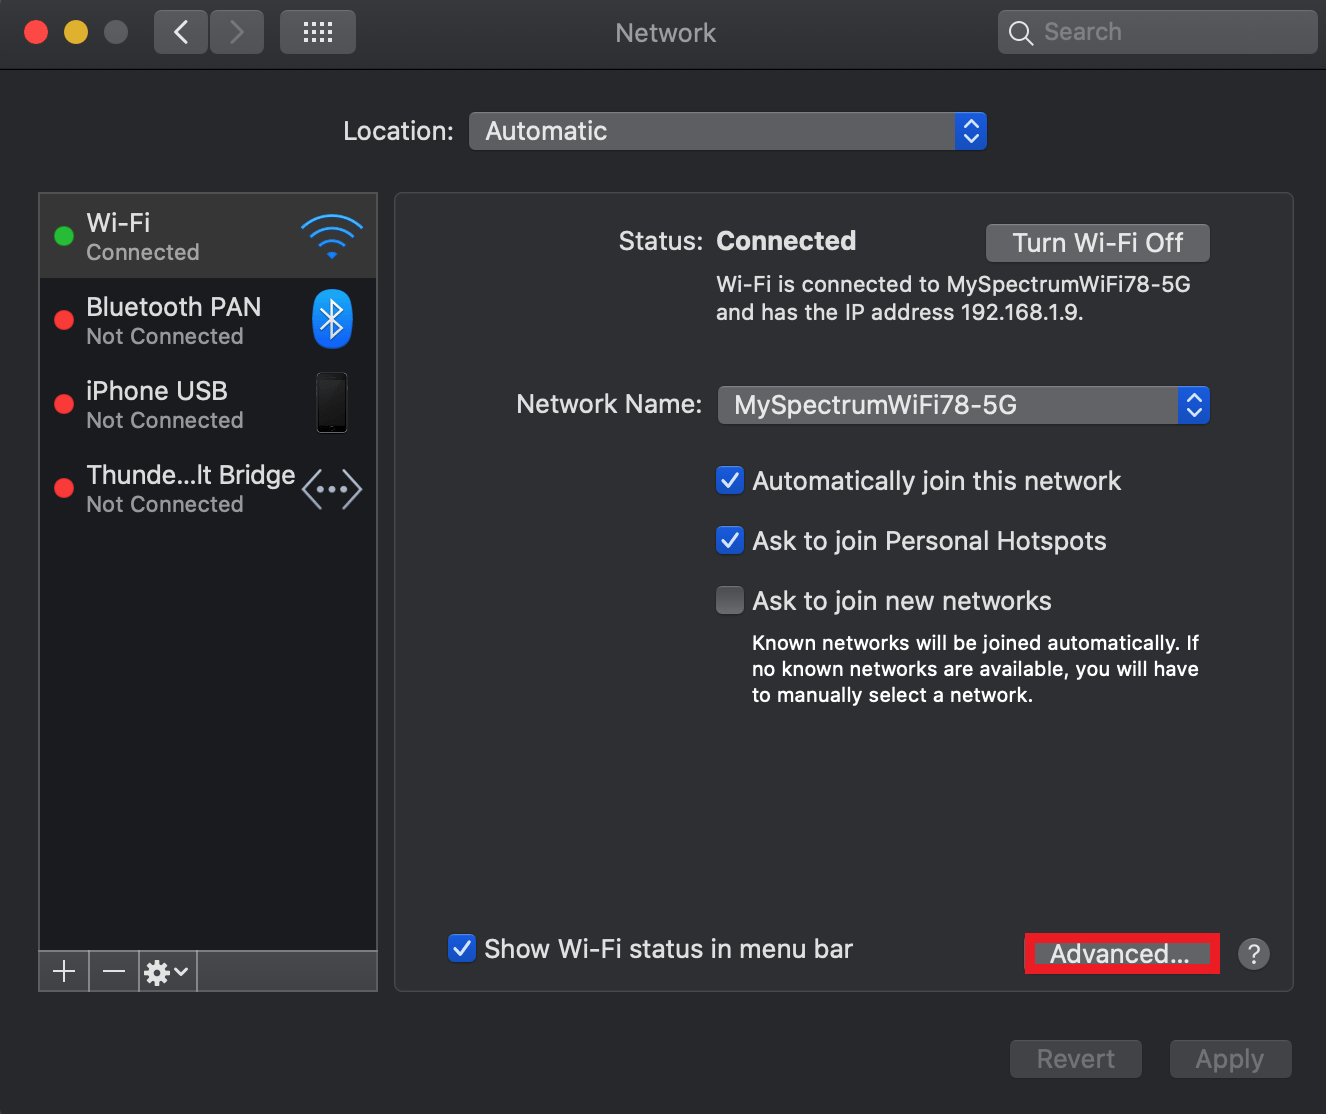
5. Next, click on TCP/IP and click on the Renew DHCP Lease button.
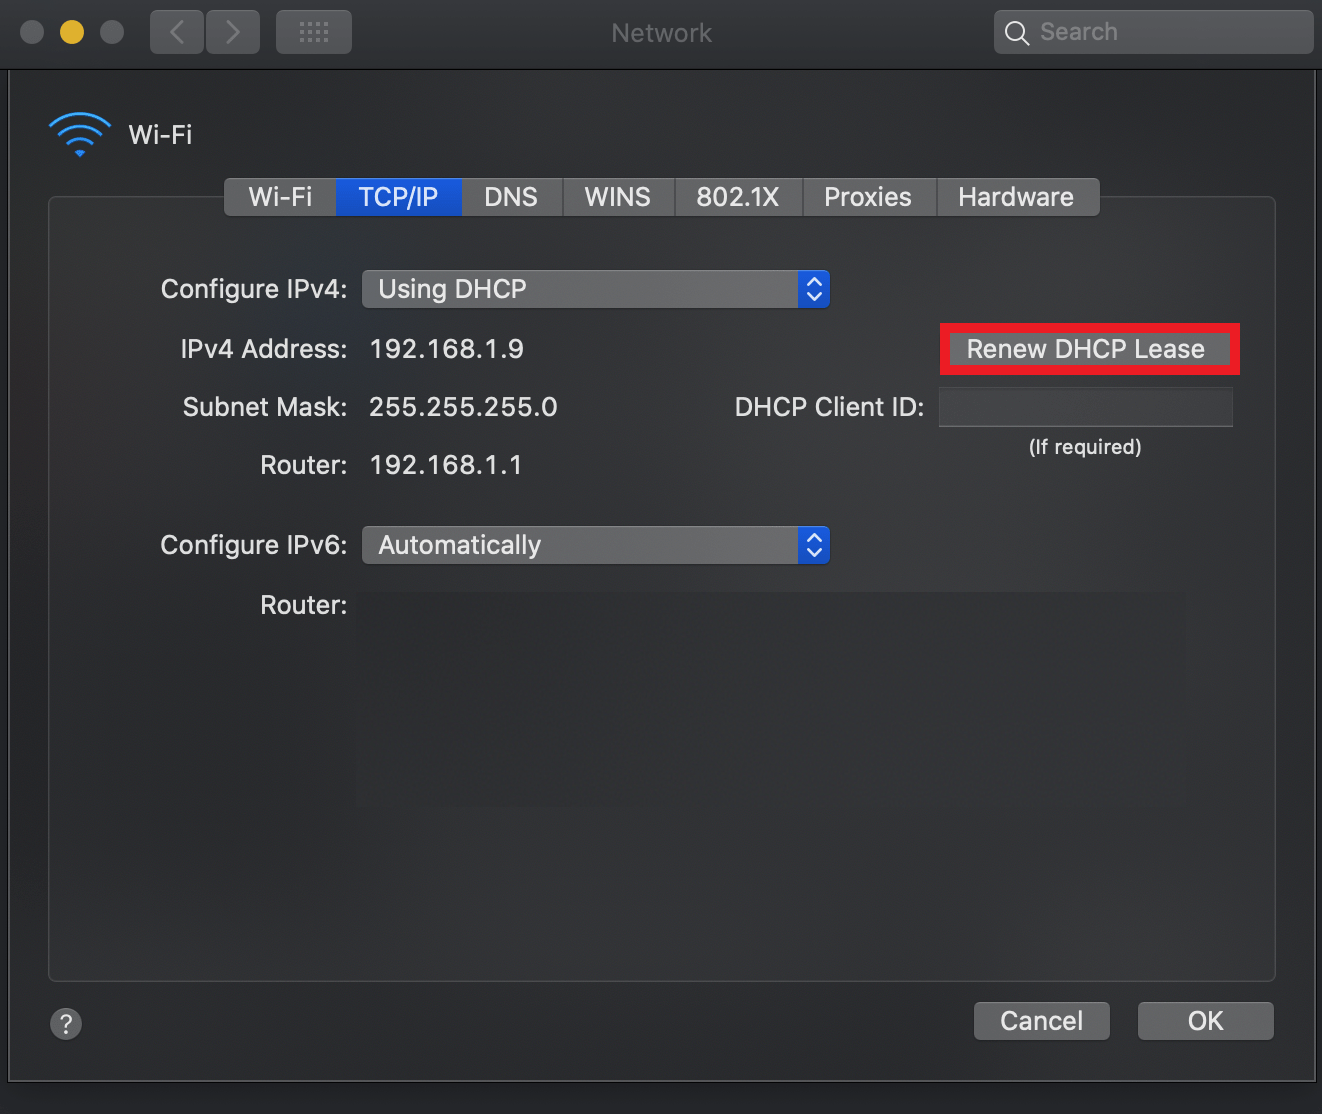
After renewing the DHCP lease, your IP address should be refreshed on Mac. Now try to browse the internet again.
6. Flush the DNS Cache.
The DNS cache consists of files that contain records of all visits to websites and other internet domains. The DNS cache is managed by the operating system.
Perhaps your IP address is valid on your computer but your DNS cache is corrupted. This would then be the reason for the error.
So let’s try flushing the DNS cache! 🙂
To refresh the DNS cache on both Windows and Mac, follow the following steps below:
If You Are on Windows
- First, press Windows Key + R on your computer. This will bring up the Run Dialogue .
- Then, type in ‘cmd’ and press the Enter key (as shown below).
3. Once Windows Command Prompt launches, type in the following command and press the Enter key:
After typing in that command, your DNS cache will be flushed. Now attempt to browse the internet again.
If You Are on Mac
- On Mac, press Command Key + Space. This will bring up the Spotlight Search.
- Then, type in ‘Terminal’ and press the Enter key (as shown below).

3. Once Terminal launches, type in the following command and press the Enter key:
Now your DNS cache should be flushed on Mac. You may now try to browse the internet again.
7. Resetting TCP/IP to Default.
The reason for the error may have to do with your IP address being invalid on your computer. For instance, if you have a dynamic IP address, then chances are your IP address is different from what is stored on your computer currently.
Therefore, we should try refreshing our IP address on our computer.
Here’s how you can refresh your IP address on both Windows and Mac:
If You Are on Windows
- First, press Windows Key + R on your computer. This will bring up the Run Dialogue .
- Then, type in ‘cmd’ and press the Enter key (as shown below).
3. Once Windows Command Prompt launches, type in the following commands and press the Enter key:
Now your TCP/IP should be reset back to their original values. Now see if the error still persists.
If You Are on Mac
- On Mac, go to the top left and click on the Apple Logo .
- Then, click on SystemPreferences… (as shown below).
3. Once System Preferences launches, go to Network and select your Connected internet connection.
4. Then, press the Advanced button at the bottom right.
5. Next, click on TCP/IP and click on the Renew DHCP Lease button.
Doing this will also refresh your IP address on Mac. Now that your TCP/IP has been reset, see if the error still persists.
8. Change the DNS Servers.
Possibly the current DNS servers our computer is attempting to access are invalid. While unlikely, it is even a possibility that another application or service running in the past may have edited the DNS servers.
Thus, we should try changing the DNS servers our computer is using to a different value. This might resolve the error! 😀
Here’s how you can change your DNS servers on both Windows and Mac:
If You Are on Windows
- First, press Windows Key + R on your computer. This will bring up the Run Dialogue .
- Then, type in ‘ncpa.cpl’ and press the Enter key (as shown below).

3. Once Network Connections launches, find your network connection device and Right-Click it.
4. Then, click on Properties. Now scroll down and click on Internet Protocol Version 4 (TCP/IPv4). Next, click on the Properties button.

5. A window should then appear. Check Use the following IP addresses for the DNS servers and type in the following:
After typing in those numbers, you may now exit the window. If the DNS_PROBE_FINISHED_BAD_CONFIG error is still being thrown, then proceed to the last step.
If You Are on Mac
- On Mac, go to the top left and click on the Apple Logo .
- Then, click on SystemPreferences… (as shown below).
3. Once System Preferences launches, go to Network and select your Connected internet connection.
4. Then, press the Advanced button at the bottom right.
5. Next, click on DNS and click on the + button at the bottom of the DNS Servers list. Then type in the following:
Once you have applied the new DNS servers, you may now exit the System Preferences application. Now check to see if the error still persists.
9. Update Your Network Drivers.
If you have tried every other method in this article and you still receive the DNS_PROBE_FINISHED_BAD_CONFIG error, then maybe your Network Drivers are out-of-date.
Therefore, you should update your Network Drivers to the latest version. Thankfully, this is an easy task to do on Windows!
If you are on a Mac, then Apple handles this stuff automatically for you. But if you are on Windows, then you might have to do it manually. To learn how to update your Network Drivers, check out this method from a previous guide from us. 😀
10. Temporarily Disable Your Antivirus.
When on a Mac, it might seem unnecessary to use an antivirus as Macs have a reputation of being ‘unhackable’. Well, quite frankly, this isn’t true and viruses still do occur on Macs.
However, on Windows, it is a whole different story. Windows has a reputation for being very hackable.
So if you use an antivirus on your device, chances are it is interfering with connecting to the internet.
In order to test this theory, we are going to temporarily disable our antivirus today to see if this is the problem for the DNS_PROBE_FINISHED_BAD_CONFIG error.
To disable your antivirus on Windows and Mac, simply follow the following steps below:
If You Are on Windows 10 and Use Windows Defender
- On your computer, press Windows Key + S . This will bring up the Search Dialogue.
- Then, type in ‘ Windows Security ’ and press the Enter key (as shown below).
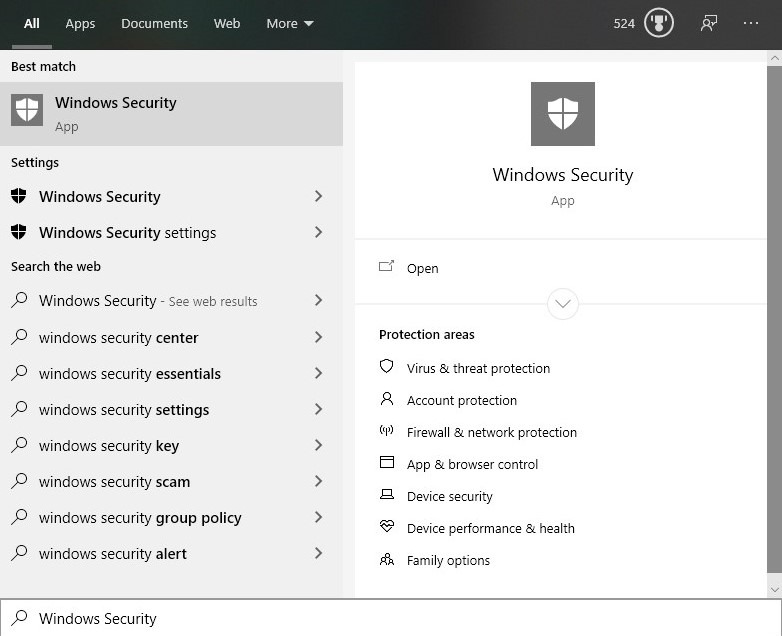
3. Once Windows Defender opens, click on Virus & threat protection on the left side of the application.
4. Then, click on the button under Real-time protection to disable Windows Defender.

After disabling Windows Defender, see if the error still occurs.
If the error no longer occurs, then you may now re-enable Windows Defender. To re-enable it, follow the same method provided above. This time you will be re-enabling Windows Defender instead.
If You Are on Windows 7, 8, or 10, and Use Your Own Antivirus
- Go to the bottom right of your taskbar where the System Clock is located.
- Then, Right-Click your antivirus. From there you should see a Disable button.
- Now, click on the Disable button (as shown below).
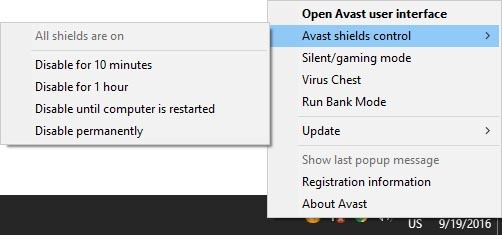
The majority of antivirus software can be disabled this way. This includes Avast, AVG, Norton, ESET, and so forth. However, if your antivirus could not be disabled this way, then try googling how to disable your current antivirus.
Now try to browse the internet again. If the error no longer occurs, then you may now re-enable your antivirus. To re-enable it, follow the same method provided above. This time you will be re-enabling your antivirus instead.
If You Are on Mac
- On Mac, go to the top left and click on the Apple Logo .
- Then, click on SystemPreferences… (as shown below).
3. Once System Preferences launches, go to Users & Groups and select the Current User on the top left.

4. Then, press the Login Items tab at the top right. From here you can uncheck your Antivirus Software so it stops running when your Mac starts.
5. Lastly, restart your Mac. Your Antivirus Software should now no longer be running.
After you have successfully disabled your antivirus, you may now see if the error has gone away. If it has, then you may re-enable your antivirus on startup by following the same method provided above. This time you will make your antivirus run on startup instead.
This ends our guide on how to fix the ‘DNS_PROBE_FINISHED_BAD_CONFIG error’. Please share any other solutions you know of that were not mentioned in this article down in the comment section below! We will credit you for your feedback once we were to update this article again. If you still have questions, then leave a comment below! 😄
If this guide helped you, please share it. 🙂
Источник


