- DNS_PROBE_FINISHED_NXDOMAIN: What It Is and 11 Ways to Fix the Problem
- Video Tutorial
- 11 Ways to Fix the DNS_PROBE_FINISHED_NXDOMAIN Error
- 1. Check if the Domain Is Active
- 2. Test the Website via a Proxy Server
- 3. Flush the DNS Cache
- Protip
- 4. Release and Renew the IP Address
- 5. Change the DNS Servers
- 6. Restart the DNS Client Service
- 7. Check the Local Hosts File
- 8. Reset Chrome Flags
- 9. Disable Antivirus or VPN
- 10. Temporarily Turn Off Your CDN
- 11. Reboot Internet Connection
- Why Does the DNS_PROBE_FINISHED_NXDOMAIN Error Occur?
- What About Other Browsers?
- Microsoft Edge
- Safari
- Mozilla
- Conclusion
DNS_PROBE_FINISHED_NXDOMAIN: What It Is and 11 Ways to Fix the Problem
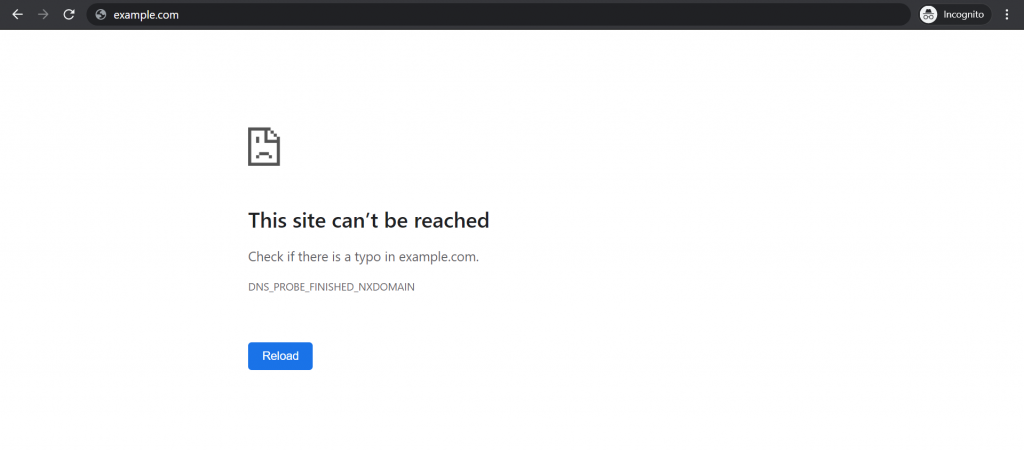
DNS_PROBE_FINISHED_NXDOMAIN is when the domain name system cannot resolve the website’s URL into an IP address, making a web browser unable to reach it. The NXDOMAIN in the error code implies that the domain is nonexistent.
If you’re a Google Chrome user, you may have encountered the DNS_PROBE_FINISHED_NXDOMAIN error before. It’s typically accompanied by a message which states that the site couldn’t be reached because the server IP address could not be found.
This problem can be frustrating, especially if it happens with every website you try to visit. Fortunately, there are many easy solutions to this problem. In this article, we will show you how to fix the DNS_PROBE_FINISHED_NXDOMAIN error and explain why it appears in the first place.
Video Tutorial
Too busy to read? Check out our video tutorial instead.

11 Ways to Fix the DNS_PROBE_FINISHED_NXDOMAIN Error
As the DNS_PROBE_FINISHED_NXDOMAIN error may show up due to issues with the website, the client’s computer, or the internet connection, the solution will naturally depend on this root cause.
Let’s look at the 11 ways to fix the DNS_PROBE_FINISHED_NXDOMAIN error message.
1. Check if the Domain Is Active
The DNS_PROBE_FINISHED_NXDOMAIN error may occur due to a problem with the website’s domain name.
For instance, you may have mistyped the URL, making the browser unable to locate the correct IP address in the domain name system (DNS).
If the domain name’s spelling is correct, but the error message is still there, the domain name is likely to be expired or unregistered.
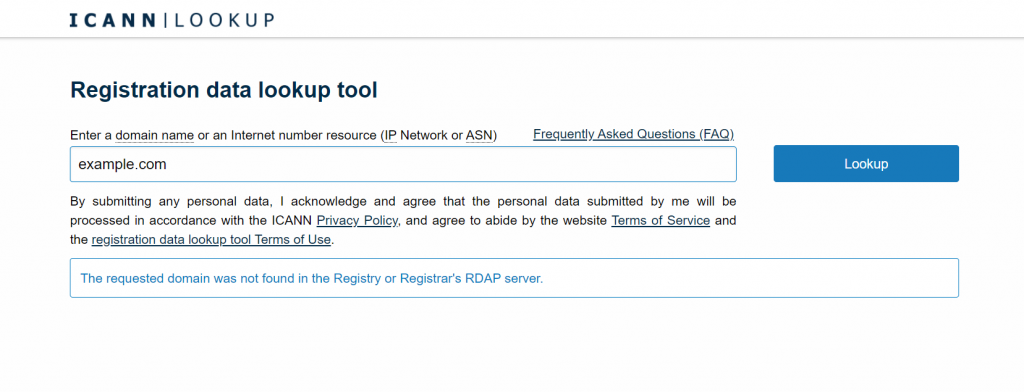
One way to check whether a domain is active is to go to the ICANN lookup tool. Enter the site’s URL and see if it is listed in their data.
Here are some ways to make sure the DNS_PROBE_FINISHED_NXDOMAIN error doesn’t happen from your end as a website owner:
- Verify your domain ownership information within 15 days of registering the domain. Otherwise, ICANN may suspend it. To unsuspend a domain, look for the verification email in your inbox and follow the instructions.
- Use the nameservers provided by the website’s hosting provider so that the domain points to the right site.
- Check the domain’s DNS records. The A record, in particular, is responsible for pointing the domain name to the IP address. Hostinger clients can do this via the DNS Zone Editor.
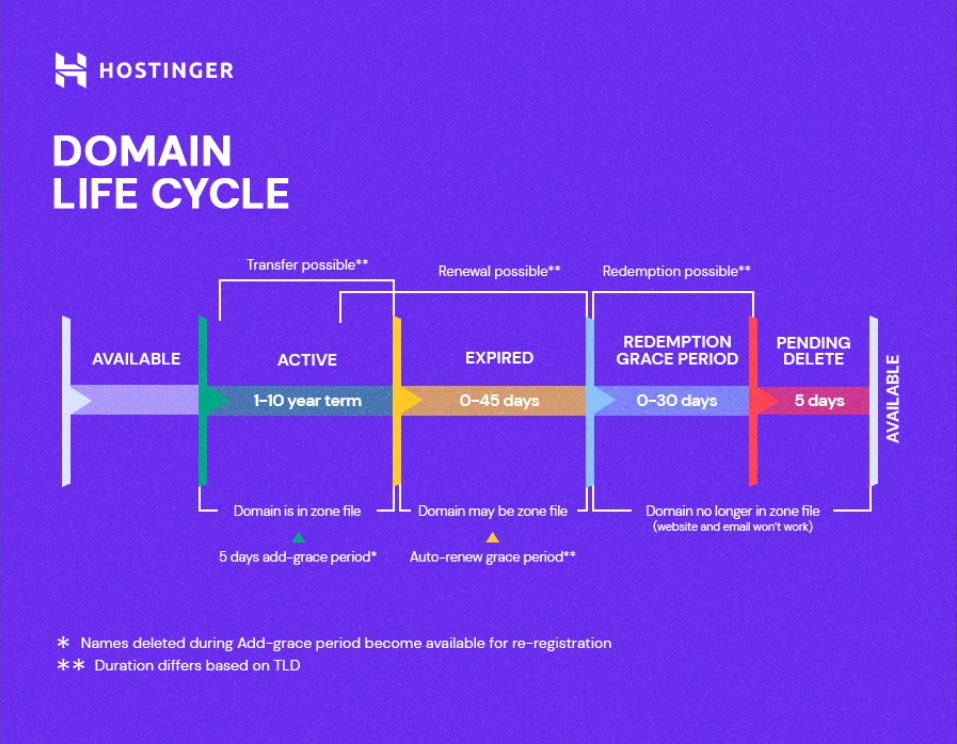
- Renew the domain’s registration before its expiration date. Here is a graphic that shows the life cycle of a domain:
2. Test the Website via a Proxy Server
The idea of this method is to check whether the DNS_PROBE_FINISHED_NXDOMAIN error occurs to all users or your browser only.
First, open a proxy server site like hide.me or HMA. Then insert the website’s URL and choose the server location.
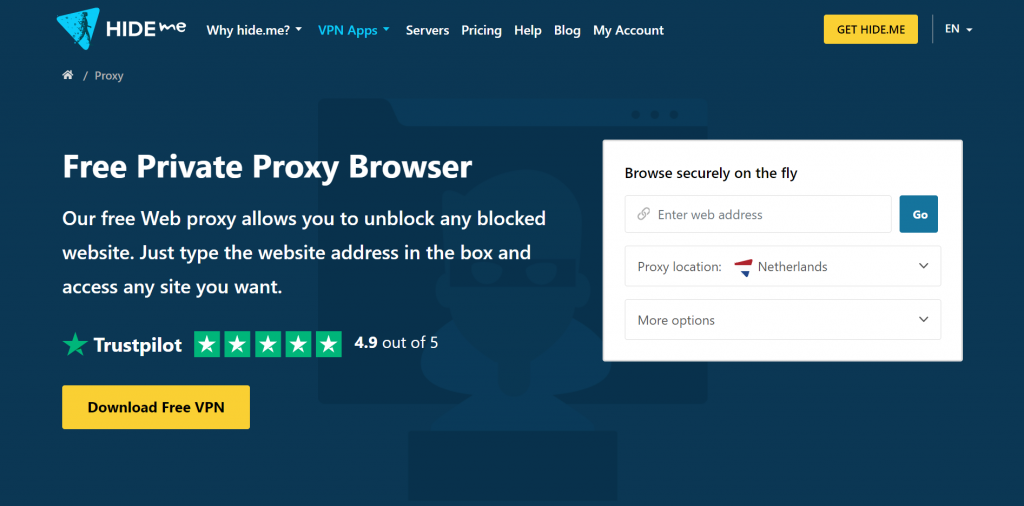
If the website is accessible from other places, the DNS_PROBE_FINISHED_NXDOMAIN error likely occurs due to issues within your device or browser rather than the site itself. The following sections will explore different solutions to fix this problem.
3. Flush the DNS Cache
Clearing or flushing the DNS cache is one of the most recommended solutions to fix the DNS_PROBE_FINISHED_NXDOMAIN error.
The DNS cache keeps all the IP addresses of the websites a client previously visited on the computer. When you open the same site, the browser doesn’t have to translate the domain name to IP address from the beginning, speeding up the loading time.
That said, some IP addresses in the DNS cache may be outdated, leaving the computer unable to find the right website.
This section will show the way to flush DNS cache for Windows, Mac, and Google Chrome users.
Windows
To flush the DNS cache on Windows, follow this step-by-step tutorial:
- On the Start menu, search for the Command Prompt. Then, right-click to select the Run as administrator option.
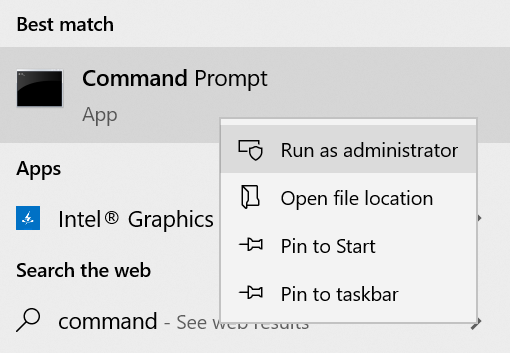
- Once a new window appears, type in the commands below. Then, hit Enter.
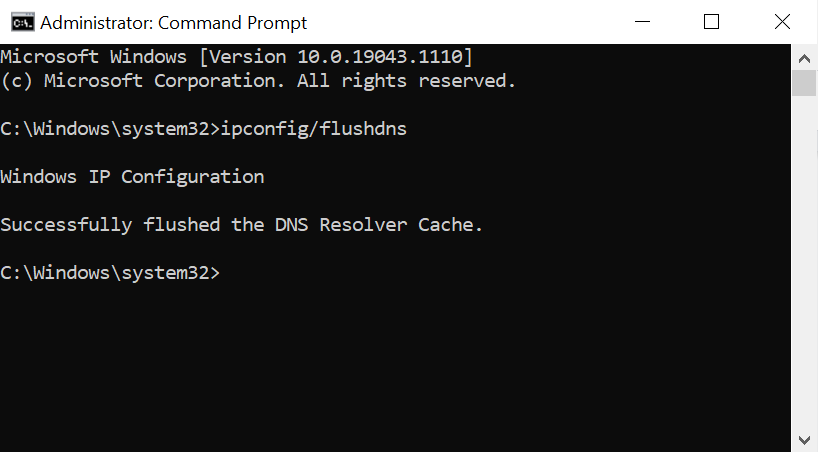
- Open the browser to see whether the DNS_PROBE_FINISHED_NXDOMAIN message still occurs.
macOS
- Open the Terminal application.
- Enter the following commands and press the Return key.
- Insert your password and press Return again.
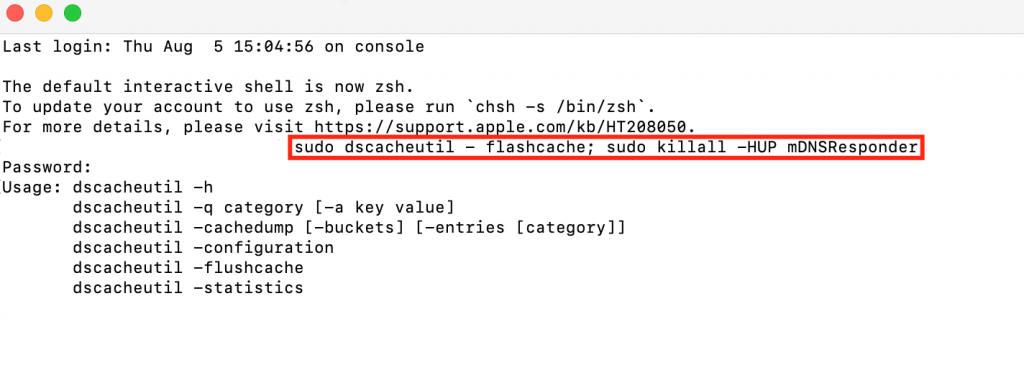
- Open the browser and check if the error is still there.
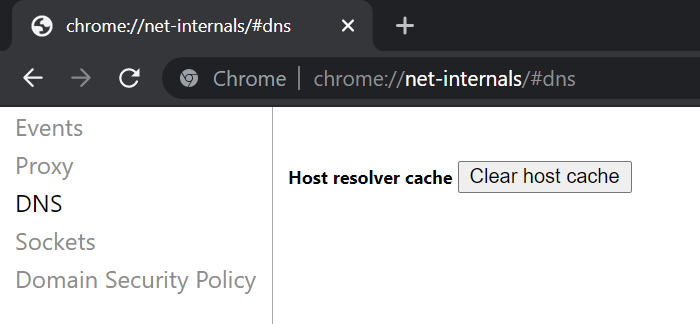
Google Chrome
Google Chrome has a separate DNS cache from the operating system, so flushing it may fix the error.
To do so, enter chrome://net-internals/#dns into the Chrome address bar. Then click Clear host cache.
Protip
If you use Linux or older versions of macOS, see our guide on how to flush DNS for more information.
4. Release and Renew the IP Address
If the previous method doesn’t work, try this more in-depth way of clearing the DNS cache. It can troubleshoot network connection issues by giving up the lease to your computer’s old IP address and requesting a new one.
Here’s how to release and renew an IP address on Windows and Mac:
Windows
- Just like with the previous method, right-click on the Command Prompt and select Run as administrator.
- Insert the commands below and press Enter between each one:
- Enter the following commands to reset your previous IP settings and reinstate the Winsock Catalog. Doing this can also prevent potential errors due to malicious scripts from downloaded files.
- Once done, close the command prompt and restart the computer. Then open the browser to see whether the DNS_PROBE_FINISHED_NXDOMAIN message persists.
macOS
Unlike with Windows, macOS users don’t need to open a command-line interface to release and renew the IP address. Follow these steps:
- Go to System Preferences ->Network.
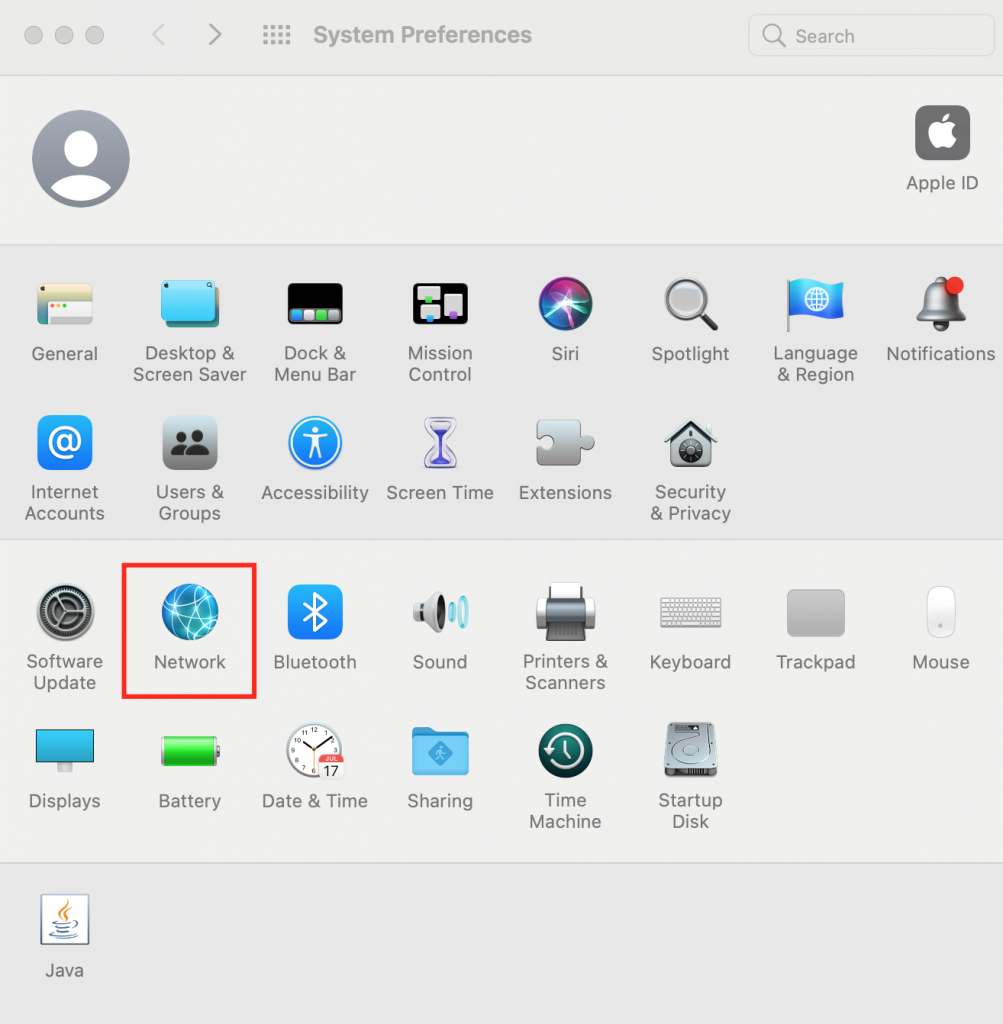
- Select your current internet connection and click on the Advanced… button.
- Navigate to the TCP/IP tab and click Renew DHCP Lease. Press OK.

- Restart the computer and check if the error message still persists.
5. Change the DNS Servers
If clearing the cache doesn’t work, consider changing the DNS servers. In DNS lookup, these servers are responsible for converting the domain name into its internet address.
By default, your computer will use the DNS server addresses provided by your internet service provider. However, they may not be the fastest or most secure.
That’s why many people opt for public DNS servers from Google, OpenDNS, and Cloudflare, which usually come with fewer technical issues.
Sometimes, switching back and forth between DNS servers can also resolve internet connection problems.
The tutorials below will explain how to change DNS servers on Windows, Mac, and Google Chrome. For the sake of illustration, we will use Google’s DNS server addresses.
Windows
Here’s a step-by-step guide to changing DNS server addresses on Windows:
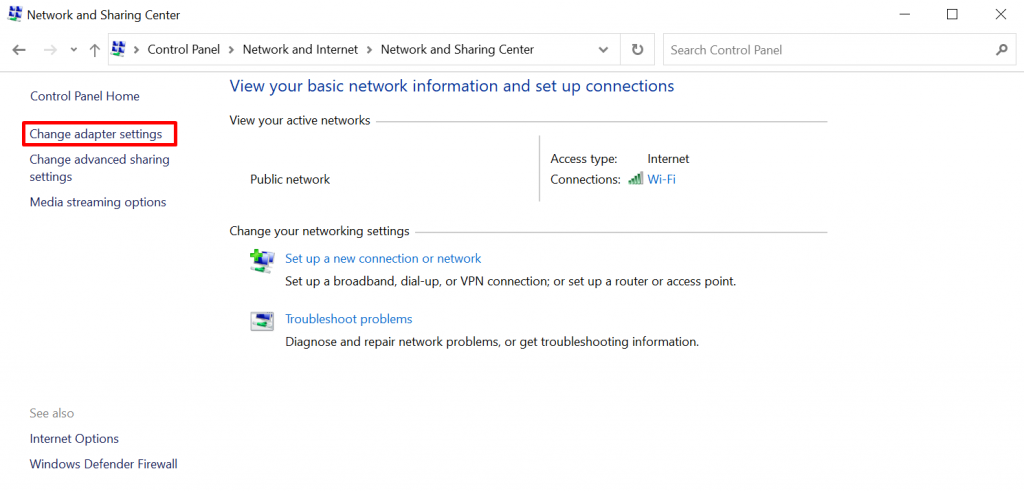
- Open the Control Panel ->Network and Internet ->Network and Sharing Center.
- On the left side of the window, click Change adapter settings.
- Right-click on the current connection and choose Properties.
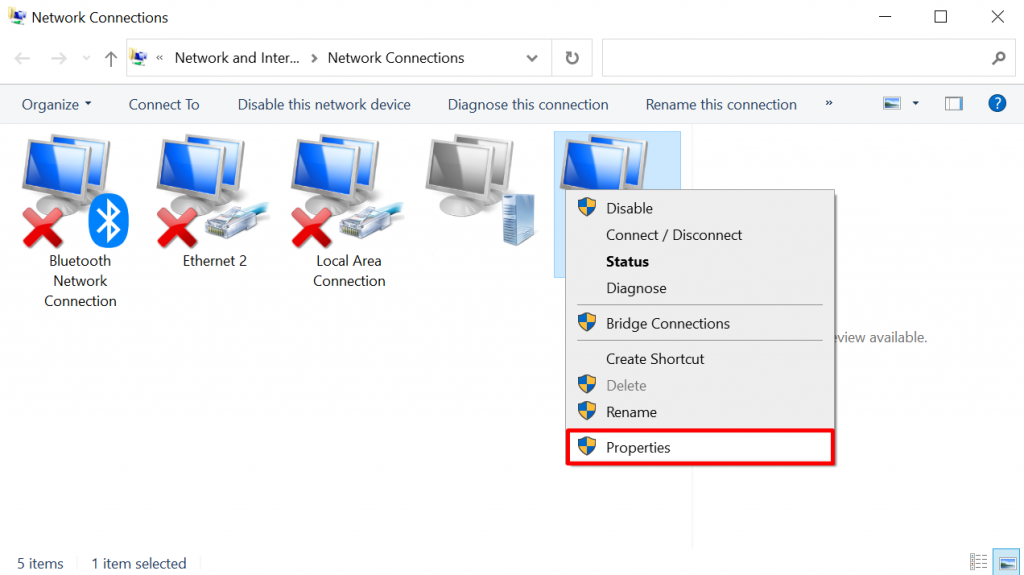
- Choose Internet Protocol Version 4 (TCP/IPv4) or Internet Protocol Version 6 (TCP/IPv6) and press the Properties button.

- At the bottom of the window, select Use the following DNS server addresses and insert the numbers below:
- Preferred DNS Server. 8.8.8.8 for IPv4 or 2001:4860:4860::8888 for IPv6.
- Alternate DNS Server. 8.8.4.4 for IPv4 or 2001:4860:4860::8844 for IPv6.
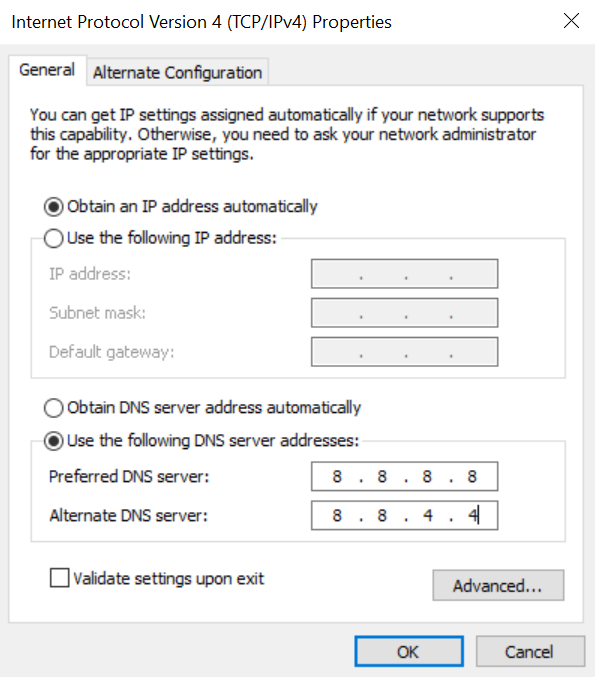
- Once done, click OK to save the changes. Restart the browser and see if the method resolves the DNS_PROBE_FINISHED_NXDOMAIN error.
macOS
For macOS users, here’s how to change DNS server addresses:
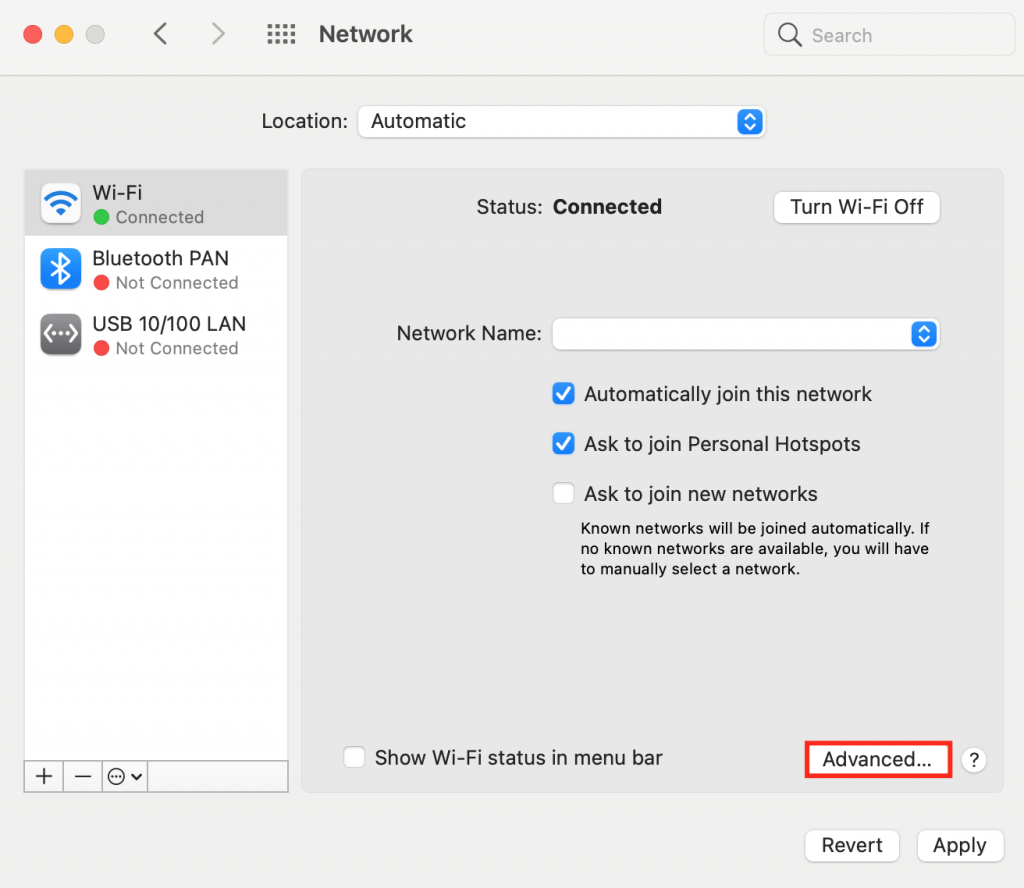
- Open System Preferences ->Network.
- Pick your current local area connection. Hit the Advanced button.
- Navigate to the DNS tab. Press the + button and type in the new IPv4 or IPv6 DNS servers. Type in each address one by one, then press OK.
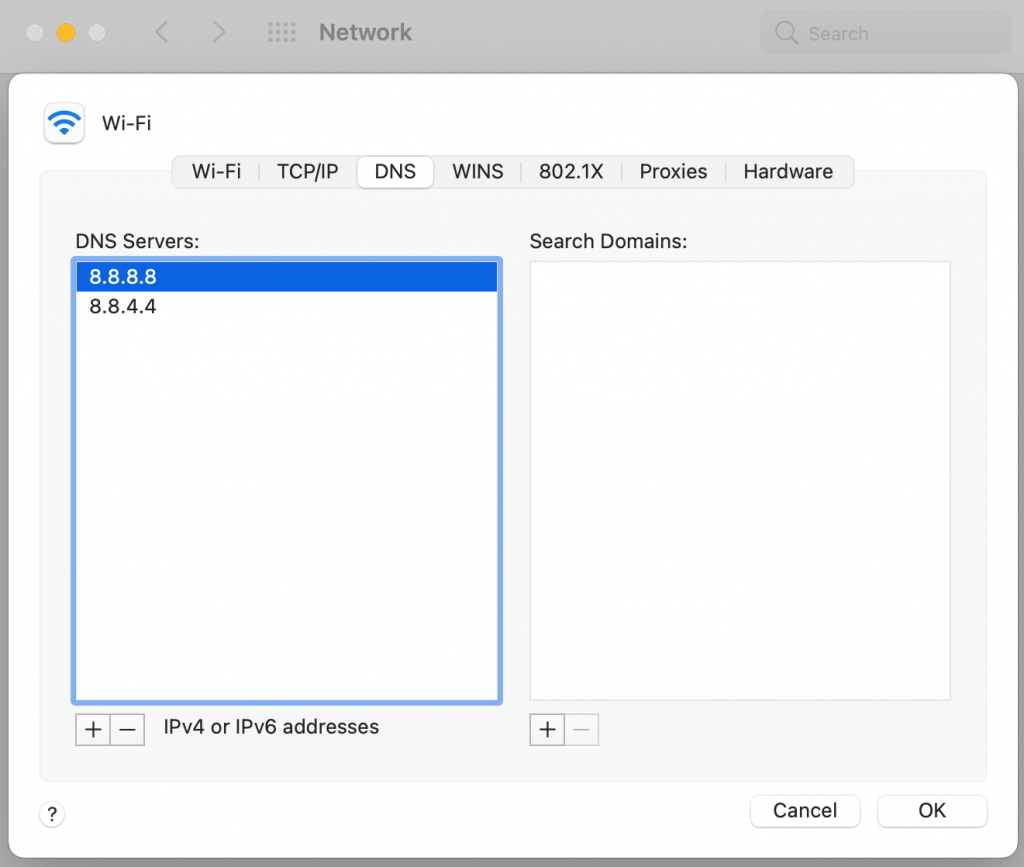
- Open the browser to see if the error code has disappeared.
Google Chrome
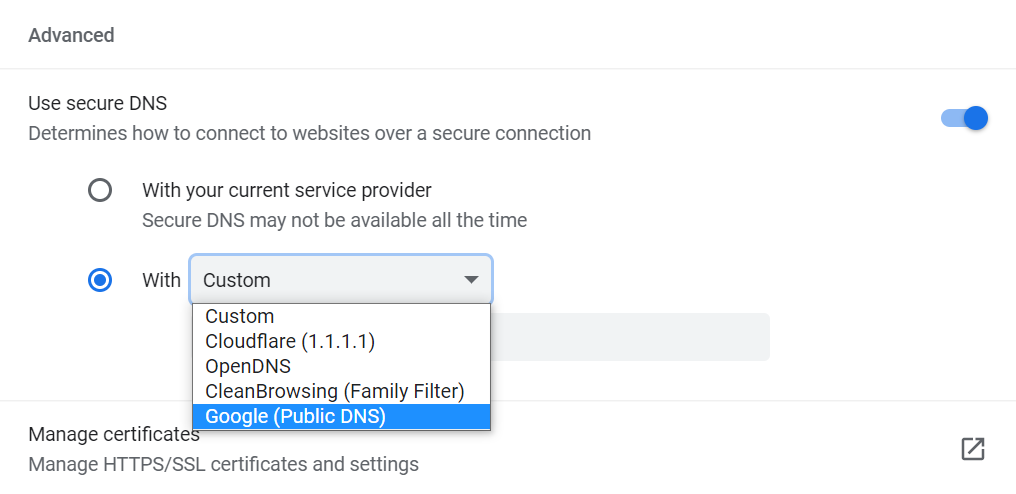
Enter chrome://settings/security on the address bar to access the Chrome DNS settings.
Scroll down to the Advanced section and select With Custom. Users can change it to one of the built-in DNS server addresses from Cloudflare, OpenDNS, CleanBrowsing, or Google.
6. Restart the DNS Client Service
Another way Windows users can reconfigure the DNS settings is by restarting the DNS client service. This program functions to resolve and save IP addresses in the DNS cache.
The DNS client service is supposed to run automatically when you start the computer. In case it doesn’t, it will make the browser unable to access any website.
There are three methods for restarting the DNS client service on Windows 10 – Windows System Configuration, Windows Services Manager, and the Command Prompt.
Windows System Configuration
Follow these instructions to restart the DNS client service:
- Press the Win + R keys on the keyboard and enter msconfig in the search bar.

- Select the Services tab, scroll down, and find the DNS Client option.
- Uncheck the box to disable it and click OK.
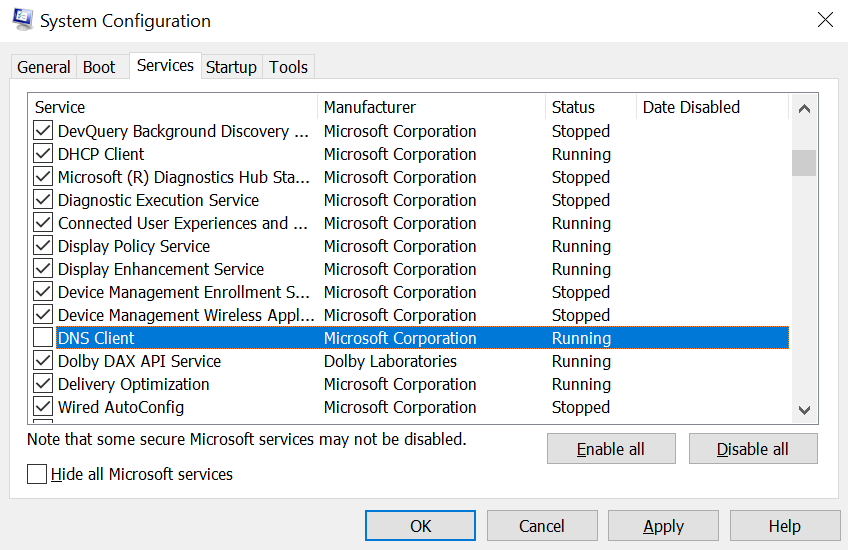
- Restart the computer.
- Repeat steps one and two. This time, however, recheck the box to enable DNS Client.
- Restart the computer again. Check if the DNS_PROBE_FINISHED_NXDOMAIN error has disappeared.
Windows Services Manager
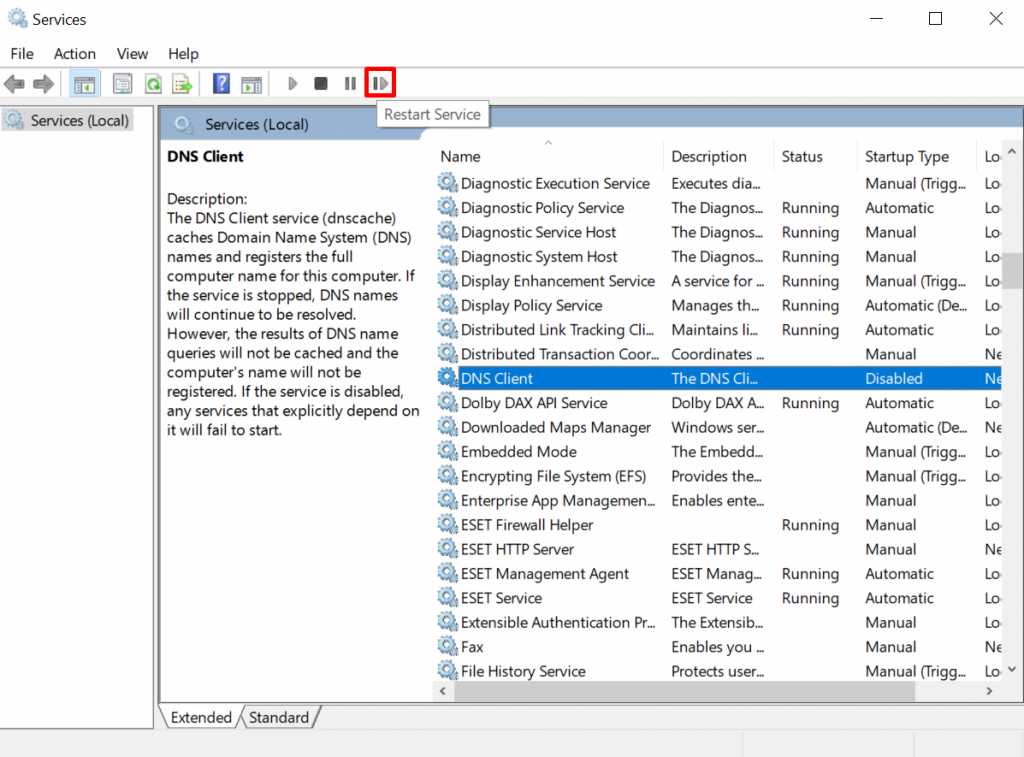
- Open the Services application.
- Scroll down and find DNS Client.
- Click the Restart Service button below the menu bar. Then relaunch the computer.
Windows Command Prompt
- Open the Command Prompt.
- To stop the DNS service, input the following command:
- Once done, wait for the following output to appear:
- Start the DNS service again by typing:
- Wait for the output below:
- Restart the computer.
For certain Windows versions, this method may not work and result in the following message:
If this happens to you, consider trying the previous solutions for restarting the DNS client or the other methods in this guide.
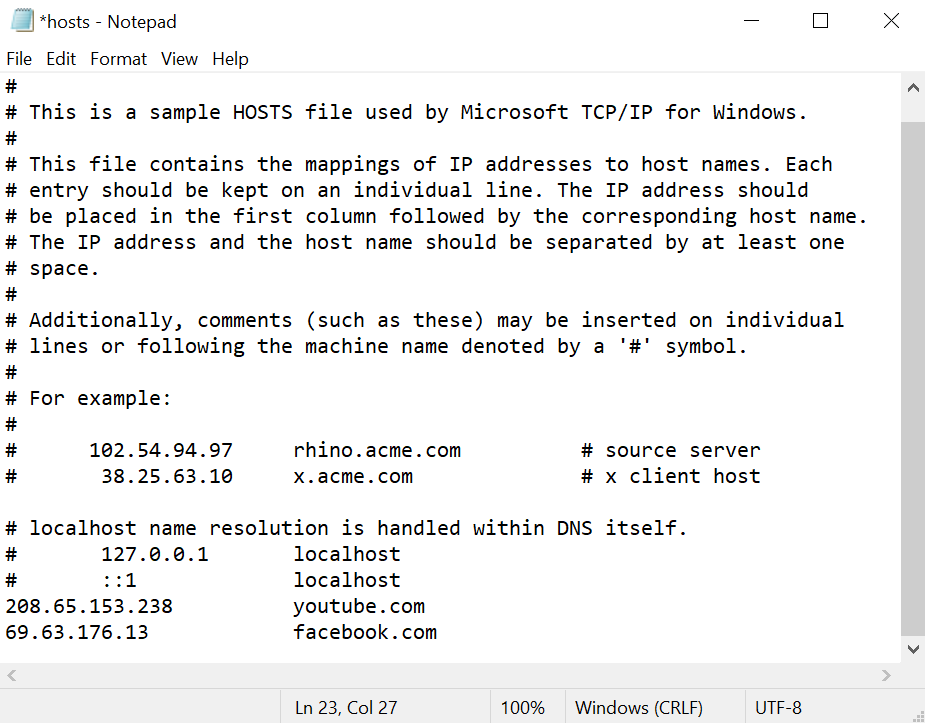
7. Check the Local Hosts File
The local hosts file matches a domain name to its IP address. Computers refer to it every time you open a website so that they can fetch the correct page to display on the browser.
In some cases, the hosts file may have unknowingly marked a specific domain name or IP address as inaccessible. As such, checking and editing the file can potentially fix the DNS_PROBE_FINISHED_NXDOMAIN error.
Windows
Here’s how to check the hosts file on Windows:
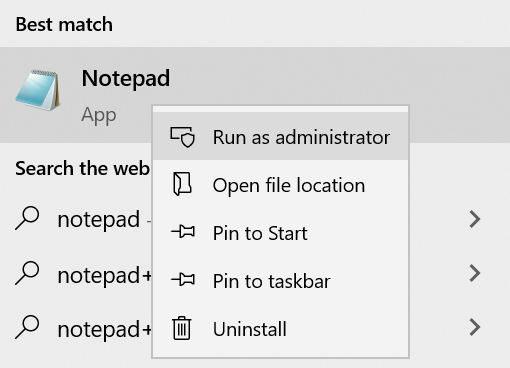
- In the search box, type Notepad and select Run as administrator.
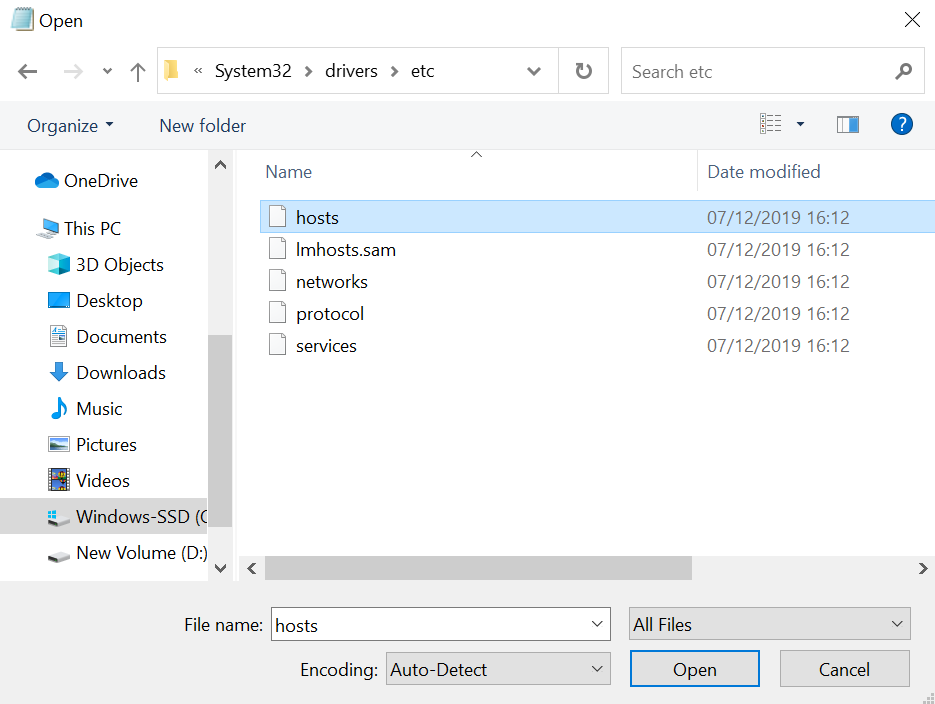
- Navigate to File ->Open. Change the file filter from Text Documents (*.txt) to All Files.
- Enter the path below in the File name bar:
- Select the hosts file and open it.
- The file will show a list of blacklisted websites below the last line using the # symbol. If the domain name and IP address of the target website are there, remove them and save changes.
- Visit the previously-blocked websites to check if the DNS_PROBE_FINISHED_NXDOMAIN notification has gone.
macOS
macOS users can follow this step-by-step guide to modifying the hosts file:
- Open the Terminal application.
- Enter the command below. Then, insert your password.
- You’ll be redirected to the hosts file. Delete the websites listed below the last ::1 line.
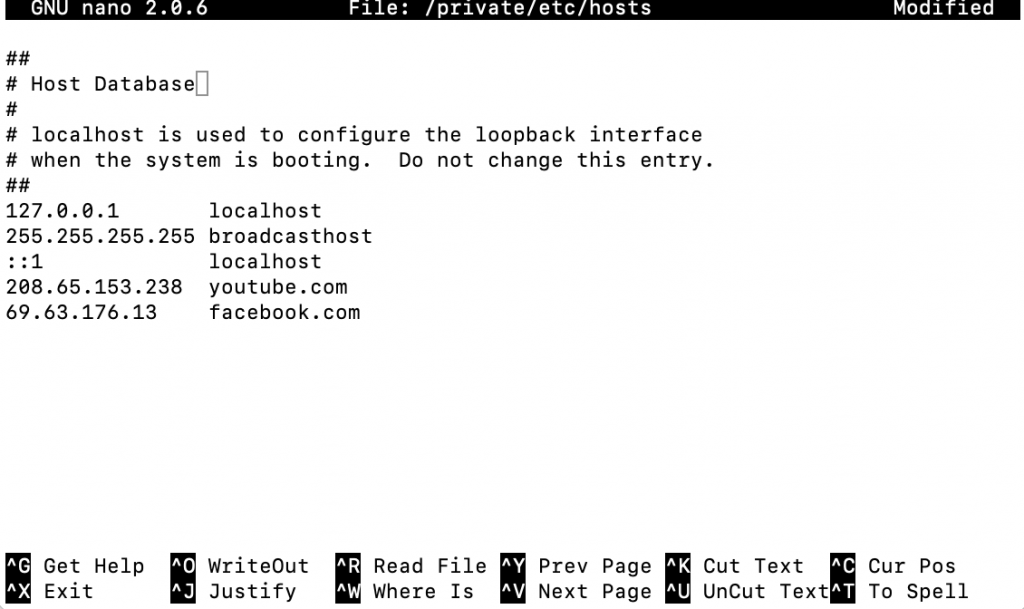
- Remove the inaccessible site’s information, and then press Command + O to overwrite the hosts file. Hit Return to confirm the changes.
- Press Command + X to close the hosts file.
- Open the formerly-blacklisted sites and see if the error has been resolved.
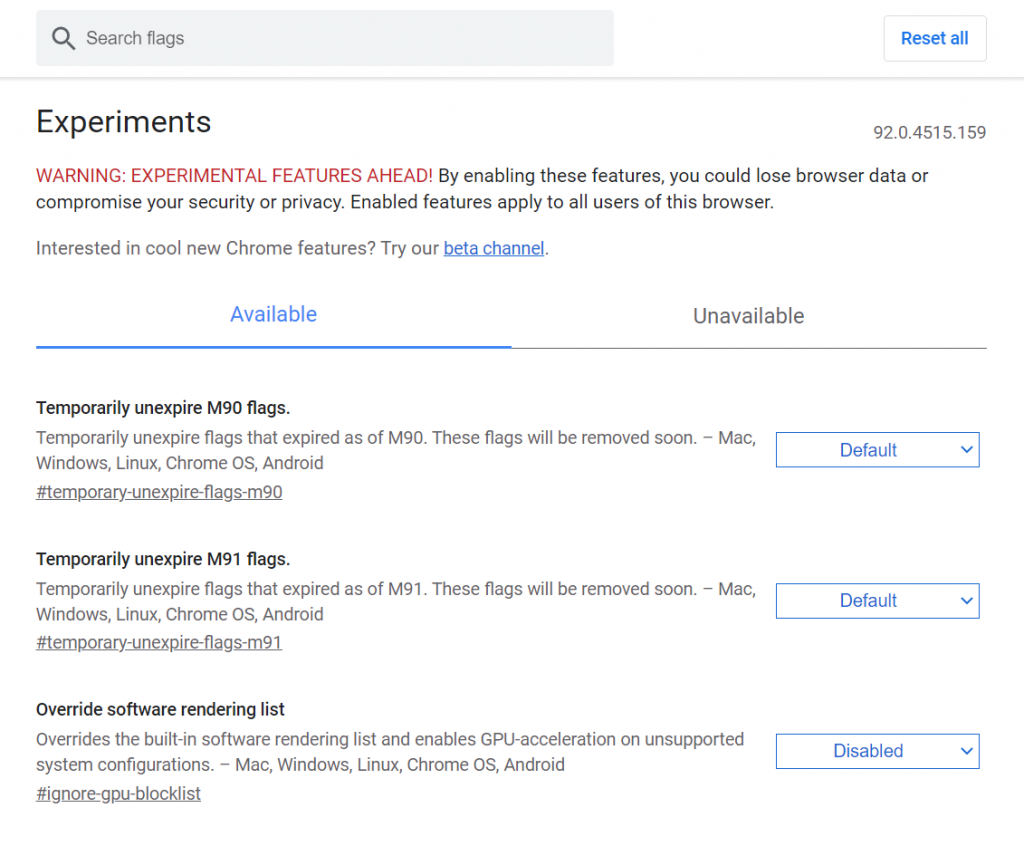
8. Reset Chrome Flags
Google Chrome Flags are experimental features that are not a part of the default browsing experience but have been made available for trial. Some may come with misconfigurations that cause the DNS_PROBE_FINISHED_NXDOMAIN error.
To disable Chrome Flags, enter chrome://flags in the address bar. You can view which new features are active on the application. Change the Enabled Chrome Flags to Disabled or click Reset all at the top to restore the default settings
Once done, close and reopen Google Chrome.
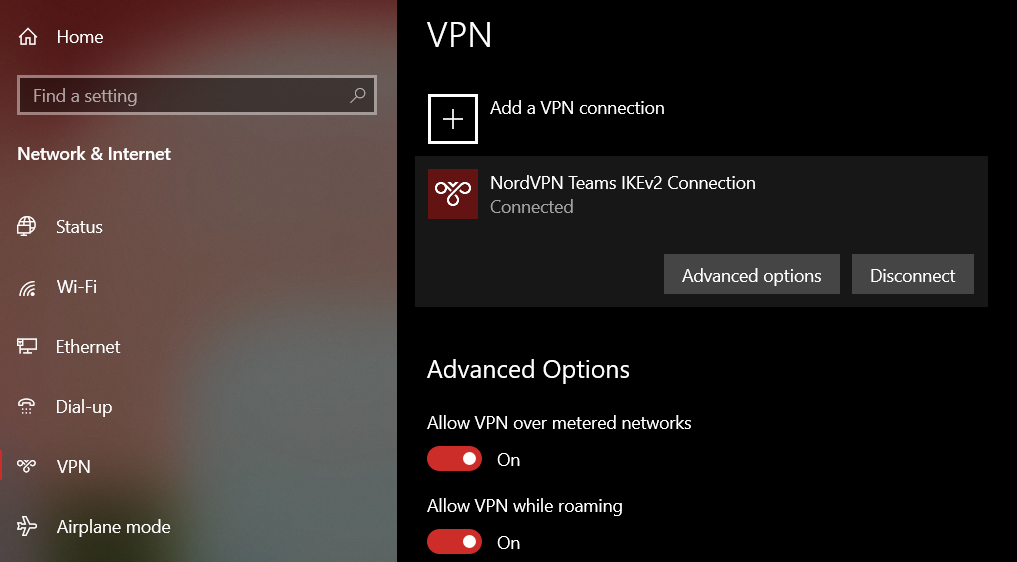
9. Disable Antivirus or VPN
An antivirus program or VPN software can make web browsing a much more secure experience. However, these tools can unintentionally block some websites, even if they are completely secure.
As such, consider checking whether either program is causing the DNS_PROBE_FINISHED_NXDOMAIN error message.
The steps to disable your antivirus program depend on the program itself. If you’re not sure how to do it, make sure to read the software’s knowledge base or contact the support team.
For deactivating the VPN connection, follow the tutorials below:
Windows
- Open Settings ->Network & Internet ->VPN.
- Select the VPN and click Disconnect.
- Restart the computer to complete the process. Open the website to see if the problem has disappeared.
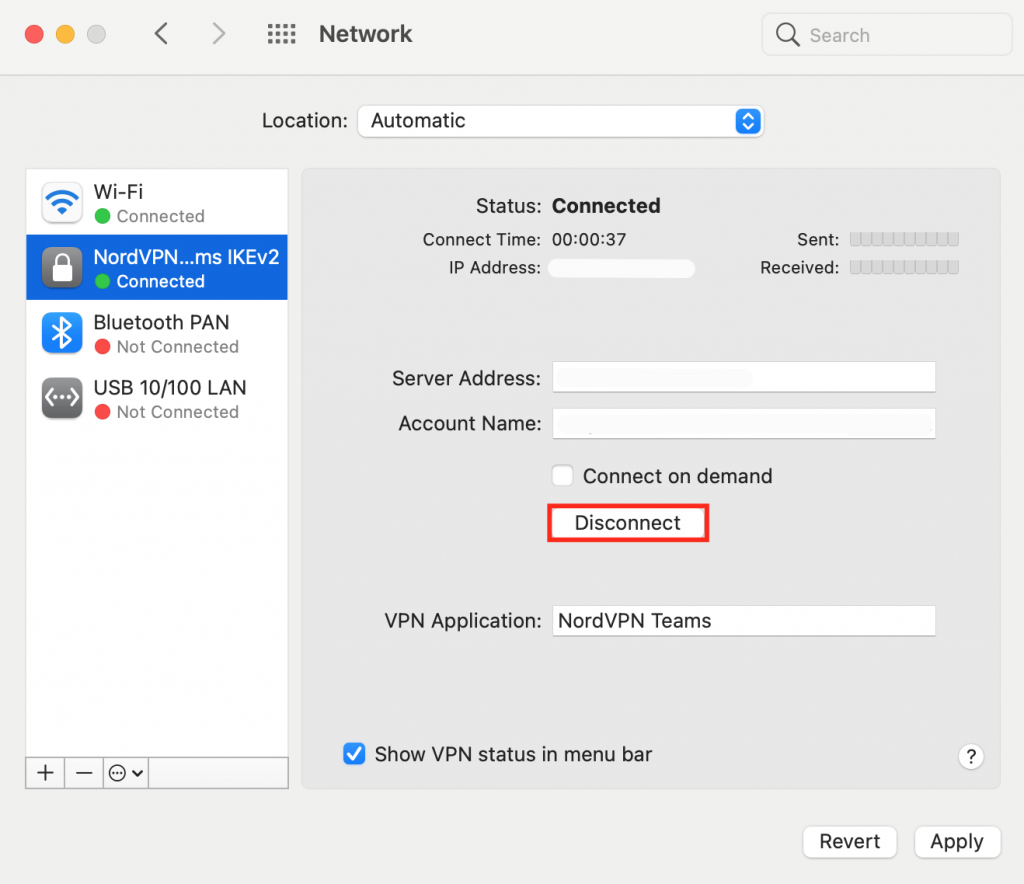
macOS
- Open System Preferences ->Network.
- On the left side of the window, select the VPN connection you want to turn off.
- Click Disconnect and Apply to save changes.
10. Temporarily Turn Off Your CDN
For website owners, another way to confirm whether the DNS_PROBE_FINISHED_NXDOMAIN originates in the site-side is by disabling the CDN.
Short for Content Delivery Network, this feature helps distribute web content faster to visitors by caching versions of the website in multiple, global servers. When users open the site, the CDN will deliver the cached content from the server closest to them.
Turning CDN off temporarily will disable the cached versions of the website. That way, all browsers will have to fetch the site from its origin server.
If the website is inaccessible without CDN, the cached content may be outdated, and there may be problems with the DNS settings.
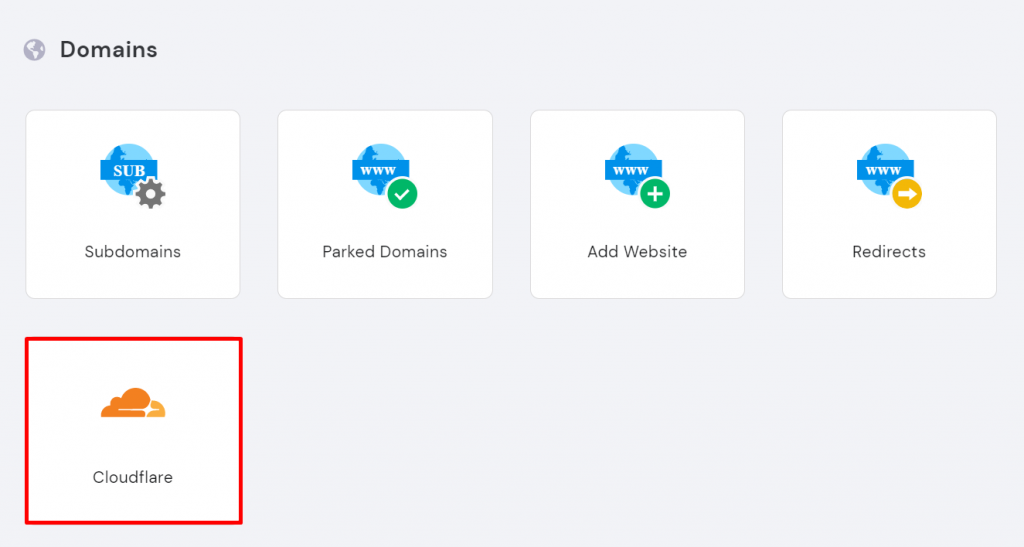
Hostinger clients that use the Cloudflare CDN can deactivate the feature on hPanel. Open the Hosting Account dashboard and scroll down to the Domains section. Select Cloudflare.
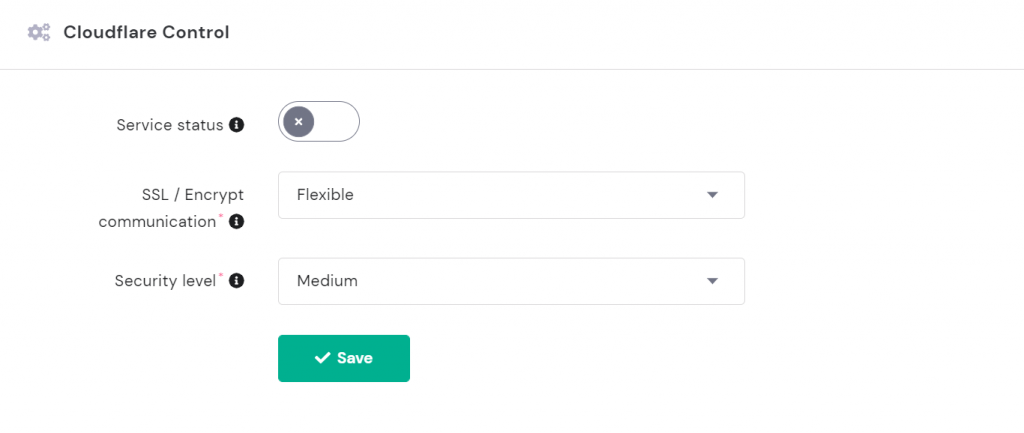
In the Cloudflare Control section, turn off Service status and click Save.
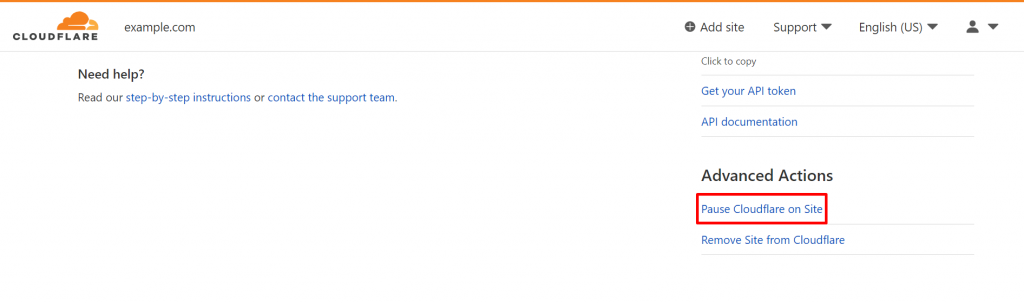
If your site points to Cloudflare’s nameservers, go to the Cloudflare dashboard and scroll down to click the Pause Cloudflare on site button.
11. Reboot Internet Connection
If the methods above still don’t fix the DNS_PROBE_FINISHED_NXDOMAIN error, try restarting the internet router and modem. Here’s how to properly do it:
- Unplug both the modem and router. Leave them like this for 30 seconds.
- Plug the modem back in and wait for at least one minute.
- Do the same with the router, but wait for two minutes before turning it back on.
- Open the browser to check whether the error code persists.
In addition, be sure to check the Windows or Mac step-by-step guide on troubleshooting network connections.
If everything else fails, contact your internet service provider. Ask if there are any issues on their side or if they can work out a solution for you.
Why Does the DNS_PROBE_FINISHED_NXDOMAIN Error Occur?
DNS_PROBE_FINISHED_NXDOMAIN can happen for several reasons:
- The target website’s domain is not registered or has expired, making the browser unable to locate it.
- The domain isn’t pointing to any IP address.
- There is a misconfiguration in the DNS settings of the user’s computer, so it cannot resolve the domain.
- The VPN or antivirus software interferes with the network settings.
- The issue comes from the internet provider.
What About Other Browsers?
While the DNS_PROBE_FINISHED_NXDOMAIN error code typically appears in Google Chrome, the same issue can occur in other browsers. Depending on the application, however, the message may look different.
Microsoft Edge
Like Google Chrome, Microsoft Edge uses the DNS_PROBE_FINISHED_NXDOMAIN error code.

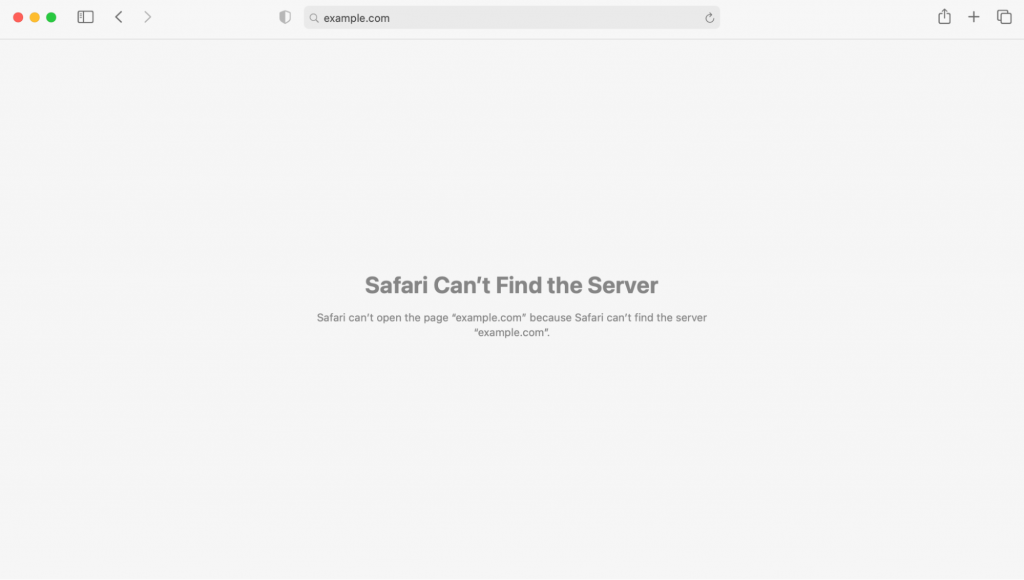
Safari
Unlike Google Chrome, Safari doesn’t use a unique error code and only tells users it can’t find the server for the website.
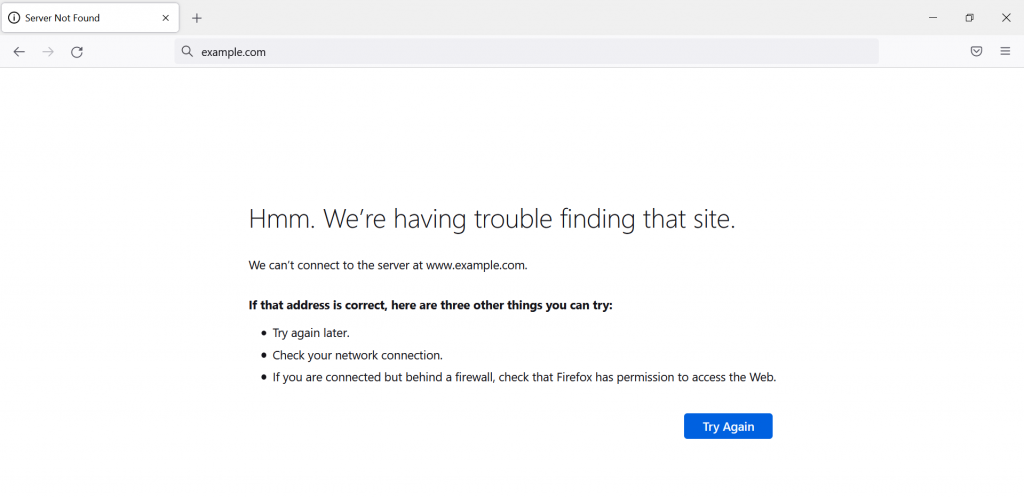
Mozilla
Much like Safari, Mozilla’s error message simply says it cannot connect to the website’s server. It also suggests visiting the site another time, checking your network connection, or examining your firewall.
Conclusion
In summary, the DNS_PROBE_FINISHED_NXDOMAIN error occurs when the browser cannot find the domain name’s corresponding IP address. The problem may originate from the server, the client’s browser, or the network connection.
While this error code can be frustrating, it’s not difficult to resolve. This guide has provided 11 ways to fix the DNS_PROBE_FINISHED_NXDOMAIN error for different scenarios.
If nothing has worked, make sure to contact your internet provider to find a solution. For website owners, check with your hosting provider or domain registrar to see whether they can look into the problem.
Do you know other methods to fix DNS_PROBE_FINISHED_NXDOMAIN? Leave a comment down below.
Maisha is a web hosting expert and content writer at Hostinger. A believer in the power of the internet and technology, she aims to help others navigate their way through the world of tech. She spends her free time reading and cooking.
Источник


