- How to Fix DNS_PROBE_FINISHED_NXDOMAIN Chrome Error
- How to Fix DNS_PROBE_FINISHED_NXDOMAIN
- How to Fix DNS_PROBE_FINISHED_NXDOMAIN on Android
- Clear Chrome Cache on Android
- Flush DNS Cache on Android
- Reinstall Chrome App on Android
- Change DNS Address on Android
- How to Fix DNS_PROBE_FINISHED_NXDOMAIN on Windows 10
- Change DNS Server in Windows PC
- Clear DNS Cache in Windows PC
- Reset Chrome to Default
- How to Fix DNS_PROBE_FINISHED_NXDOMAIN on Mac
- Change DNS Server in Mac OS
- Clear DNS Cache in Mac OS
- Reset Chrome to Default
- Conclusion
- How to Fix DNS_PROBE_FINISHED_NXDOMAIN in Chrome (7 Options)
- Prefer to watch the video version?
- What is DNS_PROBE_FINISHED_NXDOMAIN?
- Google Chrome
- Mozilla Firefox
- Microsoft Edge
- Safari
- How to Fix DNS_PROBE_FINISHED_NXDOMAIN
- 1. Release and Renew IP Address
- Windows
- Sign Up For the Newsletter
- Want to know how we increased our traffic over 1000%?
- 2. Restart DNS Client Service
- 3. Change DNS Servers
- Windows
- 4. Reset Chrome Flags
- 5. Disable VPN and Antivirus Temporarily
- 6. Check Your Local Hosts File
- Windows
- 7. Check DNS of Your Domain
- 8. Restart Your Computer
- Summary
- Hand-picked related articles
- Kinsta Go Live with Your Website Checklist
- How Kinsta Migrates Dynamic WordPress Sites (Ecommerce, Community, and Membership)
- How Do I Change My SFTP Password?
- The Agency Owner’s Guide to Managing 60+ WordPress Sites
- Award-winning WordPress hosting platform
How to Fix DNS_PROBE_FINISHED_NXDOMAIN Chrome Error
‘DNS_PROBE_FINISHED_NXDOMAIN‘ is a silly but annoying error in Google Chrome which doesn’t allow you to access your favourite websites such as YouTube, Facebook, Gmail, Twitter, Reddit, and many others. You must be wondering what in the World is DNS PROBE FINISHED NXDOMAIN means, and why Chrome is showing it every time I try to access the websites. Well, as the name suggests, the error is related to DNS, and when DNS lookup failed, Chrome displays this error. Though the problem may look scary, it is quite easy to fix if you follow our guide carefully.
How to Fix DNS_PROBE_FINISHED_NXDOMAIN
For this particular error code DNS_PROBE_FINISHED_NXDOMAIN, most of the times you will see two error terms, the first and frequent error says “This webpage is not available“, while another says “This site can’t be reached“. In this guide, we will tell you how to fix this DNS error on Android, Windows PC, and Mac.
How to Fix DNS_PROBE_FINISHED_NXDOMAIN on Android
If you are encountering This webpage is not available or This site can’t be reached error on Android, follow the below solutions to fix it for once and all.
Clear Chrome Cache on Android
The first solution to fix the subject error on Android includes clearing the browser cache. Follow the steps below.
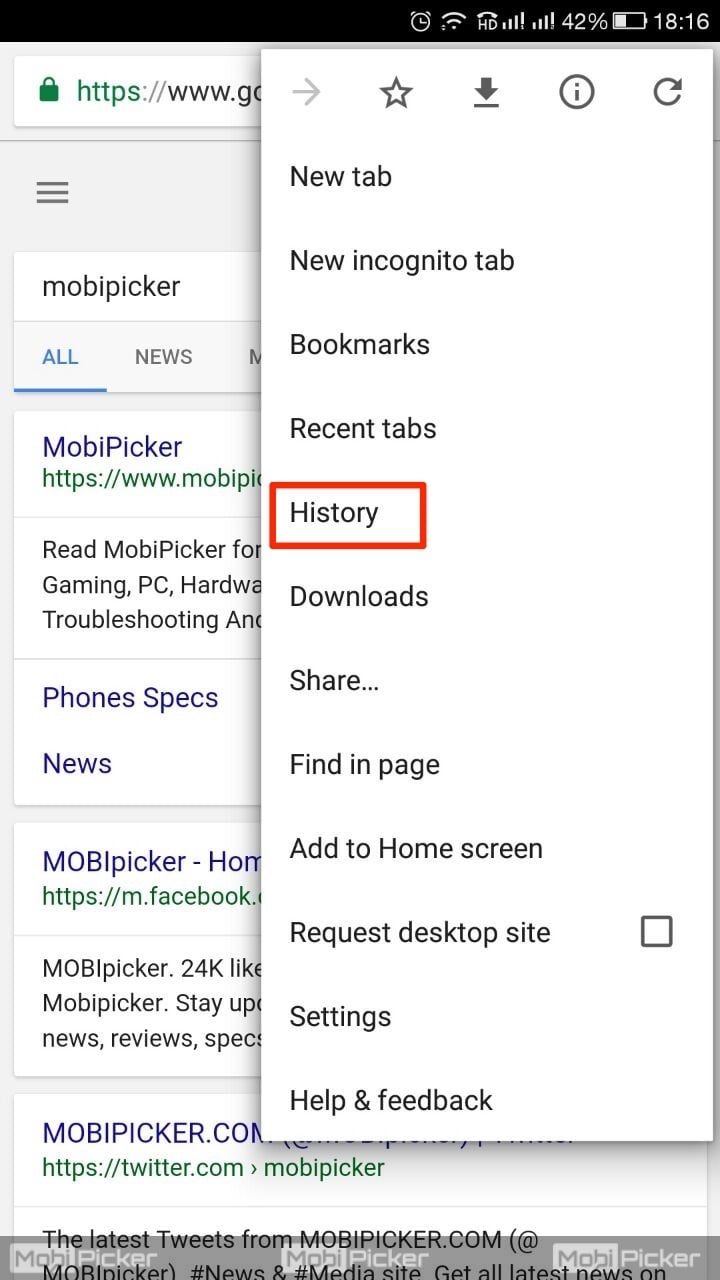
Step 1: Open Chrome. Click on the three dots option on the top right corner.
Step 2: Open History from the drop down options.
Step 3: Click “Clear Browsing Data”
![]()
Step 4: Select all the options (browsing history, cached data, cookies), and click on “Clear Data”
![]()
Flush DNS Cache on Android
If clearing cache did not help, you could flush DNS on your Android smartphone. That should fix DNS_PROBE_FINISHED_NXDOMAIN on Android for the most users. If you are using a smartphone with removable battery, take it out and wait for 30 seconds. Insert the battery back to the phone and power it on. DNS cache should be cleared on your Android smartphone.
If you are using Android smartphone with a non-removable battery, follow the steps below to flush DNS.
Step 1: Open chrome. Type chrome://net-internals/#DNS in address bar.
Step 2: Now click on “Clear Host Cache”
![]()
Step 3: Click on the black arrow pointing downwards at the top right of the screen. Now select “Clear Cache” and “Flush Sockets” from the drop down options.
![]()
Step 4: Restart the Chrome app on Android.
If flushing the DNS cache also didn’t fix the error, try out the next solution.
Reinstall Chrome App on Android
There is no technical knowledge required to reinstall the Chrome app on Android. Simply go to Play Store, search Chrome, and then click on “Uninstall.” Now that you have uninstalled the app, search “Chrome” again on Play Store and now tap on “Install.” That’s all.
By now, one of the solutions should fix the DNS PROBE FINISHED NXDOMAIN Chrome error on Android. In a rare case, if it is still visible, you may want to try one more solution.
Change DNS Address on Android
Check out the steps below to change the DNS server address on Android.
Step 1: Go to Settings > WiFI.
Step 2: Open the WiFi network which you are using for the Internet on your Android smartphone.
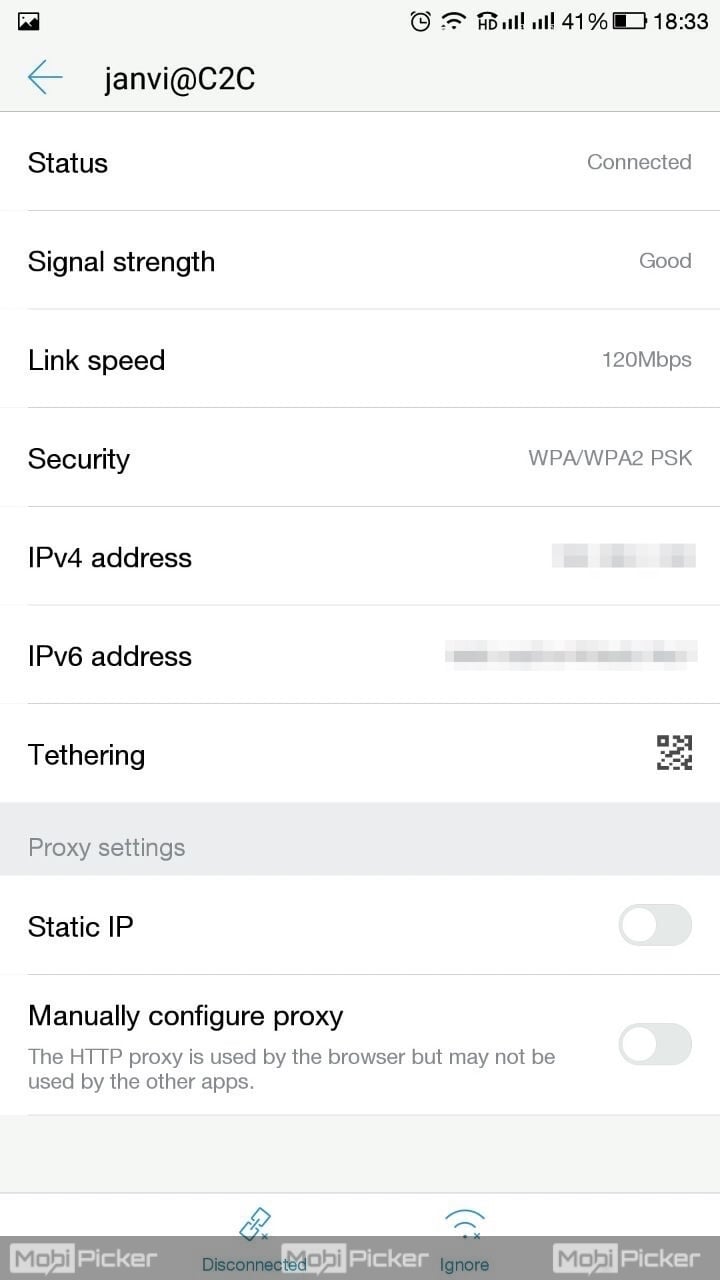
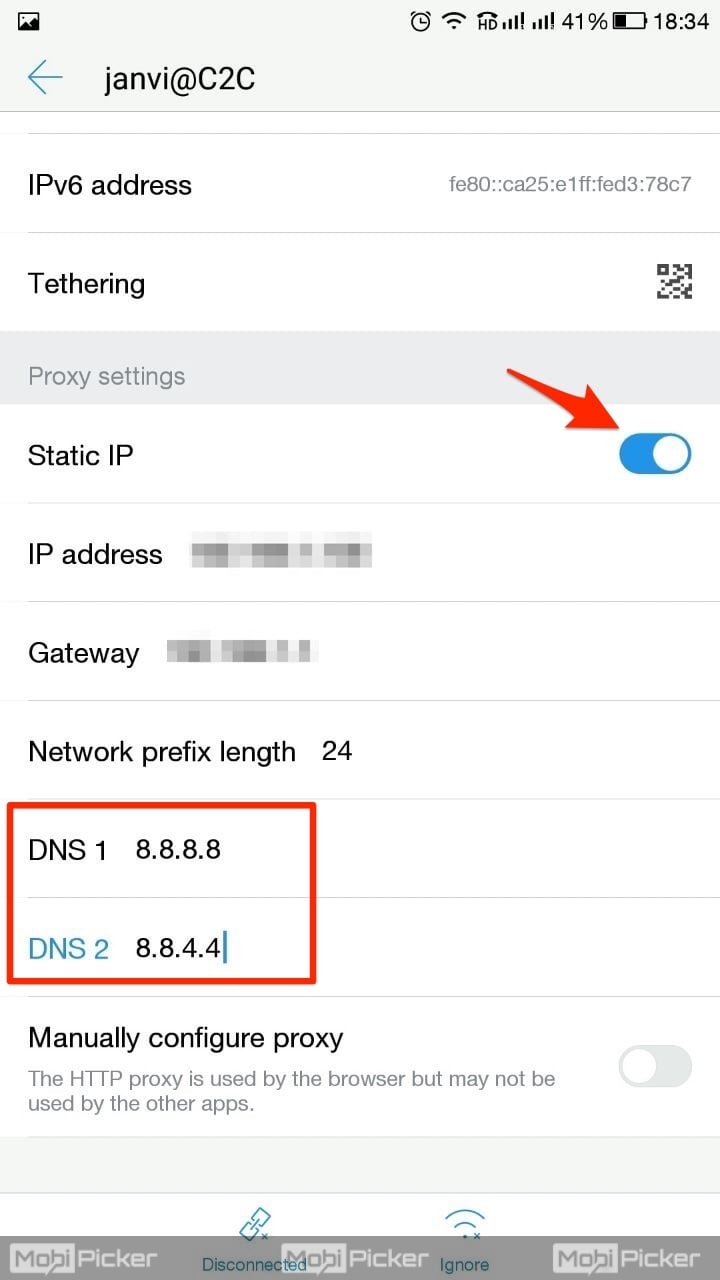
Step 3: Turn on “Static IP,” and then feed DNS address manually as follows:
DNS 1: 8.8.8.8
DNS 2: 8.8.4.4
 We hope that one of the solutions as mentioned above has fixed the DNS_PROBE_FINISHED_NXDOMAIN on Android.
Let’s proceed for the Windows PC users now.
How to Fix DNS_PROBE_FINISHED_NXDOMAIN on Windows 10
Check out the following solutions to fix This webpage is not available or This site can’t be reached DNS PROBE FINISHED NXDOMAIN Chrome error on Windows 10, 7, 8 or other versions. The fixes are same for all the Windows versions, however, there could be slight difference in steps. We are using Windows 10 while performing the solutions below.
Change DNS Server in Windows PC
We have witnessed that in 90% cases, the error DNS_PROBE_FINISHED_NXDOMAIN fixes just by changing the DNS server address. If you don’t know how to change DNS address in Windows 10, just follow our step by step guide below.
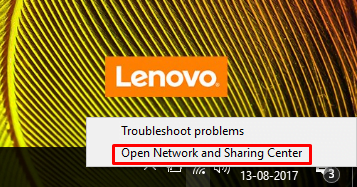
Step 1: Look at the right bottom tray on your PC where the battery, volume, and network icons are listed. Now right click on the Network icon and tap on “Open Network and Sharing Center“.
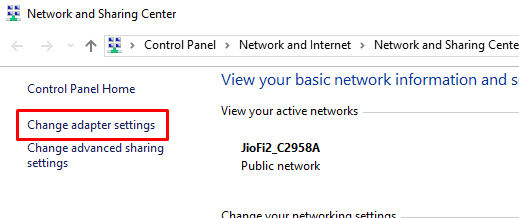
Step 2: In the Network and Sharing center, locate and tap on the “Change adapter settings” on the top left side of your screen.
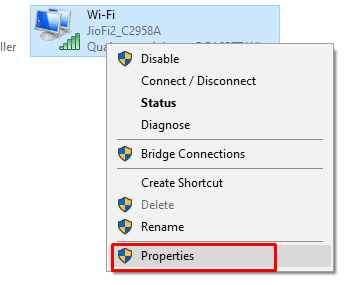
Step 3: Here you will see the list of your Networks. Right click on your active connection and then tap on “Properties” (last option in the dropdown list).
Step 4: As shown in the image below, tap on “Internet Protocol Version 4 (TCP/IPv4)” and then hit the “Properties.”
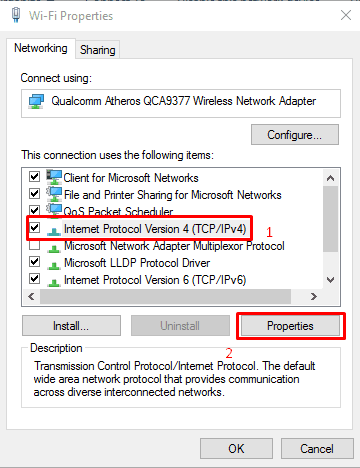
Step 5: In most of the cases, the default setting is “Obtain DNS server address automatically.” Just change it to manual as shown in the image below, add the following DNS server address, and click OK.
Preferred DNS Server: 8.8.8.8
Alternate DNS Server: 8.8.4.4

Clear DNS Cache in Windows PC
If changing the DNS server didn’t work out for you, and Chrome is still showing ‘DNS PROBE FINISHED NXDOMAIN’, we suggest you try flushing DNS cache using Command Prompt (CMD). Follow the steps below.
Step 1: Run Command Prompt (CMD) as an administrator.
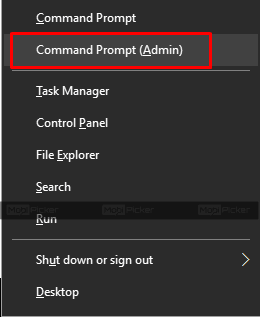
Step 2: Run the ipconfig /flushdns command. If you run the Command correctly, you will see the message “Windows IP configuration successfully flushed the DNS Resolver Cache“.
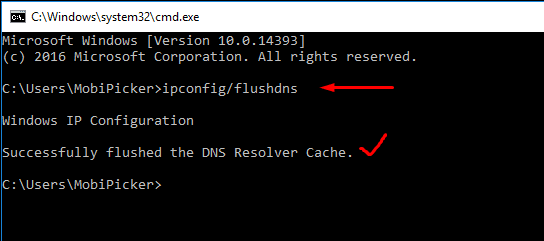
Step 3: Restart your PC for the changes to take place.
Reset Chrome to Default
Many users have reported that they fixed their DNS_PROBE_FINISHED_NXDOMAIN error by resetting all settings to default in Chrome’s experiment page. The steps to reset Chrome are same for both Windows as well as MacBook.
Step 1: Paste chrome://flags/ in your Chrome’s address bar and hit Enter button on your keyboard. You should see the page shown in the image below.
Step 2: Click on “Reset all to default“.
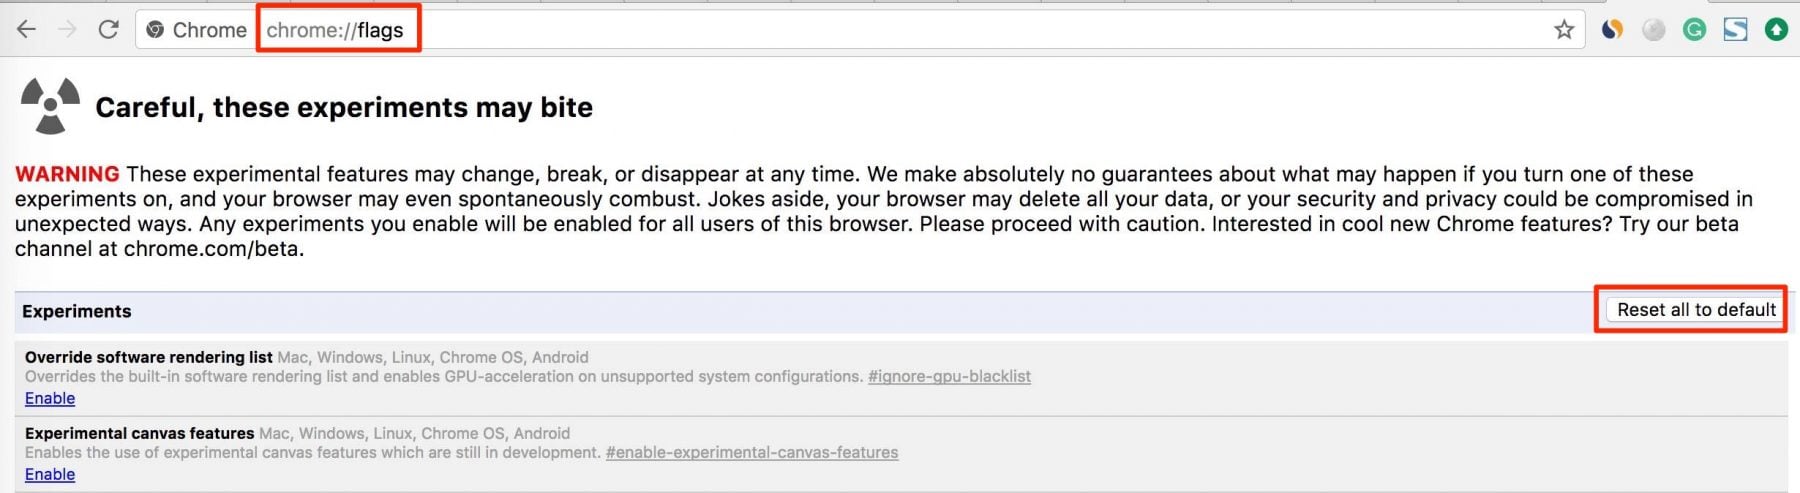
Step 3: Close the Chrome browser completely and then open it again.
This should fix the error in the Chrome browser, and you should be able to access your favourite sites again.
How to Fix DNS_PROBE_FINISHED_NXDOMAIN on Mac
The solutions are similar to Windows PC, however, the steps are different for Mac. Follow the below step-by-step solutions to fix the DNS_PROBE_FINISHED_NXDOMAIN on Mac OS.
Change DNS Server in Mac OS
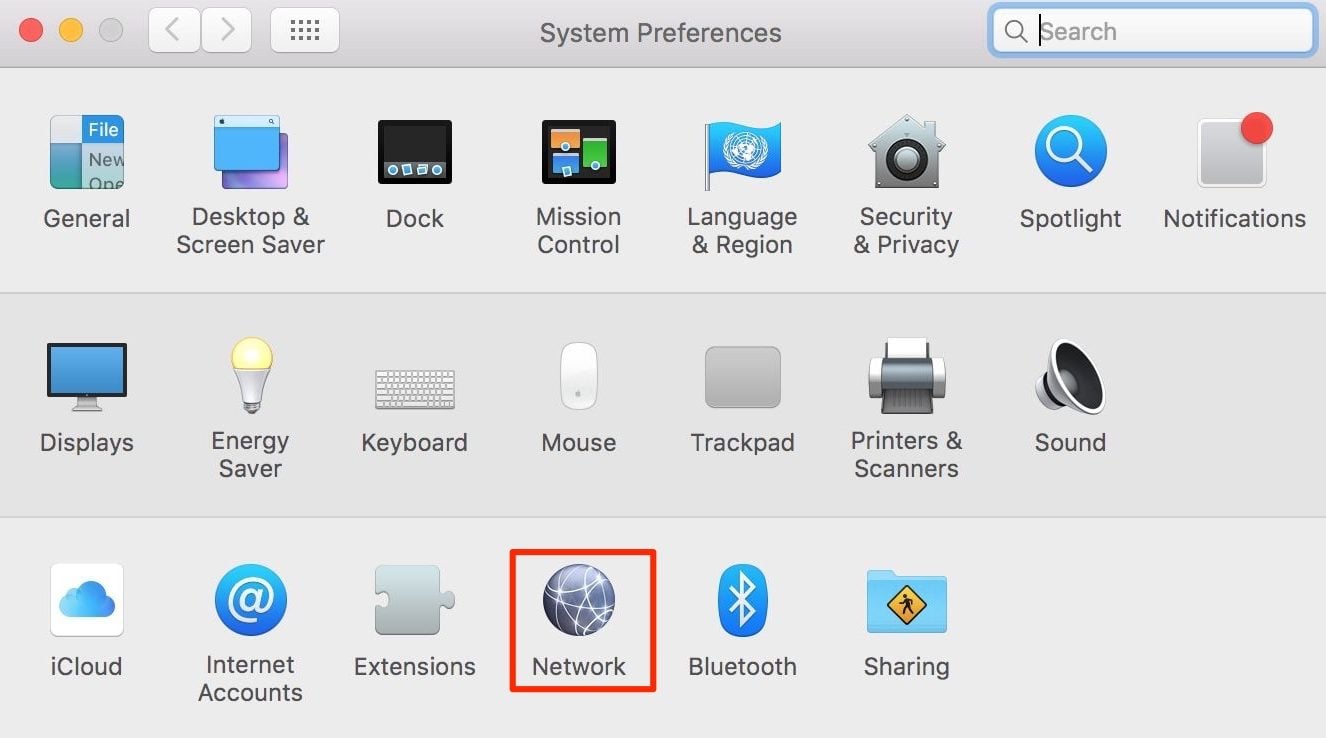
Follow the below steps to change DNS server on MacBook Pro, Air, or iMac. We are performing these steps using MacBook Pro.
Step 1: Go to Apple Logo (top left on your Mac screen) and then click on “System Preferences“.

Step 2: Double Click on Network.
Step 3: Now select your active internet connection from the list of Networks, and then tap on “Advanced“.

Step 4: Click on “DNS” tab in Menu items and then click on ‘+‘ icon to add the new DNS address as shown in the image below. Once you added the following DNS addresses, click on OK and restart your Mac.
Preferred DNS Server: 8.8.8.8
Alternate DNS Server: 8.8.4.4
This method should fix the error in most cases. However, if your case is different and the error is still popping up, please allow us to provide another solution.
Clear DNS Cache in Mac OS
To clear the DNS Cache in OS X Yosemite and Mac OS X El Capitan, please follow the below steps.
Step 1: Go to Finder > Applications > Utilities > Terminal.
Step 2: Once the Terminal is opened, run the following command.
sudo dscacheutil -flushcache;sudo killall -HUP mDNSResponder; say cache flushed
![]()
Step 3: Restart your Mac so that changes can take place.
If this also did not fix DNS_PROBE_FINISHED_NXDOMAIN error, check out our next solution.
Reset Chrome to Default
You can reset the Google Chrome to default. Type chrome://flags/ in address bar of Chrome browser. Click on Reset all to default and the restart the Chrome.
Chrome should now work without any errors.
Conclusion
DNS_PROBE_FINISHED_NXDOMAIN is a common error for Google Chrome users and is easily fixable. We are quite sure that one of the solutions mentioned above will fix the error for all the users. Due to any reasons, if you still see ‘This webpage is not available DNS PROBE FINISHED NXDOMAIN‘, share your issue in the comment section below and we will help you out.
Fix Also: DNS_PROBE_FINISHED_BAD_CONFIG
Источник
How to Fix DNS_PROBE_FINISHED_NXDOMAIN in Chrome (7 Options)

For those of you working with WordPress on a regular basis, errors specific to the CMS such as the white screen of death or database connection errors are somewhat common occurrences. But another subset of errors you will probably stumble upon are those tied to your internet connection and DNS. A very common error that Google Chrome users get when trying to browse to a web page is ‘This site can’t be reached – Server IP address could not be found’, together with DNS_PROBE_FINISHED_NXDOMAIN. This can be downright frustrating as suddenly you can’t browse to your website or perhaps even anywhere at all. 😫
If you’re seeing this error while trying to get to your WordPress site, don’t worry, this is fairly easy to fix. Check out the recommendations below on how to get connected again. This can also work for other browsers, such as Firefox, Edge, etc.
Prefer to watch the video version?
What is DNS_PROBE_FINISHED_NXDOMAIN?
The reason for DNS_PROBE_FINISHED_NXDOMAIN is typically due to a misconfiguration or problem with your DNS. DNS is short for Domain Name System, which helps direct traffic on the internet by connecting domain names with actual web servers. Essentially, it takes a human-friendly request – a domain name like kinsta.com – and translates it into a computer-friendly server IP address – like 216.3.128.12.
When a user enters a URL in their web browser, DNS gets to work to connect that URL to the IP address of the actual server. This is called DNS name resolution and involves a DNS recursor querying various nameservers to figure out the actual IP address of a server. If DNS fails to resolve the domain name or address then you might receive the DNS_PROBE_FINISHED_NXDOMAIN error. The NXDOMAIN part stand stands for Non-Existent Domain. Read more about DNS and how it works.
There are a couple different variations of this error depending upon the browser you’re running.
Google Chrome
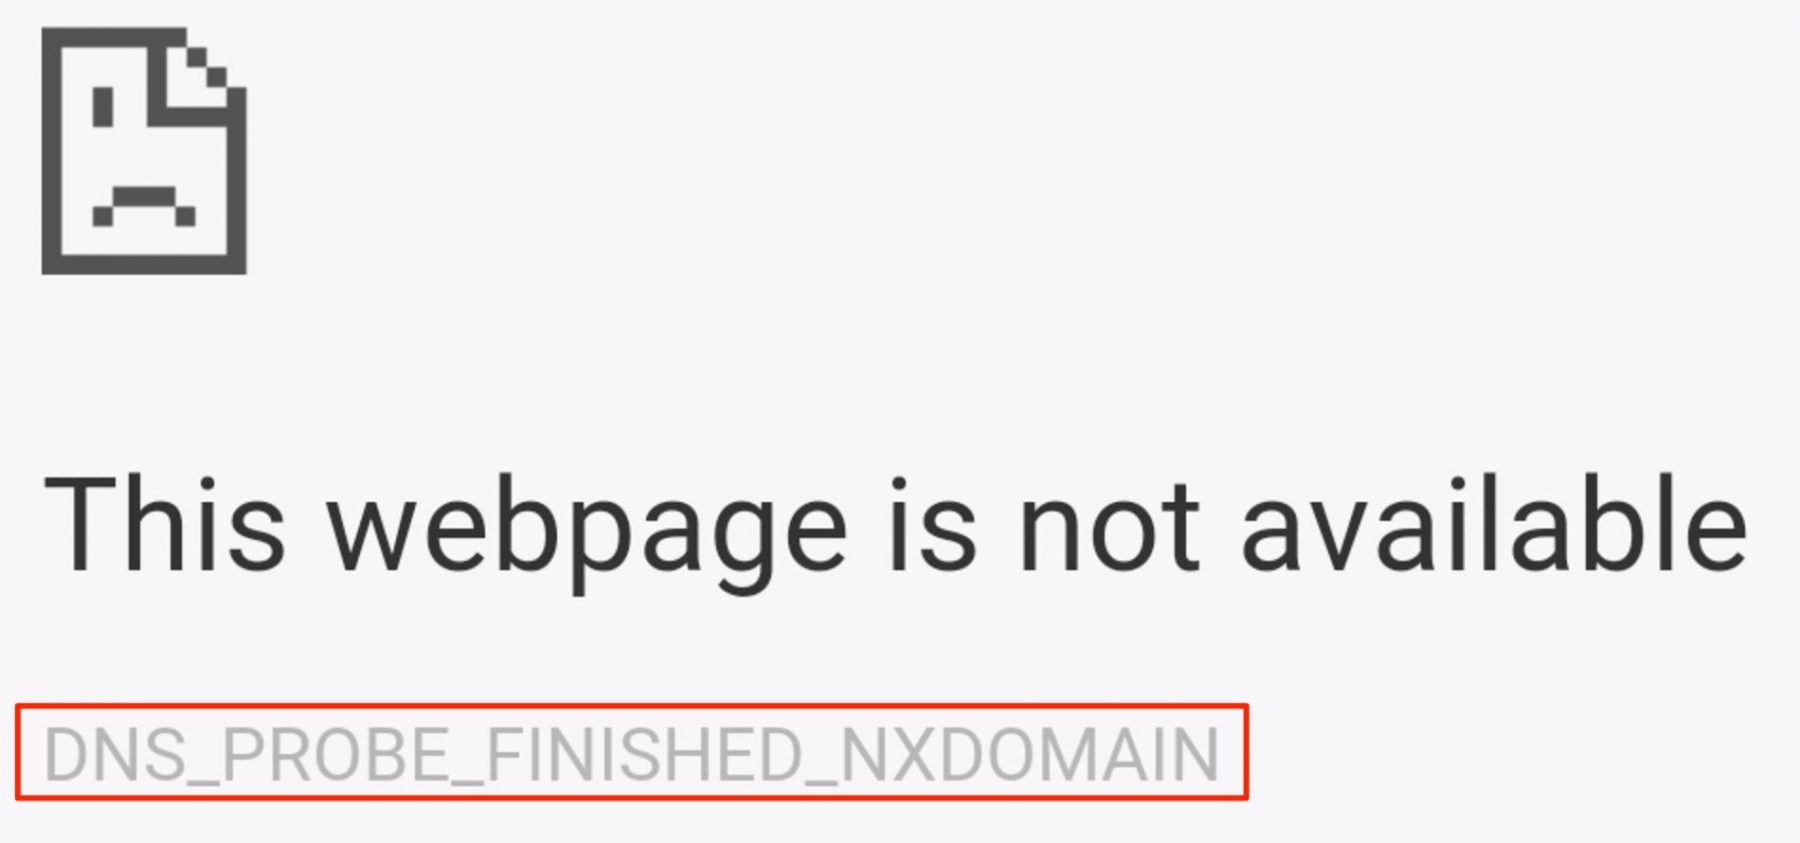
In Google Chrome this error will show as DNS_PROBE_FINISHED_NXDOMAIN (as seen below), highlighting that this site can’t be reached, followed by server IP address could not be found.
This site can’t be reached or This webpage is not available.
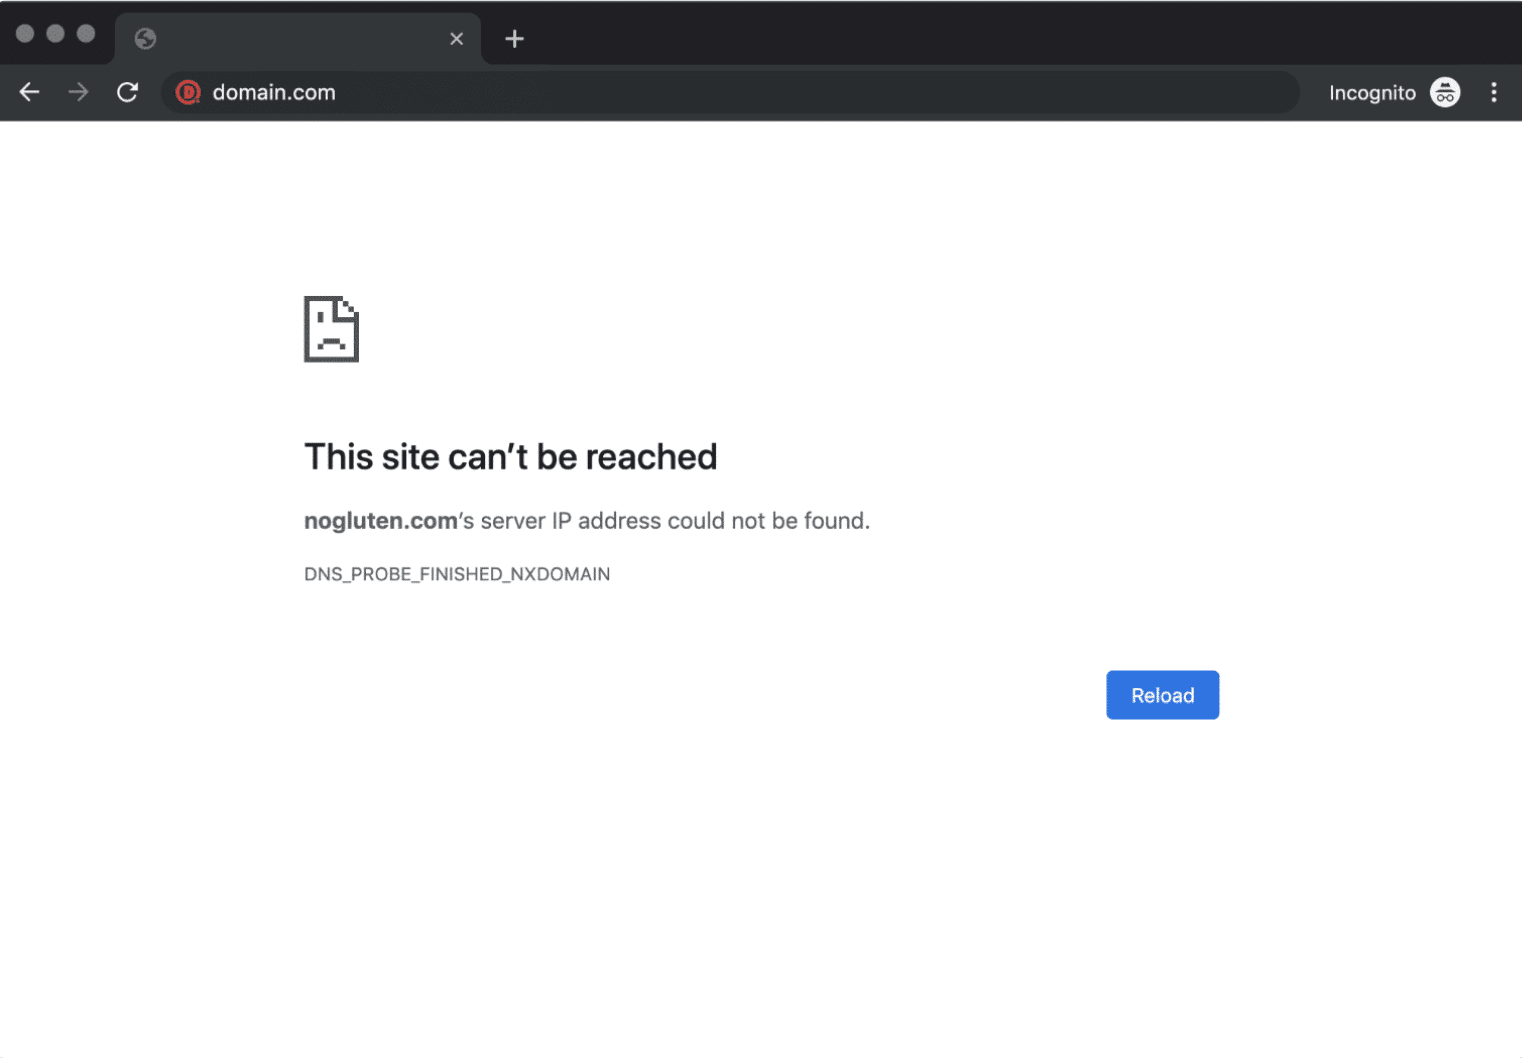
DNS_PROBE_FINISHED_NXDOMAIN error in Chrome
Mozilla Firefox
In Mozilla Firefox it will simply show as Hmm. We’re having trouble finding that site (as seen below).
We can’t connect to the server at domain.com.
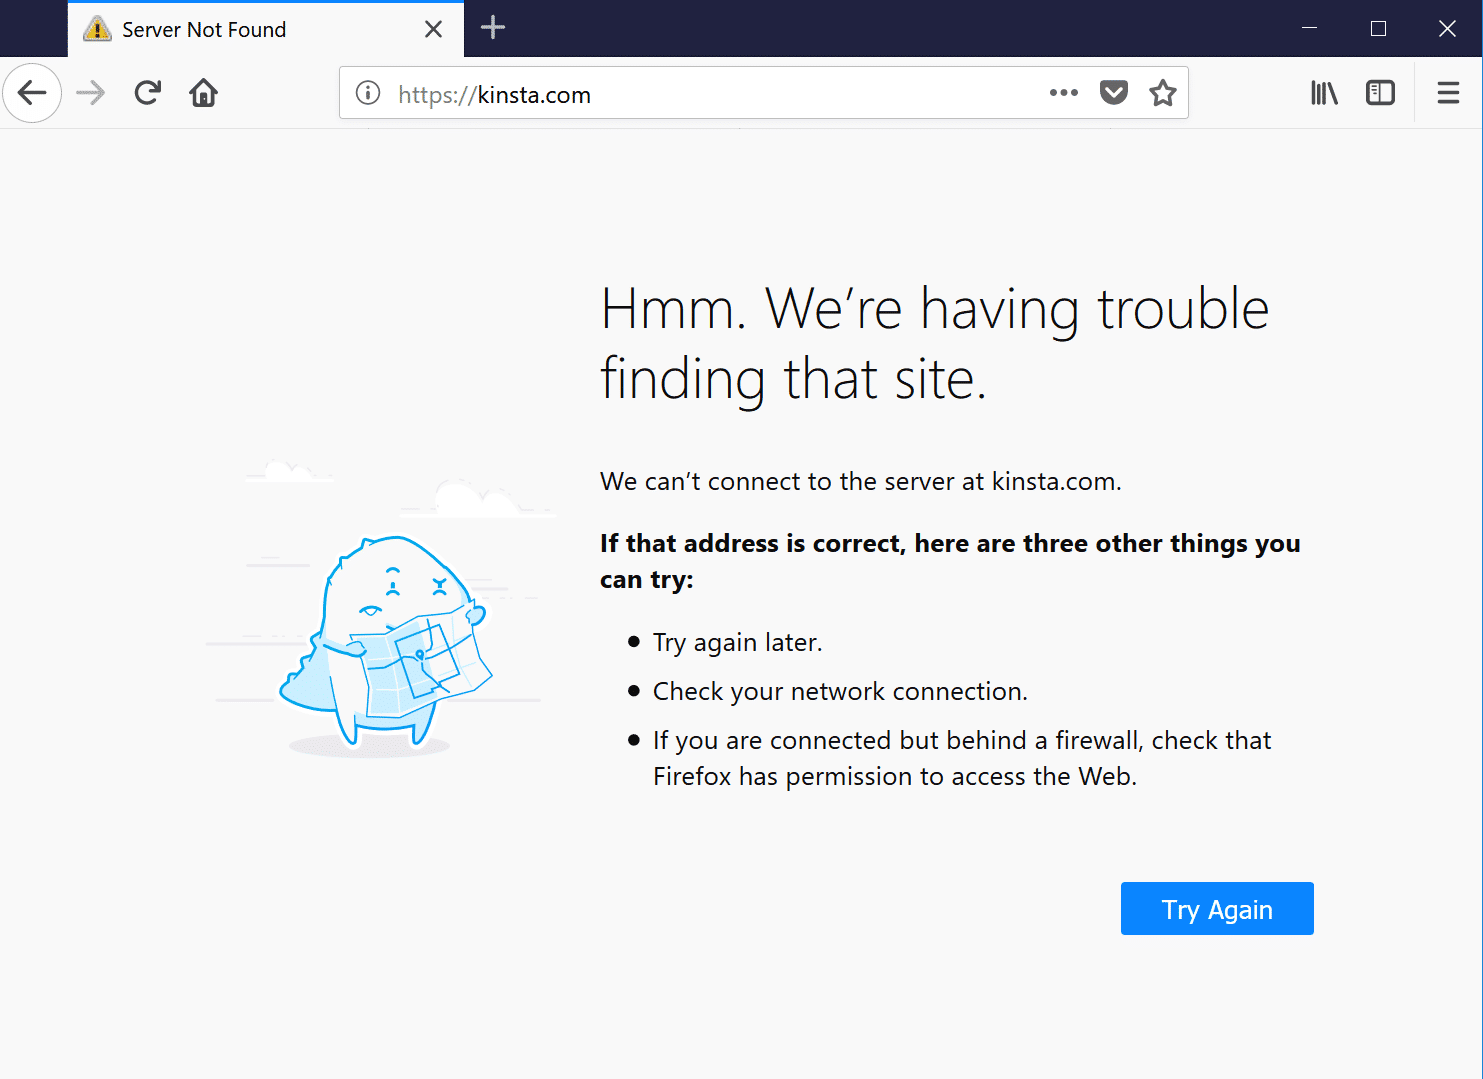
DNS_PROBE_FINISHED_NXDOMAIN error in Firefox
Microsoft Edge
In Microsoft Edge, it will simply show as Hmmm… can’t reach this page (as seen below). Which isn’t very helpful.
Make sure you’ve got the right web address: domain.com.
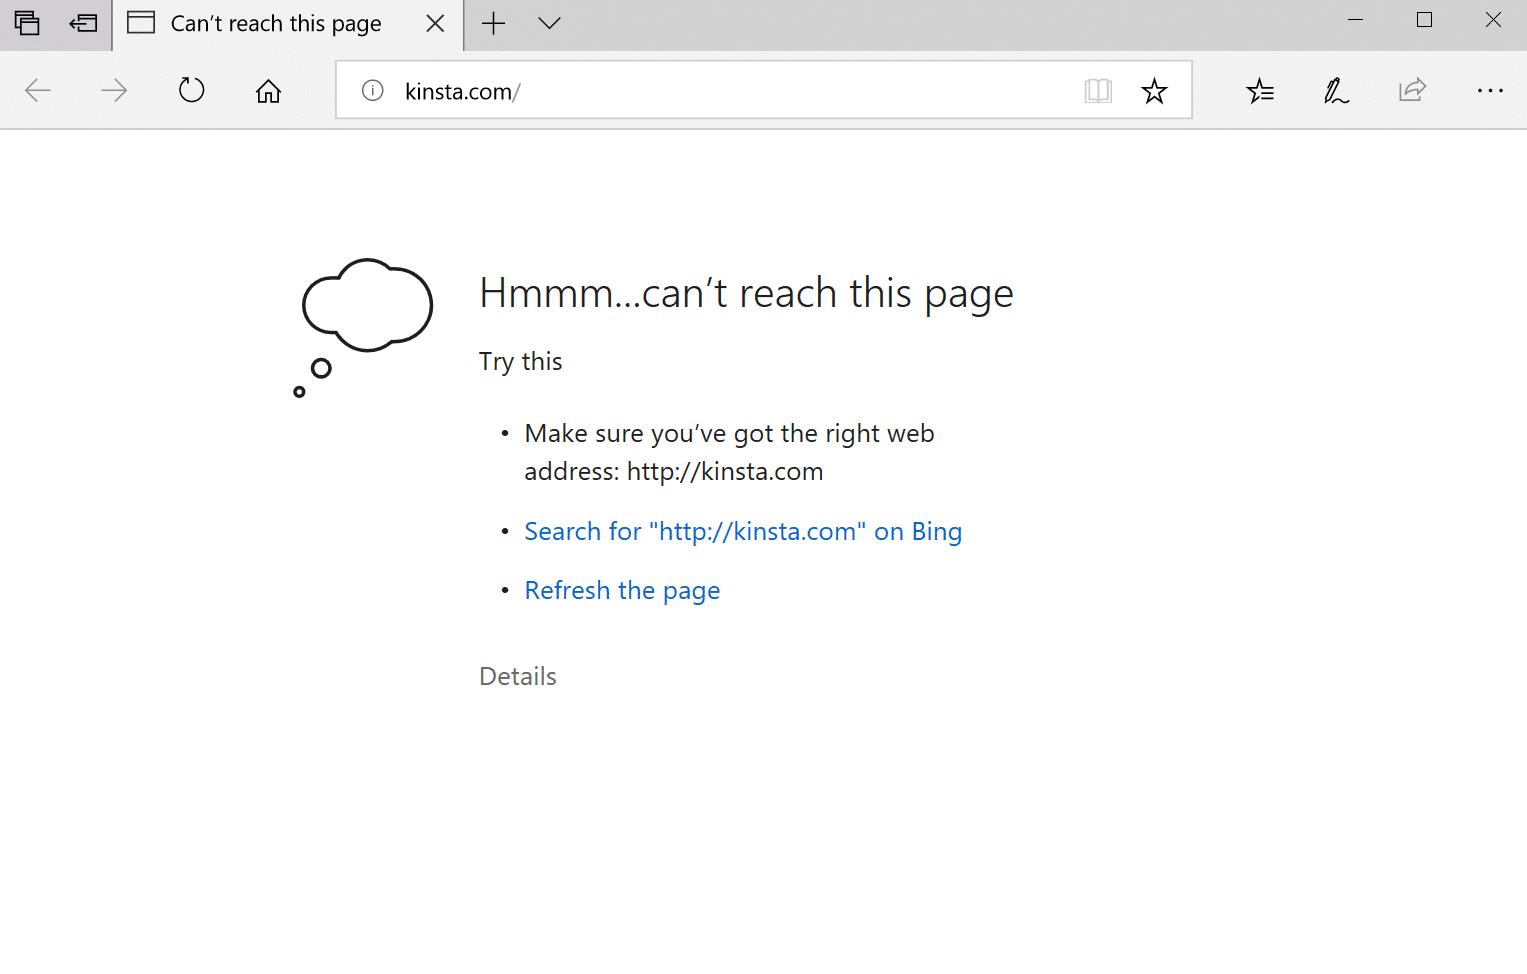
DNS_PROBE_FINISHED_NXDOMAIN error in Edge
Safari
In Safari, it will simply show as Safari Can’t Find the Server (as seen below).
Safari can’t open the page “domain.com” because Safari can’t find the server “domain.com”.
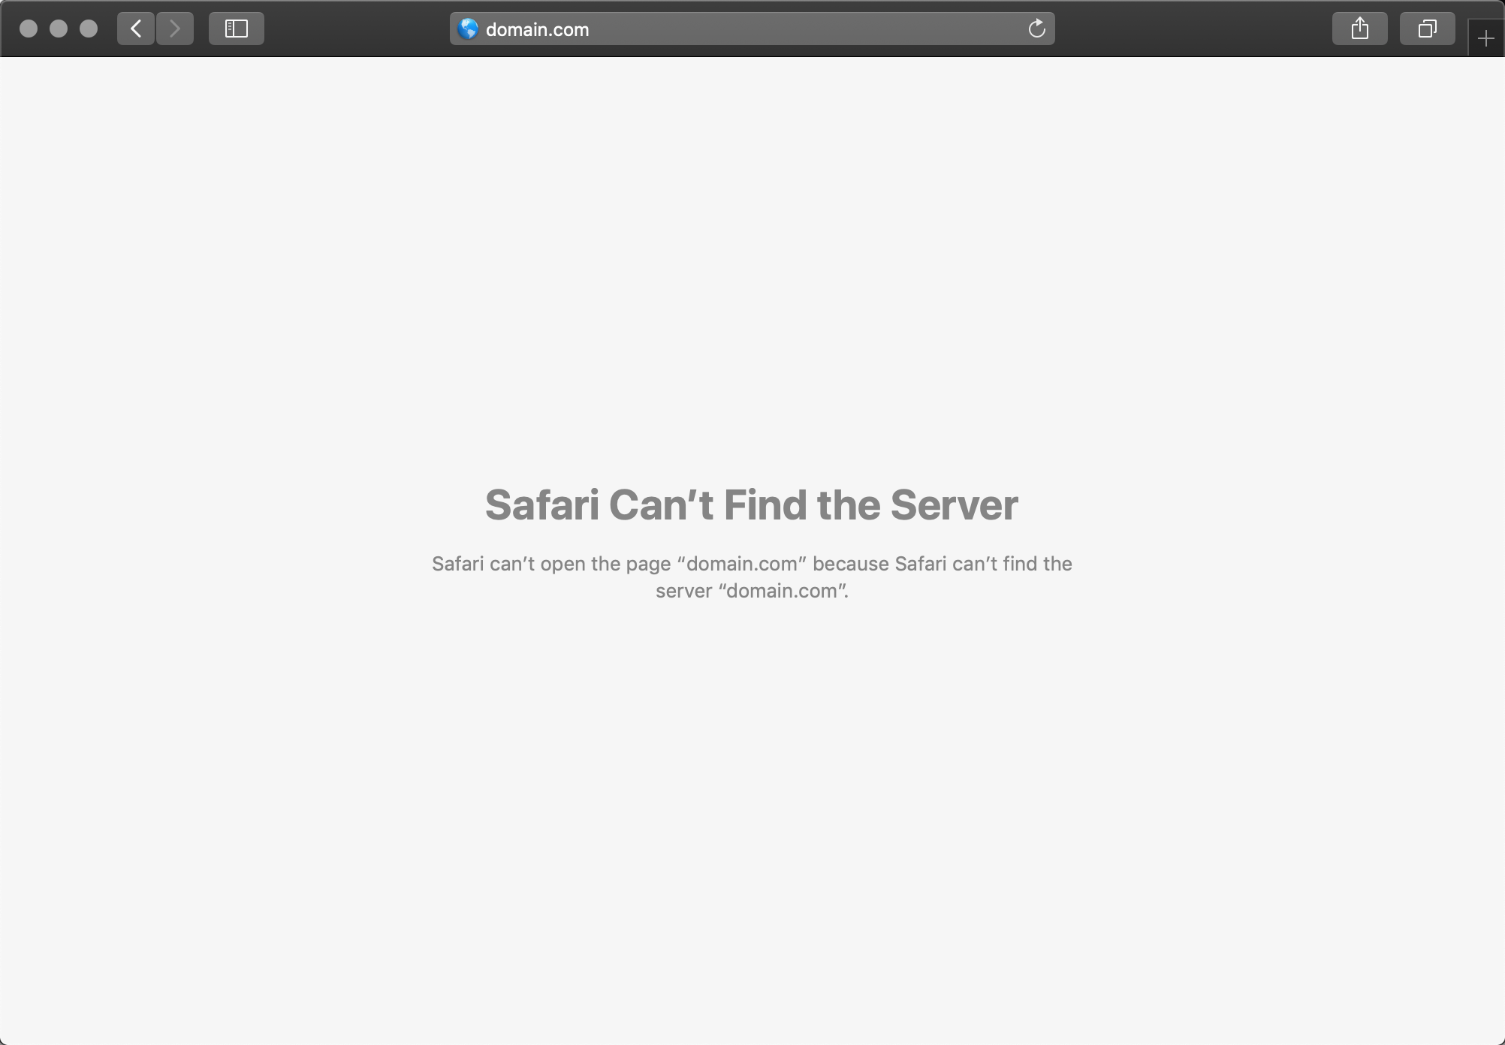
DNS_PROBE_FINISHED_NXDOMAIN error in Safari
How to Fix DNS_PROBE_FINISHED_NXDOMAIN
Here are some recommendations and things to check to fix the error (sorted in order by most common reasons we see):
1. Release and Renew IP Address
Due to the fact that this is usually a client-side DNS issue, the very first thing you should do is try releasing and renewing the IP address on your computer. This also includes flushing your local DNS cache, which is similar to browser cache.
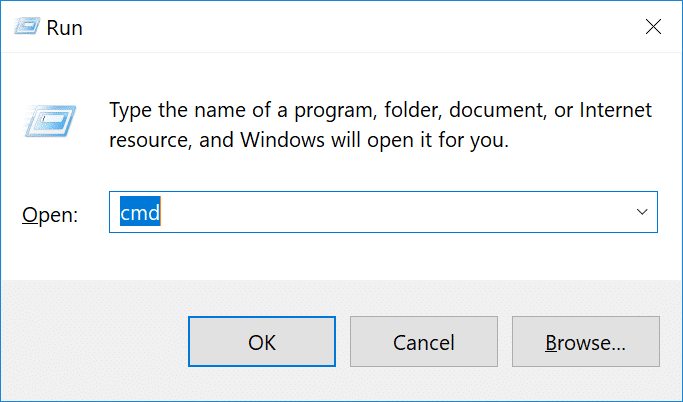
Windows
In Windows simply open up Command Prompt by pressing the Windows logo key and R. Then type “cmd” and hit Enter.
Type in ipconfig /release and hit Enter. This will release your current IP address.
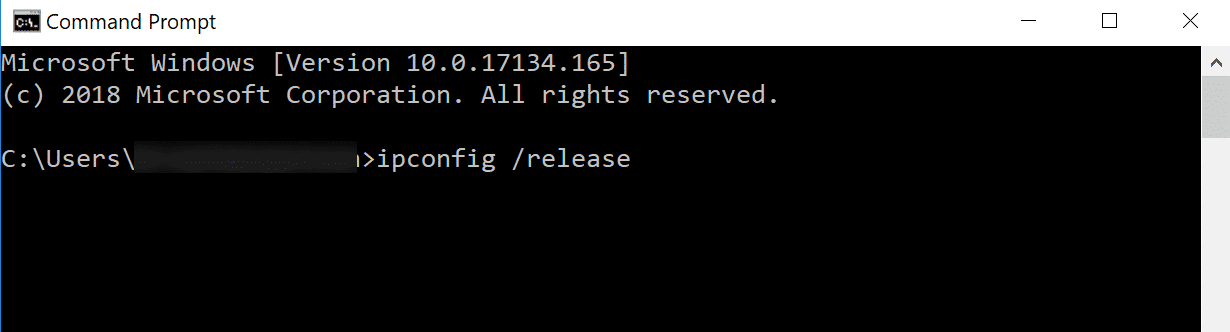
Then type in ipconfig /flushdns and hit Enter. This will flush your local DNS cache. You should see a “Successfully flushed the DNS resolver Cache” if it worked.
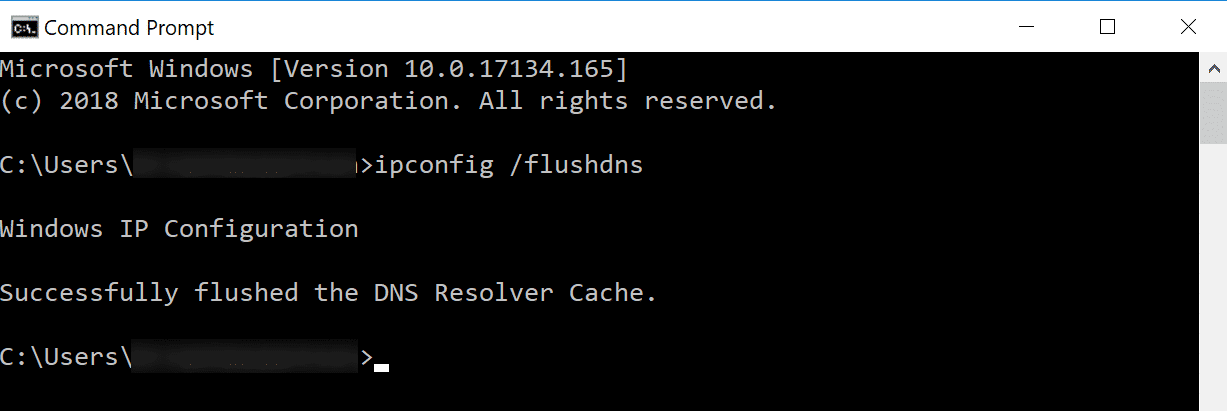
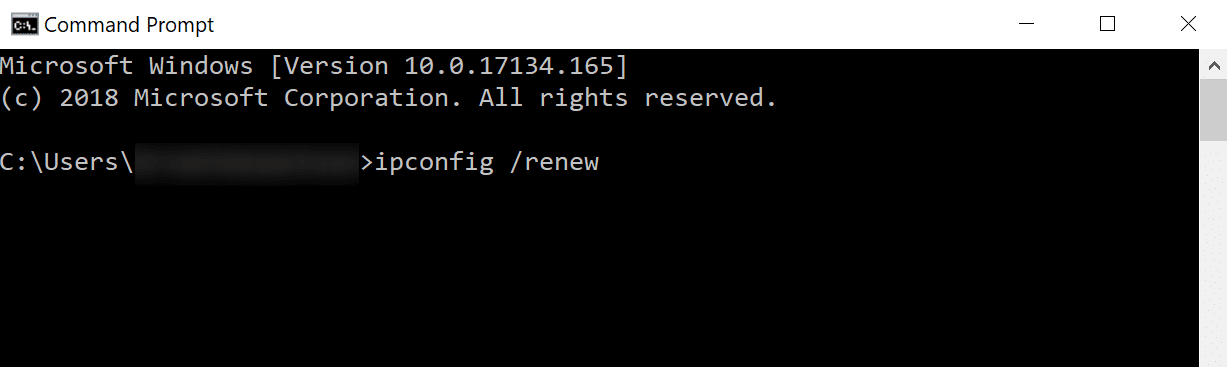
Then type in ipconfig /renew and hit Enter. This will renew your IP address.
You might also try resetting your IP settings and Winsock catalog with the following commands: netsh int ip set dns and netsh winsock reset .
An alternative way to flush and renew your DNS is simply by disabling your network adapter and re-enabling it.
Sign Up For the Newsletter
Want to know how we increased our traffic over 1000%?
Join 20,000+ others who get our weekly newsletter with insider WordPress tips!
To release and renew your IP address on a Mac, go to System Preferences…
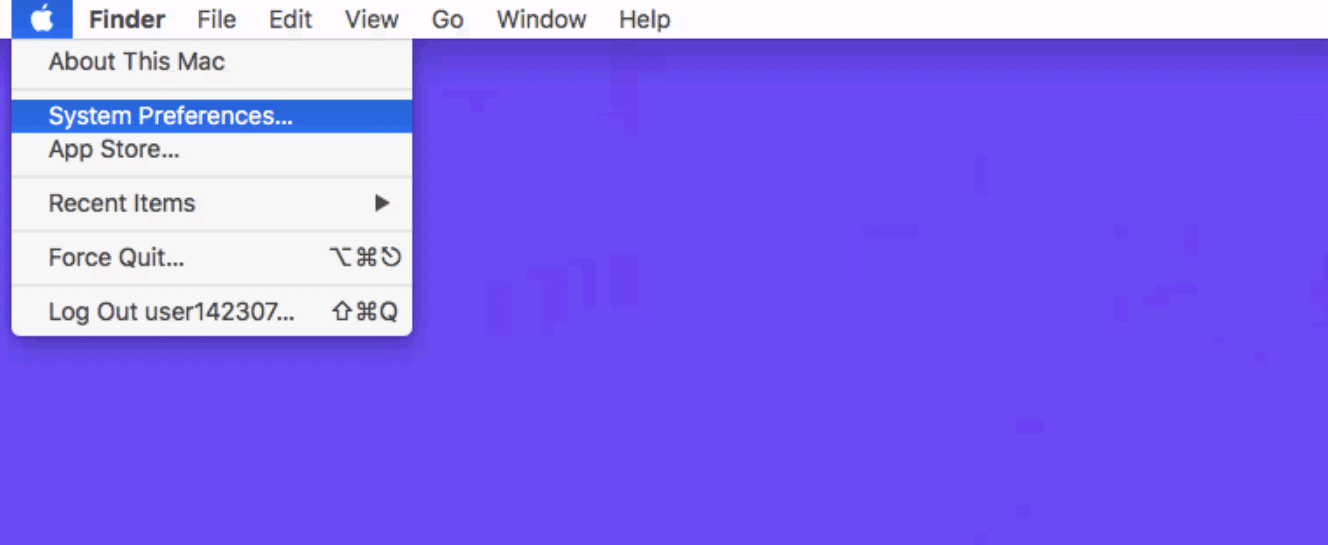
Mac system preferences
Click on the network icon and then click “Advanced.”

Mac network advanced
Click the TCP/IP tab heading if you aren’t already in there. Then click on the “Renew DHCP” lease button.
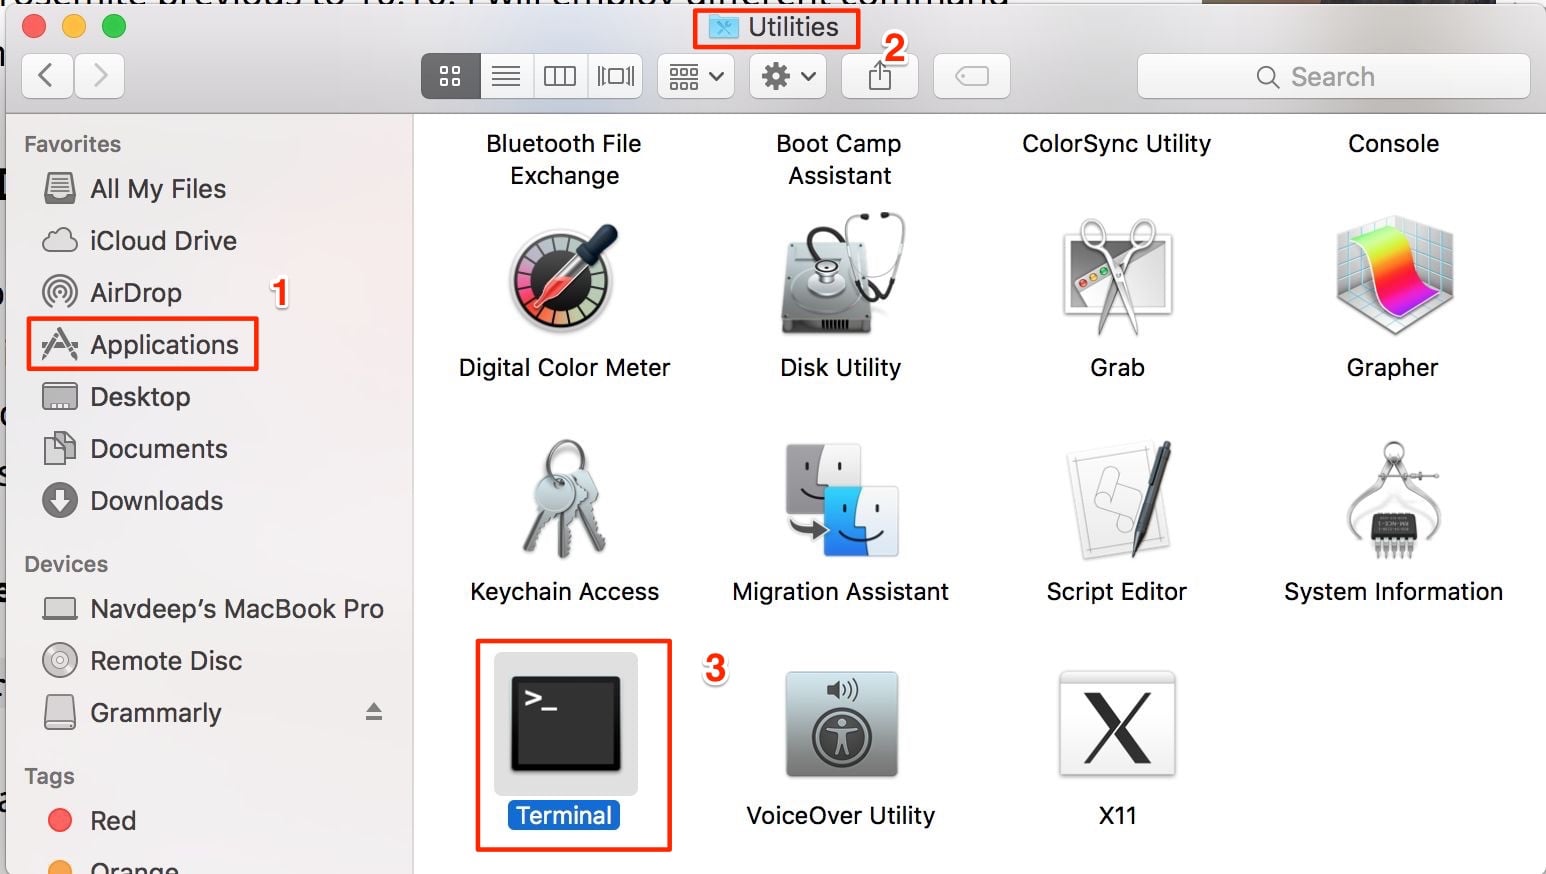
Just like we did above in Windows, Mac users can also clear their local DNS cache. Although this is done in a different place. Go to Utilities and then click on “Terminal.”

Enter in the following command:
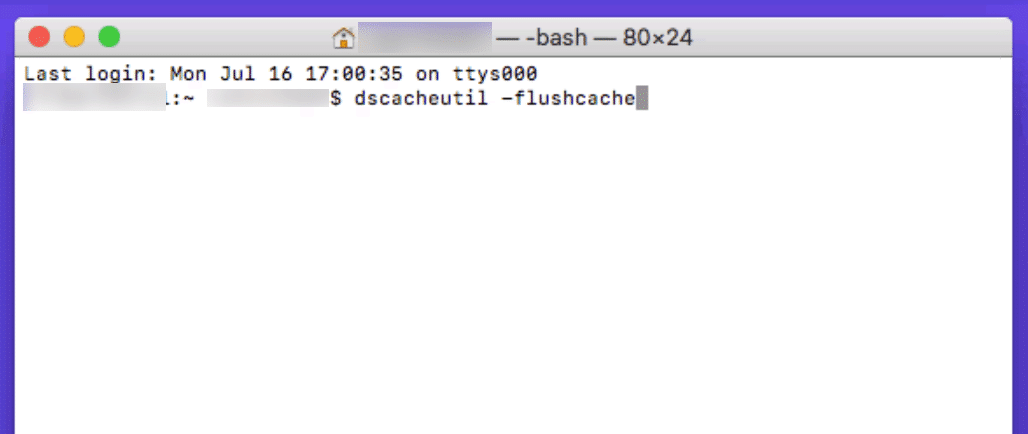
Flush DNS cache on Mac
Note: There is no success message on Macs.

2. Restart DNS Client Service
If you’re running Windows you can try restarting the DNS client services which resolves and caches DNS domain names.
Simply open up Command Prompt by pressing the Windows logo key and R. Then type “services.msc” and hit Enter.
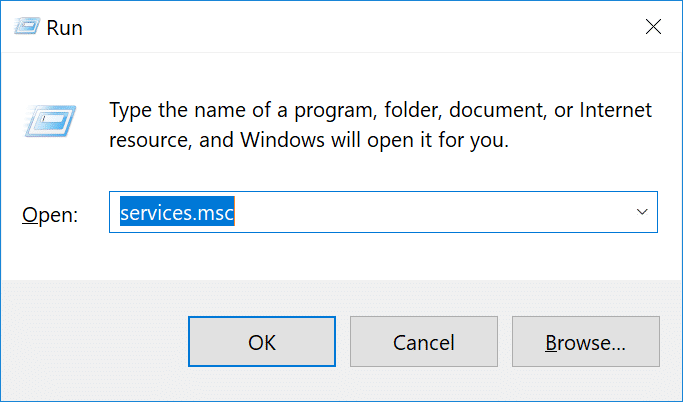
Scroll down to “DNS Client,” right click on it, and select “Restart.”
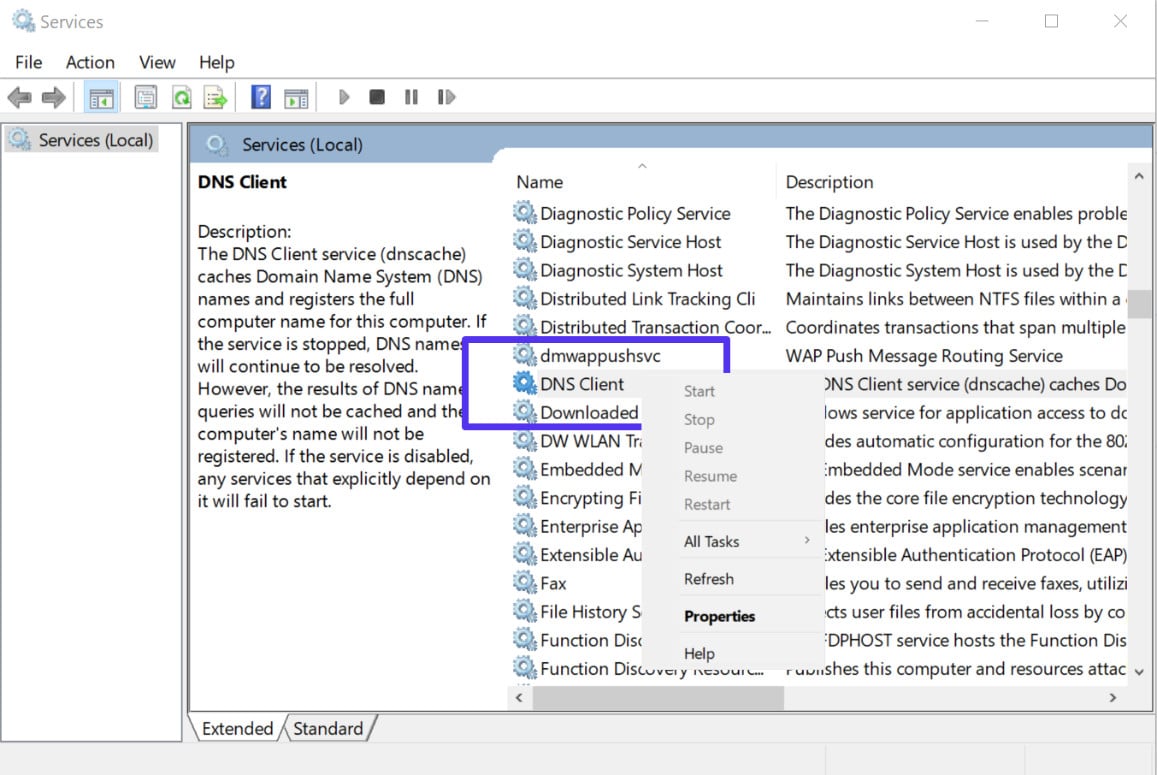
Restart DNS client service in Windows
If the restart option is greyed out for you (as it was for us), an alternative way to do it is via the command prompt.
Open up Command Prompt by pressing the Windows logo key and R. Then type “cmd” and hit Enter.
Then enter the following commands:
Depending on the version of Windows you’re running you might get an error saying:
The requested pause, continue, or stop is not valid for this service.
This is most likely because you need to run CMD as a network service to issue the command. If you’re running into this error, we suggest trying the other alternatives below first.
3. Change DNS Servers
The next thing you can try is changing your DNS servers. By default, DNS servers are automatically assigned by your ISP. But you could try temporarily changing these to a public DNS server, such as Google or Cloudflare.
- Some prefer to use Google’s public DNS (8.8.8.8 and 8.8.4.4) long-term due to them sometimes being more reliable.
- Cloudflare also just launched their new secure and blazing fast free DNS (1.1.1.1 and 1.0.0.1) which we will be using in this example. If you want to use Google’s the steps are the same, you simply replace the DNS server addresses with Googles.
Tip: If you’re already using a free DNS server and having issues, removing it and defaulting back to your ISP’s DNS servers also sometimes fix things. Google and Cloudflare aren’t perfect 100% of the time and there have been a few instances where we’ve noticed switching back has resolved the issue.
Windows
In Windows simply open up Command Prompt by pressing the Windows logo key and R. Then type “control panel” and hit Enter.
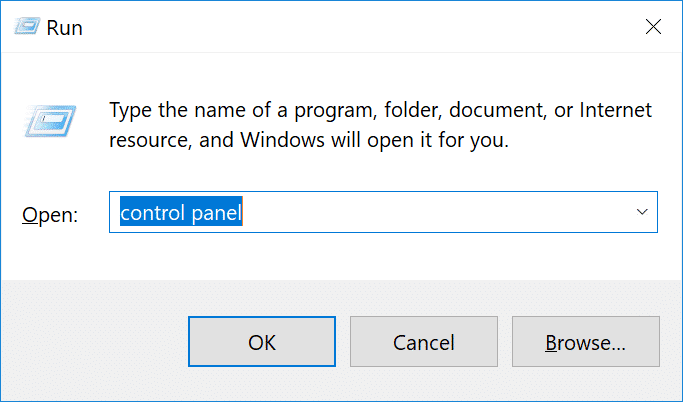
Run Control Panel Windows
Click on “Network and Internet” and then “Network and Sharing Center.” On the left-hand side, click on “Change Adapter Settings.”

Change adapter settings
Right click on your current connection, this will either be Local Area Connection or Wireless Network Connection based on how you’re connecting. Then click on “Properties.”
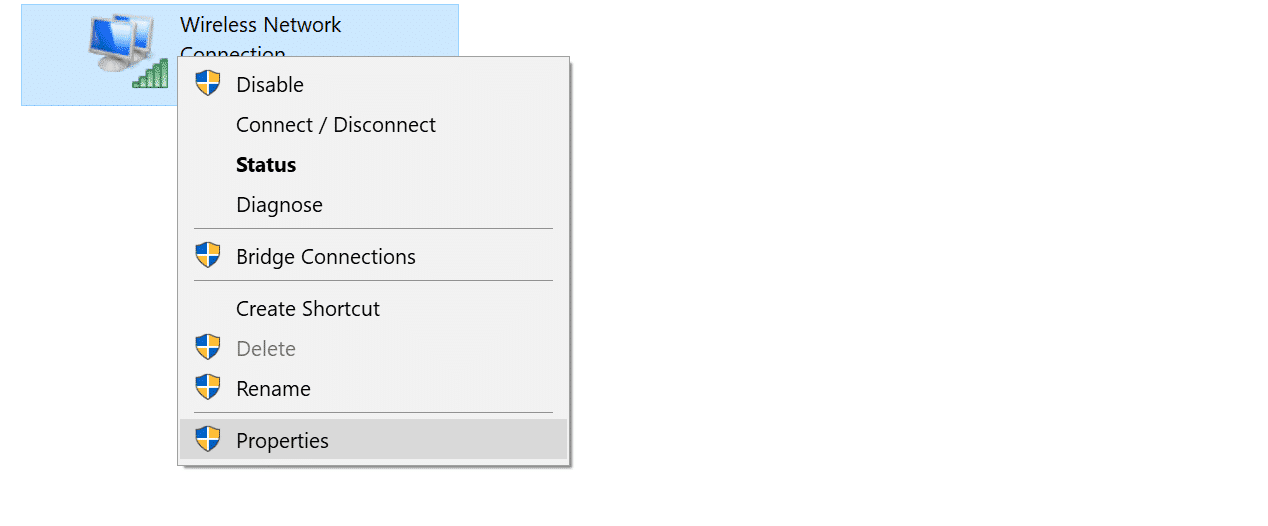
Wireless connection properties
Select Internet Protocol Version 4 (or IPv6 if desired) and click on “Properties.”
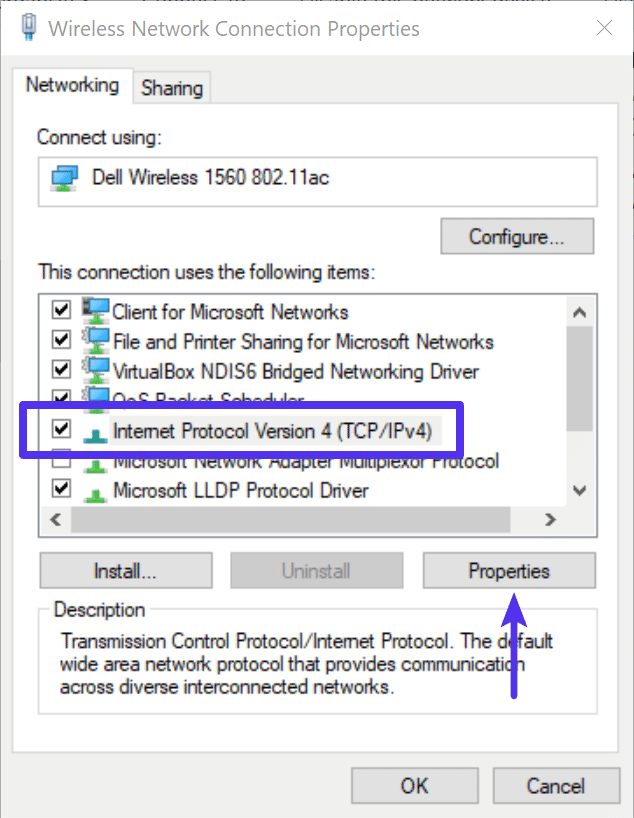
IPV 4 properties
Make a note of any existing settings in case you need to revert back. Click “Use the following DNS server addresses.” Enter the following, or replace the existing with these:
For IPv4: 1.1.1.1 and 1.0.0.1
For IPv6: 2606:4700:4700::1111 and 2606:4700:4700::1001
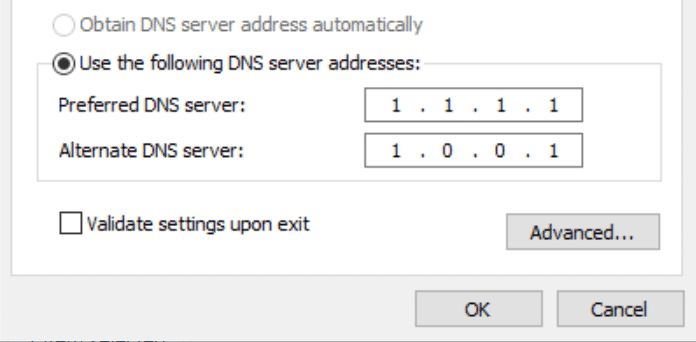
DNS server addresses
Click OK, then Close. Restart your browser.
To change DNS servers on a Mac, go to System Preferences…
Mac system preferences
Click on the network icon and then click “Advanced.”
Mac network advanced
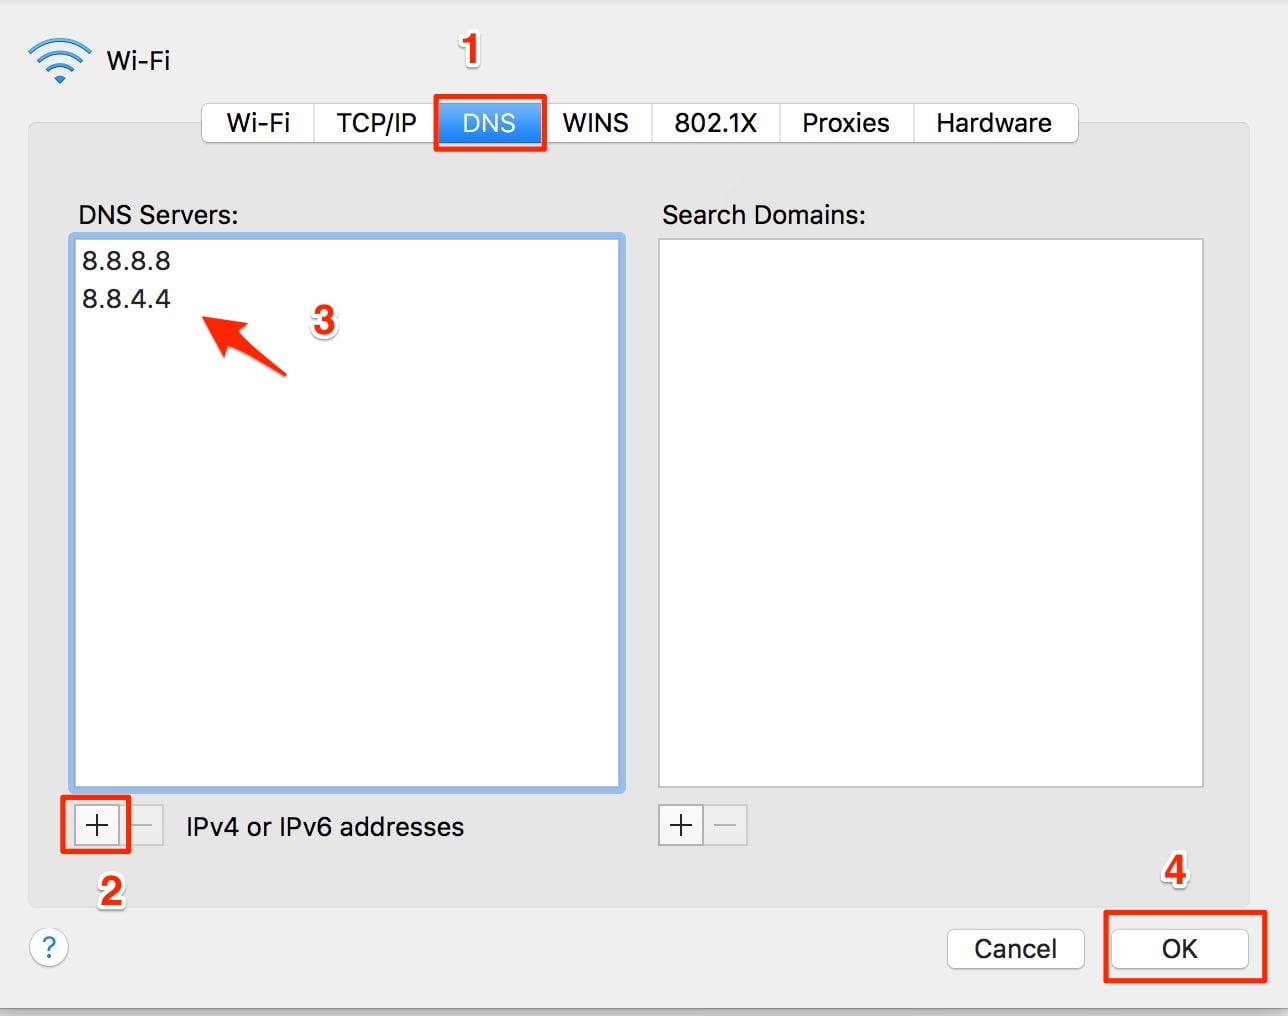
Click on the “DNS” tab.
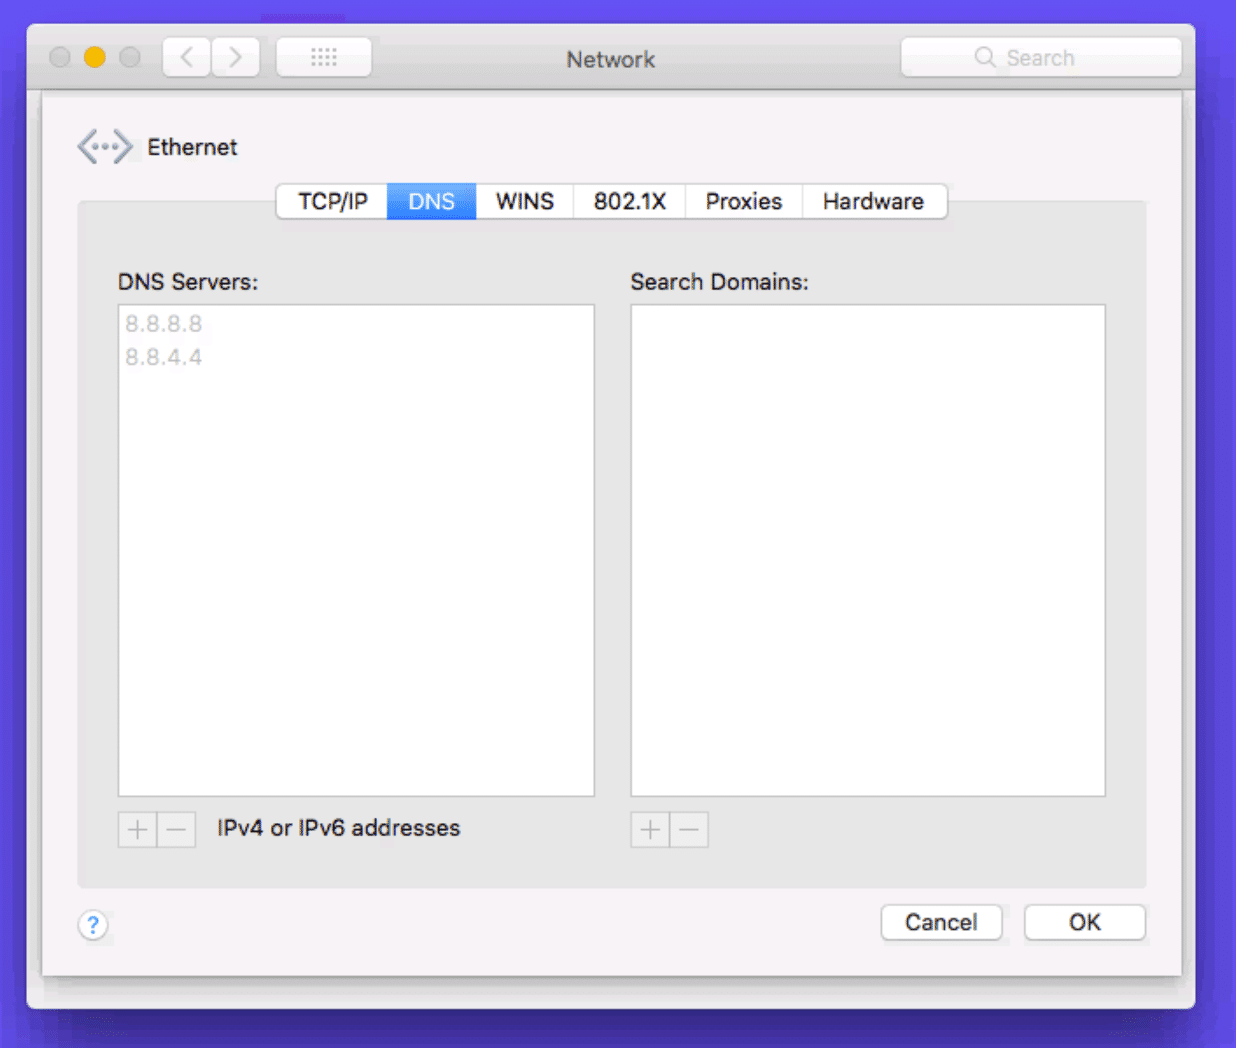
Then add Cloudflare’s DNS server addresses.
For IPv4: 1.1.1.1 and 1.0.0.1
For IPv6: 2606:4700:4700::1111 and 2606:4700:4700::1001
4. Reset Chrome Flags
Sometimes Chrome settings or experimental features can get accidentally changed or messed up. You reset these back to default by entering chrome://flags into your browser and clicking on “Reset all to default.”
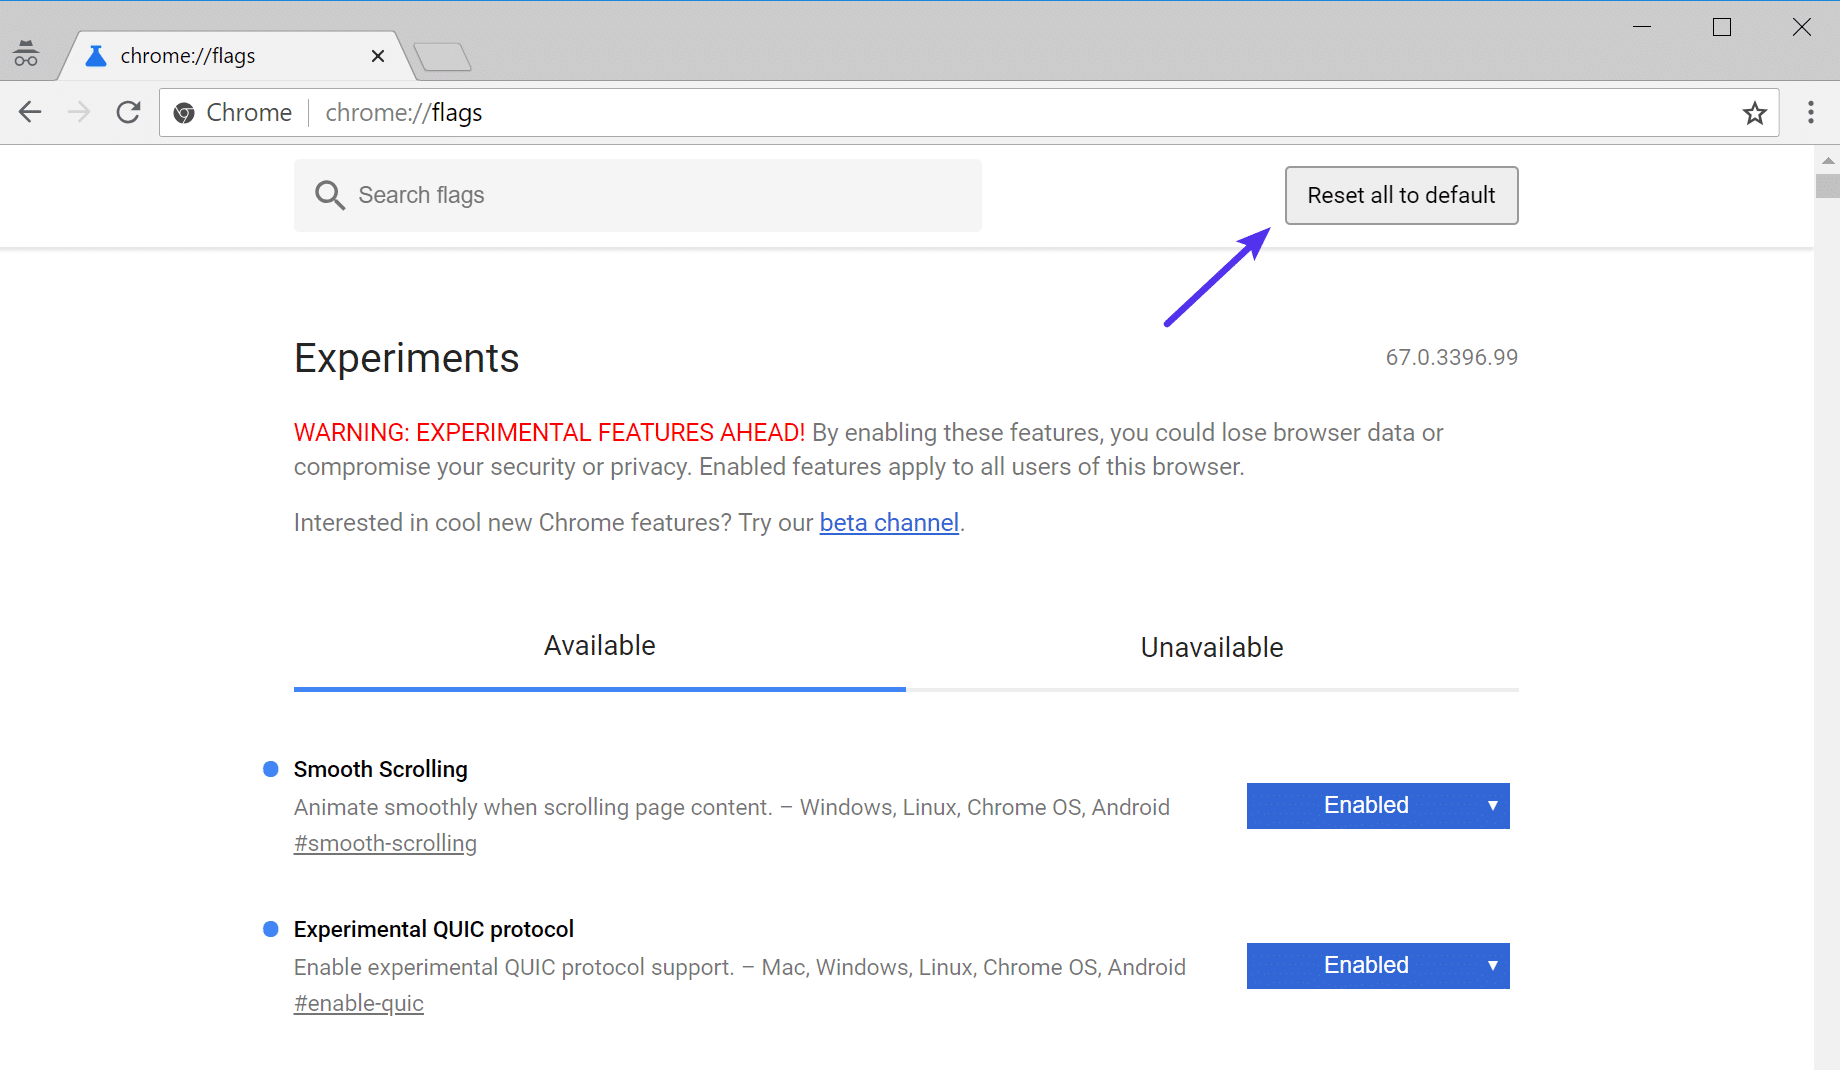
Reset Chrome flags
The restart your browser.
5. Disable VPN and Antivirus Temporarily
Sometimes VPNs and Antivirus software can conflict or override your network settings, including your DNS servers, etc. If you have any running, try temporarily disabling them (closing them) to see if it resolves the DNS probe finished nxdomain error in Chrome.
6. Check Your Local Hosts File
Every computer has what they call a local hosts file. This is a file that contains manual DNS entries which are mapped to specific IP addresses. Typically this is only edited when you want to preview your DNS before switching over domains to a new host. However, there is a multitude of different ways this file could have been changed or edited. Therefore, if none of the above options worked for you, it’s worth double checking your local hosts file to ensure the website you’re trying to access isn’t in there.
Windows
The hosts file typically requires additional access. So the first step is to open up your text editor as an administrator. Simply click on your start menu, search for your text editor, right-click on it and select “Run as administrator.” This can be done in any text editor such as Notepad, Notepad++, Atom, etc. We are using Sublime in our example below.
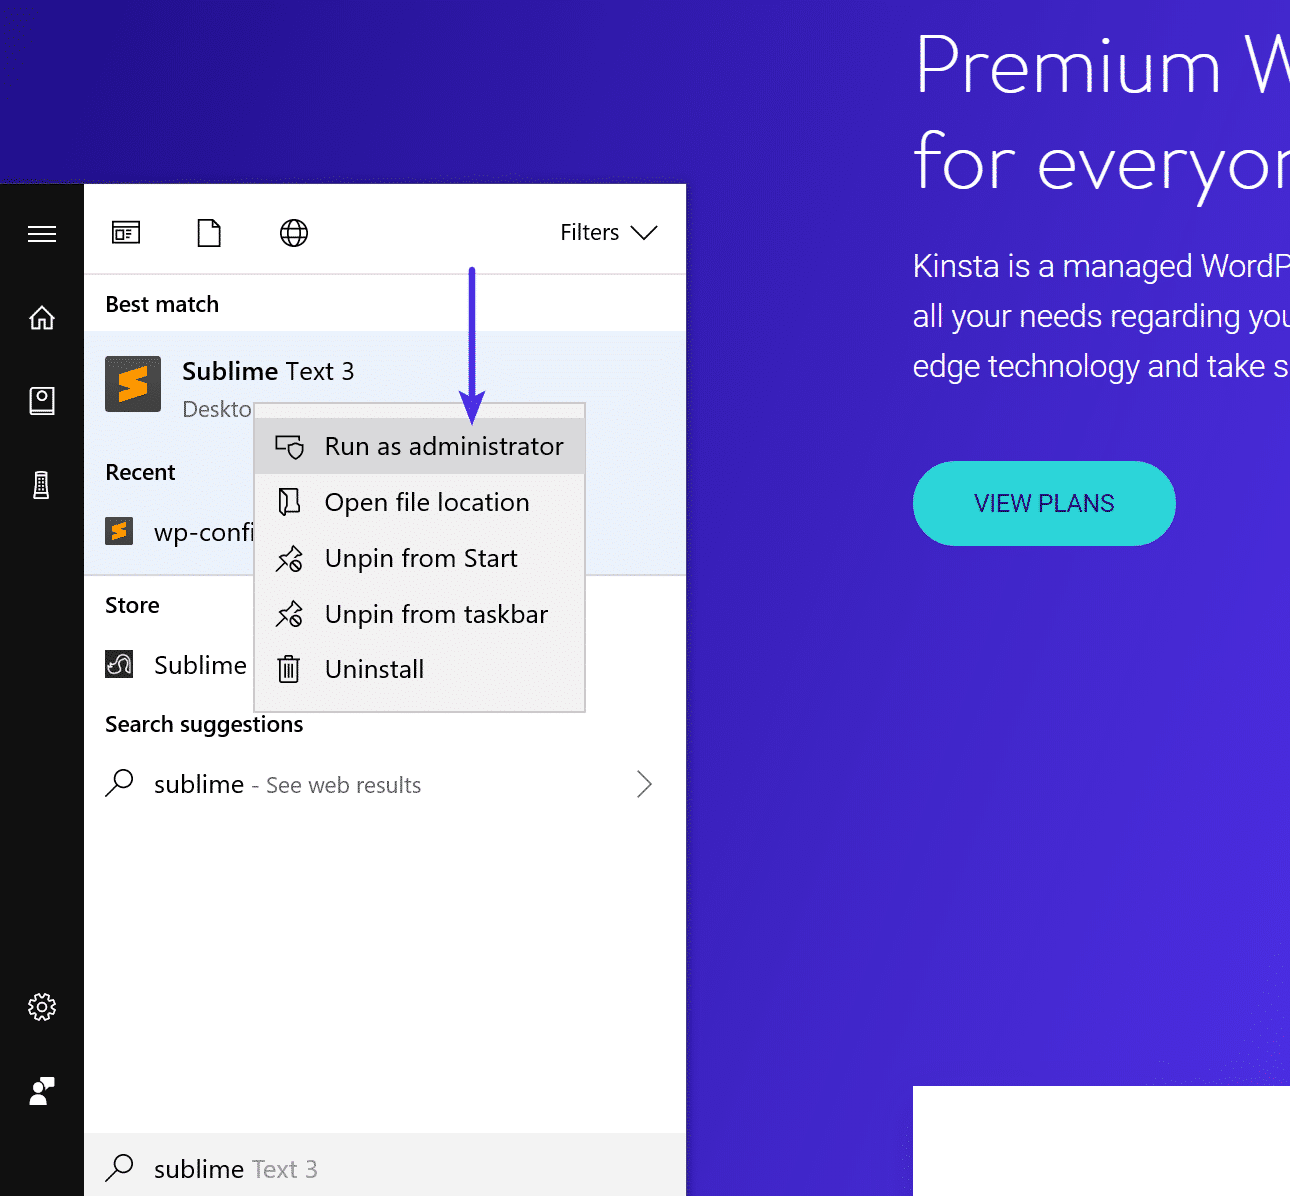
Run text editor as administrator
Within your text editor click File → Open and browse to the following location:
Click on the hosts file and “Open.”
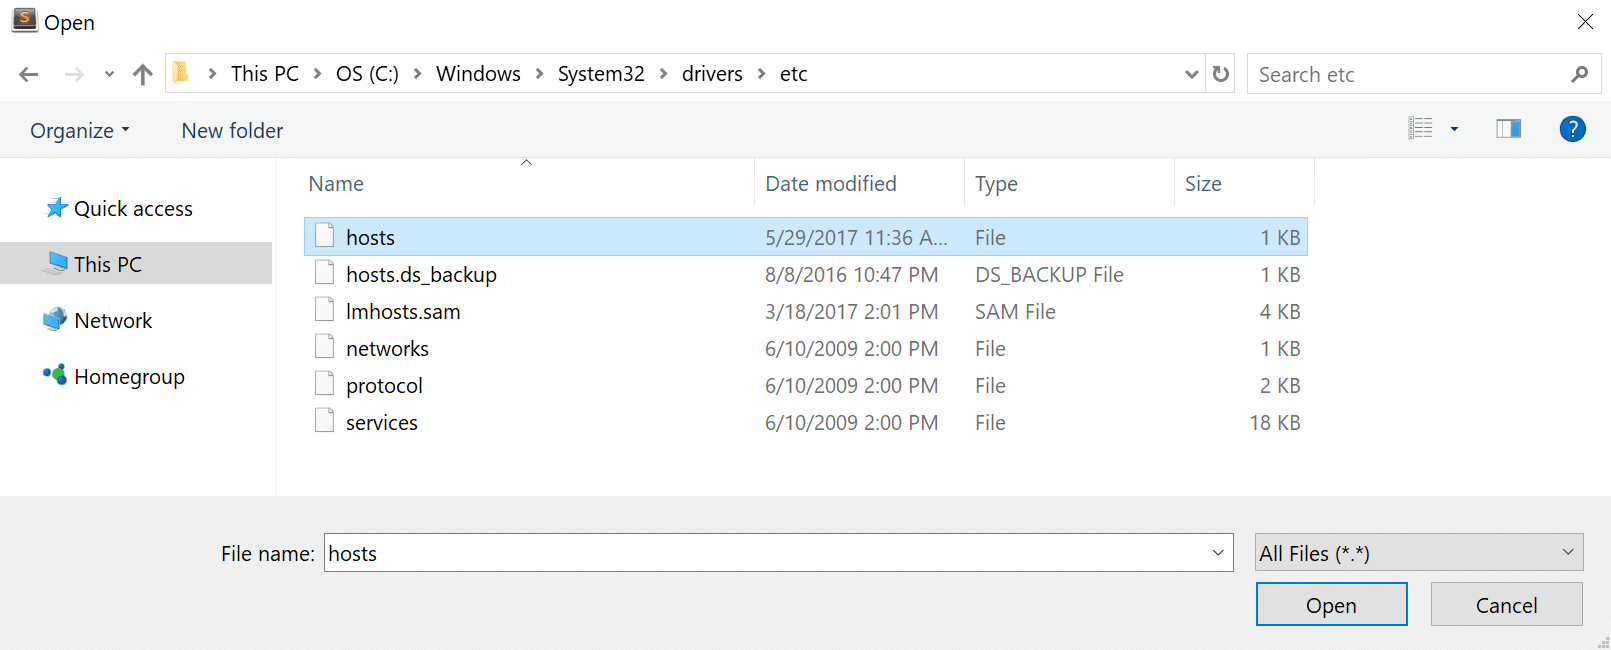
Open hosts file
Double check and make sure the website you’re trying to visit isn’t listed in there. If it is, remove it.
To check your hosts file on a Mac, we recommend getting Gas Mask. It’s a free application which can be used as hosts file manager, hosts files editor, and switch between them. It makes everything quick and easy! Otherwise, you can follow the steps below to edit your hosts file on Mac manually.
Go to Utilities and then click on “Terminal.”
Enter in the following command and press Enter (you will most likely be prompted for your administrator password as well).
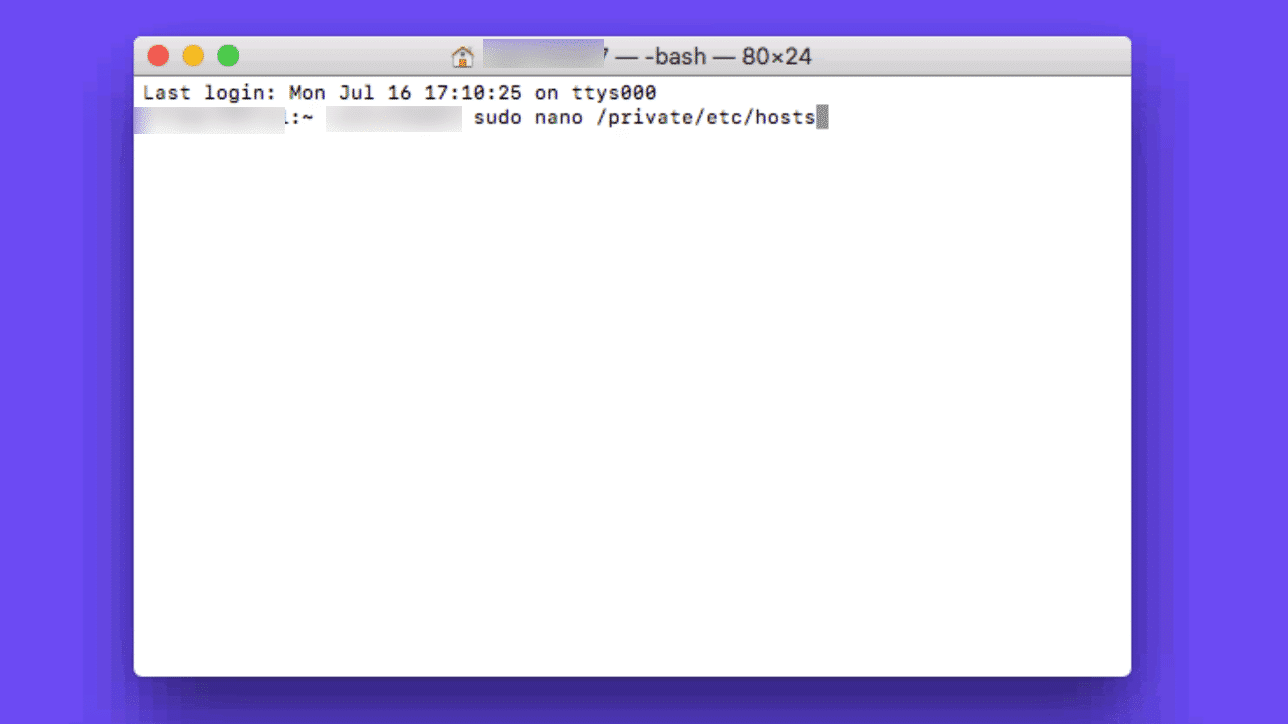
Double check and make sure the website you’re trying to visit isn’t listed in your hosts file. If it is, remove it.
7. Check DNS of Your Domain
If you’re only getting the DNS_PROBE_FINISHED_NXDOMAIN error on a single domain, even after checking your hosts file, you might need to check the DNS settings on the domain name itself. If you’re a Kinsta client we have an in-depth post on how to point your domain and or DNS to Kinsta. If you recently migrated your website to a new hosting provider, it could be the DNS was cached incorrectly on your computer. In which case, Step 2 above should have resolved that.
8. Restart Your Computer
We know it’s annoying, but it has to be mentioned. 😬 If none of the above options work, trying restarting your computer and even your router. We realize many of you probably have hundreds of tabs or applications open and that’s why we made this the last option. But rebooting devices actually clears out a lot of temporary cache.
Summary
Even though it’s frustrating, the DNS_PROBE_FINISHED_NXDOMAIN error is usually pretty easy to get resolved. Between flushing your DNS cache, renewing your IP, and trying different DNS servers, you should hopefully be back up and surfing the web in no time. If we missed anything, feel free to let us know below in the feedback section.
Save time, costs and maximize site performance with:
- Instant help from WordPress hosting experts, 24/7.
- Cloudflare Enterprise integration.
- Global audience reach with 28 data centers worldwide.
- Optimization with our built-in Application Performance Monitoring.
All of that and much more, in one plan with no long-term contracts, assisted migrations, and a 30-day-money-back-guarantee. Check out our plans or talk to sales to find the plan that’s right for you.
Hand-picked related articles
Kinsta Go Live with Your Website Checklist
How Kinsta Migrates Dynamic WordPress Sites (Ecommerce, Community, and Membership)
How Do I Change My SFTP Password?
The Agency Owner’s Guide to Managing 60+ WordPress Sites
Award-winning WordPress hosting platform


© 2021 Kinsta Inc. All rights reserved.
Legal information
Kinsta® and WordPress® are registered trademarks.
Источник


