- Dnsmgmt msc windows server 2012 r2
- Что такое msc оснастка
- Элементы оснастки Консоли управления msc
- Список msc оснасток для Windows Server
- Списка команд элементов Панели управления Windows
- Manually Configure DNS Access Settings
- Manually configure managed DNS server access settings
- Configure Windows Firewall on a managed DNS server
- To configure Windows Firewall on a managed DNS server
- Configure security groups on a managed DNS server
- To configure the IPAMUG security group
- To configure the Event Log Readers security group on a DC/DNS server
- To configure the Event Log Readers security group on a standalone DNS server
- Enable event log monitoring on a managed DNS server
- To enable event log monitoring on a managed DNS server
- Configure the DNS DACL on a managed DNS server
- To enable DNS administration on a managed DC/DNS server
- To enable DNS administration on a standalone DNS server
Dnsmgmt msc windows server 2012 r2

msc windows оснастки
Добрый день уважаемые читатели и подписчики блога, сегодня мы с вами поговорим на тему как открыть msc windows оснастки через командную строку, для чего это может быть вам нужно и как это поможет в повседневной практике системного администратора. Поверьте полученные знания в этой статье, в будущем смогут вам сэкономить огромное количество времени и нервных клеток, не говоря уже о возможности блеснуть задротскими знаниями перед вашими коллегами, просто если вы активно используете linux системы и знаете основные команды в консоли, то вам будет интересны и эти. Всегда по возможности стремитесь изучать по мимо GUI интерфейсов, еще и альтернативные методы настройки, так как при настройке Windows Server, все чаще выбирают режим core с минималистическим интерфейсом.
Что такое msc оснастка
И так msc в Windows расшифровывается как Microsoft System Console, еще проще это окна или как их еще называют оснастки, для управления теми или иными функциями операционной системы. Ранее я вас уже знакомил с методом создания удобной оснастки mmc, в которой мы добавляли все, что нужно системному администратору для повседневного администрирования.
И вы наверно спросите, а при чем тут командная строка и все такое, а вот при чем. Представим себе ситуацию, у вас в организации существует домен Active Directory, рядовые пользователи не имеют прав локального администратора на своих рабочих станциях, все идет и работает как часы, случается ситуация, что например вам нужно у пользователя поменять какие либо настройки, и сделать нужно сейчас, так что искать эти настройки в групповой политике нет времени. Что делать заходить под собой не вариант, так как нужно произвести изменения в другом профиле пользователя, и как открыть например оснастку Управление компьютером или Система.
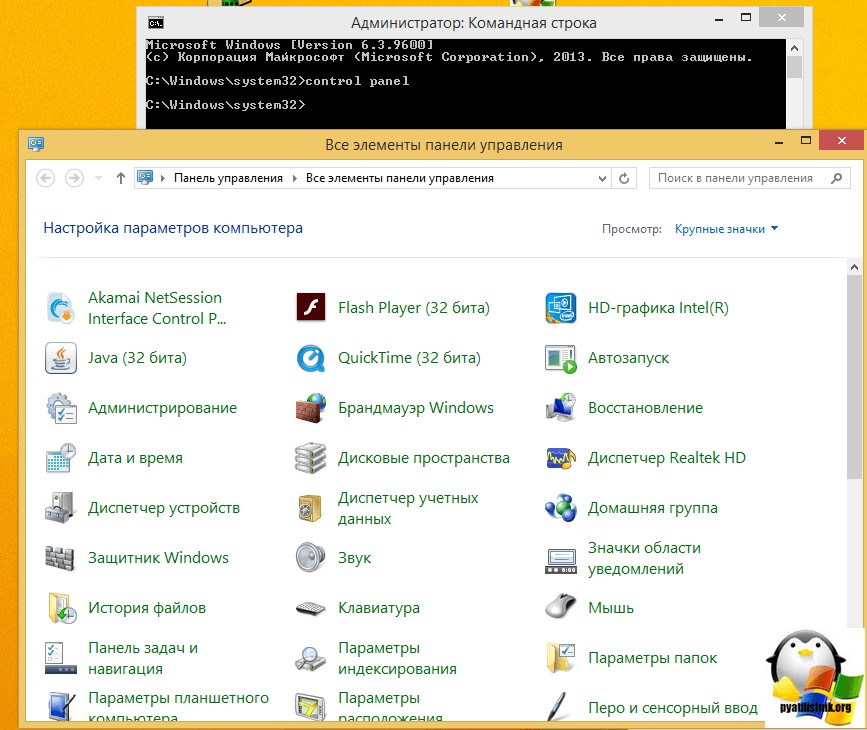
Во тут нам и поможет знание названия msc windows оснасток и командная строка. Все что вам нужно это открыть командную строку от имени администратора и ввести нужное название msc оснастки. Ниже представлен список. Как видите открыв командную строку cmd.exe я для примера ввел значение открывающее панель управления с правами администратора системы.
Элементы оснастки Консоли управления msc
- appwiz.cpl — Установка и удаление программ
- certmgr.msc — Сертификаты
- ciаdv.msc — Служба индексирования
- cliconfg — Программа сетевого клиента SQL
- clipbrd — Буфер обмена
- compmgmt.msc — Управление компьютером
- dcomcnfg — Консоль управления DCOM компонентами
- ddeshare — Общие ресурсы DDE (на Win7 не работает)
- desk.cpl — Свойства экрана
- devmgmt.msc — Диспетчер устройств
- dfrg.msc — Дефрагментация дисков
- diskmgmt.msc — Управление дисками
- drwtsn32 — Dr.Watson
- dxdiag — Служба диагностики DirectX
- eudcedit — Редактор личных символов
- eventvwr.msc — Просмотр событий
- firewall.cpl — настройки файерволла Windows
- gpedit.msc — Груповая политика
- fsmgmt.msc — Общие папки
- fsquirt — Мастер передачи файлов Bluetooth
- chkdsk — Проверка дисков (обычно запускается с параметрами буква_диска: /f /x /r)
- control printers — Принтеры и факсы — запускается не всегда
- control admintools — Администрирование компьютера — запускается не всегда
- control schedtasks — Назначенные задания (планировщик)
- control userpasswords2 — Управление учётными записями
- compmgmt.msc — Управление компьютером (compmgmt.msc /computer=pc — удаленное управление компьютером pc)
- lusrmgr.msc — Локальные пользователи и группы
- mmc— создание своей оснастки
- mrt.exe — Удаление вредоносных программ
- msconfig — Настройка системы (автозапуск, службы)
- mstsc — Подключение к удаленному рабочему столу
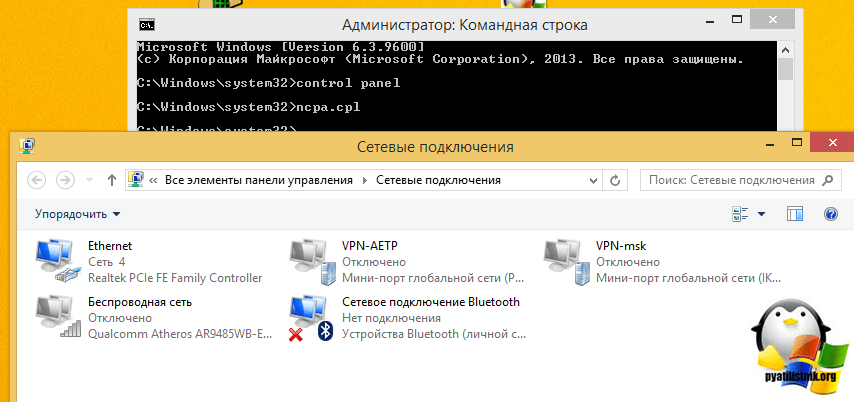
- ncpa.cpl — Сетевые подключения
- ntmsmgr.msc — Съёмные ЗУ
- mmsys.cpl — Звук
- ntmsoprq.msc — Запросы операторов съёмных ОЗУ (для XP)
- odbccp32.cpl — Администратор источников данных
- perfmon.msc — Производительность
- regedit — Редактор реестра
- rsop.msc — Результатирующая политика
- secpol.msc — Локальные параметры безопасности (Локальная политика безопасности)
- services.msc — Службы
- sfc /scannow — Восстановление системных файлов
- sigverif — Проверка подписи файла
- sndvol — управление громкостью
- sysdm.cpl — Свойства системы
- syskey — Защита БД учётных записей
- taskmgr — Диспетчер задач
- utilman Диспетчер служебных программ
- verifier Диспетчер проверки драйверов
- wmimgmt.msc — Инфраструктура управления WMI
Список msc оснасток для Windows Server
Давайте рассмотрим как запускаются Административные оснастки Windows из командной строки cmd.exe
- domain.msc — Active Directory домены и доверие
- dsa.msc — Active Directory Пользователи и компьютеры (AD Users and Computers)
- tsadmin.msc — Диспетчер служб терминалов (Terminal Services Manager)
- gpmc.msc — Консоль управления GPO (Group Policy Management Console)
- gpedit.msc — Редактор объектов локальной политики (Group Policy Object Editor)
- tscc.msc — Настройка терминального сервера (TS Configuration)
- rrasmgmt.msc — Маршрутизация и удаленый доступ (Routing and Remote Access)
- dssite.msc — Active Directory Сайты и Доверие (AD Sites and Trusts)
- dompol.msc — Политика безопасности домена (Domain Security Settings)
- dсpol.msc — Политика безопасности контроллера домена (DC Security Settings)
- dfsgui.msc — Распределенная файловая система DFS (Distributed File System)
- dnsmgmt.msc — DNS
- iscsicpl.exe — Инициатор ISCSI
- odbcad32.exe — Администратор источника данных ODBC 32 бита
- odbcad64.exe — Администратор источника данных ODBC 64 бита
- powershell.exe -noexit -command import-module ActiveDirectory — Модуль powershell Active Directory
- dfrgui.exe — Оптимизация дисков
- taskschd.msc /s — Планировщик заданий
- dsac.exe — Центр администрирования Active Directory
- printmanagement.msc — Управление печатью
- vmw.exe — Средство активации корпоративных лицензий
- eventvwr.msc /s — Просмотр событий
- adsiedit.msc — Редактор ADSIedit
- wbadmin.msc — Система архивации данных Windows Server
- ServerManager.exe — Диспетчер серверов
- dhcpmgmt.msc — DHCP сервер
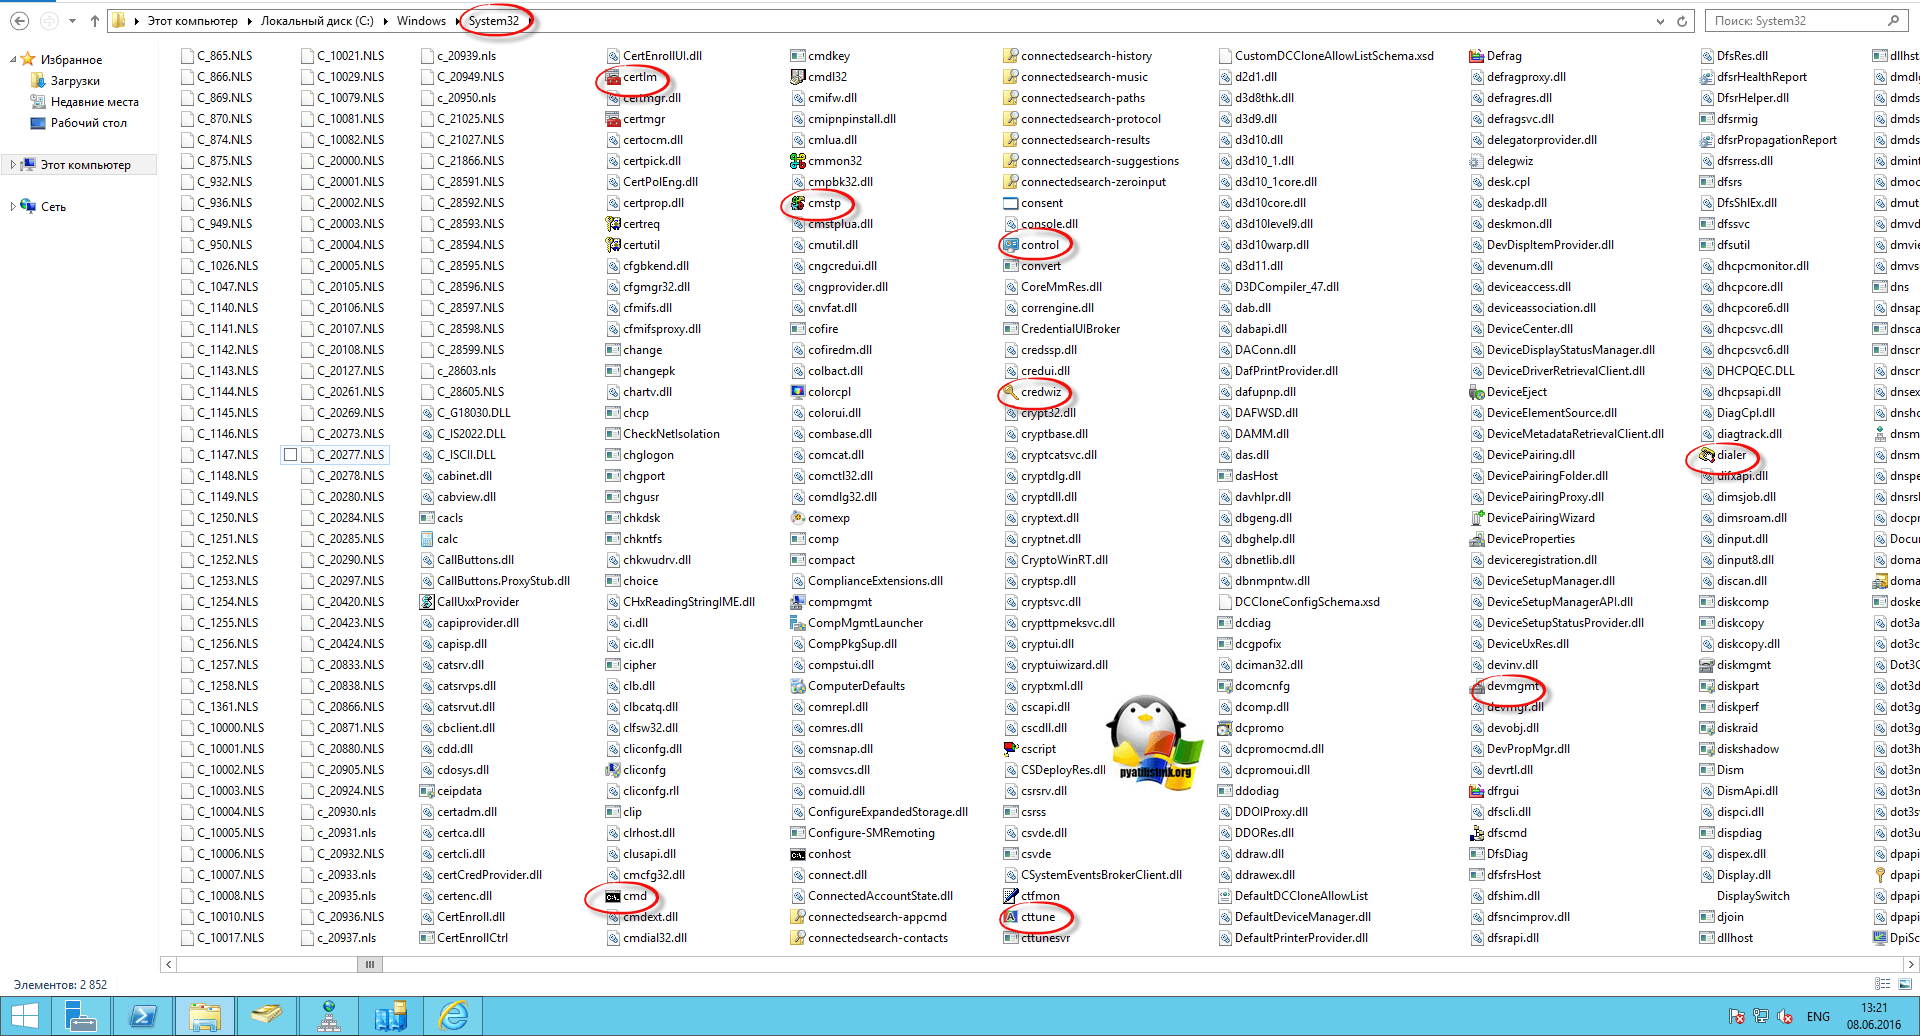
Как видите msc windows оснастки очень полезные инструменты системного администрирования. Мне даже некоторые оснастки быстрее открыть чем щелкать мышкой по куче окон, особенно если сервер или компьютер тормозит или нет мышки. Да и в любом случае знать такие вещи всегда полезно. Большая часть всего, что мы используем хранится в c:\Windows\System32. Если вы пройдете в эту папку то сможете обнаружить очень много интересного.
nbtstat -a pc — имя пользователя работающего за удаленной машиной pc
net localgroup group user /add — Добавить в группу group, пользователя user
net localgroup group user /delete — Удалить пользователя из группы
net send pc »текст ‘‘ — отправить сообщение пользователю компьютера pc
net sessions — список пользователей
net session /delete — закрывает все сетевые сессии
net use l: \\имя компа\папка\ — подключить сетевым диском l: папку на удаленном компьютере
net user имя /active:no — заблокировать пользователя
net user имя /active:yes — разблокировать пользователя
net user имя /domain — информация о пользователе домена
net user Имя /add — добавить пользователя
net user Имя /delete — удалить пользователя
netstat -a — список всех подключений к компьютеру
reg add — Добавить параметр в реестр
reg compare — Сравнивать части реестра.
reg copy — Копирует из одного раздела в другой
reg delete — Удаляет указанный параметр или раздел
reg export — Экспортировать часть реестра
reg import — Соответственно импортировать часть реестра
reg load — Загружает выбранную часть реестра
reg query — Выводит значения заданной ветки реестра
reg restore — Восстанавливает выбранную часть реестра из файла
reg save — Сохраняет выбранную часть реестра
reg unload — Выгружает выбранную часть реестра
shutdown — выключение компьютера , можно удаленно выключить другой.
SystemInfo /s machine — покажет много полезного об удаленной машине
Списка команд элементов Панели управления Windows
- control /name Microsoft.AutoPlay — Автозапуск
- control /name Microsoft.OfflineFiles — Автономные файлы
- control /name Microsoft.AdministrativeTools — Администрирование
- control /name Microsoft.BackupAndRestore — Архивация и восстановление
- control /name Microsoft.WindowsFirewall — Брандмауэр Windows Windows
- control /name Microsoft.Recovery — Восстановление
- control /name Microsoft.DesktopGadgets — Гаджеты рабочего стола
- control /name Microsoft.DateAndTime — Дата и Время
- control /name Microsoft.DeviceManager — Диспетчер устройств
- control /name Microsoft.CredentialManager — Диспетчер учетных данных
- control /name Microsoft.HomeGroup — Домашняя группа
- Windowscontrol /name Microsoft.WindowsDefender — Защитник Windows
- control /name Microsoft.Sound — Звук
- control /name Microsoft.NotificationAreaIcons — Значки области уведомлений
- control /name Microsoft.GameControllers — Игровые устройства
- Keyboardcontrol /name Microsoft.Keyboard — Клавиатура
- control /name Microsoft.Mouse — Мышь
- control /name Microsoft.TaskbarAndStartMenu — Панель задач и меню «Пуск»
- control — Панель управления
- control /name Microsoft.Fonts — Папка «Fonts»
- control /name Microsoft.IndexingOptions — Параметры индексирования
- control /name Microsoft.FolderOptions — Параметры папок
- control /name Microsoft.PenAndTouch — Перо и сенсорные устройства
- control /name Microsoft.Personalization — Персонализация
- control /name Microsoft.RemoteAppAndDesktopConnections — Подключения к удаленным рабочим столам
- control /name Microsoft.GetPrograms — Получение программ
- control /name Microsoft.GettingStarted — Приступая к работе
- control /name Microsoft.ProgramsAndFeatures — Программы и компоненты
- сontrol /name Microsoft.DefaultPrograms — Программы по умолчанию
- control /name Microsoft.SpeechRecognition — Распознавание речи
- control /name Microsoft.ParentalControls — Родительский контроль
- control /name Microsoft.InternetOptions — Свойства обозревателя
- control /name Microsoft.TextToSpeech — Свойства речи
- control /name Microsoft.System — Система
- control /name Microsoft.ScannersAndCameras — Сканеры и камеры
- control /name Microsoft.PerformanceInformationAndTools — Счетчики и средства производительности
- control /name Microsoft.PhoneAndModem — Телефон и модем
- control /name Microsoft.ColorManagement — Управление цветом
- control /name Microsoft.Troubleshooting — Устранение неполадок
- control /name Microsoft.DevicesAndPrinters — Устройства и принтеры
- control /name Microsoft.UserAccounts — Учетные записи пользователей
- control /name Microsoft.MobilityCenter — Центр мобильности
- control /name Microsoft.WindowsUpdate — Центр обновления
- control /name Microsoft.ActionCenter — Центр поддержки
- control /name Microsoft.SyncCenter — Центр синхронизации
- control /name Microsoft.EaseOfAccessCenter — Центр специальных возможностей
- control /name Microsoft.NetworkAndSharingCenter — Центр управления сетями и общим доступом
- control /name Microsoft.BitLockerDriveEncryption — Шифрование диска
- control /name Microsoft.Display — Экран
- control /name Microsoft.PowerOptions — Электропитание
- control /name Microsoft.RegionAndLanguage — Язык и региональные стандарты
Если у вас есть чем дополнить список msc канонических имен, то пишите пожалуйста в комментариях я их допишу.
Manually Configure DNS Access Settings
Applies To: Windows Server 2012 R2, Windows Server 2012
If you have chosen the manual provisioning method, you must configure access permissions and settings individually on managed servers. Two general methods for configuring these settings are available:
Manual application of IPAM GPOs: With this method, IPAM GPOs are created but are not automatically applied to managed servers. Application of GPOs is done manually by adding managed servers to GPO security filtering. To use this method, first perform the steps in Create IPAM Provisioning GPOs. When you have created these GPOS, configure security filtering by performing the steps in Configuring IPAM GPO security filtering.
Manual configuration of individual settings: GPOs are not used with this method. Instead, access settings on each managed server are configured manually by an administrator. Steps to configure these access settings are provided in this topic.
For more information about choosing an IPAM provisioning method, see Choosing a provisioning method.
Membership in the Domain Admins group, or equivalent, is the minimum required to complete this procedure. Review details about using the appropriate accounts and group memberships at Local and Domain Default Groups (https://go.microsoft.com/fwlink/?LinkId=83477).
Manually configure managed DNS server access settings
Use the following procedures to configure IPAM access settings on a managed DHCP server:
A summary of required settings is provided in the table below.
Inbound firewall rule
Discover DNS servers
Inbound firewall rule
Remote Service Management
Manage DNS servers
Inbound firewall rule
Remote Event Log Management
Monitor DNS zones and services
Event Log Readers
Monitor DNS servers
Event log access
Event log monitoring
Monitor DNS zones and services
Administer DNS zones and servers
After performing these procedures, refresh the server access status for the managed DNS server in the server inventory view on the IPAM server.
Configure Windows Firewall on a managed DNS server
Use the following procedure to enable access by the IPAM server to inbound firewall ports on a managed DNS server. If the managed DNS server becomes unmanaged, delete these inbound firewall rules. All of the following procedures are performed on the managed DNS server.
To configure Windows Firewall on a managed DNS server
On the Server Manager menu, click Tools and then click Windows Firewall with Advanced Security.
Right-click Inbound Rules, and then click New Rule. The New Inbound Rule Wizard will launch.
In Rule Type, select Predefined, choose DNS Service from the list, and then click Next.
In Predefined Rules, under Rules, select the checkboxes next to the following rules:
RPC (TCP, Incoming)
DNS (UDP, Incoming)
DNS (TCP, Incoming)
RPC Endpoint Mapper (TCP, Incoming)
Click Next, choose Allow the connection, and then click Finish.
Right-click Inbound Rules, and then click New Rule. The New Inbound Rule Wizard will launch.
In Rule Type, select Predefined, choose Remote Service Management from the list, and then click Next.
In Predefined Rules, under Rules, select the checkboxes next to the following rules:
Remote Service Management (RPC-EPMAP)
Remote Service Management (NP-In)
Remote Service Management (RPC)
Click Next, choose Allow the connection, and then click Finish.
Right-click Inbound Rules, and then click New Rule. The New Inbound Rule Wizard will launch.
In Rule Type, select Predefined, choose Remote Event Log Management from the list, and then click Next.
In Predefined Rules, under Rules, select the checkboxes next to the following rules:
Remote Event Log Management (RPC-EPMAP)
Remote Event Log Management (RPC)
Click Next, choose Allow the connection, and then click Finish.
Close the Windows Firewall with Advanced Security console.
Configure security groups on a managed DNS server
To access configuration data and server event logs, the IPAM server must be a member of the domain IPAM Users Group (IPAMUG). The IPAM server must also be a member of the Event Log Readers security group.
If the DNS Server service is running on a domain controller, some procedures below are different than if the DNS server is a domain member computer that is not running on the same server with Active Directory Domain Services (AD DS). If procedures are unique to a type of DNS server, this is specified in the procedure title.
To configure the IPAMUG security group
On a domain controller, click Tools on the Server Manager menu, and then click Active Directory Users and Computers.
In the Active Directory Users and Computers console tree, right-click the Users container under the managed DHCP server’s domain, point to New, and then click Group.
In the New Object – Group dialog box, under Group name, type IPAMUG.
Under Group scope, select Universal and under Group type select Security, and then click OK.
.jpeg)
Double-click the IPAMUG group and then click the Members tab.
Click Object Types, select the Computers checkbox, and then click OK.
Under Enter the object names to select, type the name of the IPAM server and then click OK.
Verify that the correct IPAM server is displayed under Name and then click OK.
To configure the Event Log Readers security group on a DC/DNS server
On the managed DC/DNS server, click Tools on the Server Manager menu and then click Active Directory Users and Computers.
In the navigation tree, click the \Builtin container and then double-click Event Log Readers.
On the Members tab, click Add.
Under Enter the object names to select, type IPAMUG, and then click OK twice.
To configure the Event Log Readers security group on a standalone DNS server
On the managed DNS server, click Tools on the Server Manager menu and then click Computer Management.
In the Computer Management navigation tree, click Local Users and Groups and then click Groups.
In the list of groups, double-click Event Log Readers and then click Add.
Under Enter the object names to select, type IPAMUG and then click OK.
Verify that \IPAMUG is displayed under Members and then click OK.
Enable event log monitoring on a managed DNS server
Event log monitoring is enabled through the HKLM\SYSTEM\CurrentControlSet\Services\EventLog\DNS Server registry key.
To enable event log monitoring on a managed DNS server
On the managed DNS server, type regedit.exe at an elevated command prompt, and then press ENTER.
In Registry Editor, navigate to the HKLM\SYSTEM\CurrentControlSet\Services\EventLog\DNS Server registry key.
Double-click CustomSD in the right-hand pane and then under Value data, position the mouse cursor at the end of the string.
.jpeg)
Open a Windows PowerShell prompt and type Get-ADComputer and press ENTER. Replace IPAM server name with the host name of your IPAM server.
.jpeg)
The get-ADComputer cmdlet is not available unless the Active Directory module for Windows PowerShell is installed. This module is installed by default on a domain controller. If the DNS server is a standalone domain member server, you can install the Active Directory module with the Add Roles and Features Wizard by selecting a Role-based or feature-based installation and then selecting Features\Remote Server Administration Tools\Role Administration Tools\AD DS and AD LDS Tools\Active Directory module for Windows PowerShell . Alternatively, you can acquire the SID of the IPAM server on a different computer and copy it to the standalone DNS server.
In the command output, highlight the string next to SID and press ENTER. This will copy the string to the clipboard.
In Registry Editor, at the end of the CustomSD Value data string, type (A;;0x1;;; then paste the SID from the clipboard, and then type a closed parens. For example, if the SID that was copied is S-1-5-21-319372935-2150250437-1932643794-1106 (as shown in the example above), then the end of the Value data string is (A;;0x1;;; S-1-5-21-319372935-2150250437-1932643794-1106). Be careful not to replace the entire value data string. Only append the extra characters to the end of the string.
Click OK and then close Registry Editor.
Configure the DNS DACL on a managed DNS server
The IPAM server must be added to the DnsAdmins security group. This enables the IPAM server to perform DNS administration functions. You can use DNS Manager to configure this security setting on a managed DNS server if it is also a domain controller.
To enable DNS administration on a standalone domain member DNS server, it is required to add the computer account of the IPAM server to the local Administrators group on the DNS server. This procedure is provided below, but is not recommended due to security concerns.
After performing these procedures, refresh the server access status for the managed DNS server in the server inventory view on the IPAM server.
To enable DNS administration on a managed DC/DNS server
On the managed DNS server, open an elevated command prompt, type dnsmgmt.msc, and press ENTER.
In DNS Manager, right-click the name of the DNS server and then click Properties.
Click the Security tab, click Add, type IPAMUG, and then click OK twice.
To enable DNS administration on a standalone DNS server
On a standalone DNS server, open an elevated command prompt, type lusrmgr.msc, and then press ENTER.
In the Local Users and Groups navigation tree, click Groups and then double-click Administrators in the right-hand pane.
In Administrators Properties, click Add.
Click Object Types, select the Computers checkbox, and then click OK.
Under Enter the object names to select, type the name of the IPAM server and then click OK.
Verify that the IPAM server is displayed under Members, and then click OK.


