- Fixed: USB Flash Drive not Showing Up in Windows
- USB Drive Not Showing Up in Windows
- Preliminary Checks on Your USB Drive
- Fixes for USB Drive Not Showing Up in Windows 10 File Explorer Only
- Method 1. Update USB Drive Driver
- Method 2. Reinstall Disk Driver for USB Drive
- Method 3. Create New Partitions
- Method 4. Assign a New Drive Letter to the USB
- Method 4. FixВ File System Errors
- Fixes for USB Not Showing Up in Windows File Explorer and Disk Management
- Method 1. Fix Driver Issues
- MethodВ 2. Change USB Connection
- MethodВ 3. Fix Physical Corruptions
- The Bottom Line
- Install Windows from a USB Flash Drive
- What you need
- Step 1 — Format the drive and set the primary partition as active
- Step 2 — Copy Windows Setup to the USB flash drive
- Step 3 — Install Windows to the new PC
- If your Windows image is larger than 4GB
- KB4577586: Update for the removal of Adobe Flash Player: October 27, 2020
- Summary
- Known issues in this update
- How to obtain and install the update
- Windows Update
- Microsoft Update Catalog
- Windows Server Update Service
- References
Fixed: USB Flash Drive not Showing Up in Windows
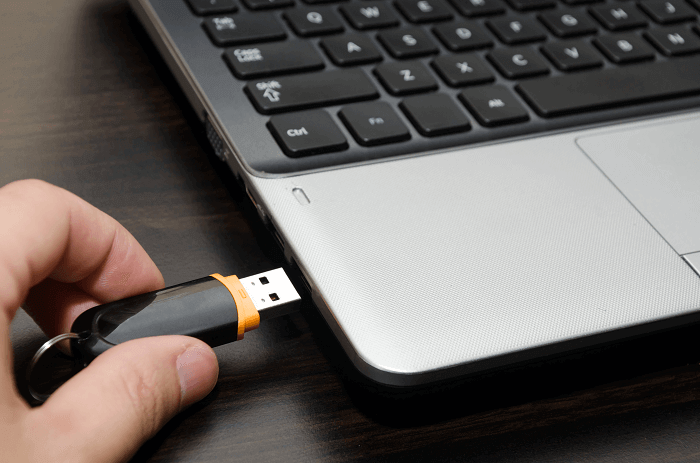
A USB drive not showing up in Windows is one of the commonest issues related to external storage devices. USB drive not showing up in Windows may result from various causes. We will show you the symptoms, causes and corresponding fixes for the issue and provide you the useful way to recover data from your USB drive with EaseUS Data Recovery Wizard.
Table of Contents
About the Author
Reviews and Awards
USB Drive Not Showing Up in Windows
«I’ve tried all the methods I can think of to connect this USB flash drive to my PC, but my computer still does not show up any signals of the drive. All of my projects from this semester are stored on the drive, how can I get to my files?!”
Preliminary Checks on Your USB Drive
Many users have encountered such a problem, that is their USB flash drive not showing up on the computer. Generally, USB not showing up means it disappears from File Explorer. Is your USB drive disappearВ in Windows File Explorer but can be seen in Disk Management? Or is it missing from both places?
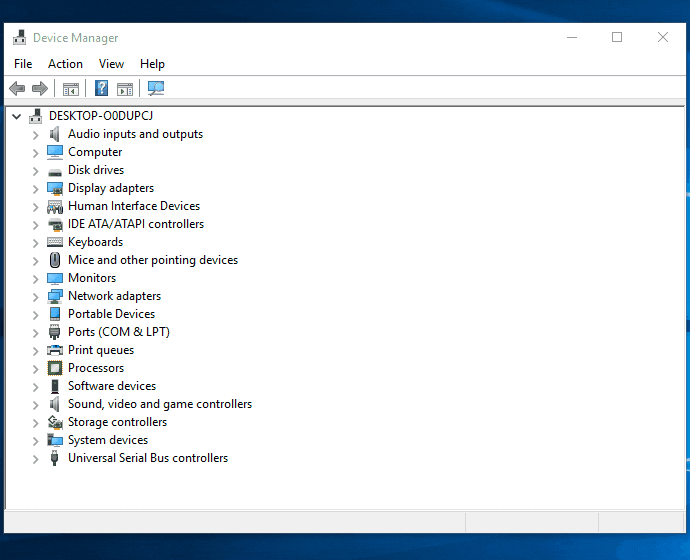
To make it clear, go to «This PC» > «Manage» > «Disk Management» and check whether your USB drive shows up. Specify your situation and choose the corresponding tips to follow.
Since there are two scenarios ofВ USB not detected by a PC, we offer a number of solutions. Follow these methods and get your missing USB drive back without losing any data. If you are a Mac user, having the same problem, follow this page to fix USB flash drive not showing up on Mac with ease.
Fixes for USB Drive Not Showing Up in Windows 10 File Explorer Only
If your USB drive shows up in Disk Management, it means Windows can still detect your drive. But due to some reasons, the USB cannot show up in File Explorer as expected. The reasons are:
- USB driver issues
- Drive letter conflicts
- File system errors
The solutions vary based on the causes but all detailed below. Follow to fix your problematic USB with ease.
| Workable Solutions | Step-by-step Troubleshooting |
|---|---|
| Fix 1. Update USB Driver | Connect USB flash drive or external USB to PC. Full steps |
| Fix 2. Reinstall Disk Driver | Right-click «This PC», click «Properties», «Devices Manager». Full steps |
| Fix 3. Recover USB Data | Connect USB flash drive to PC, run USB data recovery software. Full steps |
| Fix 4. Resolve Drive Letter Conflicts | Right-click «This PC», select «Manage» > «Disk Management». Full steps |
| Fix 5. Fix File System Errors | Right-click on the «Start» icon > Type computer management. Full steps |
Method 1. Update USB Drive Driver
This method works when yourВ USB drive not shows up in File Explorer and may show up as unallocated space under Disk Management. Follow the detailed steps below to make your USB driveВ usable again.
Step 1. Connect the USB flash driveВ to PC, right-click on «This PC» and choose «Properties».
Step 2. Click «Device Manager» then expand “Disk drives”. Find and right-click the problematic USB drive and select «Update driver»
Step 3. Click «automatically search for driver software online».
Step 4. Wait for the driver to be updated, then reboot your computer.В Afterward, you can try to reconnect your USB drive to the PC and check whether the USB drive shows up or not.
This method can also be helpful in solving disk-related issues like «The system cannot find the file specified»
Method 2. Reinstall Disk Driver for USB Drive
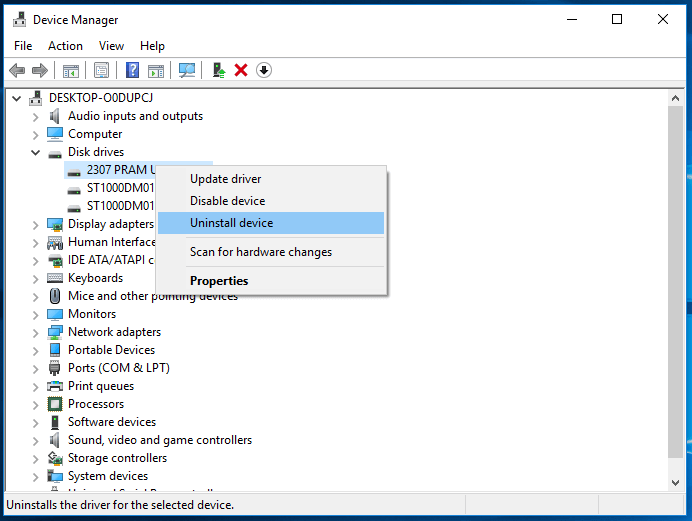
Step 1. Right-click «This PC» and choose «Properties» > «Devices Manager».
Step 2. Click on «Disk drives», right-click on your USB drive that is not showing up, and choose «Uninstall device».В
Step 3. In the prompt asking you to confirm the removal, click «OK». (Wait patiently and let the process finish. If it takes too long, you can remove the USB flash drive from the PC.)
Step 4. Restart your computer and reconnect the USB flash drive/external hard drive to the PC. After the computer restarts, the driver will be automatically installed.
Method 3. Create New Partitions
If your USB shows up as unallocated space in Disk Management after updating or reinstalling the driver, you are recommended to create a new partition to make it ready for data storage.
To create new partitions on the USB drive:
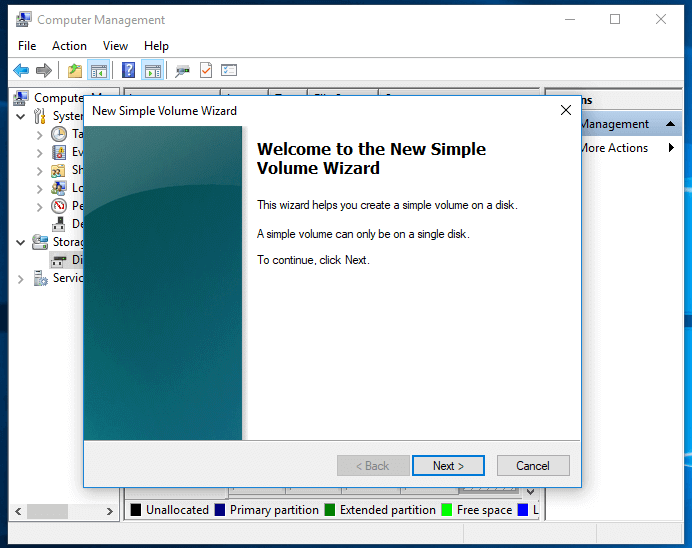
Step 1. Go to «This PC», right-click it, and choose «Manage» > «Disk Management».
Step 2. Right-click the unallocated space and choose «New Simple Volume».
Step 3. Follow the wizard to finish the remaining process.
Now your USB drive should show up in Windows as usual. You can copy the files you recovered back to your USB according to your needs.
Method 4. Assign a New Drive Letter to the USB
If the drive letter of your USB drive is the same as one of the drive letters of your computer’s hard disk partition, you won’t be able to see it in Windows File Explorer. Besides, you will see the drive has no drive letter in Disk Management. You need to assign a new drive letter to your USB drive.
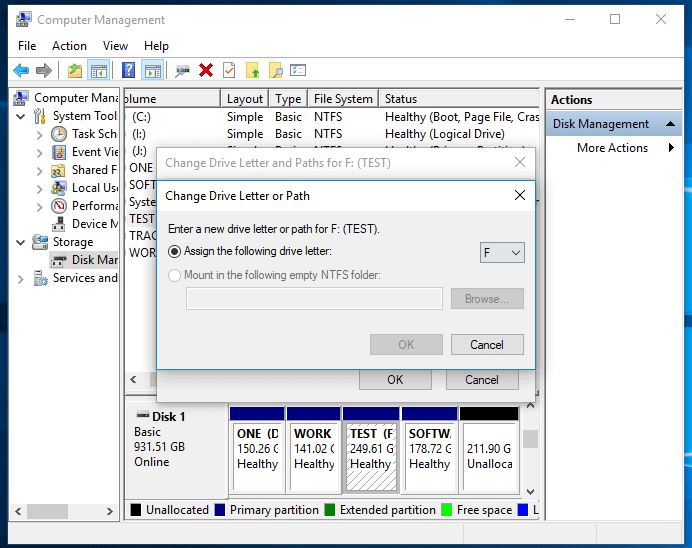
Step 1. Go to «This PC», right-click it, and choose «Manage» > «Disk Management».
Step 2. Right-click the volume on your USB flash drive and select «Change Drive Letter and Paths».
Step 3. In the new window, click «Change».
Step 4. Assign a new drive letter to your USB and click «OK».
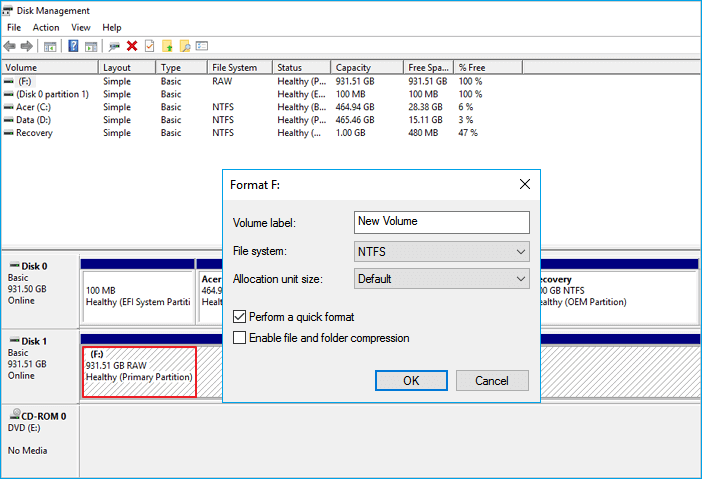
Method 4. FixВ File System Errors
If your USB flash drive has file system errors, it will show up as RAW and become inaccessible. Here the file system error refers to an unsupported file systemВ or a damaged file system caused by misoperations or improper formatting. To fix the file system error you need to format the drive to convert RAW to NTFS or FAT32.В
When you format your USB drive, all data will be deleted. To protect your data, we highly recommend you to use EaseUS Data Recovery Wizard to recover all the data before format.В It allows you to restore data from an inaccessible, RAW, or formatted USB drive and other devices with simple clicks.
Download it now and follow the guide below to restore data from your USB flash drive easily.
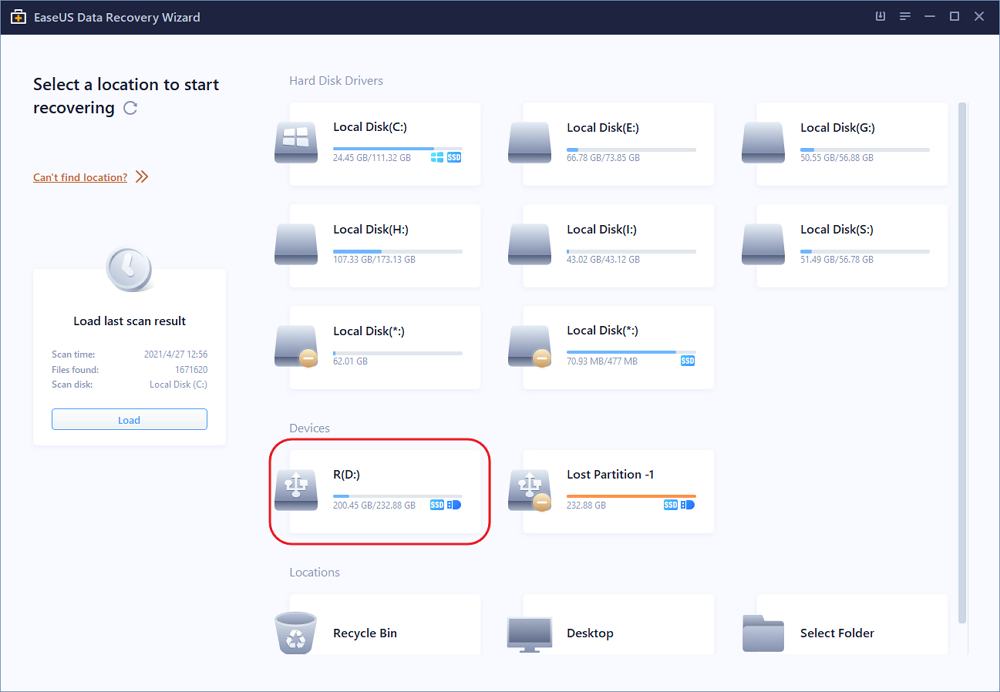
Step 1.В Run USB data recovery software.
Connect the USB flash drive to your computer and launchВ EaseUS USB data recovery software on your PC. Select your USB drive which marks as a removable disk, and click «Scan» to start finding your lost files.
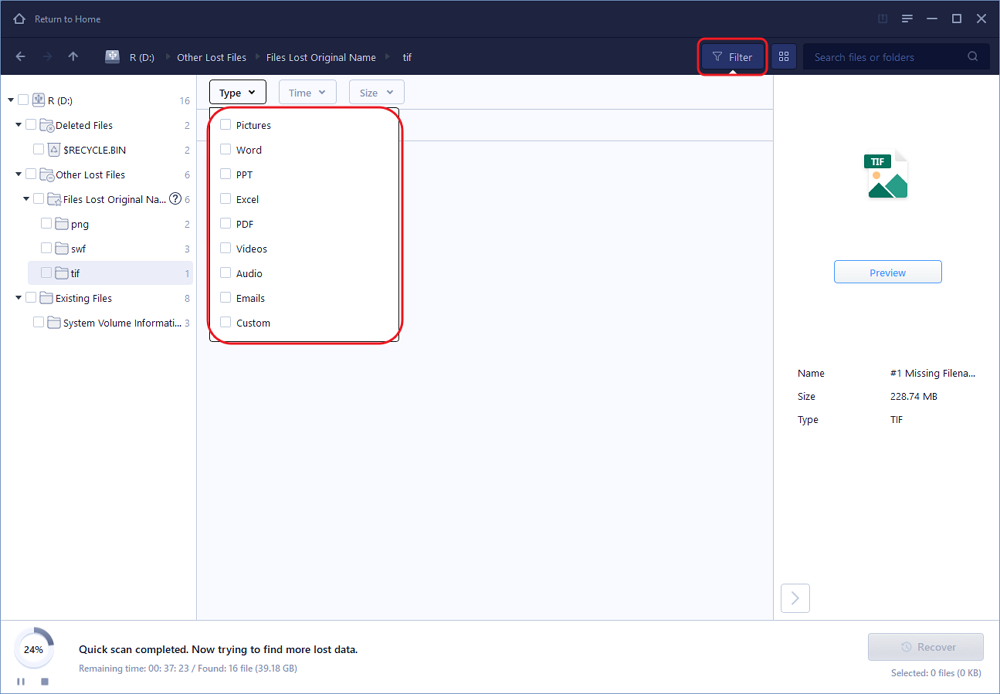
Step 2.В Scan all lost files from USB.
EaseUS Data Recovery Wizard will thoroughly scan your USB flash drive and find all your lost data on it. After the scanning process,В use the Filter feature to filter a specific file type. You can check and preview found USB files in this program.
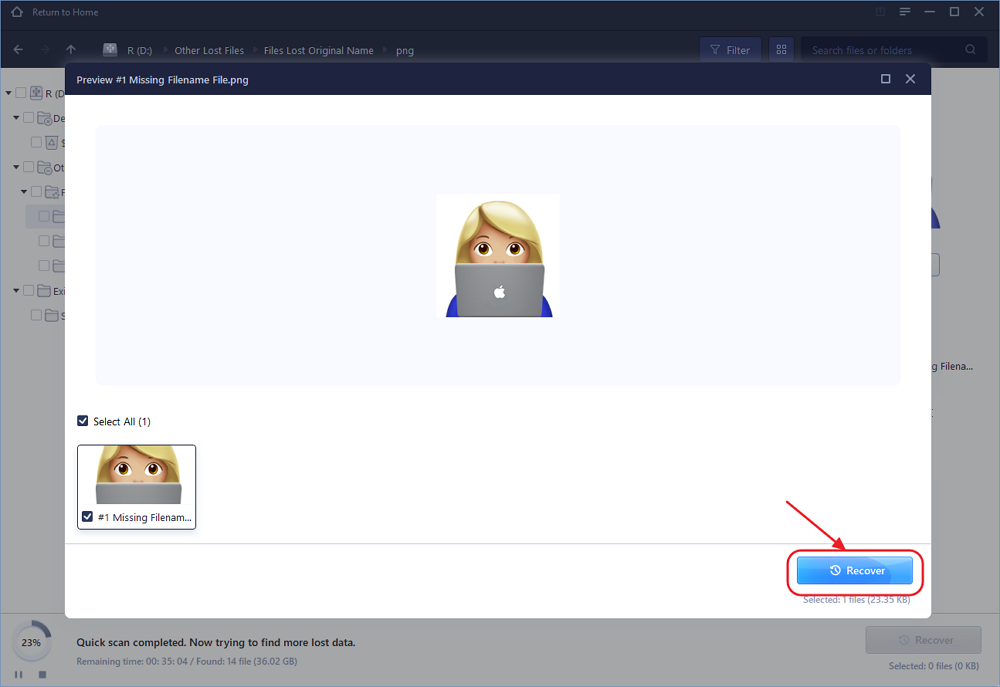
Step 3.В Restore all lost files from USB.
A double-click will allow you to preview the file results. Choose the target files and click «Recover» to save them to aВ secure location on your PC or other external storage devices.
After storing your data in a safe place, you need to format the USB drive to convert the file system back to NTFS or another Windows-compatible file system.
Step 1. Right-click on the «Start» icon > Type computer management > click on «Computer Management».
Step 2. Click «Disk Management» in the bar on the left-hand side, then find the device in the drive viewer.
Step 3. Right-click on the USB flash drive, select «Format» to directly format the USB drive to make it usable.
If you are having a similar issue on your hard drive, you may directly try the fixes below.В

Are your hard drives, be it new or old, internal or external, not showing up in File Explorer or Disk Management? Follow to learn how to make your hard drive showing up again in Windows 10/8/7 without losing data.
Fixes for USB Not Showing Up in Windows File Explorer and Disk Management
If your USB is not showing up in Windows File Explorer and Disk Management simultaneously, the reasons could be:
- USB driver issues
- USB port/cable error
- Physical corruptions of USB
Follow to fix your problematic USB with ease.
Method 1. Fix Driver Issues
Whether the USB drive shows up in Disk Management or not, the USB not showing up issue caused by problematic device drivers can be potentially solved by updating or reinstalling the USB driver. For the detailed steps, you can refer to the first two methods in the last part.
MethodВ 2. Change USB Connection
Connection failure may be the root cause. It’s a hardware problem that you can easily identify by checking the USB connection. Generally, there is more than one USB port on your computer. Try other ones on the same computer, switch from the front USB ports to the rear USB ports, or connect your USB drive to another computer and check whether the problem remains. Similarly, you can also change another USB cable if you are using an external hard drive.
MethodВ 3. Fix Physical Corruptions
If the tips above fail to fix your USB drive that is not showing up in Windows, it’s highly likely there is physical damage or corruption on your USB flash drive or external hard drive. This is the toughest situation and the only suggestion for you is to send the USB drive for manual repair.
The Bottom Line
When a USB flash drive does not show up on your Windows PC, it means that the computer has failed to read the USB drive. Therefore, in order to get a USB drive to show up, we must make the USB readable again. There are many methods for you to make an unrecognized USB drive to show up on PC: update USB flash driver, change drive letter, use Windows’s built-in disk management tool to detect the USB, and more. Hope one of them can be helpful to fix your USB drive.
Install Windows from a USB Flash Drive
Here’s how to create a bootable Windows installation USB drive starting with a Windows .iso file or a Windows Setup DVD.
If you’re looking for an easy way to create a bootable USB Windows installation drive, use the media creation tool.
What you need
- Windows 10 install .iso or DVD
- USB flash drive with at least 5GB free space. This drive will be formatted, so make sure it doesn’t have any important files on it.
- Technician PC — Windows PC that you’ll use to format the USB flash drive
- Destination PC — A PC that you’ll install Windows on
Step 1 — Format the drive and set the primary partition as active
Connect the USB flash drive to your technician PC.
Open Disk Management: Right-click on Start and choose Disk Management.
Format the partition: Right-click the USB drive partition and choose Format. Select the FAT32 file system to be able to boot either BIOS-based or UEFI-based PCs.
Set the partition as active: Right-click the USB drive partition and click Mark Partition as Active.
If Mark Partition as Active isn’t available, you can instead use diskpart to select the partition and mark it active.
Step 2 — Copy Windows Setup to the USB flash drive
Use File Explorer to copy and paste the entire contents of the Windows product DVD or ISO to the USB flash drive.
Optional: add an unattend file to automate the installation process. For more information, see Automate Windows Setup.
Step 3 — Install Windows to the new PC
Connect the USB flash drive to a new PC.
Turn on the PC and press the key that opens the boot-device selection menu for the computer, such as the Esc/F10/F12 keys. Select the option that boots the PC from the USB flash drive.
Windows Setup starts. Follow the instructions to install Windows.
Remove the USB flash drive.
If your Windows image is larger than 4GB
Windows USB install drives are formatted as FAT32, which has a 4GB filesize limit. If your image is larger than the filesize limit:
Copy everything except the Windows image file (sources\install.wim) to the USB drive (either drag and drop, or use this command, where D: is the mounted ISO and E: is the USB flash drive.)
Split the Windows image file into smaller files, and put the smaller files onto the USB drive:
KB4577586: Update for the removal of Adobe Flash Player: October 27, 2020
Adobe Flash Player is out of support as of December 31, 2020. For more information, see Adobe Flash end of support on December 31, 2020.
Applying this update will remove Adobe Flash Player from your Windows device.
After this update has been applied, this update cannot be uninstalled.
This update only removes Adobe Flash Player that was installed by your version of Windows. If you installed Adobe Flash Player manually from another source, it will not be removed. For more information about how to remove Adobe Flash Player, see the Uninstall Flash Player | Windows topic on the Adobe website.
Summary
This update removes Adobe Flash Player that is installed on any of the Windows operating systems that are listed in the «Applies to» section. After you apply this update, it cannot be uninstalled.
Note If you must use Adobe Flash Player again on your device after this update has been installed, use one of the following methods:
Method 1: Reset your device to an earlier system restore point. This feature must be explicitly enabled and a system restore point must have been created on your Windows device before you apply this update.
For more information about system restore point, see Back up and restore your PC.
Method 2: Reinstall your Windows operating system, but do not apply this update.
Known issues in this update
When this update is applied, registry settings for the third-party provided version of Adobe Flash Player may be removed.
To resolve this issue, reinstall the third-party version.
How to obtain and install the update
Windows Update
This update is an optional update in Windows Update.
Microsoft Update Catalog
To get the standalone package for this update, go to the Microsoft Update Catalog website.
Windows Server Update Service
This update is an optional update in Windows Server Update Service (WSUS).
References
Learn about the terminology that Microsoft uses to describe software updates.


