- Create a local user or administrator account in Windows 10
- How to see all existing user accounts on Windows 10
- How to see all Windows 10 accounts using Settings
- How to see all Windows 10 accounts Computer Management
- How to see all Windows 10 accounts using Command Prompt
- How to see all Windows 10 accounts using PowerShell
- Windows 10 — The «other user» option on login screen is missing
- Replies (23)
- 5 Ways to See All User Accounts Existing on Windows 10
- Way 1: See all user accounts from the login screen
- Way 2: See all user accounts using Control Panel
- Way 3: See all user accounts using Computer Management tool
- Way 4: See all user accounts using Command Prompt
- Way 5: See a list of all user accounts using Windows Password Refixer
Create a local user or administrator account in Windows 10
You can create a local user account (an offline account) for anyone who will frequently use your PC. The best option in most cases, though, is for everyone who uses your PC to have a Microsoft account.
If needed, the local user account can have administrator permissions; however, it’s better to just create a local user account whenever possible.
Caution: A user with an administrator account can access anything on the system, and any malware they encounter can use the administrator permissions to potentially infect or damage any files on the system. Only grant that level of access when absolutely necessary and to people you trust.
As you create an account, remember that choosing a password and keeping it safe are essential steps. Because we don’t know your password, if you forget it or lose it, we can’t recover it for you.
If you’re using Windows 10, version 1803 and later, you can add security questions as you’ll see in step 4 under Create a local user account. With answers to your security questions, you can reset your Windows 10 local account password. Not sure which version you have? You can check your version.
Create a local user account
Select Start > Settings > Accounts and then select Family & other users. (In some versions of Windows you’ll see Other users.)
Select Add someone else to this PC.
Select I don’t have this person’s sign-in information, and on the next page, select Add a user without a Microsoft account.
Enter a user name, password, or password hint—or choose security questions—and then select Next.
Change a local user account to an administrator account
Select Start > Settings > Accounts .
Under Family & other users, select the account owner name (you should see «Local Account» below the name), then select Change account type.
Note: If you choose an account that shows an email address or doesn’t say «Local account», then you’re giving administrator permissions to a Microsoft account, not a local account.
Under Account type, select Administrator, and then select OK.
Sign in with the new administrator account.
How to see all existing user accounts on Windows 10
If you need to see all the existing user accounts configured on your device, in this guide, you’ll learn four ways to do it on Windows 10.

On Windows 10, sometimes you may need to know the information about all the available user accounts configured on your device for a variety of reasons. Furthermore, other times, you may also need to know the hidden users accounts available on your system, such as the Administrator account, which usually is disabled by default.
If you need to see all the existing accounts, Windows 10 includes a number of ways to view this information using built-it tools and command line.
In this guide, you’ll learn four ways to see a listing of every account available on Windows 10.
How to see all Windows 10 accounts using Settings
The easiest way to see the accounts available on your device is using the Settings app:
Open Settings.
Click on Accounts.
Click on Family & other people.
 Account settings page on Windows 10
In this page you’ll find out the existing user accounts configured on your PC, but this page is limited because it doesn’t show built-in user accounts like the built-in Administrator account.
Also, you’ll notice that current user account isn’t listed either, but that’s because this information appears in the “Your info” page.
How to see all Windows 10 accounts Computer Management
If you’re using Windows 10 Pro, you can use the Computer Management console to view all the accounts configured on your device.
Open Start.
Search for Computer Management and click the top result.
Browse the following path:
 Computer Management user account list
After completing the steps, you’ll see a list of all the enable and disable, built-in, and the accounts you created on Windows 10.
How to see all Windows 10 accounts using Command Prompt
Alongside using Settings and Computer Management, you can also view a full list of existing accounts configured on Windows 10 using Command Prompt.
Open Start.
Search for Command Prompt and click the top result.
Type the following command to list all the existing accounts and press Enter:
 Net user command
Alternatively, you can use this command:
 WMIN command
After completing the steps, the output of the command will list all the accounts configured on your device.
How to see all Windows 10 accounts using PowerShell
Alternatively, you can even use a single command in PowerShell to view a list with details about every account available on Windows 10.
Open Start.
Search for PowerShell and click the top result.
Type the following command to list all the existing accounts and press Enter:
 Get-LocalUser command
Once you’ve completed the steps, you’ll see a list of every account configured on your device with their description and whether they’re active or disable accounts.
If you need to export the list of accounts to a text file, you can append the export output switch to any of the command mentioned in this guide. For example, net user > c:\path\to\output\folder\list.txt or Get-LocalUser > c:\path\to\output\folder\list.txt .
In the case one of the account has been created using a Microsoft account, the account name will only include the first five letters of the email address.
We may earn commission for purchases using our links to help keep offering the free content. Privacy policy info.
All content on this site is provided with no warranties, express or implied. Use any information at your own risk. Always backup of your device and files before making any changes. Privacy policy info.
Windows 10 — The «other user» option on login screen is missing
Like the topic stands, my Windows 10 login screen doesn’t show the option to type in username and password instead of just choosing the username I want to log on to. I was able to enable the other user login but by doing so I can only log in through the other user prompt without a list of existing accounts. I did it by enabling «Interactive logon: Don’t display last signed-in» in the group policy. However it is not exactly what I am trying to achieve.
I have seen Windows 10 devices where the user was able to login through selecting a user from a list and providing a password. On this devices in the list of known users there was the «other user» option which is missing on my PC. This devices probably where part of a domain which possibly enables the «other user» option but I am interested in achieving the same thing without a domain. Is this possible?
I am running Windows 10 2004 Education Edition.
I have an activated administrator account that I can us and log on into.
No problems logging in whatsoever, neither with user list nor with the other user prompt.
To put it my issue in simple words to summarise, I want a login screen where I have the usual list of available users along with the other user option.
I hope this description is clear enough.
Thank you in advance to anyone who might have a solution
Replies (23)
* Please try a lower page number.
* Please enter only numbers.
* Please try a lower page number.
* Please enter only numbers.
I’m Oscar, an installation specialist, 10 years as MCSE, and Volunteer Moderator, here to help you.
Fast User Switching is an easy way for another person to log on to the computer without logging you off or closing your programs and files. Follow the steps below to for Fast Switch User.
1. To begin, make sure that you have logged in as Administrator or have required administrative rights to change local group policies.
2. Press the Windows +R button.
3. Run dialog box will pop-up,type gpedit.msc..This will open Local Group Policy Editor.
4. Now, go to the following location and look for Local Computer Policy in the left pane.
5. Click on Local Computer Policy/Computer Configuration/Administrative Templates/System/Logon.
6. Just double-click Hide Entry Points for Fast User Switching to bring up a dialog box to change Fast User Switching policy setting.
7. At the top, there are Not Configured, Enabled and Disabled options available. Selecting each setting will let you read its affect in Help section. To disable Hide Entry Points for Fast User Switching, just selectEnabled from the list and click OK.
8. Once done, you will have to enforce the change made to Fast User Switching policy setting. To do so, close the Local Group Policy Editor and open the Run dialog box (Windows +R button). Enter the command “gpupdate /force“ and click OK. The policy will be updated and applied on all user accounts.
9. To re-enable Fast User Switching, just choose Not Configured in its policy setting dialog and apply the changes via gpupdate /force command.
I would also suggest you to stop and restart Fast User Switching Compatibility in services.
Keep me posted on your progress as I will be here to help until the case is resolved.
5 Ways to See All User Accounts Existing on Windows 10
Occasionally for some reason, you may want to view a full list of all user accounts that exist on Windows 10. Now, this page introduces five ways you can see all user accounts on Windows 10.
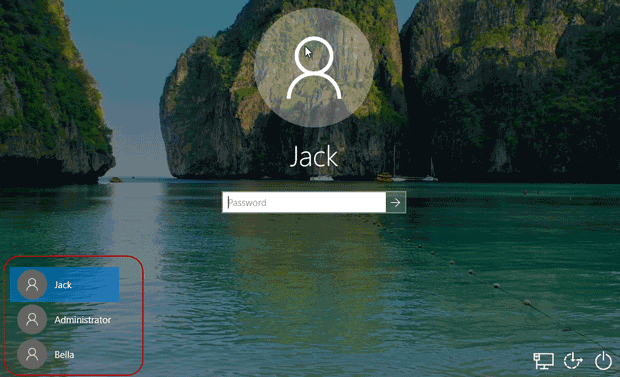
Way 1: See all user accounts from the login screen
All active user accounts on Windows 10 display in a list in the lower left corner of the login screen. You can see all of them when you are at the login screen. But the disabled or hidden user accounts won’t display here.
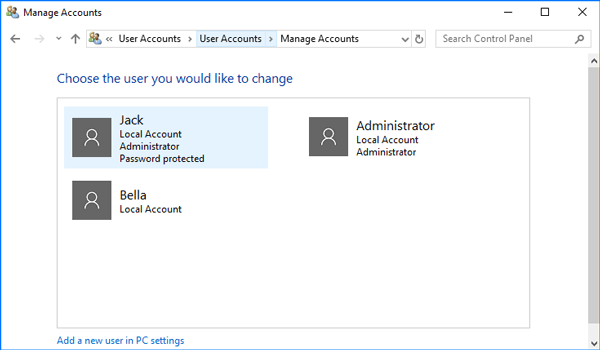
Way 2: See all user accounts using Control Panel
Open the Control Panel in Windows 10, and go to User Accounts > User Accounts > Manage Another Accounts.
Then from here, you can see all user accounts that exist on your Windows 10, except those disabled and hidden ones.
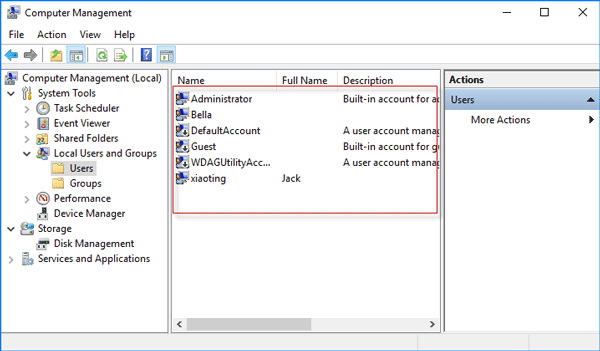
Way 3: See all user accounts using Computer Management tool
Step 1: Right-click on This PC and select Manage from the context menu to open Computer Management.
Step 2: Expand System Tools > Local Users and Groups, and then select the Users folder, so that it will list all user accounts existing on your Windows 10, including the disabled or hidden accounts. Furthermore, you can double-click on each user’s name to see its properties if you want.
Way 4: See all user accounts using Command Prompt
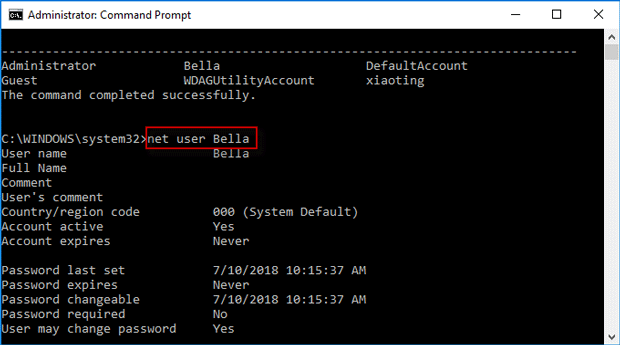
Step 2: Type in the command: net user, and then press Enter key so that it will display all user accounts existing on your Windows 10, including the disabled and hidden user accounts. They are arranged from left to right, top to down.
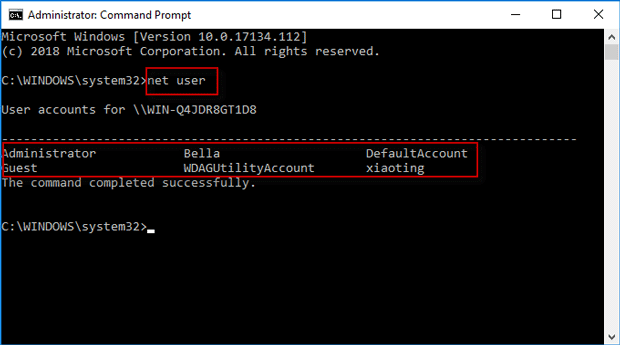
Step 3: If you want to view detailed information or properties about a specific user account, just type in the command: net user username, for example, net user Bella, and press Enter key. Then the window displays detailed information and properties about that user account, such as its full name, account active state, if the password is required or not, and so on.
Way 5: See a list of all user accounts using Windows Password Refixer
Beyond that, you can also see the list of all existing user accounts using the third-party Windows Password Refixer tool. It would be helpful especially when you can’t log on to Windows 10 or even can’t start Windows 10 normally.
Tips: Windows Password Refixer is a Windows password reset tool designed to primarily help users to reset Windows password. But it also has two other valuable features, allowing you to view all user accounts existing on Windows and create a new admin account for Windows.
Step 1: If you just want to use this tool to view a list of all user accounts that exist on your Windows 10, you can download the Windows Password Refixer tool free on any computer and install it on that computer.
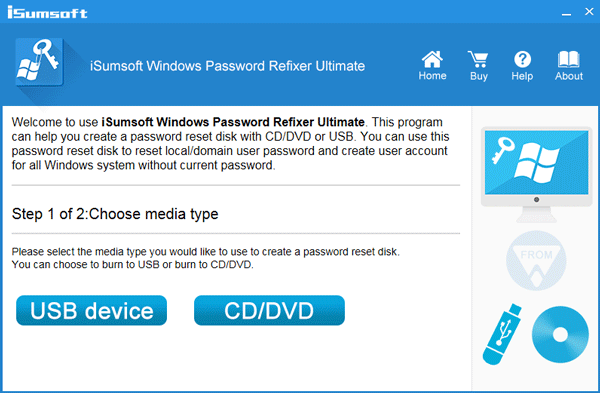
Step 2: Once you have it installed, launch it, and then follow the on-screen instructions to burn it to a USB device or CD/DVD flash drive to create a boot disk.
Step 3: Connect the boot disk to your Windows 10 computer and start/restart it from the boot disk (USB or CD flash drive). If you have no idea how to do that, refer to this page: How to boot a computer from a USB drive, or How to boot a computer from a CD/DVD flash drive.
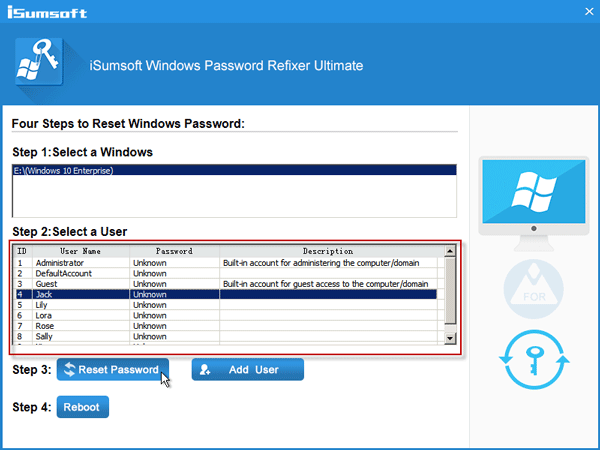
Step 4: If you boot your computer from that boot disk correctly, Windows Password Refixer should work and appear on your screen. It displays Windows 10 running on your computer and shows a full list of all user accounts existing on your Windows 10, including the disabled and hidden user accounts.
Conclusion: The first two methods allow you to view all active user accounts on Windows 10, while the last three methods allow you to view the full list of all user accounts that exist on Windows 10, including the disabled and hidden user accounts.


