- Get started with Docker remote containers on WSL 2
- Overview of Docker containers
- Prerequisites
- Install Docker Desktop
- Develop in remote containers using VS Code
- Troubleshooting
- WSL docker context deprecated
- Trouble finding docker image storage folder
- SPBDEV Blog
- Введение
- Основы Windows Containers
- Виртуальные машины против контейнеров
- Windows Server Containers против Hyper-V Containers
- Docker
- Контейнеры Windows на практике
Get started with Docker remote containers on WSL 2
This step-by-step guide will help you get started developing with remote containers by setting up Docker Desktop for Windows with WSL 2 (Windows Subsystem for Linux, version 2).
Docker Desktop for Windows is available for free and provides a development environment for building, shipping, and running dockerized apps. By enabling the WSL 2 based engine, you can run both Linux and Windows containers in Docker Desktop on the same machine.
Overview of Docker containers
Docker is a tool used to create, deploy, and run applications using containers. Containers enable developers to package an app with all of the parts it needs (libraries, frameworks, dependencies, etc) and ship it all out as one package. Using a container ensures that the app will run the same regardless of any customized settings or previously installed libraries on the computer running it that could differ from the machine that was used to write and test the app’s code. This permits developers to focus on writing code without worrying about the system that code will be run on.
Docker containers are similar to virtual machines, but don’t create an entire virtual operating system. Instead, Docker enables the app to use the same Linux kernel as the system that it’s running on. This allows the app package to only require parts not already on the host computer, reducing the package size and improving performance.
Continuous availability, using Docker containers with tools like Kubernetes, is another reason for the popularity of containers. This enables multiple versions of your app container to be created at different times. Rather than needing to take down an entire system for updates or maintenance, each container (and it’s specific microservices) can be replaced on the fly. You can prepare a new container with all of your updates, set up the container for production, and just point to the new container once it’s ready. You can also archive different versions of your app using containers and keep them running as a safety fallback if needed.
To learn more, checkout the Introduction to Docker containers on Microsoft Learn.
Prerequisites
- Ensure your machine is running Windows 10, updated to version 2004, Build 18362 or higher.
- Enable WSL, install a Linux distribution, and update to WSL 2.
- Download and install the Linux kernel update package.
- Install Visual Studio Code(optional). This will provide the best experience, including the ability to code and debug inside a remote Docker container and connected to your Linux distribution.
- Install Windows Terminal(optional). This will provide the best experience, including the ability to customize and open multiple terminals in the same interface (including Ubuntu, Debian, PowerShell, Azure CLI, or whatever you prefer to use).
- Sign up for a Docker ID at Docker Hub(optional).
WSL can run distributions in both WSL version 1 or WSL 2 mode. You can check this by opening PowerShell and entering: wsl -l -v . Ensure that the your distribution is set to use WSL 2 by entering: wsl —set-version 2 . Replace with the distro name (e.g. Ubuntu 18.04).
In WSL version 1, due to fundamental differences between Windows and Linux, the Docker Engine couldn’t run directly inside WSL, so the Docker team developed an alternative solution using Hyper-V VMs and LinuxKit. However, since WSL 2 now runs on a Linux kernel with full system call capacity, Docker can fully run in WSL 2. This means that Linux containers can run natively without emulation, resulting in better performance and interoperability between your Windows and Linux tools.
Install Docker Desktop
With the WSL 2 backend supported in Docker Desktop for Windows, you can work in a Linux-based development environment and build Linux-based containers, while using Visual Studio Code for code editing and debugging, and running your container in the Microsoft Edge browser on Windows.
To install Docker (after already installing WSL 2):
Download Docker Desktop and follow the installation instructions.
Once installed, start Docker Desktop from the Windows Start menu, then select the Docker icon from the hidden icons menu of your taskbar. Right-click the icon to display the Docker commands menu and select «Settings». 
Ensure that «Use the WSL 2 based engine» is checked in Settings > General. 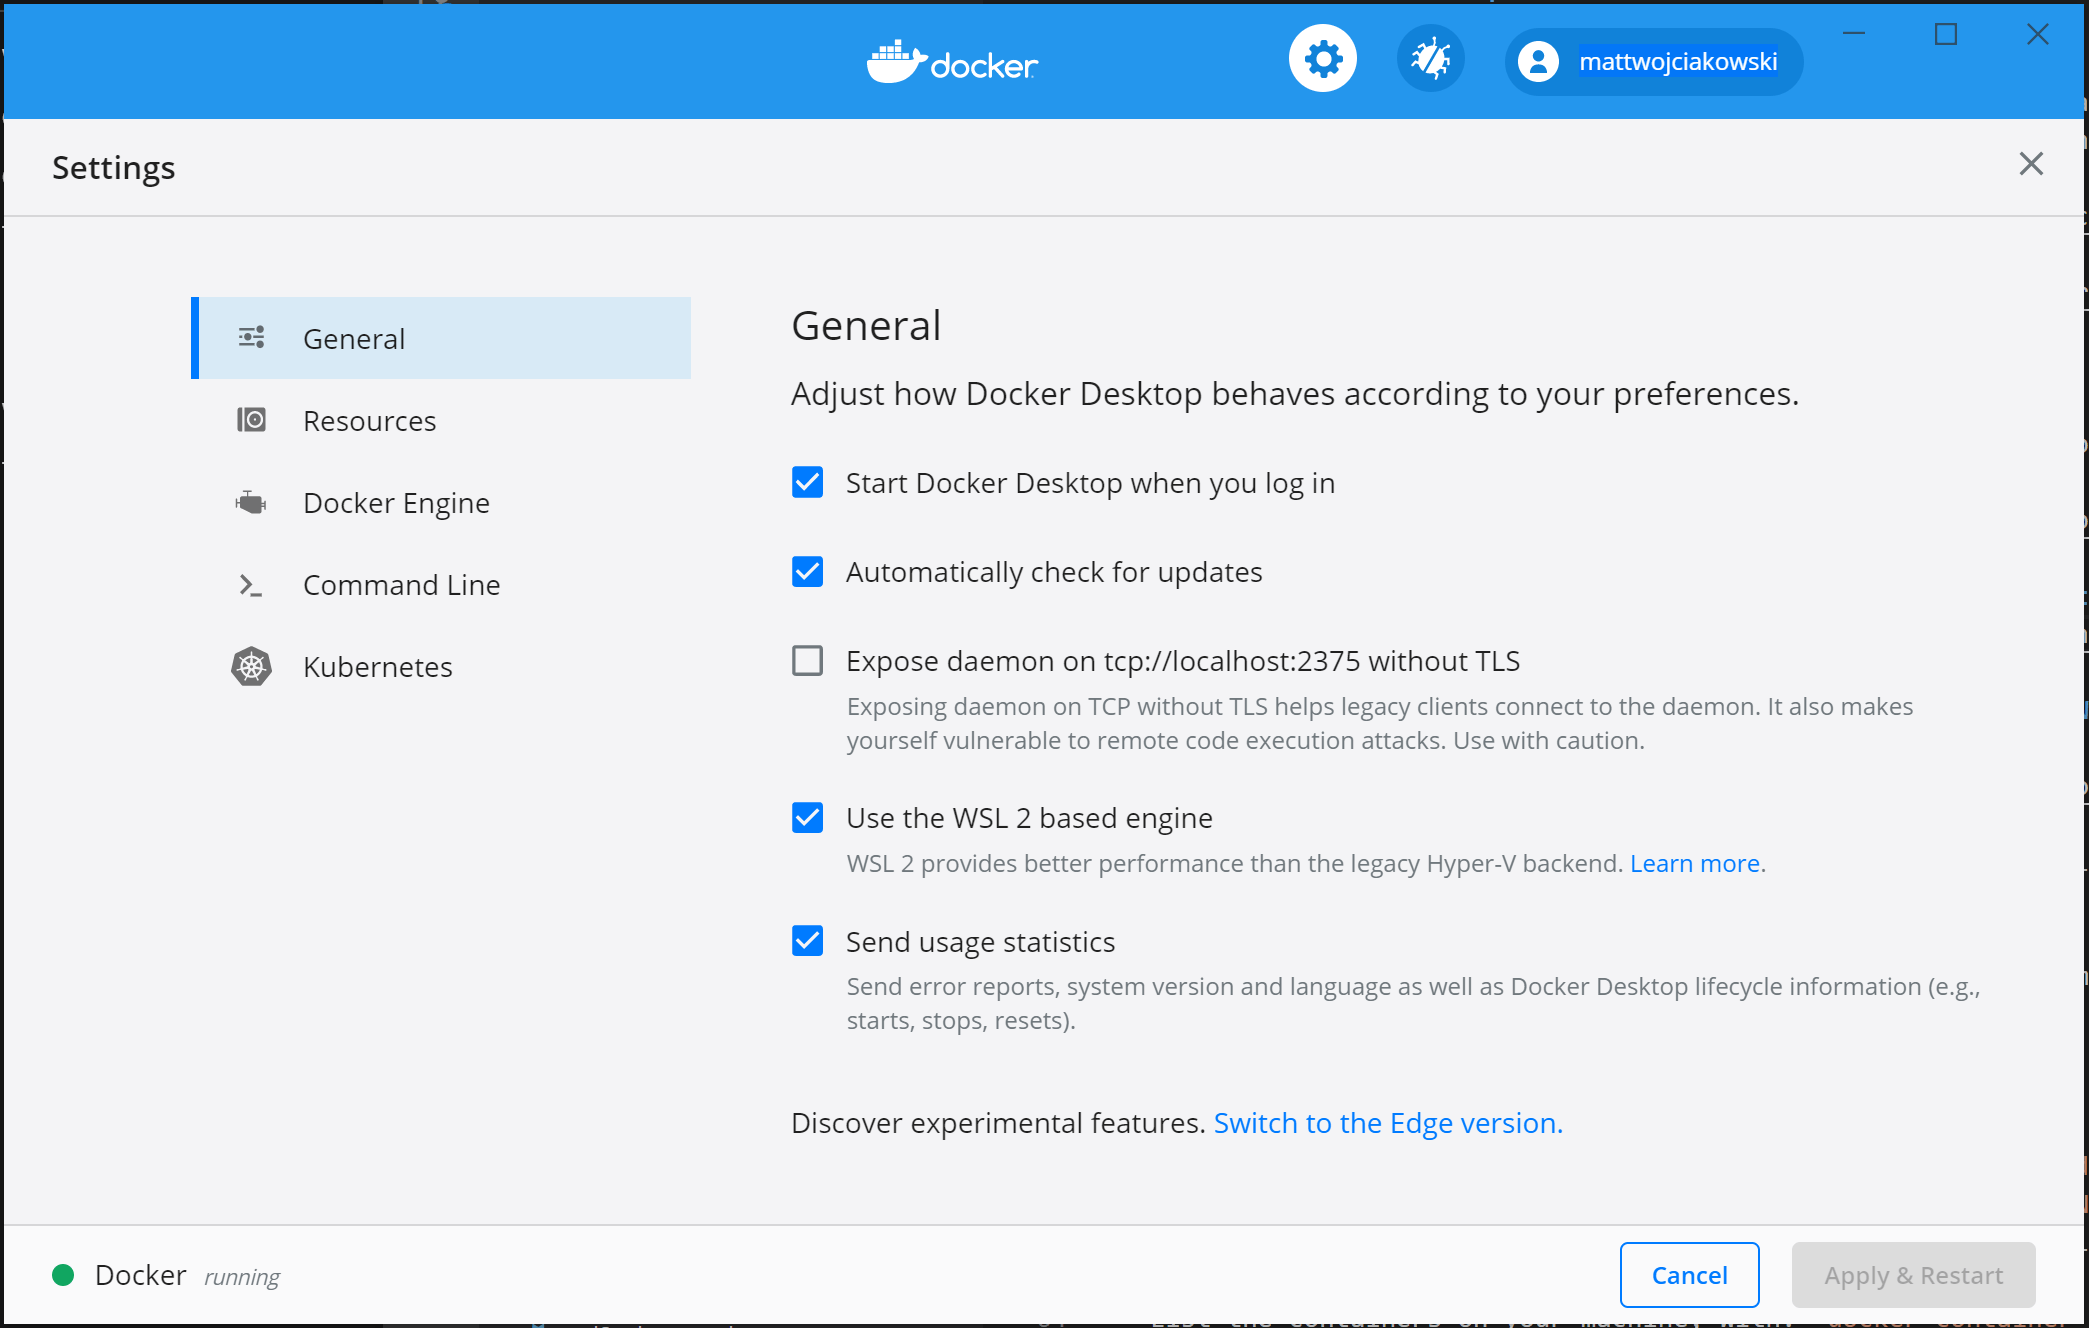
Select from your installed WSL 2 distributions which you want to enable Docker integration on by going to: Settings > Resources > WSL Integration. 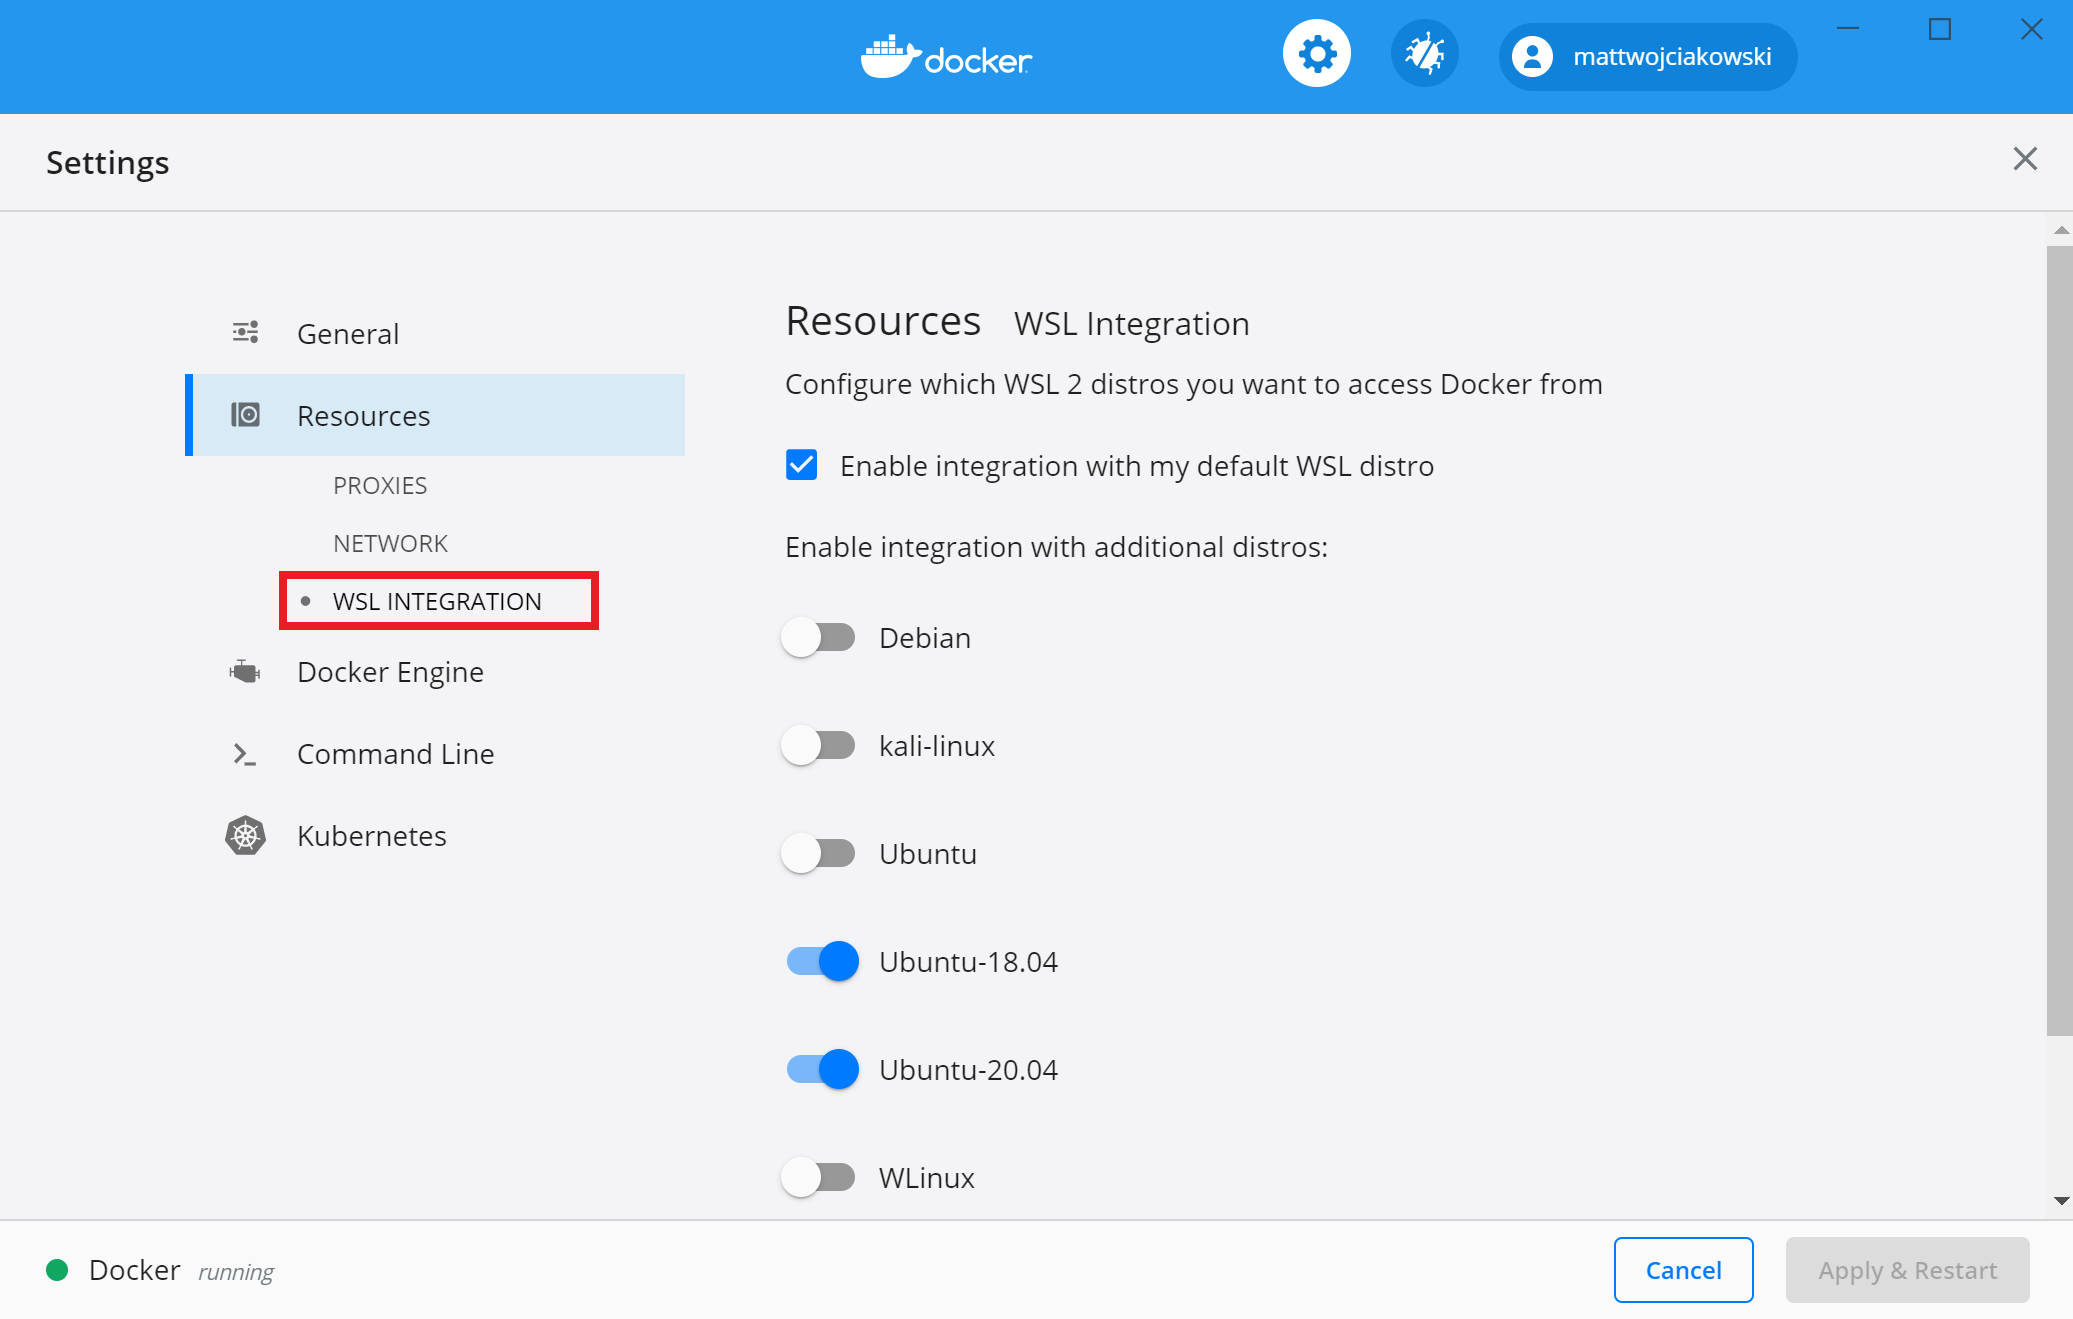
To confirm that Docker has been installed, open a WSL distribution (e.g. Ubuntu) and display the version and build number by entering: docker —version
Test that your installation works correctly by running a simple built-in Docker image using: docker run hello-world
Here are a few helpful Docker commands to know:
- List the commands available in the Docker CLI by entering: docker
- List information for a specific command with: docker —help
- List the docker images on your machine (which is just the hello-world image at this point), with: docker image ls —all
- List the containers on your machine, with: docker container ls —all or docker ps -a (without the -a show all flag, only running containers will be displayed)
- List system-wide information regarding the Docker installation, including statistics and resources (CPU & memory) available to you in the WSL 2 context, with: docker info
Develop in remote containers using VS Code
To get started developing apps using Docker with WSL 2, we recommend using VS Code, along with the Remote-WSL extension and Docker extension.
Install the VS Code Remote-WSL extension. This extension enables you to open your Linux project running on WSL in VS Code (no need to worry about pathing issues, binary compatibility, or other cross-OS challenges).
Install the VS code Remote-Containers extension. This extension enables you to open your project folder or repo inside of a container, taking advantage of Visual Studio Code’s full feature set to do your development work within the container.
Install the VS Code Docker extension. This extension adds the functionality to build, manage, and deploy containerized applications from inside VS Code. (You need the Remote-Container extension to actually use the container as your dev environment.)
Let’s use Docker to create a development container for an existing app project.
For this example, I’ll use the source code from my Hello World tutorial for Django in the Python development environment set up docs. You can skip this step if you prefer to use your own project source code. To download my HelloWorld-Django web app from GitHub, open a WSL terminal (Ubuntu for example) and enter: git clone https://github.com/mattwojo/helloworld-django.git
Always store your code in the same file system that you’re using tools in. This will result in faster file access performance. In this example, we are using a Linux distro (Ubuntu) and want to store our project files on the WSL file system \\wsl\ . Storing project files on the Windows file system would significantly slow things down when using Linux tools in WSL to access those files.
From your WSL terminal, change directories to the source code folder for this project:
Open the project in VS Code running on the local Remote-WSL extension server by entering:
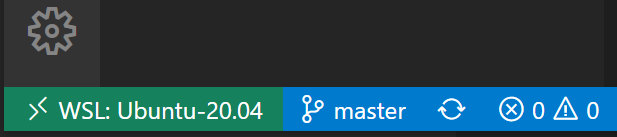
Confirm that you are connected to your WSL Linux distro by checking the green remote indicator in the bottom-left corner of your VS Code instance.
From the VS Code command pallette (Ctrl + Shift + P), enter: Remote-Containers: Open Folder in Container. If this command doesn’t display as you begin to type it, check to ensure that you’ve installed the Remote Container extension linked above.

Select the project folder that you wish to containerize. In my case, this is \\wsl\Ubuntu-20.04\home\mattwojo\repos\helloworld-django\

A list of container definitions will appear, since there is no DevContainer configuration in the project folder (repo) yet. The list of container configuration definitions that appears is filtered based on your project type. For my Django project, I’ll select Python 3.

A new instance of VS Code will open, begin building our new image, and once the build completed, will start our container. You will see that a new .devcontainer folder has appeared with container configuration information inside a Dockerfile and devcontainer.json file.

To confirm that your project is still connected to both WSL and within a container, open the VS Code integrated terminal (Ctrl + Shift +
). Check the operating system by entering: uname and the Python version with: python3 —version . You can see that the uname came back as «Linux», so you are still connected to the WSL 2 engine, and Python version number will be based on the container config that may differ from the Python version installed on your WSL distribution.
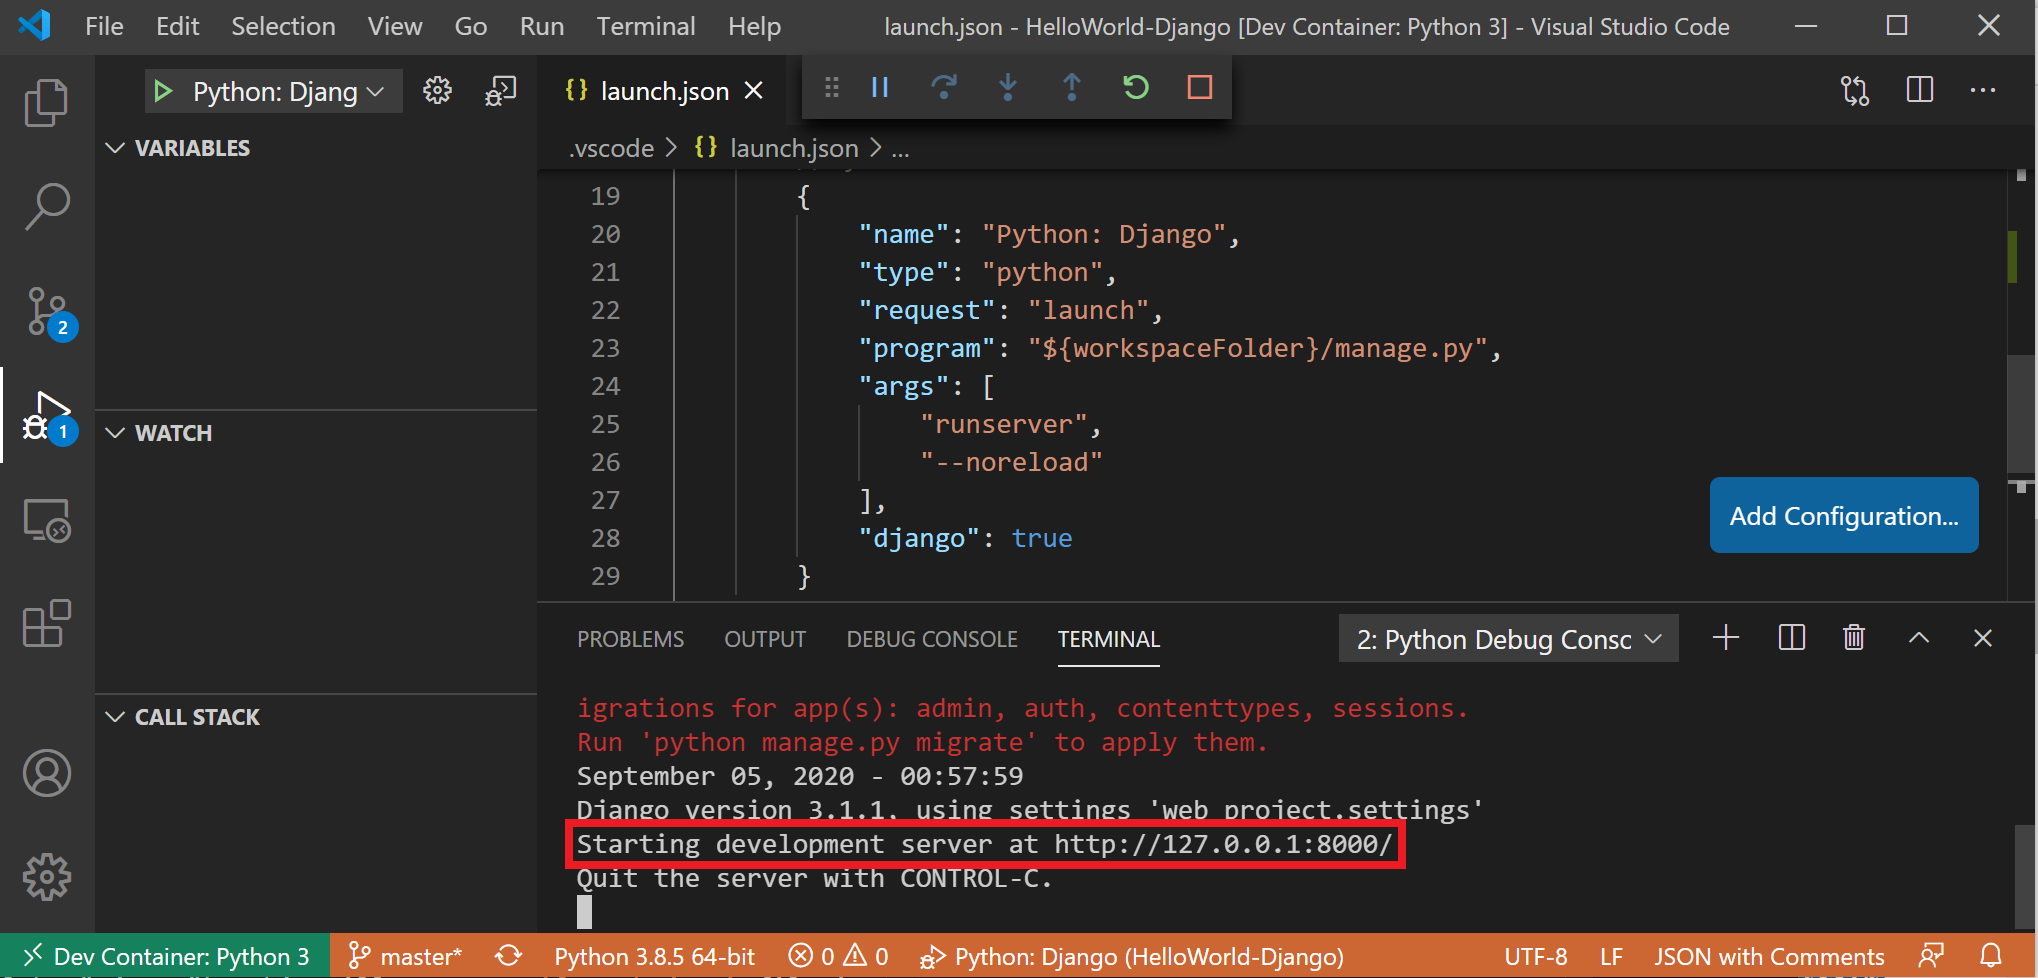
To run and debug your app inside of the container using Visual Studio Code, first open the Run menu (Ctrl+Shift+D or select the tab on the far left menu bar). Then select Run and Debug to select a debug configuration and choose the configuration that best suites your project (in my example, this will be «Django»). This will create a launch.json file in the .vscode folder of your project with instructions on how to run your app.

From inside VS Code, select Run > Start debugging (or just press the F5 key). This will open a terminal inside VS Code and you should see a result saying something like: «Starting development server at http://127.0.0.1:8000/ Quit the server with CONTROL-C.» Hold down the Control key and select the address displayed to open your app in your default web browser and see your project running inside of its container.
You have now successfully configured a remote development container using Docker Desktop, powered by the WSL 2 backend, that you can code in, build, run, deploy, or debug using VS Code!
Troubleshooting
WSL docker context deprecated
If you were using an early Tech Preview of Docker for WSL, you may have a Docker context called «wsl» that is now deprecated and no longer used. You can check with the command: docker context ls . You can remove this «wsl» context to avoid errors with the command: docker context rm wsl as you want to use the default context for both Windows and WSL2.
Possible errors you might encounter with this deprecated wsl context include: docker wsl open //./pipe/docker_wsl: The system cannot find the file specified. or error during connect: Get http://%2F%2F.%2Fpipe%2Fdocker_wsl/v1.40/images/json?all=1: open //./pipe/docker_wsl: The system cannot find the file specified.
Trouble finding docker image storage folder
Docker creates two distro folders to store data:
You can find these folders by opening your WSL Linux distribution and entering: explorer.exe . to view the folder in Windows File Explorer. Enter: \\wsl\ \mnt\wsl replacing with the name of your distribution (ie. Ubuntu-20.04) to see these folders.
Find more on locating docker storage locations in WSL, see this issue from the WSL repo or this StackOverlow post.
For more help with general troubleshooting issues in WSL, see the Troubleshooting doc.
SPBDEV Blog
Когда вы начнете работать с контейнерами, вы увидите много сходства между контейнером и виртуальной машиной; но, по сути, это два совершенно разных понятия. Контейнеры собираются изменить способ разработки Windows-разработок в следующем году, и они уже лежат в основе большой работы по ускорению процесса доставки. Мы объясним, как использовать функцию Windows Containers.
Введение
Контейнеры Windows революционизируют виртуализацию и процесс DevOps.
С Windows Server 2016 Microsoft представляет новую функцию под названием Windows Containers. Организации, которые обновляют свои серверы до этой новой операционной системы, смогут использовать контейнеры прямо из разработки в производственную среду.
Мы не будем углубляться в концепцию контейнеров, но в этой серии расскажем, как создавать, запускать, конвертировать и управлять вашими контейнерами Windows.
Основы Windows Containers
Прежде чем начать практическую сторону Windows Containers, мы должны вкратце осветить основы этой новой функции.
Контейнеры упаковывают программное обеспечение внутри полной файловой системы, которая содержит все, что нужно для запуска: код, среда выполнения, системные инструменты и системные библиотеки. Это гарантирует, что он всегда будет работать одинаково, независимо от среды, в которой он работает. Для достижения этой цели Windows использует изоляцию пространства имен, управление ресурсами и технологические процессы, чтобы ограничить файлы, сетевые порты и запущенные процессы, к которым может обращаться каждый контейнер, чтобы приложения, работающие в контейнерах, не могли взаимодействовать или видеть другие запущенные приложения в ОС хоста или в других контейнерах.
Виртуальные машины против контейнеров
Виртуальная машина является автономной и имеет собственную операционную систему, собственные приложения и собственные ресурсы (память, процессор и т. д.). Следующая схема показывает три виртуальных машины, размещенных на одном и том же физическом узле. Каждая виртуальная машина использует свою собственную ОС, библиотеки и т. Д. В результате они занимают значительное количество памяти.
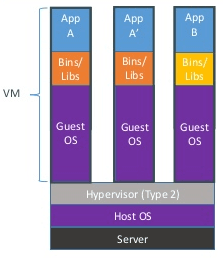
Архитектура виртуальных машин
Довольно часто разработчикам приходится очень быстро тестировать приложения с разными версиями. Затем они должны попросить команду IT Ops развернуть одну или несколько машин (виртуальных или физических): это трудоемкий процесс. VM также потребляют значительные ресурсы, такие как память и пространство для хранения. Вот почему контейнеры удивительно полезны для процесса DevOps:
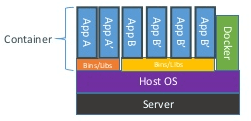
Контейнеры, напротив, не содержат никакой операционной системы, поэтому они потребляют меньше ресурсов, чем виртуальные машины на физическом хосте. Контейнеры просто используют хост-операционную систему, включая ядро и библиотеки, поэтому им не нужно загружать полную ОС.
Таким образом, преимущества контейнеров Windows заключаются в следующем:
- Когда вы развертываете контейнер в рабочей среде, процесс отката очень прост. Вам просто нужно изменить сценарий развертывания и переустановить образ контейнера. Представьте себе процесс отката с виртуальными машинами? Вы должны перестроить всю машину (или вернуться к предыдущему состоянию или резервной копии).
- Время запуска для контейнера Windows короче, чем у виртуальной машины.
- Компактность использования облачных сценариев
Наконец, философия контейнера — это «одна услуга на контейнер»,
Windows Server Containers против Hyper-V Containers
Microsoft включает два разных типа контейнера. Первый тип основан на образовании Windows Server Core и называется контейнером Windows Server. Второй называется контейнером Hyper-V и основана на образовании Windows Nano Server. Контейнеры Hyper-V расширяют изоляцию, предоставляемую контейнерами Windows Server, запустив каждый контейнер в высоко оптимизированной виртуальной машине, чтобы обеспечить полную безопасную изоляцию. Ядро хоста контейнера не используется совместно с другими контейнерами Hyper-V. Если весь код, запущенный на хосте, надежен, то изоляция, предоставляемая контейнерами Windows, скорее всего, будет адекватной. Но если мы не доверяем коду, то контейнеры Hyper-V обеспечивают тот же уровень изоляции, что и виртуальные машины, но со многими преимуществами стандартных контейнеров.
Обратите внимание, что контейнеры Hyper-V управляются только Docker, а виртуальные машины Hyper-V управляются традиционными инструментами, такими как Hyper-V Manager. На практике загрузка Hyper-V контейнеров занимает больше времени, чем контейнеры Windows Server, но они намного быстрее, чем виртуальная машина с полной ОС (даже на Nano Server).
Docker
В октябре 2014 года Microsoft Corp и Docker объявили о стратегическом партнерстве, которое обеспечит гибкость, переносимость и безопасность платформы Docker для Windows Server.

Контейнеры Windows Server 2016, работающие от Docker Engine
Необходимо понимать, что Windows Server 2016 не может запускать контейнеры Linux в формате Docker, а только контейнеры Windows. Зачем? Поскольку для Linux-контейнеров требуются API-интерфейсы Linux из ядра-хозяина, а для контейнеров Windows Server требуются API-интерфейсы Windows для ядра Windows-хоста.
Однако процесс управления контейнерами Linux и Windows строго идентичен. Следующая схема описывает платформу Docker:
Платформа Docker
Ниже приведен краткий обзор жаргонов Windows Containers с их значением:
- Container Host: физическая или виртуальная компьютерная система, настроенная с использованием функции Windows Containers
- Container Image: Изображение контейнера содержит базовую операционную систему, приложение и все зависимости приложения, которые необходимы для быстрого развертывания контейнера.
- Container OS Image: Изображение операционной системы контейнера — это среда операционной системы.
- Container Registry: изображения контейнеров хранятся в реестре контейнеров и могут быть загружены по требованию. Это место, где публикуются изображения контейнеров. Реестр может быть удаленным или локальным.
- Docker Engine: Это ядро платформы Docker. Облегченное время выполнения контейнера, которое создает и запускает ваш контейнер.
- Docker file: файлы Docker используются разработчиками для создания и автоматизации создания изображений контейнеров. С файлом Docker демон Docker может автоматически создавать образ контейнера.
Docker предоставляет центральный репозиторий, называемый Docker Hub ( https://hub.docker.com/ ), общедоступный реестр контейнерных приложений, поддерживаемый Docker. Контейнерные изображения могут быть опубликованы непосредственно в этом репозитории для совместного использования с сообществом Docker. На Docker Hub уже много изображений. Например:
Вы можете запустить частный репозиторий локально. Посредством этого URL-адреса Microsoft имеет собственный публичный и официальный репозиторий: https://hub.docker.com/u/microsoft/
Контейнеры Windows на практике
Перед развертыванием контейнеров Windows вы должны подготовить свою среду с некоторыми предварительными условиями. Для этого вы можете использовать физическую или виртуальную машину, это зависит от вас. В нашем случае мы будем использовать виртуальную машину со следующими характеристиками:
- Система под управлением Windows Server 2016 (или Windows 10). Это самая важная предпосылка. Советуем вам работать с версией Datacenter из-за лицензирования (больше информации в конце статьи). Вы можете использовать Windows Server Core для своего контейнера, а не версию Windows, которая включает полный пользовательский интерфейс.
- Разрешения администратора на хосте контейнера
- Минимальное свободное пространство для хранения изображений и сценариев развертывания
- Ваш сервер должен быть современным
Хорошо, давайте начнем с установки функции Windows Containers на хосте контейнера. Для выполнения этой задачи запустите следующую команду PowerShell:


