- Adam the Automator
- How to Create (and Manage) Docker Volumes on Windows
- Adam Bertram
- Storing Persistent Data
- Enumerating Data in Docker Volumes
- Creating Docker Volumes
- Inspecting Docker Volumes
- Deleting Docker Volumes
- Summary
- docker run with —volume
- 2 Answers 2
- Docker Volumes on Windows — Introducing the `G` Drive
- Filesystems in Docker Containers
- Storing State in Docker Volumes
- Symlink Directories
- DOS Devices to the Rescue
- Mounting Volumes
- Book Plug
- Use the G Drive For Now
Adam the Automator
How to Create (and Manage) Docker Volumes on Windows

Adam Bertram
Read more posts by this author.
Docker volumes are the preferred way of handling persistent data created by and used by Docker containers. Let’s take a look at how this works by covering how to create Docker volumes on Windows. You’ll also learn how to manage them too!
This blog post has a companion video created by TechSnips contributor, Matt McElreath. Feel free to have a watch or, if you prefer text, read on!
Table of Contents
Storing Persistent Data
If you want to store persistent data for containers, there are a couple of options. First, I’ll show you how to use a bind mount. I’m currently in a folder called data on my C:\. If I list the contents of this folder, you can see that I have five text files.
If I want to make this folder available to a container, I can mount it when starting the container.
Let’s go ahead and run a container using docker run . I’m going to run this container in interactive mode, then specify -V . Here, I’m going to put the path to my data folder, followed by a colon, then I will specify the path inside the container where I would like this folder to be mounted.
For this, I’m going to specify the C:\shareddata folder. Then I’ll specify the Windows server core image and finally, I’ll specify that I want to run PowerShell once I’m inside the container.
Now that I’m inside the new container, if I list the contents of C:\, you can see that I have a shareddata folder.
Let’s go into that folder and list the contents. Here are my five test files that are located on my container host.
I can also create files in this folder, which will be available to other containers or my container host. Let’s go ahead and run new item to create a file called containertest.
We can see above that the new file has been created from within the container. Now I’ll exit this container which will shut it down by running exit .
If I run docker ps , you can see that there are currently no running containers.
Enumerating Data in Docker Volumes
Now let’s list the contents of the data folder again from my container host.
We can see the new file that was created from inside the container called containertest. Bind mounts have some limited functionality, however, so volumes are the preferred way to accomplish what we are trying to do. To get started with volumes, we can run the same command to start up a container, but this time with a couple of small differences. Where we specified the volume, instead of using the path on the container hosts’ file system, I’m going to use the word hostdata as the name of a volume I want to create and use.
From inside the new container, if I list the contents of C:\, you can see again that I have a folder called shareddata.
If I list the contents of that folder, it is currently empty because we created a blank volume. Now let’s run Ctrl-P-Q which will take us out of the running container, but keep it running in the background.
From the container host, run docker volume ls . This will list the current volumes on this container host. I have a volume called hostdata, which was created when I specified it in the docker run command.
If I run docker ps we can see our running container.
Stop that container using docker stop . Now we have no running containers.
Remove the stopped containers by running docker rm . If I list the volumes again, you can see that the hostdata volume is still available and can be mounted to new containers.
Creating Docker Volumes
Another way to create a volume is to use the docker volume create command. If you don’t specify a name, docker will give it a name which is a long list of random characters. Otherwise, you can specify a name here. I’m going to call this volume logdata. Now we can see it is in the list when we list the volumes again.
You’ll now mount that to a new container. Use docker run again and for the volume specify the volume that just created and mount it to c:\logdata.
From inside the container, go into the logdata folder and create a couple of files. Right now, there are no files in this directory, so go ahead and create some.
Now I have two log files in this directory.
Run Ctrl-P-Q again to exit this container while it is still running. While that container’s running, start up a new container with the same volume mounted.
If we run a listing on the logdata folder in the new container we can see the two log files being shared.
Now, exit this container. You should still have one running container and two exited containers.
Now stop all running containers, then run docker rm to remove all exited containers.
List the volumes again. The logdata volume is still available to be mounted to future containers.
If you run run docker volume , you’ll get some usage help for the command.
Inspecting Docker Volumes
We already looked at create , so let’s move on to inspect . If I run docker volume inspect against the logdata volume, it will return the properties for that volume, including the mount point which is the physical path to the volume on the container host.
Let’s open that folder using Invoke-Item and have a look. Under the logdata folder, there’s a folder called data. If we open that, we can see the files that were created from the container earlier.
Deleting Docker Volumes
To delete a volume, we can run docker volume rm , followed by the name of the volume you want to delete.
Now if I list the volumes, logdata is no longer there.
Finally, we can use prune to remove all unused local volumes. This will delete all volumes that are not mounted to a running or stopped container.
You want to be careful with this command, so there’s a warning and a prompt to make sure that you are sure that you want to do this. If I type Y and hit enter, it will show me which volumes were deleted.
And if I list my volumes again you can see that they have all been deleted.
Summary
In this blog post, you should have gotten a good overview of managing Docker volumes in Windows. Docker is a great container platform. With its support for Windows and your newfound skills at managing Docker volumes, you will be unstoppable!
docker run with —volume
I’m trying to dockerize some services for development on my machine and wondering how docker run —volume=.. works. For example, if I do something like
will /path/to/data be (re)created locally only if it doesn’t exist? Is the initial data copied from the container’s image?
Links to relevant documentation would be appreciated.
2 Answers 2
The —volume option is described in the docker run reference docs, which forwards you on to the dedicated Managed data in containers docs, which then forwards you on to the Bind mounts docs.
If you use -v or —volume to bind-mount a file or directory that does not yet exist on the Docker host, -v will create the endpoint for you. It is always created as a directory.
Yes, the directory on the host FS will be created only if it does not already exist.
The same time, Docker will not copy anything from the image into bind-mounted volume, so the mount path will appear as empty directory inside the container. Whatever was in the image will be hidden.
If you need original data to be copied over, you need to implement this functionality yourself. Fortunately, it is pretty easy thing to do.
- Among the last steps in Dockerfile, move or copy the original directory elsewhere. E.g. RUN mv /data /original-data
- Add a custom script to the image, which would serve as entrypoint, and will copy the data needed into the mounted volume (see code example below). Dockerfile directive: ADD entrypoint.sh /entrypoint.sh
- Add ENTRYPOINT directive, to instruct Docker to invoke your script as a part of container initialization: ENTRYPOINT [‘/entrypoint.sh’]
The script entrypoint.sh could look like following (simplified example):
If there’s already some entrypoint script in your image, you can just add appropriate logic to it.
Docker Volumes on Windows — Introducing the `G` Drive
Update! From Windows 1809 onwards this is no longer an issue!
You use Docker volumes to store state outside of containers, so your data survives when you replace the container to update your app. Docker uses symbolic links to give the volume a friendly path inside the container, like C:\data . Some application runtimes try to follow the friendly path to the real location — which is actually outside the container — and get themselves into trouble.
This issue may not affect all application runtimes, but I have seen it with Windows Docker containers running Java, Node JS, Go, PHP and .NET Framework apps. So it’s pretty widespread.
You can avoid that issue by using a mapped drive (say G:\ ) inside the container. Your app writes to the G drive and the runtime happily lets the Windows filesystem take care of actually finding the location, which happens to be a symlink to a directory on the Docker host.
Filesystems in Docker Containers
An application running in a container sees a complete filesystem, and the process can read and write any files it has access to. In a Windows Docker container the filesystem consists of a single C drive, and you’ll see all the usual file paths in there — like C:\Program Files and C:\inetpub . In reality the C drive is composed of many parts, which Docker assembles into a virtual filesystem.
It’s important to understand this. It’s the basis for how images are shared between multiple containers, and it’s the reason why data stored in a container is lost when the container is removed. The virtual filesystem the container sees is built up of many image layers which are read-only and shared, and a final writeable layer which is unique to the container:
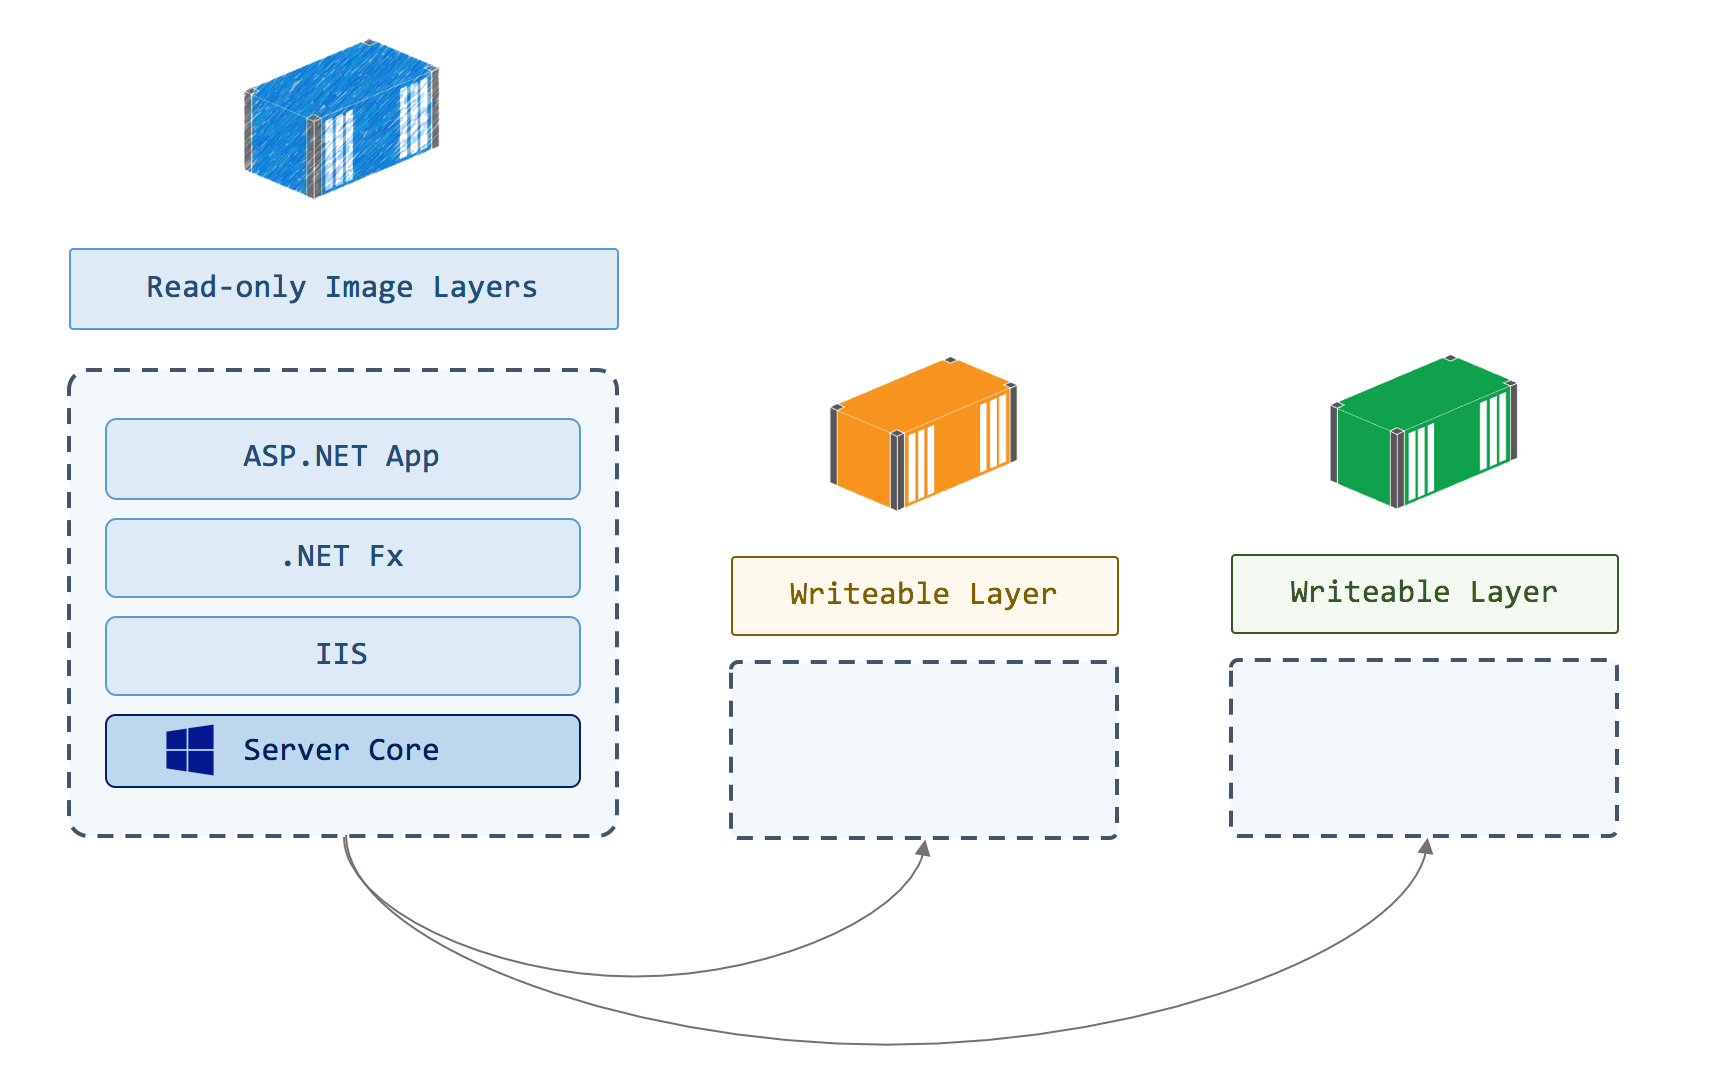
When processes inside the container modify files from read-only layers, they’re actually copied into the writeable layer. That layer stores the modified version and hides the original. The underlying file in the read-only layer is unchanged, so images don’t get modified when containers make changes.
Removing a container removes its writeable layer and all the data in it, so that’s not the place to store data if you run a stateful application in a container. You can store state in a volume, which is a separate storage location that one or more containers can access, and has a separate lifecycle to the container:
Storing State in Docker Volumes
Using volumes is how you store data in a Dockerized application, so it survives beyond the life of a container. You run your database container with a volume for the data files. When you replace your container from a new image (to deploy a Windows update or a schema change), you use the same volume, and the new container has all the data from the original container.
The SQL Server Docker lab on GitHub walks you through an example of this.
You define volumes in the Dockerfile, specifying the destination path where the volume is presented to the container. Here’s a simple example which stores IIS logs in a volume:
You can build an image from that Dockerfile and run it in a container. When you run docker container inspect you will see that there is a mount point listed for the volume:
The source location of the mount shows the physical path on the Docker host where the files for the volume are written — in C:\ProgramData\docker\volumes . When IIS writes logs from the container in C:\Inetpub\logs , they’re actually written to the directory in C:\ProgramData\docker\volumes on the host.
The destination path for a volume must be a new folder, or an existing empty folder. Docker on Windows is different from linux in that respect, you can’t use a destination folder which already contains data from the image, and you can’t use a single file as a destination.
Docker surfaces the destination directory for the volume as a symbolic link (symlink) inside the container, and that’s where the trouble begins.
Symlink Directories
Symbolic links have been a part of the Windows filesystem for a long time, but they’re nowhere near as popluar as they are in Linux. A symlink is just like an alias, which abstracts the physical location of a file or directory. Like all abstractions, it lets you work at a higher level and ignore the implementation details.
In Linux it’s common to install software to a folder which contains the version name — like /opt/hbase-1.2.3 and then create a sylmink to that directory, with a name that removes the version number — /opt/hbase . In all your scripts and shortcuts you use the symlink. When you upgrade the software, you change the symlink to point to the new version and you don’t need to change anything else. You can also leave the old version in place and rollback by changing the symlink.
You can do the same in Windows, but it’s much less common. The symlink mechanism is how Docker volumes work in Windows. If you docker container exec into a running container and look at the volume directory, you’ll it listed as a symlink directory ( SYMLINKD ) with a strange path:
The logs directory is actually a symlink directory, and it points to the path \\?\ContainerMappedDirectories\8305589A-2E5D.. . The Windows filesystem understands that symlink, so if apps write directly to the logs folder, Windows writes to the symlink directory, which is actually the Docker volume on the host.
The trouble really begins when you configure your app to use a volume, and the application runtime tries to follow the symlink. Runtimes like Go, Java, PHP, NodeJS and even .NET will do this — they resolve the symlink to get the real directory and try to write to the real path. When the «real» path starts with \\?\ContainerMappedDirectories\ , the runtime can’t work with it and the write fails. It might raise an exception, or it might just silently fail to write data. Neither of which is much good for your stateful app.
DOS Devices to the Rescue
The solution — as always — is to introduce another layer of abstraction, so the app runtime doesn’t directly use the symlink directory. In the Dockerfile you can create a drive mapping to the volume directory, and configure the app to write to the drive. The runtime just sees a drive as the target and doesn’t try to do anything special — it writes the data, and Windows takes care of putting it in the right place.
I use the G drive in my Dockerfiles, just to distance it from the C drive. Ordinarily you use the subst utility to create a mapped drive, but that doesn’t create a map which persists between sessions. Instead you need to write a registry entry in your Dockerfile to permanently set up the mapped drive:
This creates a fake G drive which maps to the volume directory C:\data . Then you can configure your app to write to the G drive and it won’t realise the target is a symlink, so it won’t try to resolve the path and it will write correctly.
I use this technique in these Jenkins and Bonobo Dockerfiles, where I also set up the G drive as the target in the app configuration.
How you configure the storage target depends on the app. Jenkins uses an environment variable, which is very easy. Bonobo uses Web.config , which means running some XML updates with PowerShell in the Dockerfile. This technique means you need to mentally map the fake G drive to a real Docker volume, but it works with all the apps I’ve tried, and it also works with volume mounts.
Mounting Volumes
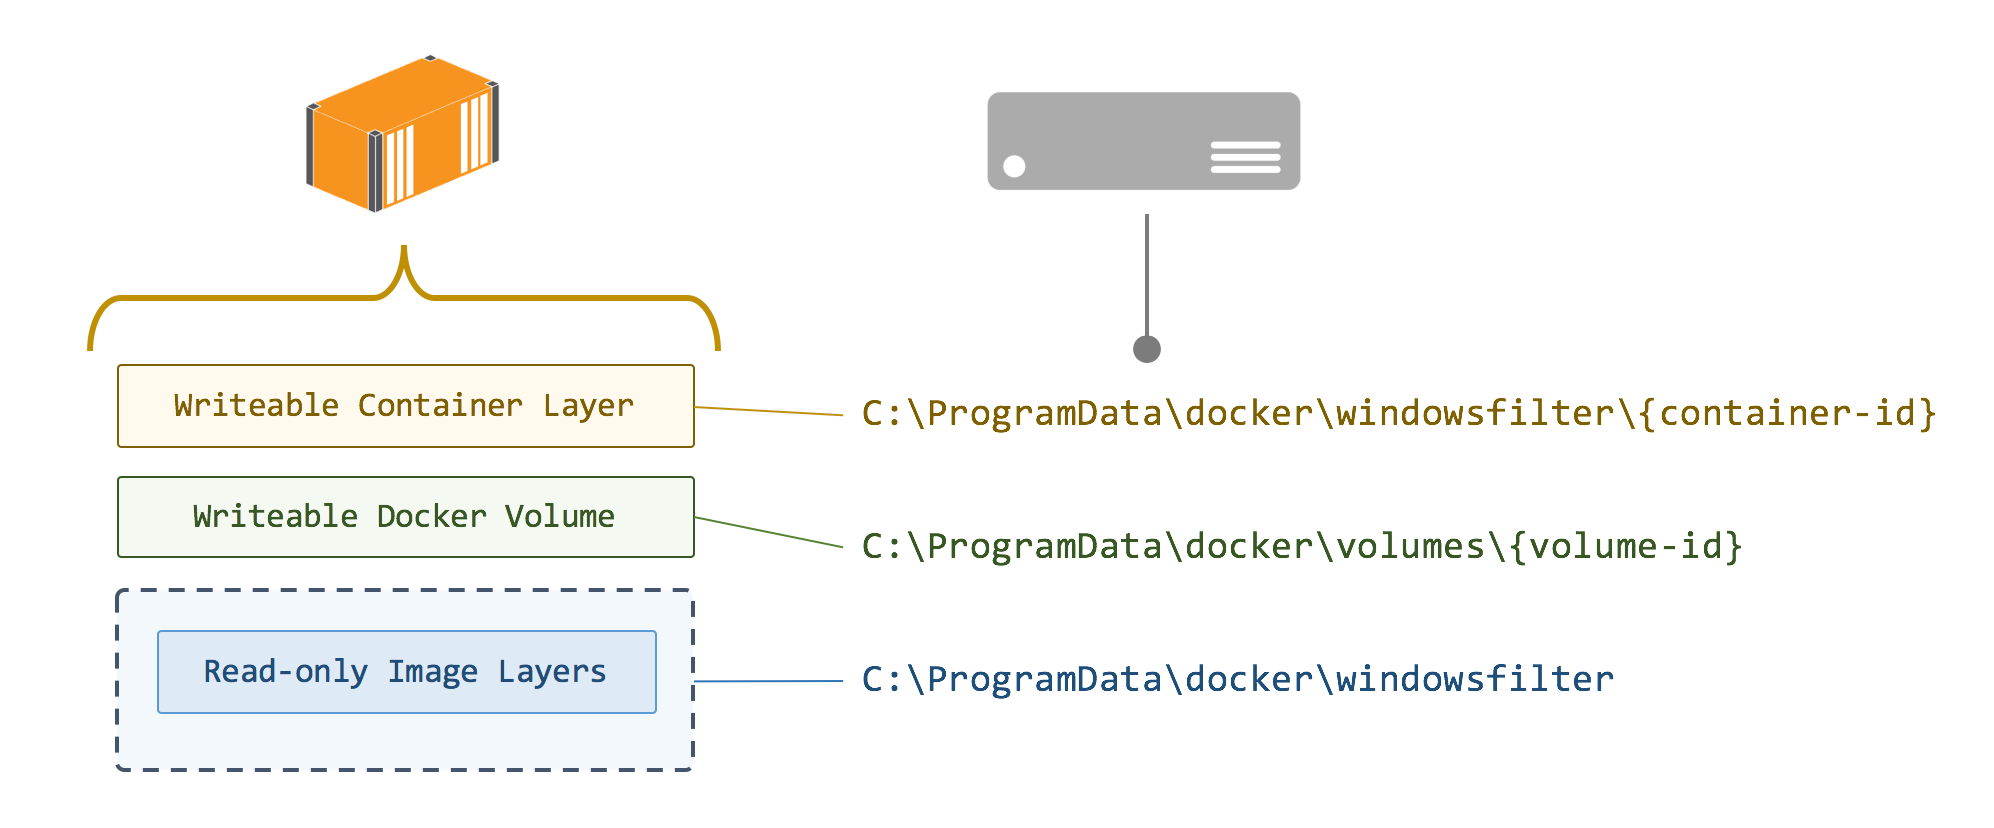
Docker volumes on Windows are always created in the path of the graph driver, which is where Docker stores all image layers, writeable container layers and volumes. By default the root of the graph driver in Windows is C:\ProgramData\docker , but you can mount a volume to a specific directory when you run a container.
I have a server with a single SSD for the C drive, which is where my Docker graph is stored. I get fast access to image layers at the cost of zero redundancy, but that’s fine because I can always pull images again if the disk fails. For my application data, I want to use the E drive which is a RAID array of larger but slower spinning disks.
When I run my local Git server and Jenkins server in Docker containers I use a volume mount, pointing the Docker volume in the container to a location on my RAID array:
Actually I use a compose file for my services, but that’s for a different post.
So now there are multiple mappings from the G drive the app uses to the Docker volume, and the underlying storage location:
Book Plug
I cover volumes — and everything else to do with Docker on Windows — in my book Docker on Windows, which is out now.
If you’re not into technical books, all the code samples are on GitHub: sixeyed/docker-on-windows and every sample has a Docker image on the Hub: dockeronwindows.
Use the G Drive For Now
I’ve hit this problem with lots of different app runtimes, so I’ve started to do this as the norm with stateful applications. It saves a lot of time to configure the G drive first, and ensure the app is writing state to the G drive, instead of chasing down issues later.
The root of the problem actually seems to be a change in the file descriptor for symlink directories in Windows Server 2016. Issues have been logged with some of the application runtimes to work correctly with the symlink (like in Go and in Java), but until they’re fixed the G drive solution is the most robust that I’ve found.
It would be nice if the image format supported this, so you could write VOLUME G: in the Dockerfile and hide all this away. But this is a Windows-specific issue and Docker is a platform that works in the same way across multiple operating systems. Drive letters don’t mean anything in Linux so I suspect we’ll need to use this workaround for a while.


