- Linux Mint 17 и DLNA
- Зачем это все надо
- DLNA-сервер за пять минут
- 12 Best Media Server Software for Linux in 2021
- 1. Kodi – Home Theater Software
- Kodi Features:
- How to Install Kodi in Linux
- 2. PLEX – Media Server
- Plex Features:
- How to Install Plex in Linux
- 3. Subsonic – Personal Media Streamer
- Subsonic Features:
- How to Install Subsonic in Linux
- 4. Madsonic – Music Streamer
- Madsonic Features:
- How to Install Madsonic in Linux
- 5. Emby – Open Media Solution
- Emby Features:
- How to Install Emby in Linux
- 6. Gerbera – UPnP Media Server
- Gerbera Features:
- How to Install Gerbera in Linux
- 7. Red5 Media Server
- How to Install Red5 in Linux
- 8. Jellyfin
- How to Install Jellyfin in Linux
- 9. Universal Media Server
- How to Install Universal Media Server in Linux
- 10. LibreELEC – Open Embedded Linux Entertainment Center
- OpenELEC Features
- How to Install LibreELEC in Linux
- 11. OSMC – Open Source Media Center
- How to Install OSMC in Linux
- 12. Ampache
- 13. Tvmobili – Smart TV Media Server [Discontinued]
- Tvmobili Features:
- How to Install Tvmobili in Linux
- 14. OpenFlixr – Media Server [Discontinued]
- How to Install OpenFLIXR in Linux
- If You Appreciate What We Do Here On TecMint, You Should Consider:
Linux Mint 17 и DLNA
Зачем это все надо
Linux Mint — отличная домашняя ОС. Богатый выбор графических сред на любой вкус, простая и понятная даже новичку установка, сразу после установки имеем основной набор необходимого софта, удобный менеджер приложений, основные мультимедийные кодеки. В общем, отличная система для перехода и ознакомления с Linux.

Но возникает проблема для тех, у кого нет дома NAS или чего-то подобного, а смотреть контент с ПК на других устройствах, поддерживающих DLNA хочется. Под Linux существует множество различных DLNA-серверов, но оптимальным, все же, является MiniDLNA. И тому есть несколько причин. Во-первых, это типичный Unix-way: этот сервер является именно DLNA-сервером, а не комбайном с кучей свистелок, при этом контент без проблем воспринимается на любом устройстве. Даже телевизоры Samsung со своим AllShare прекрасно подключаются к нему. Также можно отметить и замечательную скорость работы и нетребовательность к ресурсам этого сервера.
И все бы было хорошо, но вот в с помощью команды
установить его не получится — нет его в репозитарии.
Существуют разные варианты устранения этого недоразумения, но самый правильный путь — установка из исходников.
Чтобы не отвратить возможных новоиспеченных линуксоидов с этого пути и, возможно, помочь кому-то, напишу как обойти подводные камни, ибо информации много, но в начале пути людям нужно попроще.
Подготовка
Если будете выполнять команды в консоли, запущенной с правами root, команду sudo писать не нужно.
Для начала нужно установить необходимые библиотеки:
И устанавливаем сами библиотеки:
Самая свежая версия MiniDLNA на данный момент — 1.1.3, ее можно скачать здесь, либо загрузить из консоли: ключ перед адресом нужен, чтобы сохранилось оригинальное имя, с выхдом новой версии имя файла будет отличатся. После этого архив нужно распаковать:
Теперь перейдем в распакованную папку с исходниками
Если вы хотите, чтобы на устройстве отображались сразу папки с файлами, нужно немного подправить код:
Для отключения запроса способа отображения файлов нужно в папке с исходниками (minidlna-1.1.3, мы в нее уже должны были перейти) подправить файл upnpsoap.c, но сначала сделаем его резервную копию:
и откроем в редакторе поиском (F6), ищем процедуру:
В начале процедуры выполняется разбор SOAP/XML-запроса, затем его обработка и возврат результата. Разбор запроса завершается формированием отладочного сообщения:
Далее реализован выбор корневого контейнера в зависимости от конфигурационного параметра root_container:
Сразу после этого блока и перед блоком с запросами к БД добавляем код перенаправления папок для видео, музыки и изображений:
В итоге правленный фрагмент должен выглядеть следующим образом:
Чтобы упростить процедуру последующего обновления, сохраним патч с внесенными изменениями:
Теперь вместо редактирования файла, достаточно применить патч:
Теперь можно переходить к конфигурированию.
Если вам это не нужно, переходите сразу к конфигурированию:
Установка
1) Для тех, кто в дальнейшем захочет обновить версию, предыдущую можно удалить (конфигурационные файлы при этом сохраняются), если этого не сделать, то в случае, если в новой версии состав установочных файлов изменится, в /usr/local могут остаться старые файлы, при первой установке — переходим сразу к пункту 2.
Для удаления заходим в папку с предыдущей установкой и выполняем команду: 2) Запускаем установку (в комментариях предложили более правильный путь, чем make install):
Ключ -D указывает, что должен быть создан Debian-пакет
3)Если мы производим первоначальную установку, нужно создать init-скрипт: , если мы обновляем версию, больше ничего делать не нужно, при первоначальной установке у нас откроется пустой файл, в который нужно внести следующий код:
, сохранить комбинацией клавиш Ctrl+O и выйти из редактора — Ctrl+X.
4) После этого даем права на запуск скрипта:5) И активируем запуск init-скрипта: 6) Так как по умолчанию служба запускается под пользователем minidlna, нам нужно создать соответствующую учетную запись:
7) Правим файл конфигурации сервера: В нем нам нужно следующее содержимое (здесь подправлен интервал, с которым сервер себя анонсирует, так как не все телевизоры опрашивают сервер, также вам надо прописать путь к папке с медиа, к примеру так: «media_dir=V,/mnt/sdb6/Video/Alex/» в соответствующем разделе файла):
Обычно после этого не требуется дополнительных настроек, но если есть проблемы с доступом к медиа (или хотите перестраховаться), можно настроить права доступа:
Поскольку служба работает под пользователем с ограниченными правами, публикуемые папки и файлы должны быть доступны на чтение для всех пользователей, следовательно, иметь разрешения 644: «rw- r— r—», для файлов и 755: «rwx r-x r-x», для папок.
Проверяем доступность для каждой папки, заданной в minidlna.conf, командой:Если папка недоступна, задаем права доступа:Вышестоящие папки также должны быть доступны на чтение всем пользователям. Проверяем доступность на чтение каждой папки, указанной в пути. Для вышестоящих папок используем chmod без ключа -R, если не требуется сброс разрешений для всех дочерних файлов и папок.
В качестве альтернативы смене разрешений, можно запустить MiniDLNA от имени пользователя или группы-владельца файлов. Для этого необходимо задать параметры USER и GROUP в /etc/default/minidlna, и сменить владельца папки /var/lib/minidlna командой:
Запуск сервера
Проверяем, работает ли служба, также смотрим параметры запуска:
Проверяем, слушается ли порт:
В случае успешного старта, лог должен быть примерно следующим:
Если видим: «WARNING: Inotify max_user_watches [8192] is low.», необходимо увеличить число дескрипторов слежения inotify до 100 000. Для этого в файл /etc/sysctl.conf добавим строки:
Или копипастом команды:
Изменение параметра вступит в силу после перезагрузки системы.
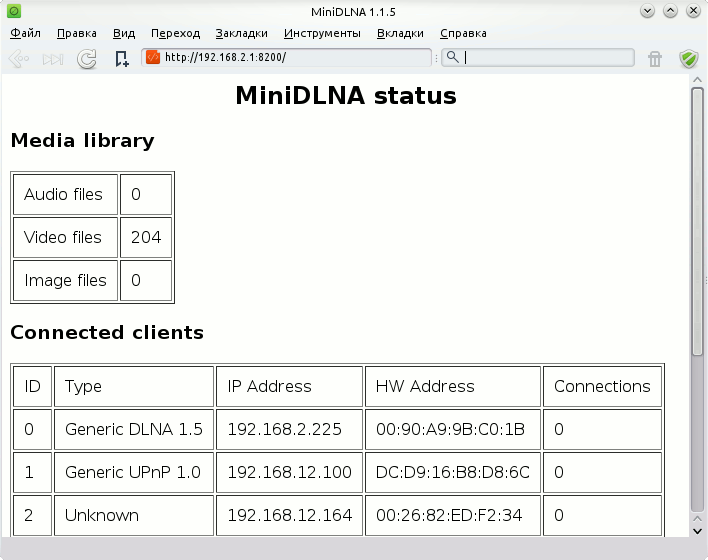
Открываем в браузере адрес.сервера:8200, видим количество файлов в библиотеке, начиная с версии 1.1.2, также отображается список подключенных клиентов.
Настройка DLNA/UPnP-AV сервера завершена.
При появлении ошибок в каталоге, необходимо выполнить повторное сканирование файлов.
При использовании приведенного выше init-скрипта, для запуска сканирования медиа-библиотеки используем команду:
Служба при этом будет перезапущена, подключенные клиенты будут отключены.
Для сканирования медиа-библиотеки при каждом старте системы можно задать ключ запуска: «-R» в параметре DAEMON_OPTS в файле /etc/default/minidlna. Сканирование большой медиа-библиотеки существенно нагружает диск, что может замедлить загрузку системы.
Полное формирование каталога может занять несколько минут. Сканирование папок выполняется в порядке их объявления в конфиге. Файлы из небольших папок, объявленных в конфиге выше, появятся в каталоге в самом начале процесса сканирования. Крупные папки с редко воспроизводимым контентом имеет смысл размещать в конфиге последними.
Все это опробовано на своей системе, пользуйтесь на здоровье. Надеюсь, количество пользователей Linux будет постоянно увеличиваться.
Источник
DLNA-сервер за пять минут
DLNA — набор стандартов для быстрой передачи медиа-контента между устройствами. DLNA привлекает внимание простотой в использовании и широкой распространённостью: такие технологии как AllShare от Samsung, SmartShare от LG и AirPlay от Apple по сути своей являются реализациями DLNA со своими маркетинговыми названиями.
Разработкой стандартов занимается альянс DLNA. Он же проводит сертификацию устройств, проверяя их совместимость со стандартом. На устройствах прошедших такую сертификацию обычно размещается логотип альянса:

Далее будет показано как можно быстро развернуть на домашнем сервере DLNA-сервер для использования совместно с устройствами на базе Android.
Начальные условия: домашний сервер под управлением Ubuntu 16.04, коллекция фильмов, которую мы хотим смотреть на Smart TV под управлением Android, находится в директории /home/ubuntu/Films. По DLNA мы собираемся отдавать только видео-файлы.
Среди всего множества реализаций DLNA мы выберем minidlna от разработчиков из компании Netgear. Некоторое время назад он был переименован в ReadyMedia, однако в репозитории Ubuntu пакет пока ещё по прежнему называется minidlna. Одной из интересных особенностей minidlna является возможность работы сразу на нескольких сетевых интерфейсах, хотя это нужно далеко не всем. Установим пакет:
Далее открываем в редакторе файл /etc/minidlna.conf и приступаем к настройке. Первым делом надо указать директорию с медиа-файлами. Поскольку мы собираемся отдавать только видео то надо так же явно это обозначить:
Чтобы упростить клиентам навигацию укажем начальный путь обзора на сервере:
В параметре «network_interface» перечислим через запятую интерфейсы, на которых будет слушать наш сервер:
Ну и напоследок в параметре «friendly_name» укажем имя нашего сервера, которое будут видеть все клиенты:
На этом настройка сервера заканчивается и остаётся только перезапустить сервис для применения настроек:
Если что-то пойдёт не так то первым делом надо смотреть файл журнала «/var/log/minidlna.log». Статус сервера и список подключенных клиентов можно смотреть на веб-странице «http:// :8200». Выглядит эта страница примерно так:
С клиентскими устройствами так же всё должно быть просто. Многие устройства из коробки поддерживают протокол DLNA. Если у вас устройство на базе Android и штатного приложения для работы с DLNA у вас нет то можно поставить DLNA-браузер, коих очень много в Google Play. Например у автора этих строк хорошо зарекомендовали себя AnDLNA и GinkgoDlna.
Интересную задачку «подкинул» недорогой Smart TV от Akai (Akai LES-32А64М): он был подключен к локальной сети через Ethernet и не имел штатного DLNA-браузера. Казалось бы что задача решается просто: достаточно установить любой DLNA-браузер из Google Play, однако большинство из них (включая указанные выше AnDLNA и GinkgoDlna) работают только с WiFi-соединением и оказывались не способы «найти» DLNA-сервер через Ethernet соединение.
Перебор нескольких десятков приложений привёл к MediaHouse UPnP / DLNA Browser. Это приложение оказалось «всеядным» и спокойно заработало с DLNA-сервером, будучи подключенным к сети через Ethernet-порт:
Для просмотра видео почти все DLNA-браузеры используют внешний плеер. Как оказалось штатный плеер Android на большинстве устройств поддерживает ограниченный набор кодеков. Если возникает проблема при воспроизведении (нет звука и/или видео) то стоит установить сторонний плеер с большим набором кодеков. Хорошим выбором может быть MX Player.
Источник
12 Best Media Server Software for Linux in 2021
A media server is simply a specialized file server or computer system for storing media (digital videos/movies, audio/music, and images) that can be accessed over a network.
In order to set up a media server, you need computer hardware (or perhaps a cloud server) as well as software that enables you to organize your media files and makes it easier to stream and/or share them with friends and family.
In this article, we will share with you a list of the 10 best media server software for Linux systems. By the time you complete this article, you will be able to choose the most appropriate software to set up your home/office/cloud media server powered by a Linux system.
1. Kodi – Home Theater Software
Kodi (previously known as XBMC) is a free and open-source, highly customizable media server software. It is cross-platform and runs on Linux, Windows, macOS; iOS, and Android. It is more than just a media server; it’s an ideal entertainment center software with a fabulous user interface and several other media server software appliances are based on it.
![]() Kodi Home Theater Software
Kodi Home Theater Software
Kodi enables you to play movies/videos, music/audio, podcasts, view images, and other digital media files from your local computer or a network server as well as the internet.
Kodi Features:
- Runs on a wide variety of devices.
- It is user-friendly.
- Supports a web interface.
- Supports a variety of user-created Add-ons.
- Supports televisions and remote controls.
- Has a highly configurable interface via skins.
- Allows you to watch and record live TV.
- Supports importing pictures into a library.
- Allows you to browse, view, sort, filter, or even start a slideshow of your pictures and much more.
How to Install Kodi in Linux
To install Kodi on Ubuntu-based distributions, use the following PPA to install the latest version.
To install Kodi on Debian, use the following command, as Kodi is available in the default “main” Debian repository.
To install Kodi on Fedora use pre-built RPMFusion packages as shown.
2. PLEX – Media Server
Plex is a powerful, secure and fully-featured, and easy-to-install media server software. It runs on Linux, Windows, macOS, and many other platforms.
![]() Plex Home Media Server
Plex Home Media Server
It supports almost all major file formats and allows you to organize your media in a central point for easy access. Plex has an easy-to-navigate interface, and a collection of useful apps for a variety of devices: phones, tablets, gaming consoles, streaming devices, and smart TVs.
Plex Features:
- Supports encrypted connections with multiple user accounts.
- Allows you to easily pick and choose what to share.
- Offers parental control functionality.
- Supports mobile sync which offers offline access to your media files.
- Supports flinging of video from one device to another.
- Also supports cloud sync.
- Supports audio fingerprinting and automatic photo-tagging.
- Has a media optimizer and much more.
How to Install Plex in Linux
To install Plex in Ubuntu, Fedora, and CentOS distributions, go to the Download section and choose your Linux distribution architecture (32-bit or 64-bit) to download DEB or RPM package and install it using your default package manager.
3. Subsonic – Personal Media Streamer
Subsonic is a secure, reliable, and easy-to-use personal media server and streamer. It runs on Linux, Windows, macOS, and Synology NAS. It is very customizable and supports all major media formats. There are more than 25 supported apps that you can use to stream music directly on your mobile phone.
![]() Subsonic Personal Media Streamer
Subsonic Personal Media Streamer
Subsonic can operate with multiple users and any number of players at the same time. And it allows you to play movies/videos or music/audio files on any compatible DLNA/UPnP devices.
Subsonic Features:
- Has a highly configurable UI (user interface).
- Supports secure connections over HTTPS/SSL.
- Integrates with the best web services.
- Supports up to 28 languages and comes with 30 different themes.
- Offers chat features.
- Allows you to access your server using your own address i.e https://yourname.subsonic.org.
- Supports authentication in LDAP and Active Directory.
- Has an integrated podcast receiver.
- Supports setting upload and download bandwidth limits and lots more.
How to Install Subsonic in Linux
To install Subsonic in Debian/Ubuntu and Fedora/CentOS distributions, you need to first install Java 8 or Java 9 using the following commands on your respective distributions.
Next, go to the Subsonic Download section to grab the .deb or .rpm package and install it using your default package manager.
4. Madsonic – Music Streamer
Madsonic is an open-source, flexible, and secure web-based media server and media streamer developed using Java. It runs Linux, macOS, Windows, and other Unix-like systems. If you are a developer, there is a free REST API (Madsonic API) that you use to develop your own apps, addons, or scripts.
![]() Madsonic Music Streamer
Madsonic Music Streamer
Madsonic Features:
- Easy to use and comes with jukebox functionality.
- It is highly flexible and scalable with an intuitive web interface.
- Offers search and index functionalities with Chromecast support.
- Has built-in support for your Dreambox receiver.
- Supports authentication in LDAP and Active Directory.
How to Install Madsonic in Linux
To install Madsonic in Debian/Ubuntu and Fedora/CentOS distributions, you need to first install Java 8 or Java 9 using the following commands on your respective distributions.
Next, go to the Madsonic Download section to grab the .deb or .rpm package and install it using your default package manager.
5. Emby – Open Media Solution
Emby is a powerful, easy-to-use, and cross-platform media server software. Simply install the emby server on your machine running Linux, FreeBSD, Windows, macOS, or on NAS. You can also grab the emby app on Android, iOS, Windows or run the web client from a browser or still use the emby TV app.
![]() Emby Media Solution
Emby Media Solution
Once you have it, it will help you manage your personal media libraries, such as home videos, music, photos, and many other media formats.
Emby Features:
- A beautiful UI with supports for mobile sync and cloud sync.
- Offers powerful web-based tools for managing your media files.
- Supports parental control.
- It automatically detects DLNA devices.
- Enables easy sending of movies/videos, music, pictures, and live TV shows to Chromecast and much more.
How to Install Emby in Linux
To install Emby in Ubuntu, Fedora, and CentOS distributions, go to the Emby Download section and choose your Linux distribution to download DEB or RPM package and install it using your default package manager.
6. Gerbera – UPnP Media Server
Gerbera is a free open source, powerful, flexible, and full-featured UPnP (Universal Plug and Play) media server. It comes with a simple and intuitive web user interface for easily configuring your web server.
![]() Gerbera UPnP Media Server
Gerbera UPnP Media Server
Gerbera has a highly flexible configuration, allowing you to control the behavior of various features of the server. It allows you to browse and playback media via UPnP.
Gerbera Features:
- It is easy to set up.
- Supports metadata extraction from mp3, ogg, FLAC, jpeg, etc. files.
- Supports user-defined server layout based on extracted metadata.
- Support for ContentDirectoryService container updates.
- Comes with Exif thumbnail support.
- Supports automatic directory rescans (timed, inotify).
- Offers a nice Web UI with a tree view of the database and the file system, allowing to add/remove/edit/browse media.
- Support for external URLs (create links to internet content and serve them via UPnP to your renderer).
- Supports flexible media format transcoding via plugins/scripts and much more.
How to Install Gerbera in Linux
To install Gerbera in Ubuntu, Fedora, and CentOS distributions, follow our installation guide that explains the installation of Gerbera – UPnP Media Server in Linux and also shows how to stream media files using Gerbera on your home network.
Alternatively, you can install Gerbera in Linux distributions using:
7. Red5 Media Server
Red5 is an open-source, powerful, and multi-platform media streaming server for streaming live audio/video, recording client streams (FLV and AVC+AAC), remote object sharing, data synchronization, and much more. It is developed to be flexible with an effortless plugin architecture that offers customization for any live streaming scenario.
![]() Red5 Media Server
Red5 Media Server
How to Install Red5 in Linux
To install Red5 in Linux, follow the installation instructions on Github to get started with the server.
8. Jellyfin
Jellyfin is an open-source and free media streaming system that enables you to control and manage the stream of your media. It is an alternative to Emby and Plex, which offers media streaming from a dedicated server to end-user devices through multiple applications.
![]() Jellyfin – Media Streaming System
Jellyfin – Media Streaming System
How to Install Jellyfin in Linux
Install Jellyfin via Apt repository in Debian-based distributions.
For other Linux distributions, go to the Jellyfin download page and follow the installation instructions.
9. Universal Media Server
Universal Media Server is a DLNA-compatible UPnP media solution that created as a fork of PS3 Media Server. It enables you to stream media files to a wide range of devices that includes TVs, smartphones, gaming consoles, computers, audio receivers, and Blu-ray players.
![]() Universal Media Server
Universal Media Server
How to Install Universal Media Server in Linux
To install UMS in Linux, you need to download UMS tarball and compile it from the source.
10. LibreELEC – Open Embedded Linux Entertainment Center
LibreELEC is a lightweight Linux-based operating system for setting up your machine as a media server using Kodi. It is built from scratch for the sole purpose of running Kodi media server software.
![]() LibreELEC – Open Embedded Linux
LibreELEC – Open Embedded Linux
It allows you to organize your movie collections; offers you a picture browser, music and audiobook player, TV and personal video recorder, and a TV show management functionality. It is highly extensible through a great number of addons.
OpenELEC Features
- Organize your movie collections and play your media with relevant info, subtitles, and fanart.
- Manually watch all your photos or use a handy slide show with a zoom effect.
- Browe, watch and record your favorite TV channels.
- Manage your TV series and keep track of your favorite episodes.
- Listen to audio files in various formats with artists’ photos and album covers.
- Easy expandable with Addons.
How to Install LibreELEC in Linux
As we said, LibreELEC is a small Linux-based operating system built from scratch as a platform to turn your computer into a Kodi media center. To install it, go to the LibreELEC download section and choose your Linux distribution to download DEB or RPM package, and install it using your default package manager.
11. OSMC – Open Source Media Center
OSMC is a free open source, simple, easy-to-use, full-featured media server software and media streamer for Linux. It is based on the Kodi media server software. It supports all well-known media formats and a variety of sharing protocols. In addition, it comes with a remarkable interface. Once you have installed it, you get easy updates and apps to use.
![]() OSMC – Open Source Media Center
OSMC – Open Source Media Center
How to Install OSMC in Linux
To install OSMC in Debian/Ubuntu, Fedora, and RHEL/CentOS distributions, first go to the OSMC release section and download compiled version of OSMC, and install it.
12. Ampache
Ampache is an open-source audio and video streaming media server and file manager that enables you to host and manage your own audio/video collection on your server. It can stream your music and videos to your computer, smartphone, smart TV, or tablet using Ampache’s web interface from anywhere using an internet connection.
![]() Ampache – Music Streaming Server
Ampache – Music Streaming Server
For Ampache installation, please visit the wiki page.
13. Tvmobili – Smart TV Media Server [Discontinued]
Tvmobili is a lightweight, high-performance, cross-platform media server software that runs on Linux, Windows, and macOS; NAS as well as embedded/ARM devices. It is easy to install and in addition, tvmobili is fully integrated with iTunes and offers amazing support for full 1080p High Definition (HD) videos.
![]() Tvmobili Media Server
Tvmobili Media Server
Tvmobili Features:
- Easy to install, high-performance media server.
- Fully integrated with iTunes (and iPhoto on Macs).
- Supports full 1080p High Definition (HD) video.
- Lightweight media server.
How to Install Tvmobili in Linux
To install Tvmobili in Ubuntu, Fedora, and CentOS distributions, go to the Tvmobili Download section and choose your Linux distribution to download DEB or RPM package and install it using your default package manager.
14. OpenFlixr – Media Server [Discontinued]
OpenFlixr is a virtual, flexible, energy-efficient, and fully automated media server software. It uses several other applications to achieve its overall functions, including Plex as a media server (to organizes movies, series, music, and pictures and streams them), Ubooquity for serving comics and ebooks, and a web-based reader. It supports automated downloading and serving of media, encrypted connections, and smart auto-updating.
![]() OpenFLIXR Media Server
OpenFLIXR Media Server
How to Install OpenFLIXR in Linux
To install OpenFLIXR, the only thing you need is visualization software such as VirtualBox, KVM, Vmware, etc.
Once you have visualization software installed, Download OpenFLIXR and then import in the hypervisor, power on, and let it sit back for a couple of minutes till installation finishes, after that go to http://IP-Address/setup to setup OpenFLIXR.
Conclusion
In this article, we shared with you some of the best media server software for Linux systems. If you know any media server software for Linux missing in the list above, just hit us up via the feedback form below.
If You Appreciate What We Do Here On TecMint, You Should Consider:
TecMint is the fastest growing and most trusted community site for any kind of Linux Articles, Guides and Books on the web. Millions of people visit TecMint! to search or browse the thousands of published articles available FREELY to all.
If you like what you are reading, please consider buying us a coffee ( or 2 ) as a token of appreciation.

We are thankful for your never ending support.
Источник


