How To Enable RDP In Windows 7 Home Premium
The Remote Desktop Protocol allows you to access your computer running windows over port 3389 securely and easily. Although, there are numerous programs out there such as TeamViewer, LogMeIn, JoinMe BUT they are all paid and does not provide the feel that RDP does. Once it’s enabled, it stays enabled and as long as the windows computer is set to allow Remote Connections via RDP (Remote Desktop Protocol) is turned on you can connect to it from any part of the world using any Windows-based computer or a Mac (How to RDP from a Mac OS X).
By default, RDP uses the port 3389 which can be a security risk because vulnerability scanners are set to scan default ports to exploit vulnerabilities, imaging that a vulnerability for RDP comes out, and you have system running RDP hosting sensitive data (such as medical records); a hacker may be able to exploit it and gain access using the default port. Therefore, i highly recommend changing RDP Port once it’s setup. (see steps here)
Windows has limited the use and setup of RDP to their professional versions only, which means Home, Starter, and Basic versions of Windows will not be able to setup RDP.
The aim of this guide is to help you setup RDP on versions where Windows limits them.
To enable Remote Desktop where available, you can go to Control Panel -> System -> Advanced System Settings -> and Click on the Remote tab.
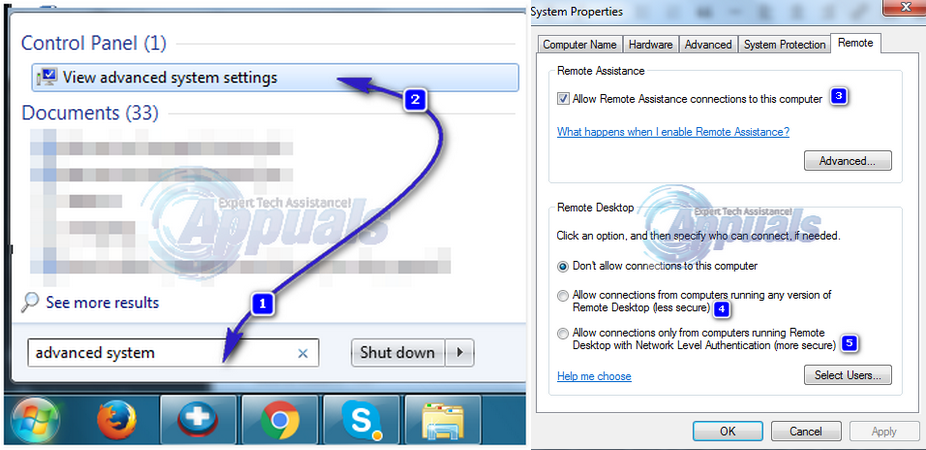
There’s a small bit to understand here, which can leave you scratching your head in trying to troubleshoot RDP if it’s not setup correctly, at the initial stage and that is Authentication. When setting up RDP, you have two choices under the Remote Desktop option, they are “Allow connections from computers running any version of Remote Desktop” and “Allow connections only from computers running Remote Desktop with Network Level Authentication“, if the computer you are enabling RDP on is the same version from where you will connect, then you choose the second option, which is the Network Level Authentication, otherwise, you will need to choose the first option which is to allow connections from any version of Remote Desktop because of the way windows treats authentication protocols.
Now coming back to the objective of this guide and as discussed earlier, the Remote Desktop option is limited to Professional versions and above, but there is a patcher known as Concurrent RDP Patcher which serves two purposes, allowing concurrent connections and enabling RDP in the versions where it is not available. Concurrent RDP Patcher was released at The Green Buttons forum which is the official Windows Media Center Community forum.
Method 1: Using the W7-SP1-RTM-RDP
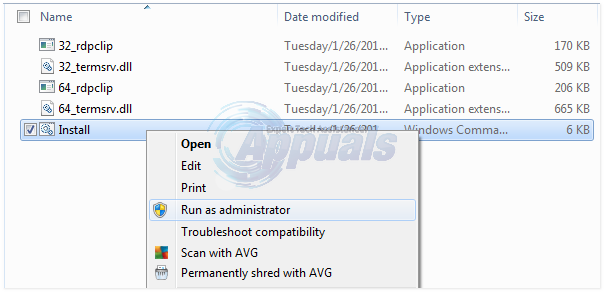
Download W7-SP1-RTM-RDP from here. Open the downloaded folder and extract it to your desktop. In it there will be a file named Install.cmd. Right click on it and click Run as Administrator. Click Yes to User Account Control warning message.
Command Prompt will launch, and execute the instructions in the file. Once done, follow the steps above to Enable RDP. If this method doesn’t work, then try Method 2.
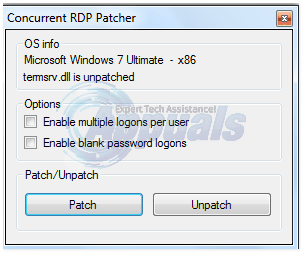
Method 2: Concurrent RDP Patcher
Download the Concurrent RDP Patcher from here. Extract the downloaded file, and execute Concurrent RDP Patcher file. Click the Patch button. Once done, you should be able to enable RDP and also be able to allow concurrent connections to it.
An update by Windows KB3003743 was released, which reverts the changes made by RDP Patcher. If this is the case, then follow Method 3 to make the patch work.
Method 3: Undo KB3003743
A Microsoft update KB3003743 was released on 11 November 2011 which reverts changes made by the above patcher, leaving RDP Disabled.
To undo these changes, we will use an update patch made specifically for fixing it. Download the updated patcher from here. Open the downloaded folder and Double click on Concurrent RDP Patcher to run it. Click the Patch button. This will revert changes made by the update to disable RDP Patcher.
Включение удаленного рабочего стола в Windows 7
Буквально на днях я столкнулся с проблемой включения «Удаленного рабочего стола» на системе Windows 7.
Многие тут же подумали:«Ай, да наверняка у него стоит какая-нибудь Win 7 Home Premium или вообще Starter». Однако это совсем не так. У меня полноценная Windows 7 x64 Professional, в которой казалось бы все должно заработать моментально и без оговорок.
Стандартный алгоритм включения
Заходим в свойства компьютер Пуск->Компьютер(правый клик)->Свойства
Слева в списке выбираем «Настройка удалённого доступа»
В разделе «Удалённый рабочий стол» выбираем второй или третий пункт. Различие: второй пункт — любые ОС, третий — Vista и выше
Жмем кнопку выбрать пользователей и добавляем нужных. (Например своего пользователя на этом компьютере. Или вы можете создать отдельного пользователя для удаленного рабочего стола)
Настройка закончена
У меня это всё выглядело совсем иначе. И пункт номер 3 был для меня недоступен. Пункты есть, но они — disabled.
Примерно вот так у меня выглядели настройки включения RDP 
Различного рода поиски не привели меня к однозначному и ясному ответу на вопрос: «Что же делать с такой ерундой»?
Только куски разрозненной информации, которые мне хотелось бы свести воедино. Справившись с этой небольшой проблемой, я решил, что таки стоит поделится ее решением с общественностью.
Итак, приступим.
Нам потребуется:
- Компьютер
- Глазка/руки/голова
- Права администратора
Нестандартный алгоритм включения
1. Идем в службы (Пуск->Панель управления->Администрирование->Службы)
2. Находим там брендмауэр Windows. Ставим ему автоматический запуск, и запускаем службу.
Примерно вот так: 
3. Идем в локальные политики безопасности (Пуск->Панель управления->Администрирование->Локальная политика безопасности ИЛИ Пуск->Выполнить->Вводим secpol.msc)
4. Выбираем там Брэндмауэр Windows в режиме повышенной безопасности — Объект локальной групповой политики -> Правила для выходящих подключений.

5. В правой части оснастки выбираем по правому клику мыши «Создать правило». Далее по шагам (каждый пункт — ссылка на картинку с шагом):
В конце концов, вы должны получить что-то вроде этого: 
6. Заходим в редактор локальной групповой политики (Пуск -> Выполнить -> gpedit.msc).
7. Конфигурация компьютера -> Административные шаблоны -> Компоненты Windows -> Службы удалённый рабочих столов -> Узел сеансов удаленный рабочих столов -> Подключения
8.Далее вы можете сами решить, что же вам нужно. Обязательным является включение опций:
- Разрешать удаленное подключение с использование служб удаленных рабочих столов
- Устанавливает правила удаленного управления для пользовательских сеансов служб удаленного рабочего стола (значение параметра выберите сами, я поставил лично для себя «Полный контроль без разрешения клиента»).
Итого у вас получится: 
9. Заходим в свойства компьютер Пуск->Компьютер(правый клик)->Свойства
10. Слева в списке выбираем «Настройка удалённого доступа»
11. В разделе «Удалённый рабочий стол» выбираем второй или третий пункт. Различие: второй пункт — любые ОС, третий — Vista и выше. 
12. Жмем кнопку выбрать пользователей и добавляем нужных. (Например своего пользователя на этом компьютере. Или вы можете создать отдельного пользователя для удаленного рабочего стола) 
В общем и целом после этого я смог подключаться к данному компьютеру удалённо без каких-либо вопросов.
Спасибо за внимание!
Данная статья не подлежит комментированию, поскольку её автор ещё не является полноправным участником сообщества. Вы сможете связаться с автором только после того, как он получит приглашение от кого-либо из участников сообщества. До этого момента его username будет скрыт псевдонимом.
Домашняя расширенная windows удаленный рабочий стол
ДЛЯ ПРОСМОТРА САЙТА РЕКОМЕНДУЕТСЯ ИСПОЛЬЗОВАТЬ: Uran — браузер от uCoz на базе проекта Chromium. | Google Chrome | Opera | Firefox
—>
|
| |||||||||||||||||||||||||||||||||||||||||||||||||||||||||||||||||||||||||||||||||||||||||||||||||||||||||||||||||||||||||||||||||||||||||||||||||||||||||||||||||||||||||||||||||||||||||||||||||||||||||||||||||||||||||||||||||||||||||||||||||||||||||||||||||||||||


 Парней 1092
  Девушек 283


