- Dosbox.conf
- Contents
- Creation and Location
- Windows
- Windows XP
- Windows Vista, Windows 7 & Windows 8.x
- Linux
- Mac OS X
- Sections
- [dosbox]
- [render]
- frameskip = nnn
- aspect = true | false
- scaler = none | normal2x | normal3x | tv2x | tv3x | rgb2x | rgb3x | scan2x | scan3x | advmame2x | advmame3x | advinterp2x | advinterp3x | 2xsai | super2xsai | supereagle | hq2x | hq3x
- core = simple | normal| dynamic | auto
- cputype = auto | 386 | 386_slow | 486_slow | pentium_slow | 386_prefetch
- cycles = fixed nnnn | max [default%] [limit cycle limit] | auto [realmode default] [protected mode default%] [limit «cycle limit»]
- cycleup = nnn
- cycledown = nnn
- [mixer]
- mpu401 = intelligent | uart | none
- mididevice = default | win32 | alsa | oss | coreaudio | coremidi | none
- midiconfig = id of MIDI device
- Запускаем DOS игры на Mac OS X
Dosbox.conf
dosbox.conf is a configuration file that DOSBox can use globally and/or locally per game (and settings that are left out are taken from the global file). It contains various system settings and initialization values that define your emulated environment. Everything can be controlled by editing this file or if you like through more graphically oriented Front Ends. You can also create separate dosbox.conf files for multiple host environments (which is helpful in playing various DOS games that expect various types of hardware).
The configuration file is broken into separate sections which contain section settings. Many of these settings do not need to be fully understood to configure DOSBox, but it is helpful to know where to look. You should also be aware that anything to the right of the # to the end of the line is considered a comment as is totally ignored by DOSBox when it loads.
Contents
Creation and Location
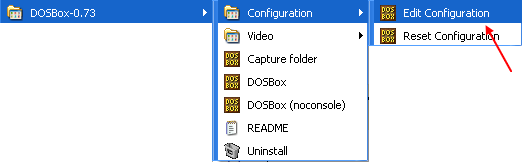
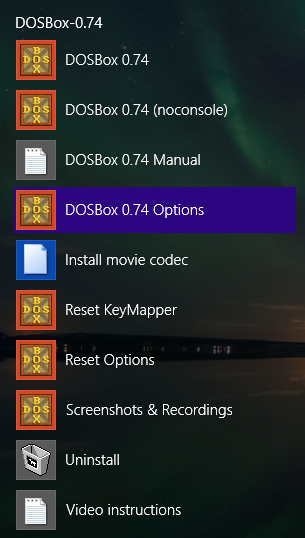
Depending on the version or host OS, the dosbox.conf file is located either inside the user profile folder or inside the same folder as dosbox.exe. On 0.74, just go to the DOSBox folder and open «DOSBox 0.74 Options.bat» in order to open the configuration file (*.conf).
Windows
Dosbox.conf is created automatically in the Windows’ user profile folder. The location is indicated by the DOSBox Status Window upon startup.
You can find the dosbox.conf by browsing Start > All Programs > Dosbox-
Windows XP
%USERPROFILE%\Local Settings\Application Data\DOSBox\dosbox-
Windows Vista, Windows 7 & Windows 8.x
Linux
For Linux the configfile is created on the first run in
/.dosbox/
The name is dosbox- .conf where version is currently 0.74
On Ubuntu in the dosbox man file it is written:
Mac OS X
If you are using Mac OS X, a preferences file will be created for you on the first time you run DOSBox (as of version 0.73). This file contains the same system settings and initialization values as the dosbox.conf file on other systems.
It can be found (and modified) at
/Library/Preferences/DOSBox 0.73 Preferences, where
/ is your user profile folder (usually /Macintosh HD/Users/username/). The exact folder name in the Finder may vary, depending on the language you use for OS X.
Wine makes a temporary config file every time it runs at /.wine/drive_c/users/$
Sections
This section contains all of the low level system settings for how DOSBox interacts with your real hardware. You can define what resolutions are emulated, how DOSBox should treat errors or listen to your keyboard and mouse. You can often achieve a fair level of optimization by working with these setting, though for the most part leaving them at their default settings will create the best experience. These settings are passed on to the SDL Library which handles low level things like input and thread priority.
[dosbox]
The [dosbox] section contains various settings that do not pertain to any other section (e.g. setting the language used in DOSBox help texts, where to store screen captures, etc.)
- vesa_oldvbe the same as svga_s3, but uses a lower version of VESA (1.3), the code used to interface with SVGA cards. This is necessary for some older SVGA programs.
- vesa_nolfb the same as svga_s3 introduces a no-line frame buffer hack. Sometimes runs faster than plain svga_s3. Only needed in a few games due to either a bug in DOSBox or the line-frame buffer mode of the game.
- svga_paradise emulates the Paradise PVGA1A and is only capable of the SVGA resolutions of 256 colors at 640×480 and 16 colors at 800×600. Like all SVGA modes, it is nearly 100% backwards compatible with VGA.
- svga_et3000 emulates the Tseng Labs ET3000, which can handle everything the Paradise card can plus 256 colors at 800×600 and 16 colors at 1024×768.
- svga_et4000 emulates the Tseng Labs ET4000, which is the same as the ET3000 except it can also handle 256 colors at 1024×768.
(info taken from http://ipggi.wordpress.com/2008/03/16/dosbox-graphic-and-machine-emulation-cga-vga-tandy-pcjr-hercules/)
[render]
The rendering (drawing) section controls methods that DOSBox uses to improve the speed and quality of the graphics displayed on the screen. E.g. it can «forget» (skip) the every 3rd screen update (which will save time), or it can try to smooth out some of the coarse low-resolution graphics that was used on old displays, but which looks bad when shown on a modern, high-resolution screen.
frameskip = nnn
How many frames DOSBox skips before drawing one.
aspect = true | false
Do aspect correction. It only affects non-square pixel modes like VGA Mode 13h, which has a resolution of 320×200 pixels and is used by many DOS games (DOOM, etc). Recommended as such games were designed for 4:3 displays, and without aspect correction will look distorted and not as the developer intended.
Default is false.
scaler = none | normal2x | normal3x | tv2x | tv3x | rgb2x | rgb3x | scan2x | scan3x | advmame2x | advmame3x | advinterp2x | advinterp3x | 2xsai | super2xsai | supereagle | hq2x | hq3x
Specifies which scaler is used to enlarge and enhance low resolution modes, BEFORE any additional scaling done according to the Fullresolution and Windowresolution settings under [sdl]. To see comparisons between the different scalers, see Scaler.
none: no scaling is performed. normal: nearest-neighbour scaling (big square pixels). scan: like ‘normal’, but with horizontal black lines. tv: like ‘scan’, but with darkened versions of the data instead of black lines. rgb: simulates the phosphors on a dot trio CRT. advmame: smooths corners and removes jaggies from diagonal lines. advinterp: identical to ‘advmame’. sai: similar to ‘advmame’ but with much softer color gradients and edges. supersai: similar to ‘sai’ but sharper. hq: a ‘high quality’ scaler which delivers a cleaner and sharper image than ‘advmame’ or ‘sai’ scalers.
Default is normal2x.
Supported scalers which still need descriptions: supereagle
The CPU section controls how DOSBox tries to emulate the CPU, how fast the emulation should be, and to adjust it. DOSBox offers 4 different methods of CPU emulation.
core = simple | normal| dynamic | auto
CPU core used in emulation. The choices result in a different efficency of DOSBox and in very rare cases have an effect on stability.
normal
Default is auto.
cputype = auto | 386 | 386_slow | 486_slow | pentium_slow | 386_prefetch
CPU Type used in emulation. auto is the fastest choice.
Default is auto.
cycles = fixed nnnn | max [default%] [limit cycle limit] | auto [realmode default] [protected mode default%] [limit «cycle limit»]
Amount of instructions DOSBox tries to emulate each millisecond. Set to max to automatically run as many cycles as possible. auto setting switches to max if appropriate.
fixed nnnn
Default is auto.
Examples:
- cycles=fixed 5000, cycles=5000 — All games you start are run with a fixed speed of
5 MIPS. Useful for speed sensitive games or games that need a continuous CPU speed. You can change the actual value with Ctrl+F11 and Ctrl+F12 (keycombo) while DOSBox runs.
cycleup = nnn
Amount of cycles to increase with keycombo.
Default is 10. Setting it lower than 100 will be a percentage of the current value.
cycledown = nnn
Amount of cycles to decrease with keycombo.
Default is 20. Setting it lower than 100 will be a percentage of the current value.
[mixer]
Here you can define the quality of emulated audio.
Here you can define any MIDI related settings. The term MIDI is commonly used to refer to background music found in games, but specifically it refers to synthesizer audio (which can be passed directly from emulated games to modern hardware.
mpu401 = intelligent | uart | none
Specifies which type of MIDI Processing Unit to emulate.
intelligent: (from Wikipedia) The MPU-401 can work in two modes, normal mode and UART mode. «Normal mode» would provide the host system with an 8-track sequencer, MIDI clock output, SYNC 24 signal output, Tape Sync and a metronome; as a result of these features, it is often called «intelligent mode», whereas. uart: . this simply emulates UART mode, which reduces the MPU-401 to just relaying in-/outcoming MIDI data bytes. none: MIDI is not emulated.
mididevice = default | win32 | alsa | oss | coreaudio | coremidi | none
A slightly confusing config name, because this isn’t so much which MIDI device to use as which MIDI interface to use. As DOSBox currently does not emulate MIDI, but instead passes it through to an interface that does give MIDI playback support, this setting tells DOSBox which interface to pass MIDI data through to.
default: The default system MIDI playback device is used. win32: Win32 MIDI playback interface is used. alsa: Linux’s Advanced Linux Sound Architecture playback interface is used. oss: Linux’s Open Sound System playback interface is used. coreaudio: MacOS X’s framework to render the music through the built-in OS X synthesizer. coremidi: MacOS X’s framework to route MIDI commands to any device that has been configured in Audio MIDI Setup. none: MIDI is disabled.
midiconfig = id of MIDI device
As used by the MIDI interface described above, this specifies the ID which identifies the particular MIDI device to playback MIDI on. Can be determined on Windows using MIXER /LISTMIDI or on Linux using pmidi -l in the console.
Источник
Запускаем DOS игры на Mac OS X
Современные игры настолько хороши своей графикой, боевой системой и реалистичностью, что на сюжет просто не хватает времени. Это печально, но не стоит забывать, что всегда есть старые игры, в которых сюжет является основной составляющей. Я говорю не о играх, изданных в 2005 году или 2003, а именно о тех старых играх, которые были разработаны в прошлом веке, то есть в 80-90ых годах. Так называемые «Досовские» игры навсегда останутся лучшими в жанре Quest, так как именно они стали эталоном этого жанра.
- Monkey Island
- Full Throttle
- Woodruff and the Schnibble of Azimuth
- Beneath a Steel Sky
- The Goblins
Эти игры стали, не побоюсь этого слова, шедеврами, которые можно сравнить, разве что с картиной из мировой галереи или с классической литературой. Несколько поколений выросло именно на этих играх, они являлись культом, как сейчас таким же культом является Apple или Google. Благодаря сюжетной линии и ненавязчивой графики игроку был предложен огромный мир, где только он решает различные загадки и выполняет интереснейшие задания. Я не знаю, как можно выразить свою мысль полностью, но мне кажется, что в те игры была вложена душа и жизнь разработчиков, их эмоции, желания, стремления, их надежды и мечты. В такие игры хотелось играть снова и снова, но текло время, платформу DOS заменил Windows OS, и началась другая эпоха. Увы, но те игры умерли, их больше нет, так как создание игровых проектов больше не является целью жизни или мечтой, создание игры стало способом заработка. Игровые новинки в настоящее время штампуют с неимоверной скоростью.
Но, если вы заядлый «олдскульщик» и не можете жить без «Досовских» игр, то наличие эмулятора MS DOS, на вашем компьютере, безусловно, сделает жизнь ярче!

Итак, пожалуй, начнём с обзора классического эмулятора под названием DOSBox. Данный эмулятор доступен для любой платформы, а именно:
- Windows OS
- Mac OS X
- Linux, а так же много других платформ, с полным списком которых вы можете ознакомиться на официальном сайте приложения.
К большому сожалению, рядовому пользователю будет сложно с начала, но я попробую наиболее проще объяснить процесс запуска игр, именно на этом эмуляторе. Перед тем как приступить к инструкции по запуску игр на DOSBox я хотел бы продемонстрировать его внешний вид:

Чтобы запустить игру на этом эмуляторе нам потребуется:
Сама игра, то есть папка с ней.
Немного терпения и наличие свободного времени.
После того, как вы увидите вот такой черный экран с мигающим курсором, напишите следующее:
- mount c program
- c:
- cd имя папки с игрой, которая должна находиться в корневом каталоге с DOSBox.
- Далее нам потребуется указать название файла, который запускает игру, обычно такой файл носит имя, такое же, как и сама игра.
А так же вы можете посмотреть видео инструкцию:
После всех этих, непростых на первый взгляд, действий перед вашими глазами появится красивая пиксельная картинка с игрой. Теперь остаётся только наслаждаться любой игрой из детства.
Но если вам не понравился этот эмулятор из-за своей сложности, то хочу обратить ваше внимание на ScummVM.

В отличие от предшественника, данный эмулятор не требует никаких знаний командной строки, то есть если вы хотите запустить на нём свою любимую игру, то вам необходима, лишь папка с игрой. То есть мы скачиваем игру, нажимаем на Add Game и выбираем нужную папку, далее нам будет предложено желаемое имя игры и некоторые настройки, после всех этих весьма несложных действий выбранная вами игра будет доступна для дальнейшего прохождения.

Но если вы считаете, что тот и другой эмулятор не для Mac пользователя, то спешу вас обрадовать, есть очень хороший и красивый эмулятор DOS’а сделанный специально для платформы Macintosh.

Boxer, именно такое название носит это великолепное приложение.
Запустив Boxer.app вы увидите следующее окно:

Вы можете просмотреть список уже установленных игр, изначально их четыре, а именно:
- Commander Keen 4
- Epic pinball demo
- Ultima Underworld demo
- X-COM demo
Для установки, вам потребуется папка с игрой, установочный файл или образ диска. Если у вас есть хоть что то из этого списка, то смело нажимайте на Import a new game, после чего вы увидите следующее:

Как вы уже успели догадаться, нужно перенести установочные файлы, именно в это окошко. После того, как вы перетащите файл, группу файлов, папку или образ диска, то игра будет установлена и вам будет предложен список файлов, которые могут запустить игру, обычно это файл с названием самой игры или start.bat (start.exe).
Достаточно просто и удобно пользоваться этим эмулятором MS DOS’а, так как единственное что от вас требуется, это наличие самой игры. А так же меня особенно порадовало визуальное оформление каталога установленных игр:
Источник


