- Download iCloud photos and videos
- How to download photos and videos from iCloud.com
- On your iPhone, iPad, or iPod touch
- On your Mac or PC
- What happens when you delete photos or videos
- How to download photos and videos from the Photos app
- On your iPhone, iPad, or iPod touch
- On your Mac
- On your PC
- How to download photos and videos from Shared Albums
- On your iPhone, iPad, or iPod touch
- On your Mac
- On your PC
- [Full Guide] 5 Best Ways on How to Download Photos from iCloud
- Part 1: How to Download Photos from iCloud to iPhone
- Part 2: How can you Download Individual Photos from iCloud via iCloud.com
- Tip: How to Select Multiple Pictures on iCloud.com for Downloading?
- Part 3: How can you Download all iCloud Photos to PC with iCloud for Windows
- Part 4: How can you Download iCloud Photos to Mac
- Part 5: The Easiest Way to Download Photos from iCloud Backup to PC/Mac
- Conclusion
- How to Download All Photos From iCloud to PC
- Download ALL Photos From iCloud to PC
- 1. Download All Photos From iCloud to PC Using Keyboard Shortcut
- 2. Download All Photos From iCloud to PC Using iCloud For Windows
- Add iCloud to Windows Start Menu or Task Bar
Download iCloud photos and videos
With iCloud Photos, you can download a copy of your photos and videos on any device.
How to download photos and videos from iCloud.com
If you want to save copies of your photos and videos from iCloud.com to your iPhone, iPad, iPod touch, or your Mac or PC, follow these steps.
On your iPhone, iPad, or iPod touch
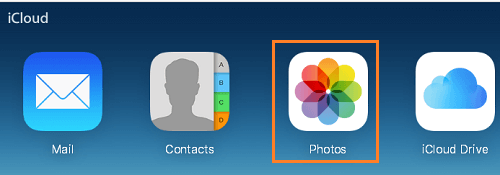
- On iCloud.com, tap Photos.
- Tap Select, then tap a photo or video. To select multiple photos or videos, tap more than one. To select your entire library, tap Select All.
- Tap the more button .
- Choose Download, then tap Download to confirm.
If your photos download as a ZIP archive, learn how to uncompress the folder on your iPhone, iPad, or iPod touch.
On your Mac or PC
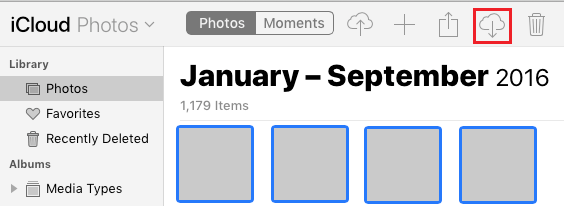
- On iCloud.com, click Photos and select a photo or video. Hold the command key on your Mac or control key on your PC to select multiple photos or videos.
- Click and hold the download button in the upper corner of the window. If you want to download your photo or video as it was originally captured or imported, choose Unmodified Original. For JPEG or H.264 format — including edits, and even if it was originally in HEIF or HEVC format — choose Most Compatible.*
- Click Download.
If your photos download as a ZIP archive, learn how to uncompress the folder on your Mac or your PC.
What happens when you delete photos or videos
Remember, when you delete a photo from iCloud Photos, it also deletes from iCloud and any other device where you’re signed in with the same Apple ID — even if you turned on Download and Keep Originals or Download Originals to this Mac. If you choose to download your originals, this also impacts your device storage. Learn more about how to manage your device storage. You can also learn how to AirDrop your photos and videos to another device.
How to download photos and videos from the Photos app
If you want to download a full-size copy of your photos and videos from the Photos app to your iPhone, iPad or iPod touch with iOS 10.3 or later or iPadOS, or your Mac with OS X Yosemite 10.10.3 or later, follow these steps.
On your iPhone, iPad, or iPod touch
- Go to Settings > [your name].
- Tap iCloud, then tap Photos.
- Select Download and Keep Originals.
On your Mac
- Open the Photos app.
- Choose Photos > Preferences.
- Select iCloud, then click Download Originals to this Mac.
On your PC
If you’re using a PC, you can set up iCloud for Windows and download a copy of your photos and videos from iCloud Photos.
How to download photos and videos from Shared Albums
You can download copies of photos and videos in Shared Albums to your own library. Learn more about how to use Shared Albums.
On your iPhone, iPad, or iPod touch
- Open the Photos app, then go to the Albums tab.
- Scroll down to Shared Albums and select an album.
- Tap the photo or video, then tap .
- Choose Save Image or Save Video.
On your Mac
- Open Photos, then select a Shared Album from the left-hand menu.
- Select the photo or video.
- Control-click a photo, then choose Import.
On your PC
In iCloud for Windows 11.1:
- Choose Start menu > iCloud Shared Albums.
- Double-click the shared album that you want to download photos or videos from.
- Double-click a photo or video, then copy it to another folder on your computer.
In iCloud for Windows 7.x:
- Open a Windows Explorer window.
- Click iCloud Photos in the Navigation pane.
- Double-click the Shared folder.
- Double-click the shared album that you want to download photos or videos from.
- Double-click a photo or video, then copy it to another folder on your computer.
To download the full album, open a File Explorer window or Windows Explorer window (Windows 7), open the Pictures folder, then open the iCloud Photos folder. Copy the Shared Album folder to another location on your computer.
[Full Guide] 5 Best Ways on How to Download Photos from iCloud
by Jenefey Aaron Updated on 2019-08-16 / Update for iCloud
iCloud is regarded as an extension to your hard drive. If you are using an iOS device or MacOS or even a Windows PC, almost everyone uses it for cloud storage. And when it comes to photos, the iCloud Photo Library feature is one of the best ways to store your photos. This feature is able to store a large number of photos wirelessly but the main problem here is that the users don’t have any idea on how to download photos from iCloud. They basically store the files without even knowing anything. In reality, it is very easy to access those photos from your iPhone XS/XS Max/XR/X/8/7/6S/6/5S or PC or Mac. The breakdown of the procedure is detailed in this article so that you can do it on your own. So, let’s get started.
Part 1: How to Download Photos from iCloud to iPhone
One of the oldest iOS apps, iCloud was designed to store your essential files in times of need and you can also get them downloaded when you need them again. When we talk about photos, iCloud provides a special feature for that specific purpose known as iCloud Photo Library. Basically, you can use this feature to download or transfer the existing photos to your iPhone or other devices where iCloud has been activated with your own account. So, you can either download photos from iCloud to iPhone or directly access them through the iCloud website. The following steps will show you how you can quickly download photos from iCloud to your iPhone.
- First, activate the Photo Library feature from the Settings of your iPhone. Go to Settings, then iCloud and then again proceed to Photos. Find and activate iCloud Photo Library.
- 2. Now, tap on the option «Download and keep original».
- 3. After that you can easily launch the Photos app on your iPhone to see the photos, iCloud Photo Library will sync the data automatically.

This method of downloading photos from iCloud is very simple but effective. You can get a copy of the downloaded photo but the original is safe in the photo library.
Part 2: How can you Download Individual Photos from iCloud via iCloud.com
Do you have one or a lot of photos stored in your iCloud account but you want to download photos from iCloud safely? iCloud can help you download or get access to single or multiple photos. Here’s how you can do it:
- First of all, this method is applicable on Mac, PC or any other supported device.
- 2. Begin with opening a browser on your device and type www.icloud.com.
- 3. After the website opens, you can sign in with your Apple ID.
4. Once you are signed in, click on the Photos icon in the website.
There you have it, this way you can download photos directly from iCloud.com. The procedure is same on any web-browser so, it really does not matter where you are downloading your photos, it’s basically the same.
Tip: How to Select Multiple Pictures on iCloud.com for Downloading?
- You can select multiple photos by holding down the CTRL key on your keyboard if you use Windows computer or the COMMAND key in Mac, and then clicking the photos you want to select.
If you think it troublesome to select multiple photos on iCloud one by one,there is another method. That is, switch to the “Moment” view. Then, select a batch of photos according to the moment.
Part 3: How can you Download all iCloud Photos to PC with iCloud for Windows
iCloud Photo Library is undoubtedly one of safest places to keep your photos but most of the users want some sort of insurance in case something happens to their beloved pictures, which could be the reason behind their need to download iCloud photos to PC. Now, the procedure to get all the photos all at once is very simple. Have a look:
- 1. Go to Settings on your iPhone, and then navigate to iCloud. Open Photos and activate iCloud Photo Library.
- 2. On your PC, download and install the iCloud for Windows software.
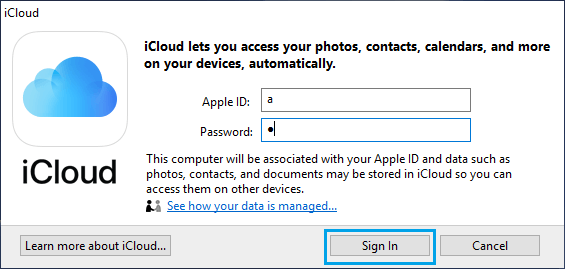
- 3. Now launch the tool and enter the iCloud account with your Apple ID and password.
- 4. After you have logged in successfully, select «Options» just beside «Photos».
- 5. Turn on iCloud Photo Library.
- 6. Go to your Windows Explorer and find the iCloud Photos folder.
- 7. Tap «Download photos and videos», and select the photos.
- 8. You can select all or choose the years respectively.
- 9. Once all of them are selected, you can click «Download».
- 10. Now, open the Downloads folder inside the iCloud Photos folder and you will get access to your iCloud photos right away.
This is a simple process and the photos can be found inside the Downloads folder. You can also change the location when you are downloading the files.
Part 4: How can you Download iCloud Photos to Mac
If you operate a Mac device then your best option is to download the photos on that device before transferring them to another server. This way you can also keep a copy of your Photo Library on your Mac. The procedure to get your photos out from iCloud to Mac is as follows:
- 1. Assuming, you have the iCloud Photo Library feature activated on your iPhone.
- 2. Open Photos on your Mac, then click on «Photos».
- 3. After that, navigate to Preferences.
- 4. Now, go to iCloud and enter the iCloud account with the help of your Apple ID and password.
- 5. Activate iCloud Photo Library and select the «Download the originals to this Mac» option.
- 6. Now, you can close the Preferences and select the Photos.
- 7. You can press «Command+A» to select all the photos or simply tap on any photo you want.
- 8. Then click on File and click on Export.
- 9. When you are exporting the photos, you can select any one among the two options; Export Unmodified Original or Select Export items.
- 10. Finally, select a destination folder and tap Export.
That’s it! This way you can download all photos from iCloud to your Mac device easily. Though it’s not an easy process to execute, it is effective nonetheless.
Part 5: The Easiest Way to Download Photos from iCloud Backup to PC/Mac
Tenorshare UltData is a third-party tool which is used by users all over the world to restore iCloud backup and even to restore deleted data. The selective recovery feature of this tool is a boon for users who want to get pictures out of their iCloud backup. Yes, you heard it right; this stellar software will also let you download pictures from iCloud backup very easily and that too selectively. The tool is supported both on Windows and Mac as well. The transfer speed is amazing and there is no chance of data loss. So, if you have a Windows PC or a Mac, don’t worry, just follow the procedure mentioned below:
1. Start by downloading and installing the Tenorshare UltData on your computer, click on the «Recover from iCloud backup file» on the main window. Then log-in to iCloud with your Apple ID.


2. After you have logged in you can choose a backup that contains your photos and click on «Next».
3. Select «Camera Roll & Videos» and «App Photos» options under the «Photos & Videos» tab then click on Next for scanning and downloading.
4. After the download is completed, select the required photos you need and just tap on «Recover».
Well, your goal to download photos from a backup ends here. Yes, it is that easy! The selective feature is a great add-on to this amazing software.
Conclusion
Overall, these are the best ways to get your iCloud photos to your respective devices. All of these methods are tried and tested and works as it should if done right! Choose the one according to your need and follow the instructions carefully. We hope it will educate you and solve all your iCloud photo downloading issues.
In our opinion, if you want to know the best method here, we highly recommend you to go for Tenorshare UltData. Keep in mind, except UltData, every option here is wireless and that involves a certain risk of data loss and slow transfer speeds. So, its better you go for the safest option! It is quite simply the best way to get your iCloud photos as it comes with great features and offers the most simple yet effective download method both on your PC and Mac.
How to Download All Photos From iCloud to PC
By: Waseem Patwegar
You may want to Download All Photos From iCloud to PC as an additional backup, to clear up storage space in your iCloud Account or for other reasons. You will find below the steps to select and Download All Photos from iCloud to PC.

Download ALL Photos From iCloud to PC
As you must have noticed, there is no ‘Download All’ or ‘Select All’ button on iCloud. Also, you won’t be able to use your mouse to select Multiple or All Photos on iCloud.
This can be a problem, if there are thousands of Photos in your iCloud Account and you want to download them all to your Windows computer.
Luckily, there is a keyboard shortcut to select All iCloud Photos and you will find below 2 different methods to Download All Photos from iCloud to your Windows computer.
1. Download All Photos From iCloud to PC Using Keyboard Shortcut
If the number of Photos that you want to download from iCloud to PC is less than 1,000, you can follow this method to select and download up to 999 photos from iCloud to PC.
If you are trying to download over 1,000 photos, you can move to the next method as provided below in this guide.
1. Go to icloud.com on your Windows Computer.
2. Login to your iCloud Account by entering your Apple ID and Password .

3. Once you are signed-in, click on the Photos icon.
4. In iCloud Photos, make sure you are on Photos Tab and click on the First Photo .

5. Press and hold Shift + Ctrl + Alt Keys and press the Down Arrow Key to select All iCloud Photos.
Note: You can also scroll down to the bottom of the page and click on the Last Photo .
6. Once All Photos are selected, click on the Download icon to begin the process of downloading all iCloud Photos to your computer.
Unless you have changed the default settings, all iCloud Photos will be downloaded to ‘Downloads’ Folder on your computer.
2. Download All Photos From iCloud to PC Using iCloud For Windows
The only way to download more than 1,000 Photos at once from iCloud to PC is to download and install ‘iCloud For Windows’ program on your computer.
1. Download iCloud For Windows application on your Computer.

2. Once the download is complete, click on the downloaded iCloud Setup file and follow the onscreen instructions to Install iCloud For Windows on your computer.

3. When prompted, Sign-in to your iCloud Account by entering your Apple ID and Password .
4. On the next screen, select Photos option by clicking in the little box next to Photos.
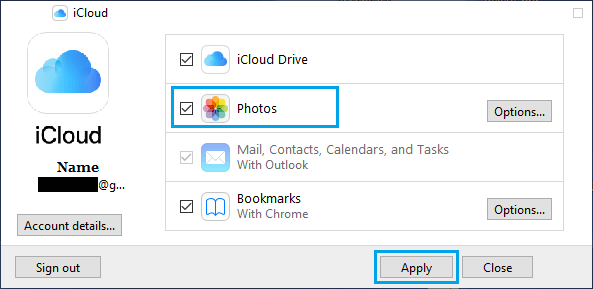
On the pop-up, select iCloud Photo Library option and click on Done .
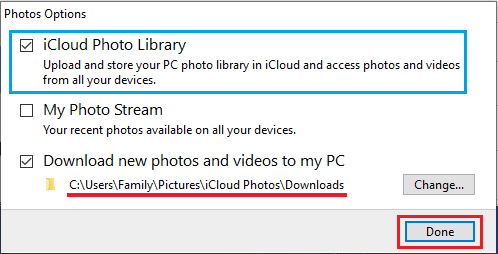
Note: You can change iCloud download location by clicking on Change.
5. Click on Apply to begin the process of Syncing all iCloud Photos to the Downloads Folder on your computer.
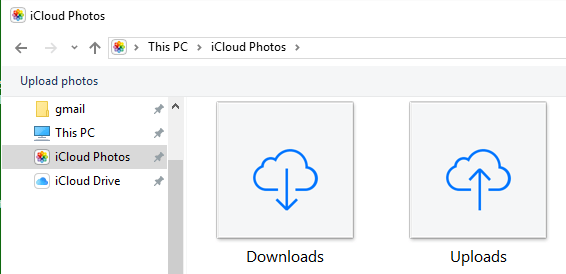
6. Once all iCloud Photos are downloaded, open the File Explorer on your computer.

7. In the File Explorer window, click on iCloud Photos tab in the left-pane. In the right-pane, click on the Downloads Icon.
8. On the next screen, click on the Downloads Folder to see all your iCloud Photos arranged in different sub-folders.
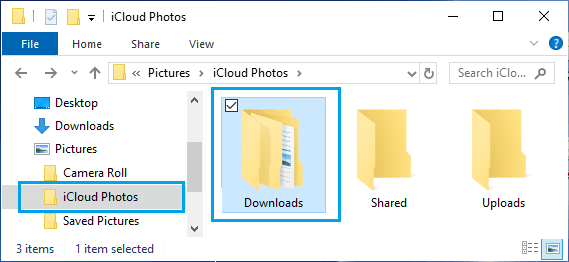
To make a Backup, you can copy the entire Downloads Folder to Desktop, USB drive or any other location on your computer.
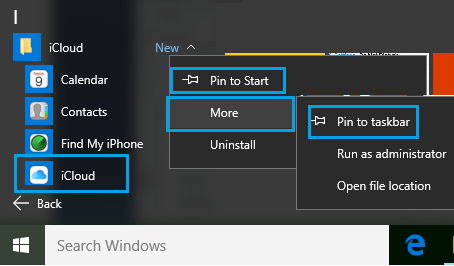
Add iCloud to Windows Start Menu or Task Bar
In order to make it easy for you to open iCloud, you can Add iCloud icon to the Taskbar by clicking on the Start button > right-click on iCloud > More > Pin to Taskbar .
Important: If you are planning to disable iCloud Photos, make sure that you copy all the Photos from Downloads to another Folder.


