- UNetbootin
- Features
- Using UNetbootin
- Supported Distributions
- Installing Other Distributions Using UNetbootin
- Distribution X isn’t on the list of supported distributions, will it work?
- UNetbootin isn’t able to download the distribution, what should I do?
- My USB stick isn’t booting, what should I do?
- My USB stick/hard drive isn’t detected, what should I do?
- How do I use UNetbootin from the command line?
- How does UNetbootin work, and what does it do?
- Where can I report bugs, submit patches, etc?
- Does UNetbootin have any spyware, viruses, trojans, or other malware?
- What translations are available, and how can I use them?
- Can I help translate?
- Removal Instructions (Applicable only to Hard Disk installs)
- Where’s the source code, and how can I compile or modify it?
- License
- Other open-source projects from the creators of UNetbootin
- HabitLab
- Install Any Linux From a Usb the Easy Way
- Introduction: Install Any Linux From a Usb the Easy Way
- Step 1: What You Need
- Step 2: UNetbootin
- Step 3: You Now Have Linux on Your Usb!
- Step 4: Now Install It
- Step 5: Finished
- Be the First to Share
- Boot and Run Linux from a USB Flash Drive
- Helping You Make Linux Boot from USB since 2006
- Download linux from usb
- 2. Requirements
- 3. USB selection
- 4. Boot selection and Partition scheme
- 5. Select the Ubuntu ISO file
- 6. Write the ISO
- 7. Additional downloads
- 8. Write warnings
- 9. Writing the ISO
- 10. Installation complete
UNetbootin
UNetbootin allows you to create bootable Live USB drives for Ubuntu and other Linux distributions without burning a CD.
You can either let UNetbootin download one of the many distributions supported out-of-the-box for you, or supply your own Linux .iso file.
Features
UNetbootin can create a bootable Live USB drive
It loads distributions either by downloading a ISO (CD image) files for you, or by using an ISO file you’ve already downloaded.
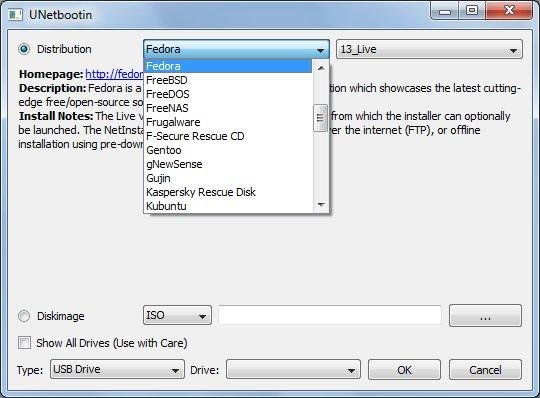
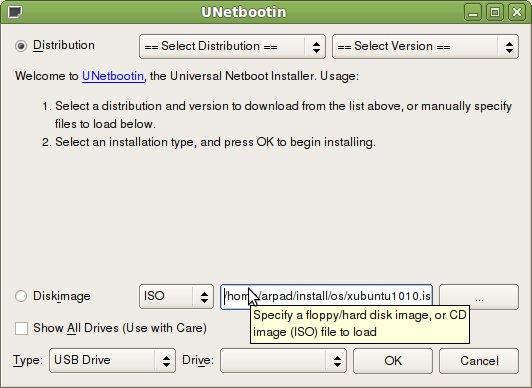
Using UNetbootin
Select an ISO file or a distribution to download, select a target drive (USB Drive or Hard Disk), then reboot once done. If your USB drive doesn’t show up, reformat it as FAT32.
If you used the «USB Drive» install mode: After rebooting, boot from the USB drive. On PCs, this usually involves pressing a button such as Esc or F12 immediately after you turn on your computer, while on Macs, you should hold the Option key before OSX boots.
If you used the «Hard Disk» install mode: After rebooting, select the UNetbootin entry from the Windows Boot Menu.
Supported Distributions
UNetbootin has built-in support for automatically downloading and loading the following distributions, though installing other distributions is also supported:
UNetbootin can also be used to load various system utilities, including:
Installing Other Distributions Using UNetbootin
Download and run UNetbootin, then select the «disk image» option and supply it with an ISO (CD image).
UNetbootin doesn’t use distribution-specific rules for making your live USB drive, so most Linux ISO files should load correctly using this option. However, not all distributions support booting from USB, and some others require extra boot options or other modifications before they can boot from USB drives, so these ISO files will not work as-is. Also, ISO files for non-Linux operating systems have a different boot mechanism, so don’t expect them to work either.
Distribution X isn’t on the list of supported distributions, will it work?
UNetbootin isn’t able to download the distribution, what should I do?
Download the ISO straight from the website, then provide it to UNetbootin via the diskimage option.
My USB stick isn’t booting, what should I do?
Reformat the USB drive as FAT32, then use UNetbootin again to put your distribution on the USB stick.
My USB stick/hard drive isn’t detected, what should I do?
Reformat the USB drive as FAT32, then use UNetbootin again. If it still isn’t showing up, use the targetdrive command line option.
How do I use UNetbootin from the command line?
How does UNetbootin work, and what does it do?
Where can I report bugs, submit patches, etc?
First, make sure you are using the latest version available on this website.
» See Github Issues to file a bug report.
» See Github Pull Requests to submit a patch.
Does UNetbootin have any spyware, viruses, trojans, or other malware?
No; though some anti-virus products may raise «Trojan.generic» warnings due to the auto-uninstall feature, these are false positives. Just make sure you obtain UNetbootin from this site, not some shady third-party source. If you’re absolutely paranoid, you can check the source code and compile it yourself.

What translations are available, and how can I use them?
A number of translations are included in the latest UNetbootin release. See the Translations Page for the status of each.
If a translation corresponding to your system’s native language has already been included into UNetbootin, it should automatically load the corresponding translation. Alternatively, you can force the language to use via the lang=es command-line option, where you substitute es with the the 2-letter ISO 639-1 code for your language.
Can I help translate?
If you’d like to help translate this website, join the project on Transifex, then edit translations either on this website or on Transifex.
If you’d like to help translate the UNetbootin program itself, please use Launchpad Translations. If you are new to Launchpad, you will first have to join the corresponding Ubuntu Translators group for the language you intend to translate. For information on using the Launchpad Translations system, see the translations help page.
Removal Instructions (Applicable only to Hard Disk installs)
If using Windows, UNetbootin should prompt you to remove it the next time you boot into Windows. Alternatively, you can remove it via Add/Remove Programs in the Control Panel.
If using Linux, re-run the UNetbootin executable (with root priveledges), and press OK when prompted to uninstall.
Removal is only required if you used the «Hard Drive» installation mode; to remove the bootloader from a USB drive, back up its contents and reformat it.
Uninstalling UNetbootin simply removes the UNetbootin entry from your boot menu; if you installed an operating system to a partition using UNetbootin, removing UNetbootin will not remove the OS.
To manually remove a Linux installation, you will have to restore the Windows bootloader using «fixmbr» from a recovery CD, and use Parted Magic to delete the Linux partition and expand the Windows partition.
Where’s the source code, and how can I compile or modify it?
Source code is on Github, though you may prefer a tarball of the latest release.
License
UNetbootin was created and written by Geza Kovacs (Github: gkovacs, Launchpad: gezakovacs, contact info).
Translators are listed on the translations page.
UNetbootin is licensed under the GNU General Public License (GPL) Version 2 or above. Site materials, documentation, screenshots, and logos are licensed as Creative Commons Attribution-Share-Alike 3.0.
Other open-source projects from the creators of UNetbootin

HabitLab
A Chrome extension to help you waste less time online (on sites like Facebook, Youtube, etc) by experimenting with different interventions (news feed blockers, comment hiders, and more) to find the ones that work best for you.
Источник
Install Any Linux From a Usb the Easy Way

Introduction: Install Any Linux From a Usb the Easy Way


Are you tired of wasting all your disks on Linux distros?
Maybe your cd drive is broken?
Maybe you are simply too cool for ancient tech like CD’s?
In this Instructable I am going to show you how to install linux from a USB, the easiest way I know how.
Edit: I wrote this awhile ago (xp era!). It included a poorly made video and terrible grammar. Its had a lot of views and hopefully helped some people so I have updated the whole Instructable with better instructions.
Step 1: What You Need
Not much! You can most likely get these things without leaving the room.
1.A copy of linux.This can be any distro you want. Choosing an OS mostly personal opinion, if you are looking for a simple user friendly OS I would suggest Linux mint
(I am using a copy of kodibuntu in the shown install)
2.You will need this program unetbootin
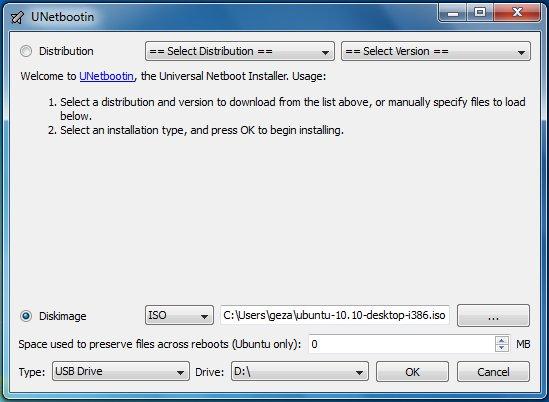
Step 2: UNetbootin
The program we downloaded allows you to create bootable Live USB drives.
Its extremely simple to use.
(Numbered steps match arrows on images)
1.Insert your USB and check the corresponding drive letter.
2. Open the program.
3.Click the Diskimage radiobutton.
4.Select your diskimage.
5.Select the correct drive letter for your usb
6. Click ok and watch the magic happen
Step 3: You Now Have Linux on Your Usb!
That was easy! You are ready to install it on your computer.
Go into the bios and set it to read from usb during boot.This is different for every computer so do some research.Once you have enabled this restart with the usb plugged in.You will see a screen similar to the image.Choose default and let it do its thing.
Step 4: Now Install It
Now its all loaded up and on the home screen(hopefully).
You will see a icon that looks like a disk and says install.
Click on it and it will.. wait for it.. install!
During the install it will ask you questions to set your preferences. All very straightforward.
You will have to reboot and that’s that. Done 🙂
Step 5: Finished
Well that it, you should have Linux working.If something went wrong or you don’t understand then just ask a question!
If I have left anything out or you think there is a way to make this better then feel free to tell me, I don’t bite (and even if I did your safe on your side of the internet)
Thanks for reading. Hope you enjoyed the revised edition of this Instructable,
Be the First to Share
Did you make this project? Share it with us!
Источник
Boot and Run Linux from a USB Flash Drive
Boot from USB and take your favorite Portable Linux Desktop with you!
Make a Linux Bootable USB to Boot and Run Linux from a USB Flash Drive.
Recommended YUMI – Multiboot USB Creator Updated: September 29, 2021
Legacy Classic Universal USB Installer – UUI Updated: August 29, 2021
 Easily install your favorite Linux operating system to a bootable USB flash drive. Take your portable Linux with you to run from any computer that can boot from a USB device. You can also Boot Multiple ISO files from a flash drive by using tools like YUMI to create a MultibootUSB. Multibooting allows you to store, boot and then run several Live Linux Operating Systems, Windows installers, diagnostic utilities, antivirus scanners, penetration testing, backup tools, and more, all from the same device. Resulting in your very own custom USB bootable diagnostic tool kit that will fit in your pocket.
Helping You Make Linux Boot from USB since 2006
Pendrivelinux provides simplified information to make it easy for anyone to install, USB boot, and then run their favorite Distros and tools from a flash drive.
- USB Boot Creators
- USB Emulation
- USB Boot From Windows
- USB Boot From Linux
Источник
Download linux from usb
With a bootable Ubuntu USB stick, you can:
- Install or upgrade Ubuntu
- Test out the Ubuntu desktop experience without touching your PC configuration
- Boot into Ubuntu on a borrowed machine or from an internet cafe
- Use tools installed by default on the USB stick to repair or fix a broken configuration
Creating a bootable Ubuntu USB stick from Microsoft Windows is very simple and we’re going to cover the process in the next few steps.
Alternatively, we also have tutorials to help you create a bootable USB stick from both Ubuntu and Apple macOS.

2. Requirements
- A 4GB or larger USB stick/flash drive
- Microsoft Windows XP or later
- Rufus, a free and open source USB stick writing tool
- An Ubuntu ISO file. See Get Ubuntu for download links

Take note of where your browser saves downloads: this is normally a directory called ‘Downloads’ on your Windows PC. Don’t download the ISO image directly to the USB stick! If using Windows XP or Vista, download version 2.18 of Rufus.
3. USB selection
Perform the following to configure your USB device in Rufus:
- Launch Rufus
- Insert your USB stick
- Rufus will update to set the device within the Device field
- If the Device selected is incorrect (perhaps you have multiple USB storage devices), select the correct one from the device field’s drop-down menu

You can avoid the hassle of selecting from a list of USB devices by ensuring no other devices are connected.
4. Boot selection and Partition scheme
Now choose the Boot selection. Choices will be Non bootable and FreeDOS. Since you are creating a bootable Ubuntu device select FreeDOS.
The default selections for Partition scheme (MBR) and Target system (BIOS (or UEFI-CSM)) are appropriate (and are the only options available).

5. Select the Ubuntu ISO file
To select the Ubuntu ISO file you downloaded previously, click the SELECT to the right of “Boot selection”. If this is the only ISO file present in the Downloads folder you will only see one file listed.
Select the appropriate ISO file and click on Open.

6. Write the ISO
The Volume label will be updated to reflect the ISO selected.
Leave all other parameters with their default values and click START to initiate the write process.

7. Additional downloads
You may be alerted that Rufus requires additional files to complete writing the ISO. If this dialog box appears, select Yes to continue.

8. Write warnings
You will then be alerted that Rufus has detected that the Ubuntu ISO is an ISOHybrid image. This means the same image file can be used as the source for both a DVD and a USB stick without requiring conversion.
Keep Write in ISO Image mode selected and click on OK to continue.

Rufus will also warn you that all data on your selected USB device is about to be destroyed. This is a good moment to double check you’ve selected the correct device before clicking OK when you’re confident you have.

If your USB stick contains multiple partitions Rufus will warn you in a separate pane that these will also be destroyed.
9. Writing the ISO
The ISO will now be written to your USB stick, and the progress bar in Rufus will give you some indication of where you are in the process. With a reasonably modern machine, this should take around 10 minutes. Total elapsed time is shown in the lower right corner of the Rufus window.

10. Installation complete
When Rufus has finished writing the USB device, the Status bar will be green filled and the word READY will appear in the center. Select CLOSE to complete the write process.

Congratulations! You now have Ubuntu on a USB stick, bootable and ready to go.
If you want to install Ubuntu, take a look at our install Ubuntu desktop tutorial.
Источник


