- Download and install Windows support software on your Mac
- Install the latest macOS updates
- Format a USB flash drive
- Download the Windows support software
- Install the Windows support software
- Learn more
- Install Windows 10 on your Mac with Boot Camp Assistant
- What you need to install Windows 10 on Mac
- How to install Windows 10 on Mac
- 1. Check your Secure Boot setting
- 2. Use Boot Camp Assistant to create a Windows partition
- 3. Format the Windows (BOOTCAMP) partition
- 4. Install Windows
- 5. Use the Boot Camp installer in Windows
- How to switch between Windows and macOS
- Learn more
- Download windows programs on mac
- Software for your Mac
- Mac Software of the day
- FileZilla
- Editor’s Pick
- Games
- Editor’s Pick
- Latest tips & tricks
Download and install Windows support software on your Mac
After using Boot Camp Assistant to install or upgrade Microsoft Windows on your Mac, you may also need to install the latest Windows support software (drivers) from Apple.
When you install Microsoft Windows on your Mac, Boot Camp Assistant automatically opens the Boot Camp installer, which installs the latest Windows support software (drivers). If that doesn’t happen or you experience any of the following issues while using Windows on your Mac, follow the steps in this article.
- Your Apple mouse, trackpad or keyboard isn’t working in Windows.
Force Touch isn’t designed to work in Windows. - You can’t hear audio from the built-in speakers of your Mac in Windows.
- The built-in microphone or camera of your Mac isn’t recognised in Windows.
- One or more screen resolutions are unavailable for your display in Windows.
- You can’t adjust the brightness of your built-in display in Windows.
- You’re having issues with Bluetooth or Wi-Fi in Windows.
- You’ve received an alert stating that Apple Software Update has stopped working.
- You’ve received a message stating that your PC has a driver or service that isn’t ready for this version of Windows.
- Your Mac starts up to a black or blue screen after you’ve installed Windows.
If your Mac has an AMD video card and is having graphics issues in Windows, you may need to update your AMD graphics drivers instead.

Install the latest macOS updates
Before proceeding, install the latest macOS updates, which can include updates to Boot Camp.
Format a USB flash drive
To install the latest Windows support software, you need a 16 GB or larger USB flash drive formatted as MS-DOS (FAT).
- Start your Mac from macOS.
- Plug the USB flash drive into your Mac.
- Open Disc Utility, which is in the Utilities folder of your Applications folder.
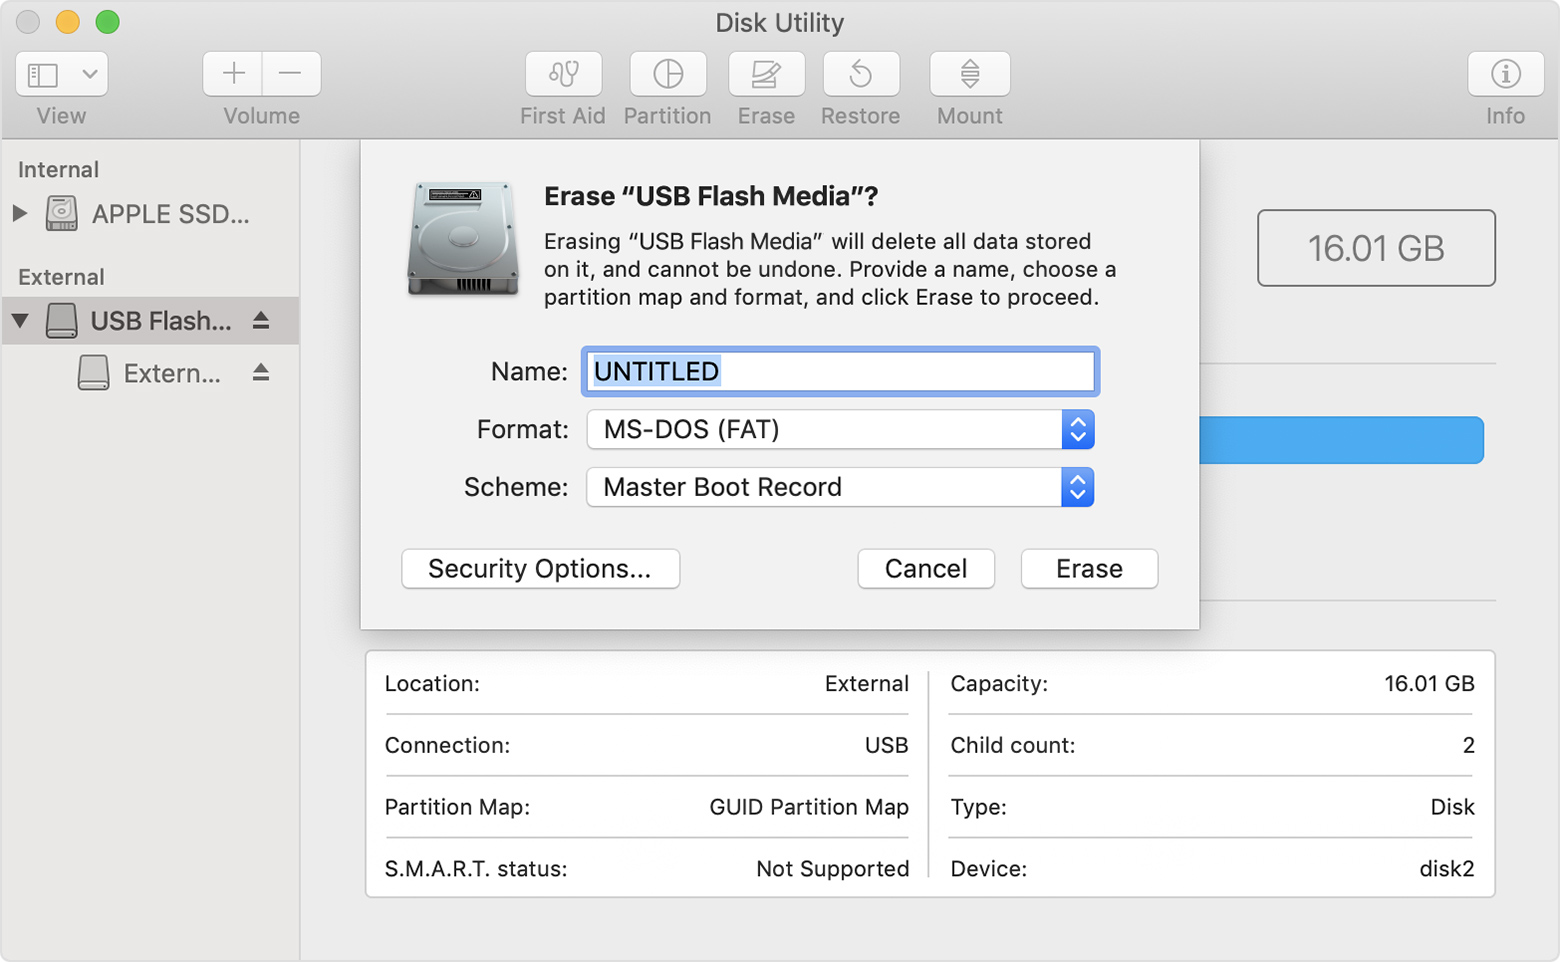
- Choose View > Show All Devices from the menu bar.
- From the sidebar in Disc Utility, select your USB flash drive. (Select the drive name, not the volume name beneath it.)

- Click the Erase button or tab.
- Choose MS-DOS (FAT) as the format and Master Boot Record as the scheme.
- Click Erase to format the drive. When it’s finished, quit Disk Utility.
Download the Windows support software
- Make sure your Mac is connected to the Internet.
- Open Boot Camp Assistant, which is in the Utilities folder of your Applications folder.
- From the menu bar at the top of your screen, choose Action > Download Windows Support Software, then choose your USB flash drive as the destination to save to. When the download has been completed, quit Boot Camp Assistant.
Install the Windows support software
After downloading the Windows support software to your flash drive, follow these steps to install the software. (If you’re attempting to resolve issues with a Bluetooth mouse or keyboard, it may be easier to use a USB mouse or keyboard until these steps have been completed.)
- Make sure the USB flash drive is plugged into your Mac.
- Start up your Mac in Windows.
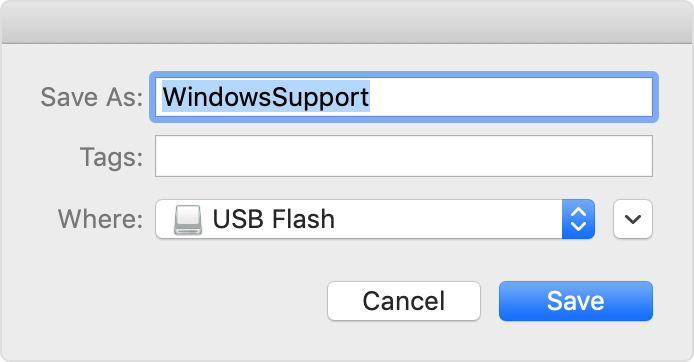
- From File Explorer, open the USB flash drive, then open Setup or setup.exe, which is in the WindowsSupport folder or BootCamp folder. When you’re asked to allow Boot Camp to make changes to your device, click Yes.
- Click Repair to begin installation. If you receive an alert stating that the software hasn’t passed Windows Logo testing, click Continue Anyway.
- After the installation has been completed, click Finish, then click Yes when you’re asked to restart your Mac.
Learn more
If you can’t download or save the Windows support software:
- If the assistant states that the Windows support software could not be saved to the selected drive or that the USB flash drive can’t be used, make sure your USB flash drive has a storage capacity of at least 16 GB and has been formatted correctly.
- If the assistant can’t see your USB flash drive, click Go Back and make sure the drive has been connected directly to the USB port on your Mac – not to a display, hub or keyboard. Disconnect and reconnect the drive, then click Continue.
- If the assistant states that it can’t download the software because of a network problem, make sure your Mac is connected to the Internet.
- Make sure your Mac meets the system requirements to install Windows using Boot Camp.
If a Mac feature still doesn’t work after updating the Windows support software, search for your symptom on the Apple support website or Microsoft support website. Some features of your Mac aren’t designed to work in Windows.
Information about products not manufactured by Apple, or independent websites not controlled or tested by Apple, is provided without recommendation or endorsement. Apple assumes no responsibility with regard to the selection, performance or use of third-party websites or products. Apple makes no representations regarding third-party website accuracy or reliability. Contact the vendor for additional information.
Install Windows 10 on your Mac with Boot Camp Assistant
With Boot Camp, you can install Microsoft Windows 10 on your Mac, then switch between macOS and Windows when restarting your Mac.
What you need to install Windows 10 on Mac
- MacBook introduced in 2015 or later
- MacBook Air introduced in 2012 or later
- MacBook Pro introduced in 2012 or later
- Mac mini introduced in 2012 or later
- iMac introduced in 2012 or later 1
- iMac Pro (all models)
- Mac Pro introduced in 2013 or later
The latest macOS updates, which can include updates to Boot Camp Assistant. You will use Boot Camp Assistant to install Windows 10.
64GB or more free storage space on your Mac startup disk:
- Your Mac can have as little as 64GB of free storage space, but at least 128GB of free storage space provides the best experience. Automatic Windows updates require that much space or more.
- If you have an iMac Pro or Mac Pro with 128GB of memory (RAM) or more, your startup disk needs at least as much free storage space as your Mac has memory. 2
An external USB flash drive with a storage capacity of 16GB or more, unless you’re using a Mac that doesn’t need a flash drive to install Windows.
A 64-bit version of Windows 10 Home or Windows 10 Pro on a disk image (ISO) or other installation media. If installing Windows on your Mac for the first time, this must be a full version of Windows, not an upgrade.
- If your copy of Windows came on a USB flash drive, or you have a Windows product key and no installation disc, download a Windows 10 disk image from Microsoft.
- If your copy of Windows came on a DVD, you might need to create a disk image of that DVD.
![]()
How to install Windows 10 on Mac
To install Windows, use Boot Camp Assistant, which is included with your Mac.
1. Check your Secure Boot setting
Learn how to check your Secure Boot setting. The default Secure Boot setting is Full Security. If you changed it to No Security, change it back to Full Security before installing Windows. After installing Windows, you can use any Secure Boot setting without affecting your ability to start up from Windows.
2. Use Boot Camp Assistant to create a Windows partition
Open Boot Camp Assistant, which is in the Utilities folder of your Applications folder. Follow the onscreen instructions.
- If you’re asked to insert a USB drive, plug your USB flash drive into your Mac. Boot Camp Assistant will use it to create a bootable USB drive for Windows installation.
- When Boot Camp Assistant asks you to set the size of the Windows partition, remember the minimum storage-space requirements in the previous section. Set a partition size that meets your needs, because you can’t change its size later.
3. Format the Windows (BOOTCAMP) partition
When Boot Camp Assistant finishes, your Mac restarts to the Windows installer. If the installer asks where to install Windows, select the BOOTCAMP partition and click Format. In most cases, the installer selects and formats the BOOTCAMP partition automatically.
4. Install Windows
Unplug any external devices that aren’t necessary during installation. Then click Next and follow the onscreen instructions to begin installing Windows.
5. Use the Boot Camp installer in Windows
After Windows installation completes, your Mac starts up in Windows and opens a ”Welcome to the Boot Camp installer” window. Follow the onscreen instructions to install Boot Camp and Windows support software (drivers). You will be asked to restart when done.
- If the Boot Camp installer never opens, open the Boot Camp installer manually and use it to complete Boot Camp installation.
- If you have an external display connected to a Thunderbolt 3 port on your Mac, the display will be blank (black, gray, or blue) for up to 2 minutes during installation.
How to switch between Windows and macOS
Restart, then press and hold the Option (or Alt) ⌥ key during startup to switch between Windows and macOS.
Learn more
If you have one of these Intel-based Mac models using OS X El Capitan or later, you don’t need a USB flash drive to install Windows:
- MacBook introduced in 2015 or later
- MacBook Air introduced in 2017 or later 3
- MacBook Pro introduced in 2015 or later 3
- iMac introduced in 2015 or later
- iMac Pro (all models)
- Mac Pro introduced in late 2013 or later
For more information about using Windows on your Mac, open Boot Camp Assistant and click the Open Boot Camp Help button.
1. If you’re using an iMac (Retina 5K, 27-inch, Late 2014) or iMac (27-inch, Late 2013) or iMac (27-inch, Late 2012) with a 3TB hard drive and macOS Mojave or later, learn about an alert you might see during installation.
2. For example, if your Mac has 128GB of memory, its startup disk must have at least 128GB of storage space available for Windows. To see how much memory your Mac has, choose Apple menu > About This Mac. To see how much storage space is available, click the Storage tab in the same window.
3. These Mac models were offered with 128GB hard drives as an option. Apple recommends 256GB or larger hard drives so that you can create a Boot Camp partition of at least 128GB.
Information about products not manufactured by Apple, or independent websites not controlled or tested by Apple, is provided without recommendation or endorsement. Apple assumes no responsibility with regard to the selection, performance, or use of third-party websites or products. Apple makes no representations regarding third-party website accuracy or reliability. Contact the vendor for additional information.
Download windows programs on mac

Software for your Mac
Find the best programs for Mac, protect your computer with antivirus, find out how to record music or learn how to download movies and songs for free and with full guarantees. 100% safe software.
Mac Software of the day

One of the best free drawing programs

FileZilla
FTP, SFTP and FTPS client for Mac
- CleanMyMac
 CleanMyMac
Improve and optimize the performance of macOS
 Google Drive
Store your information on the cloud
 Setapp
An alternative store to iTunes
 Google Chrome
The Mac version of the browser by Google
 Adobe Acrobat Reader
The most used PDF Reader in the world
 TeamViewer
VNC client to remotely control any computer
 Calibre
The perfect organizer for your eBooks
 FileZilla
FTP, SFTP and FTPS client for Mac
 Steam
Steam
Platform for the sale and distribution of video games
 Epic Games
Download Epic’s games with its client
- Adobe Photoshop
 Adobe Photoshop
The best image editor for Mac
 GarageBand
One of the best applications to compose music
 GTA San Andreas — Grand Theft Auto
The legendary San Andreas for Mac
 FL Studio
One of the best DAWs comes to Mac
 Adobe Illustrator
The best software to work with vector graphics
 Format Factory
Convert multimedia files to any format
 macOS El Capitan
Version 10.11 of OS X, the Mac operating system
 Microsoft Excel
Microsoft’s spreadsheet application
 Microsoft PowerPoint
Create PowerPoint presentations on your Mac
 Microsoft Word
Microsoft Office’s text editor
Editor’s Pick
- VLC Media Player
 VLC Media Player
VLC is considered the best multimedia player for Mac
 iTunes
Apple’s multimedia player and cataloger
 Little Snitch
Protect your computer’s privacy
![]() Transmission
Transmission
The most powerful BitTorrent client for Mac
Google Chrome
The Mac version of the browser by Google
 Skype
Skype
Calls, video calls and messaging for free
 Minecraft
The Mac version of the most famous sandbox construction game
 Caffeine
Keep your Mac awake for whenever you need it
 Final Cut Pro X
Considered by many as the best video editor for Mac
 Keynote
iWork’s tool to create slideshows
Follow us on…
Categories
Games
World War II is fought on your PC
Play your Windows games on your Mac
Play Nintendo DS games on your Mac
A minimalistic and hypnotic arcade game
Compete with Tux and his friends in kart races
The crossword application for your Mac
Editor’s Pick
App uninstaller for Mac
Draw and edit images with a simple application
Locate nearby Wi-Fi connections
Popcorn Time on your iPhone and without jailbreak
Microsoft’s cloud storage system
Get rid of online advertising on your Mac
Latest tips & tricks
macOS
macOS is the name given to Apple’s operating system for laptops and desktop computers. Currently based on UNIX, it appeared in 1984 and was one of the first systems that included the integration of a mouse, a windows-based system, as well as icons and functional menus. The functionality of the classic Mac OS remained in force until its ninth version, in which it changed its name from Mac OS to OS X.
At Malavida we analyze the best programs for macOS and we offer you our selection of software for both MacBooks and desktop Mac computers. The programs are reviewed by our experts that, as well as offering you the best software, also draw up tutorials, how-to manuals and videos, to help you in your learning process.


