- Windows Update fails to install or will not download in Windows 10
- Windows Update failed to install
- 1] Try again
- 2] Delete Temporary Files and Browser Cache
- 3] Disable your Firewall and Anti-virus software
- 4] Run SFC and DISM
- 5] Run Windows Update Troubleshooter
- 6] Manually Reset Windows Update Components to default
- 7] Use FixWU
- 8] Flush the Software Distribution Folder
- 9] Reset the Catroot folder
- 10] Check Windows Update Services status
- 11] Check Windows Update log file
- 12] Clear pending.xml file
- 13] Clear the BITS queue
- 14] Delete incorrect Registry values
- 15] Run Windows Module Installer
- 16] Run Background Intelligent Transfer Service Troubleshooter
- 17] Download its stand-alone installer
- 18] Run Windows Update in Clean Boot State
- 19] Take the help of Microsoft Virtual Agent
- 20] Contact Microsoft Support
- Windows Update Fails [FIXED]
- Fix the bugging Windows Update issues
- Method 1: Run Windows Update Troubleshooter
- Method 2: Reset the Windows Update related components
- Method 3: Manually download and install updates
- Method 4: Run DISM and System File Checker
- Method 5: Disable your antivirus
- Method 6: Update your drivers
- Method 7: Restore your Windows
Windows Update fails to install or will not download in Windows 10
Sometimes, some Windows Update fails to download, or just refuse to get installed on your computer even when you try a couple of times. If you face this problem where Windows Updates will not install or download, then this tutorial will help you identify and troubleshoot the problem.
Windows Update failed to install
If Windows Update fails to install, is not working, updates will not download or keep failing, on your Windows 10/8/7 then these suggestions will help you troubleshoot & fix Windows Updates.
- Try again
- Delete Temporary Files and Browser Cache
- Disable your Firewall and Anti-virus software
- Run SFC and DISM
- Run Windows Update Troubleshooter
- Manually Reset Windows Update Components to default
- Use FixWU
- Flush the SoftwareDistribution Folder
- Reset the Catroot folder
- Check Windows Update Services status
- Check Windows Update log file
- Clear pending.xml file
- Clear the BITS queue
- Delete incorrect Registry values
- Run Windows Module Installer
- Run Background Intelligent Transfer Service Troubleshooter
- Download its stand-alone installer
- Run Windows Update in Clean Boot State
- Take the help of Microsoft Virtual Agent
- Contact Microsoft Support.
Let us see all these potential fixes in detail. Do create a system restore point first. Go through the entire post and then see which of these may apply to your system. You may then try any of these, in no particular order.
1] Try again
As mentioned earlier, many times, an update may fail to install in the first instance, but for some inexplicable reason, succeeds in the 2nd or 3rd try. So try a couple of times.
2] Delete Temporary Files and Browser Cache
If you are unable to install Windows Updates, first clear up your Temporary Files and Browser Cache, reboot, and try again. See if this helps resolve the issue. Best and easy to use the built-in Disk Cleanup utility or CCleaner.
3] Disable your Firewall and Anti-virus software
Temporarily Disable your Firewall and Anti-virus software and try again. Here is a list of Windows files and folders you may exclude from Antivirus scans.
4] Run SFC and DISM
Run System File Checker to replace potentially corrupted system files.
You can also fix corrupted Windows Update system files using DISM Tool. The Dism.exe tool can be used in different situations, and one of them is to repair a corrupted Windows Update files. Do note that you need to run a different command if you want to repair corrupted Windows Update System Files. If you run the usual /RestoreHealth command, it may not necessarily help.
DISM will replace potentially corrupted or missing system files with good ones. However, if your Windows Update client is already broken, you will be prompted to use a running Windows installation as the repair source or use a Windows side-by-side folder from a network share, as the source of the files.
You will then be required to run the following command instead:
Here you have to replace the C:\RepairSource\Windows placeholder with the location of your repair source.
Once the process is complete, DISM will create a log file in %windir%/Logs/CBS/CBS.log and capture any issues that the tool finds or fixes.
These can help fix problems that might prevent Windows Updates from installing.
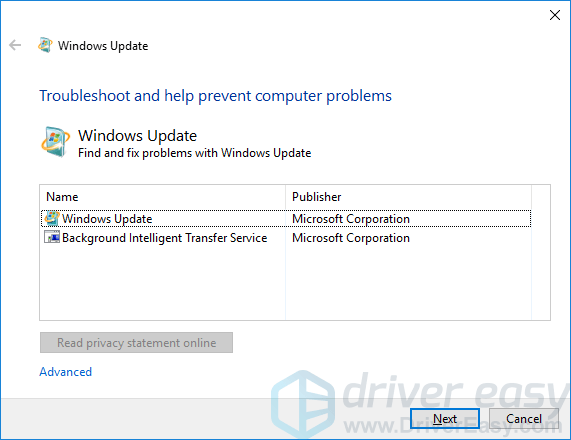
5] Run Windows Update Troubleshooter
Use the Windows Update Troubleshooter from Microsoft. It resets Windows Updates settings to defaults. You may also run the Online Windows Troubleshooter from Microsoft.
6] Manually Reset Windows Update Components to default
7] Use FixWU
Use our Fix WU tool and see if it helps. It re-registers all the dll , ocx , and ax files required for the proper functioning of Windows Updates.
8] Flush the Software Distribution Folder
Flush the SoftwareDistribution Folder. Run Command Prompt as administrator. In the CMD box that appears on the computer screen, enter the following strings of text, one at a time, and hit Enter.
Now browse to the C:\Windows\SoftwareDistribution folder and delete all the files and folders inside.
If the files are in use, restart your device. After rebooting, run the commands above again. Your Windows Store App needs to be closed, by the way, so do not start it.
Now you will be able to delete the files from the mentioned Software Distribution folder. Now in the Command Prompt windows, type the following commands one at a time, and hit Enter:
Reboot. If you are using Windows Update, try using Microsoft Updates or vice versa.
9] Reset the Catroot folder
Reset the Catroot folder and see. To reset the catroot2 folder do this:
Open an elevated Command Prompt, type the following command one after the other and hit Enter:
Next, delete all the contents of the catroot2 folder.
Having done this, in the CMD windows, type the following and hit Enter:
Your catroot folder will be reset, once you start Windows Update again.
10] Check Windows Update Services status
The default configuration on a standalone Windows 10 PC is as follows:
- Windows Update Service – Manual (Triggered)
- Windows Update Medic Services – Manual
- Cryptographic Services – Automatic
- Background Intelligent Transfer Service – Manual
- DCOM Server Process Launcher – Automatic
- RPC Endpoint Mapper – Automatic
- Windows Installer – Manual.
This will ensure that the required Services are available.
Apart from the direct service, you should find the dependencies of Windows Update service and ensure if they are running or not.
To get started, search for “services” in the Taskbar search box and click on the search result. After opening the Services window, find out Windows Update, DCOM Server Process Launcher, and RPC Endpoint Mapper. Check if they are running or not.
If not, you need to start those services one after one.
11] Check Windows Update log file
If still, you have a problem then, go to C:\Windows\WindowsUpdate.log and look for the most recent entry. This will be present towards the end of the log. Any failed updates will have error code/s written next to them. Note them down. If you find just too many entries too confusing delete this WindowsUpdate.log and try installing the problematic updates again.
Now open the newly re-created WindowsUpdate log file and have a look at its contents.
The warnings will probably appear as -: WARNING: Failed to find updates with error code XXXXXXXX.
Now Right-click Computer > Manage > Event Viewer > Applications and Service Logs > Microsoft > Windows > WindowsUpdateClient > Operational . Check out for any Critical Message or Warning.
Next, refer to the Windows Update Error Codes. This will give you the direction in which you may have to look for the solution. You may also search for the Windows Update error code here and see if a specific solution is available.
12] Clear pending.xml file
Open an elevated command prompt windows, type the following and hit Enter:
This will rename pending.xml file to pending.old. Now try again.
13] Clear the BITS queue
Clear the BITS queue of any current jobs. To do this, type the following in an elevated CMD and hit Enter:
14] Delete incorrect Registry values
Open Registry Editor and navigate to the following key:
Right-click COMPONENTS. Now in the right-pane, delete the following if they exist:
- PendingXmlIdentifier
- NextQueueEntryIndex
- AdvancedInstallersNeedResolving
Restart your computer and try again.
15] Run Windows Module Installer
The Windows Module Installer is a built-in Windows 10 service. It lets you fix the Windows updates which are stuck.
To use this, open a command prompt with admin privileges.
Type the following and hit Enter:
Once successfully executed, you should see [SC] ChangeServiceConfig SUCCESS display within the Command Prompt console.
Exit the command prompt, and check if the buttons are back to normal.
16] Run Background Intelligent Transfer Service Troubleshooter
Run the Background Intelligent Transfer Service Troubleshooter and see if it helps. Background Intelligent Transfer Service or BITS helps in the transfer, download or upload of files between a client and server, and provides progress information related to the transfers. It also plays a role in the download of files from a peer. This Windows Service is essential for Windows Updates to work properly.
17] Download its stand-alone installer
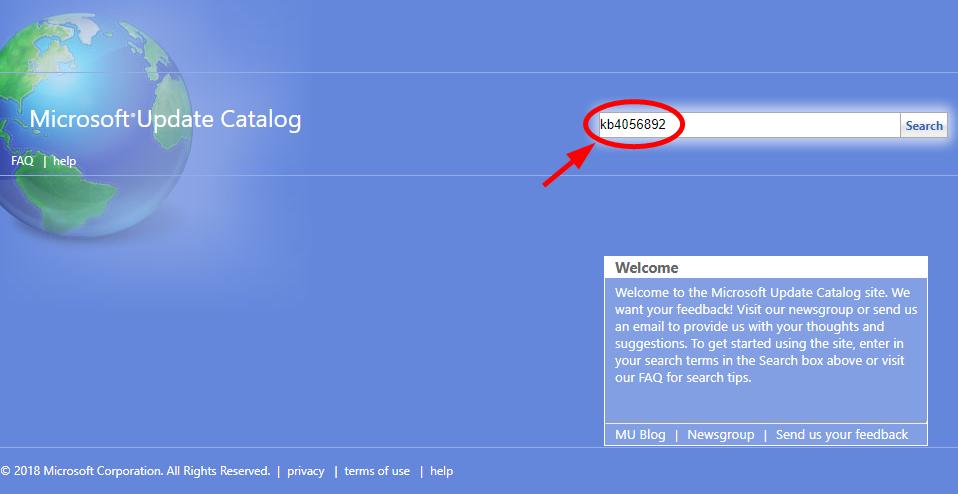
Search on the Microsoft Update Catalog website for the Windows Update patch using the Update KB number, and download its stand-alone installer. Now apply the patch manually. Search for just the number; don’t include KB.
18] Run Windows Update in Clean Boot State
Boot in Clean Boot State and run Windows Update and see if this helps. It works in most cases.
19] Take the help of Microsoft Virtual Agent
If you’re getting an error downloading or installing Windows Updates, you could also take the help of Microsoft Virtual Agent, by clicking here.
20] Contact Microsoft Support
If nothing helps, you can always contact Microsoft Support. They will surely be able to help you.
We hope something here has helped you fix your Windows Updates issues.
Windows Update Fails [FIXED]
Fix the bugging Windows Update issues
Last Updated: 3 years ago
Window Update is an important component of your Windows system. It helps you install updates on your system. Windows Update is designed to keep your Windows up to date and healthy and it usually does. But unfortunately, in many cases, it fails to do so and instead become the source of multiple annoying problems.
Many Windows users have reported that they have got this or that kind of issues with their Windows Update. They have been told that Windows Update “failed to install” certain updates or these updates’ “installation failed”. They’ve got an error popping up with a code and an associated message, which stops them from installing updates. Or they couldn’t download or install the updates with no clear message but get stuck in the update process.
No matter how these issues look like, it stops you from installing the updates on your Windows. You can’t fix your system security vulnerabilities, fix bugs, and enjoy new system features without those updates. This can be extremely frustrating.
But don’t panic. All Windows Update issues can be fixed. You can fix them by trying the methods below. You don’t have to try them all; just work your way down the list until you find the one that really works for you.
Methods that fix your Windows Update issues:
Method 1: Run Windows Update Troubleshooter
Windows Update Troubleshooter is a tool released by Microsoft that can help you troubleshoot issues with your Windows Update. You can run it to check your Windows Update when it fails to work properly. To do so:
1) Download Windows Update Troubleshooter (the program is from a Microsoft site and it’s verified and safe).
2) Run the tool you’ve just downloaded and follow the on-screen instructions to complete the troubleshooting process.
Method 2: Reset the Windows Update related components
Your Windows Update may fail to update your Windows because its components are corrupted. These components include the services and temporary files and folders associated with Windows Update. You can try resetting these components and see if this can fix your problem.
To reset these components:
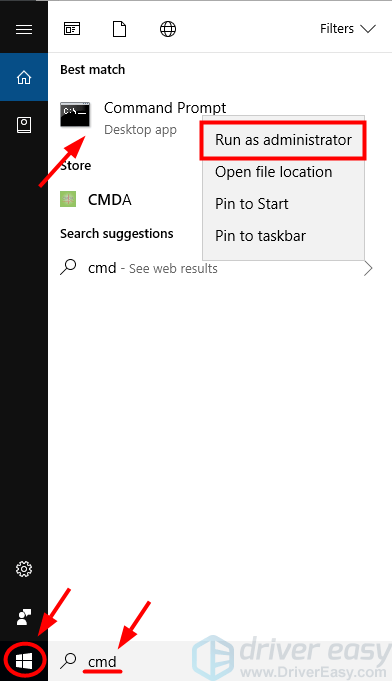
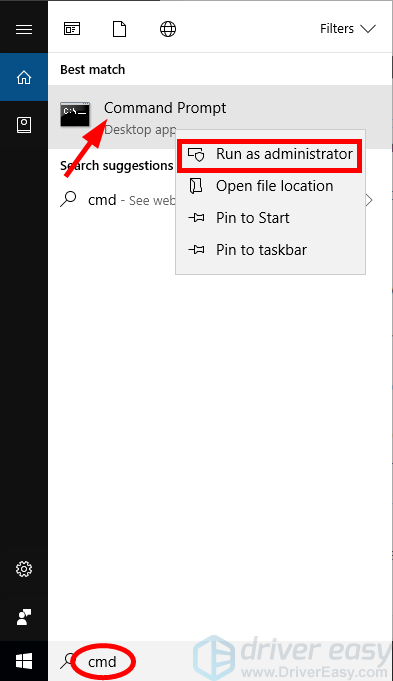
1) Click the Start button in the lower left corner of your screen, then type “cmd“. In the list of results, right-click Command Prompt and select Run as administrator.
2) In Command Prompt, type the following lines of command and press Enter on your keyboard after typing each:
- net stop bits
- net stop wuauserv
- net stop appidsvc
- net stop cryptsvc
(These commands will stop the services that Windows Update requires to download and install updates.)
3) Type these lines of command and press Enter after typing each in Command Prompt:
- Ren %systemroot%\SoftwareDistribution SoftwareDistribution.old
- Ren %systemroot%\system32\catroot2 catroot2.old
(This will rename the SoftwareDistribution and catroot2 folder, which are used by Windows Update to store data and temporary files. Your system will detect that these folders are missing, and then it’ll create new ones. The purpose of this is to make the system use the new SoftwareDistribution and catroot2 folders so that Windows Update can avoid issues from the old ones.)
4) In Command Prompt, type these commands and press Enter after each to restart the services you closed just now:
- net start bits
- net start wuauserv
- net start appidsvc
- net start cryptsvc
5) Check your Windows Update to see if it works fine.
Method 3: Manually download and install updates
If Windows Update can’t help you download certain system updates, you can try doing so on your own. Microsoft has put all its system updates online, and you can download these updates and install them on your computer without the help of Windows Update.
To manually download and install updates:
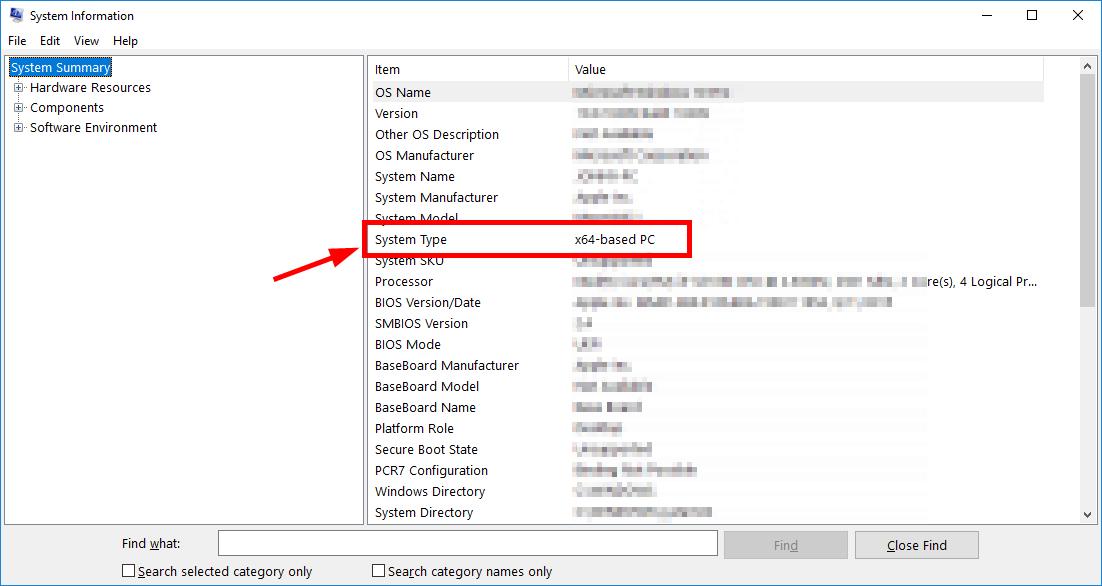
1) Click the Start button in the lower left corner of your screen. Then type “information“. In the list of results, click System Information.
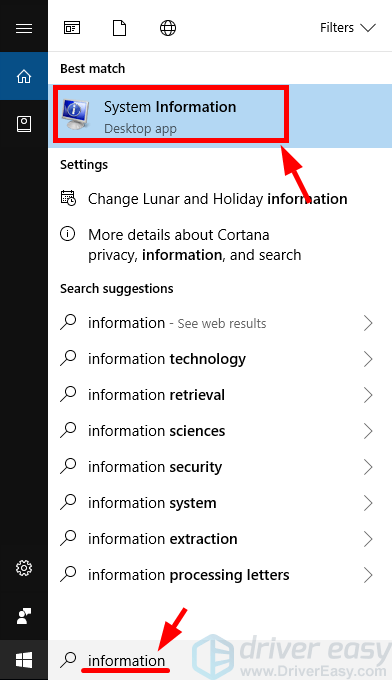
2) In the System Information window, check System Type. Its value is usually x64-based or x86-based (or sometimes ARM64-based).
3) On Windows Update, note down the system updates that failed to install. (You may need to get the information from the update history.)


4) Go to Microsoft Update Catalog. Then search for the updates you have failed to install.
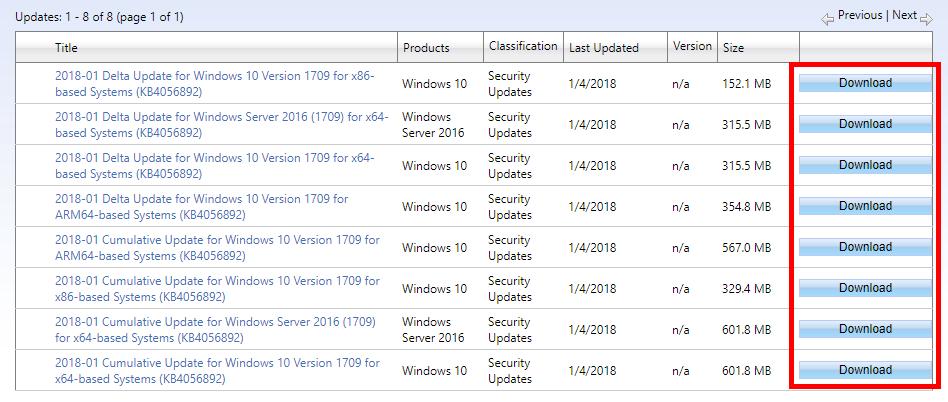
5) In the search results, find the update that matches your operating system and system type (x86-, x64- or ARM64-based). Then click Download next to the update.
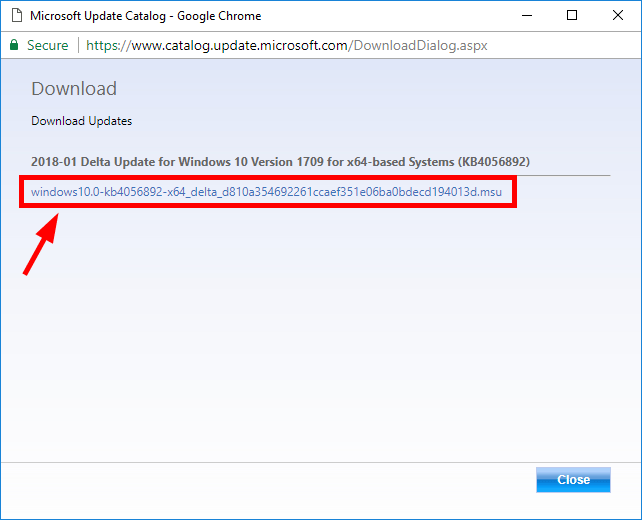
6) Click the link on the new window to download the update.
7) Open the file you’ve just downloaded and follow the on-screen instructions to install the update.
Method 4: Run DISM and System File Checker
It’s also possible that your Windows Update can’t work because of the corrupted files on your operating system. Windows has two built-in tools called SFC (System File Checker) and DISM (Deployment Imaging and Servicing Management) that scan your computer and fix various issues on it. To run these tools:
1) Click the Start button in the lower corner of your screen. Then type “cmd“. Right-click Command Prompt in the list of results and select Run as administrator.
2) In Command Prompt, to run System File Checker, type “sfc /scannow” and press Enter on your keyboard.
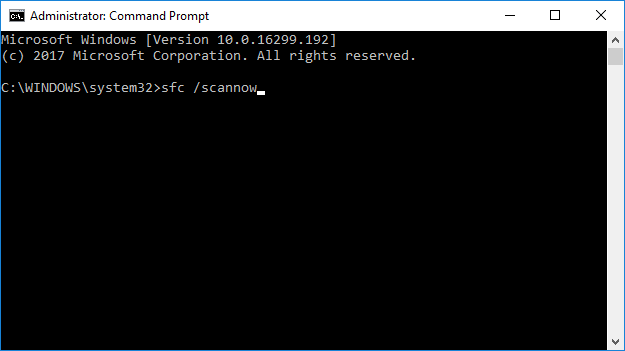
3) To run DISM, type “dism /online /cleanup-image /restorehealth“. and press Enter.

4) Wait for the process to complete, then restart your computer. After that, check to see if your Windows Update recovers.
Method 5: Disable your antivirus
Sometimes your system can’t install new updates due to the interference from your antivirus software. You can temporarily disable your antivirus and check if the problem persists. (Consult your antivirus program documentation for instructions on disabling it.)
If this resolves the problem, contact the vendor of your antivirus software and ask them for advice, or install a different solution.
Method 6: Update your drivers
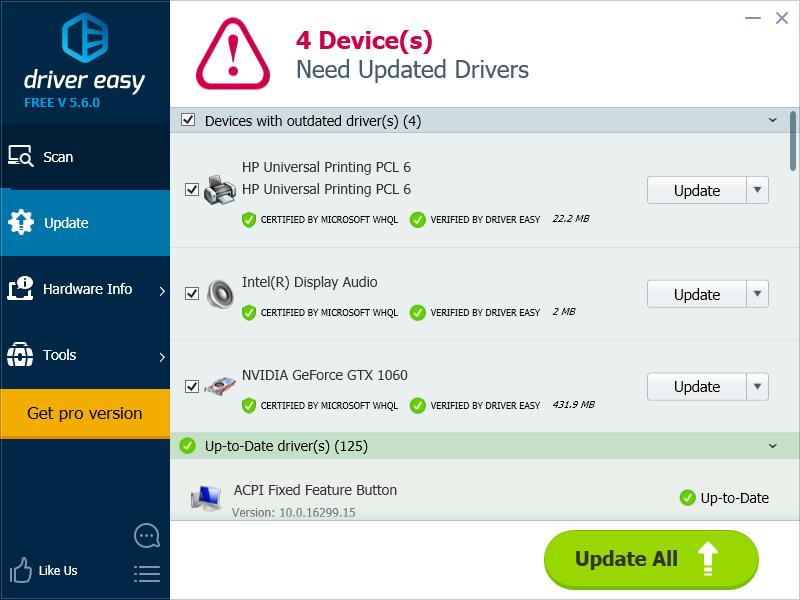
You may get issues with your Windows Update if you are using wrong or out-of-date device drivers. You should regularly check your device drivers and keep them up to date so as to prevent your computer from many annoying issues. But you may not have the time or patience to check and update your drivers manually. If you want to have this done easily and automatically, you can use Driver Easy.
Driver Easy will automatically recognize your system and find the correct drivers for it. You don’t need to know exactly what system your computer is running, you don’t need to risk downloading and installing the wrong driver, and you don’t need to worry about making a mistake when installing.
You can update your drivers automatically with either the FREE or the Pro version of Driver Easy. But with the Pro version it takes just 2 steps (and you get full support and a 30-day money back guarantee):
1) Download and install Driver Easy.
2) Run Driver Easy and click the Scan Now button. Driver Easy will then scan your computer and detect any problem drivers.

3) Click the Update button next to each driver to automatically download and install the correct version of this driver (you can do this with the FREE version). Or click Update All to automatically download and install the correct version of all the drivers that are missing or out of date on your system (this requires the Pro version – you’ll be prompted to upgrade when you click Update All).
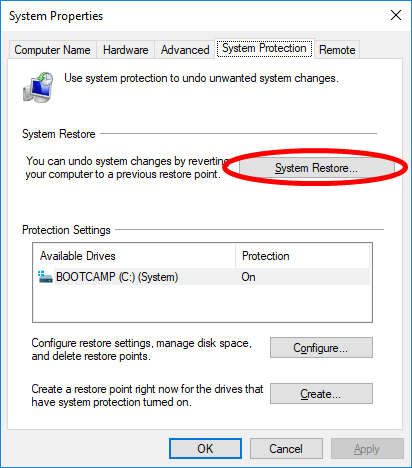
Method 7: Restore your Windows
Perhaps the issues with your Windows come from some changes you’ve made to your system. You can perform a system restore. This will restore your system from a restore point (you need to have one that has been created before your Windows Update issue occurs) undo those changes made.
1) Click the Start button in the lower corner of your screen. Then type “restore“. In the list of results, click “Create a restore point“. The System Properties dialog will appear.
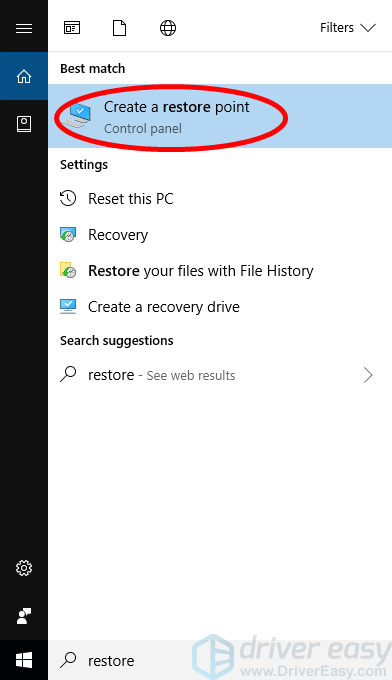
2) Click System Restore. The System Restore wizard will pop up.
3) Follow the on-screen instructions to choose a system restore point and restore your Windows.
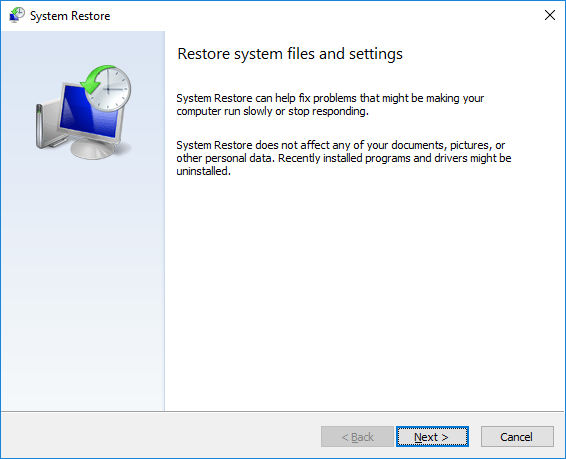
4) Wait for the restore process to complete and then check to see if your Windows Update gets back to normal.


