- How to Download Files from the Linux Command Line
- How to Download a File From a Server to Your Desktop Using SSH
- Step 1: Gather the Necessary Information
- Step 2: Create the SCP Command
- Step 3: Running the Command
- Copy Files Between Windows and Linux Using Command Line
- Copy File from Windows To Linux Using PSCP
- Copy File From Linux To Windows Using PSCP
- Copy File from Windows To Linux Using FTP GUI
- Conclusion
- How to share and transfer files between Linux and Windows
- File Sharing between Linux and Windows Systems
- Over the Network
- Method 1: Transfer Files Between Ubuntu And Windows Via SSH
- Method 2: Transfer Files Via Samba
- Method 3: Shared Network Folders
- Transferring files between Windows and Linux on the same machine
- Why it isn’t easy
- A simple solution
- Create a SharedPartition
- Configure Auto-Mount on Linux
- Configure your Special Folders (Linux)
- Configure your Special Folders (Windows)
How to Download Files from the Linux Command Line
This guide will teach you step by step how to download files from the command line in Linux, Windows or macOS using open source (free) software – wget. Wget is a very cool command-line downloader for Linux and UNIX environments that has also been ported to Windows and macOS. Don’t be fooled by the fact that it is a command line tool. It is very powerful and versatile and can match some of the best graphical downloaders around today. It has features such as resuming of downloads, bandwidth control, it can handle authentication, and much more. I’ll get you started with the basics of using wget and then I’ll show you how you can automate a complete backup of your website using wget and cron.
Let’s get started by installing wget. Most Linux distributions come with wget pre-installed. If you manage to land yourself a Linux machine without a copy of wget try the following. On a Red Hat Linux based system such a Fedora you can use:
# yum install wget
or if you use a Debian based system like Ubuntu:
# sudo apt-get install wget
One of the above should do the trick for you. Otherwise, check with your Linux distribution’s manual to see how to get and install packages. Users on Windows can access wget via this website, and for Mac users we have a full guide on how to install wget in macOS.
The most basic operation a download manager needs to perform is to download a file from a URL. Here’s how you would use wget to download a file:
# wget https://www.simplehelp.net/images/file.zip
Yes, it’s that simple. Now let’s do something more fun. Let’s download an entire website. Here’s a taste of the power of wget. If you want to download a website you can specify the depth that wget must fetch files from. Say you want to download the first level links of Yahoo!’s home page. Here’s how would do that:
# wget -r -l 1 https://www.yahoo.com/
Here’s what each options does. The -r activates the recursive retrieval of files. The -l stands for level, and the number 1 next to it tells wget how many levels deep to go while fetching the files. Try increasing the number of levels to two and see how much longer wget takes.
Now if you want to download all the “jpeg” images from a website, a user familiar with the Linux command line might guess that a command like “wget http://www.sevenacross.com*.jpeg” would work. Well, unfortunately, it won’t. What you need to do is something like this:
# wget -r -l1 –no-parent -A.jpeg https://www.yahoo.com
Another very useful option in wget is the resumption of a download. Say you started downloading a large file and you lost your Internet connection before the download could complete. You can use the -c option to continue your download from where you left it.
# wget -c http://www.example_url.com/ubuntu-live.iso
Now let’s move on to setting up a daily backup of a website. The following command will create a mirror of a site in your local disk. For this purpose wget has a specific option, –mirror. Try the following command, replacing sevenacross.com with your website’s address.
# wget –mirror http://www.sevenacross.com/
When the command is done running you should have a local mirror of your website. This make for a pretty handy tool for backups. Let’s turn this command into a cool shell script and schedule it to run at midnight every night. Open your favorite text editor and type the following. Remember to adapt the path of the backup and the website URL to your requirements.
BACKUP_PATH=`/home/backup/` # replace path with your backup directory
WEBSITE_URL=`http://www.sevenacross.net` # replace url with the address of the website you want to backup
# Create and move to backup directory
cd $BACKUP_PARENT_DIR/$YEAR/$MONTH
mkdir $DAY
cd $DAY
Now save this file as something like website_backup.sh and grant it executable permissions:
# chmod +x website_backup.sh
Open your cron configuration with the crontab command and add the following line at the end:
0 0 * * * /path/to/website_backup.sh
You should have a copy of your website in /home/backup/YEAR/MONTH/DAY every day. For more help using cron and crontab, see this tutorial.
Now that you get the basics of downloading files from the command line you can get into the advanced stuff by reading up wget’s man page – just type man wget from the command line.
If this article helped you, I’d be grateful if you could share it on your preferred social network — it helps me a lot. If you’re feeling particularly generous, you could buy me a coffee and I’d be super grateful 🙂
Источник
How to Download a File From a Server to Your Desktop Using SSH
An SSH session is like a portal into another machine. If you’re used to working with Windows, you’ll know how easy it is to transfer files from one location to another. Just drag and drop! No text commands, no authentication, none of that.

However, sometimes you will need to download a file from SSH to your local desktop, such as if you are using one of our Linux VPS servers. And there’s no simple command from within the SSH terminal itself to do this. The two environments are too far apart. However, we have a dedicated tool called “SCP” which stands for “Secure Copy” that’s made for precisely these kinds of situations.
Here’s how it works. First, we have a file on the remote server called filetodownload.txt , as shown here:
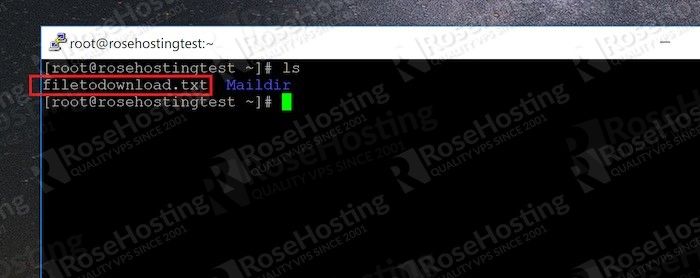
We’re going to transfer this file from Linux to our Windows desktop.
Table of Contents
Step 1: Gather the Necessary Information
To transfer a file from a remote server via SSH using SCP, we need the following pieces of information:
- Login credentials – username, server name or IP address, and password
- The port number for SSH connections
- The path to the file on the remote server
- The path to the download location
You should already have the login credentials when you connect to the server using PuTTY, or some other tool, so we won’t go into it here.
As for the port number, you’ll need to know which SSH server port your VPS listens to. It’ll either be 22 (the default port), or it’ll be given to you when you order your VPS from your hosting provider.
To get the full path to the file you want to transfer, enter the “pwd” command on the CLI of the remote server while the file is in your current directory. This will give you the folder name, like this:
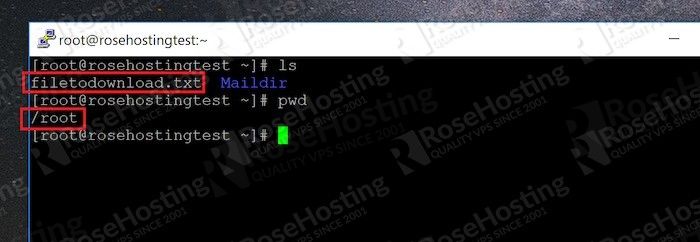
Now just append the name of the file to the path you get and you’re done.
As for the path to the download location, that’s something you have to get on your own!
Step 2: Create the SCP Command
The SCP command looks like this:
Replace the sections in bold with the information you gathered in step 1. For example, the command used for this example is:
Step 3: Running the Command
Open up a command line in Windows. Windows 10 already has SCP installed by default. For this example, we’ll use the Windows PowerShell tool to run the commands. The color contrasts with the yellow, and syntax highlighting is a nice change from the drab command line.
Pasting the above command into the local command line editor gives us:
![]()
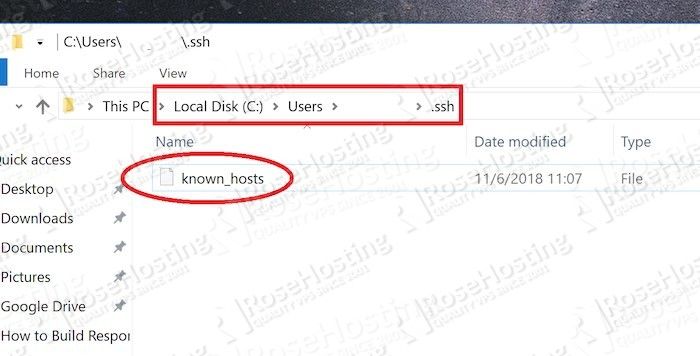
As you can see, you first need to confirm the connection using the RSA fingerprint of the remote server. Once you type “yes”, it’ll be permanently added to the “known_hosts” file.
The “known_hosts” file in Windows is located at:
Replace [UserName] with your own Windows username. It’s a file without an extension, like this:
An editor like Notepad++ is ideal for these kinds of files. Each RSA fingerprint is added on a new line. This allows you to clear them easily by deleting an entire line at once if you ever need to remove an entry.
Once you provide your password in the prompt, the file is downloaded immediately, as shown here:
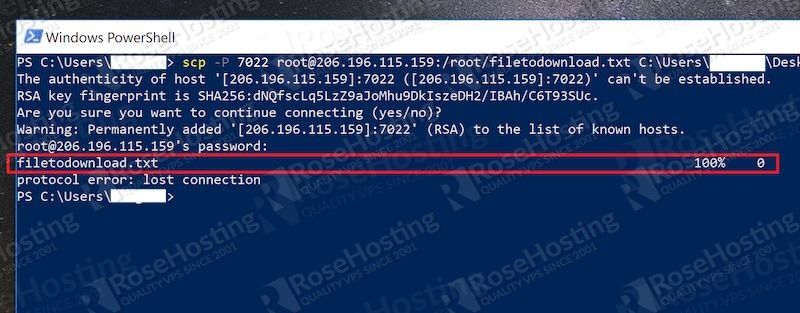
And you’re done! Navigate to the location you specified in your SCP command and the file should be visible.
![]()
SCP is the most direct way to transfer files from remote servers to local systems. It makes use of the same SSH protocols, so the connection is encrypted all the way through, making it immune to man-in-the-middle attacks. Hopefully, this tutorial will help you use it in an efficient, and easy manner. If you use one of our Managed Linux VPS services, and you have an issue with SCP or need more information about it please don’t hesitate to contact our 24×7 Linux Server Support, which comes included with your hosting plan.
If this tutorial helped you move files from your remote server to your local machine, maybe consider sharing this knowledge with your friends by using our share shortcuts. You can also leave any additional tips or questions in our comment section below. Thank you.
Источник
Copy Files Between Windows and Linux Using Command Line

In this updated guide, I will walk you through the steps to copy files from Windows to Linux using easy-to-follow steps.
I will show you two ways to copy files from windows to Linux
- Using command line with pscp
- Using GUI FTP utility.
Copy File from Windows To Linux Using PSCP
It is not always that you will need to copy a file from Windows to Linux or vice versa.
But at times when you are automating things or trying to achieve some copy functionality using a script, it is good to have a utility to do that.
Here is where pscp comes into play. Using pscp you can copy the file to/from windows and Linux.
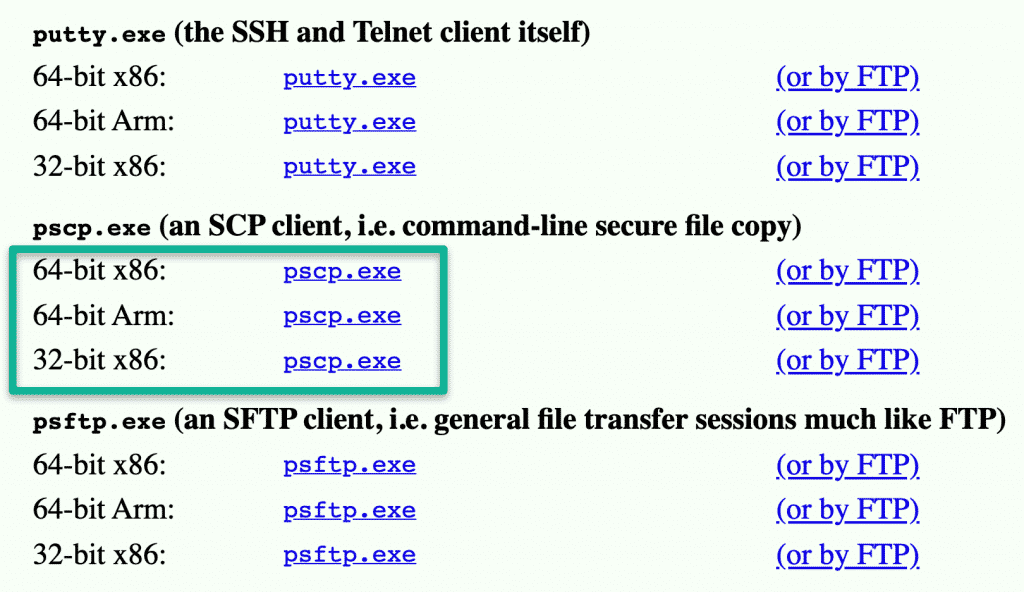
Step 1: Download pscp.exe from here. Select the appropriate package.
Step 2: copy the pscp.exe executable to the system32 directory of your windows machine. This folder normally exists in C:\Windows\System32 path.
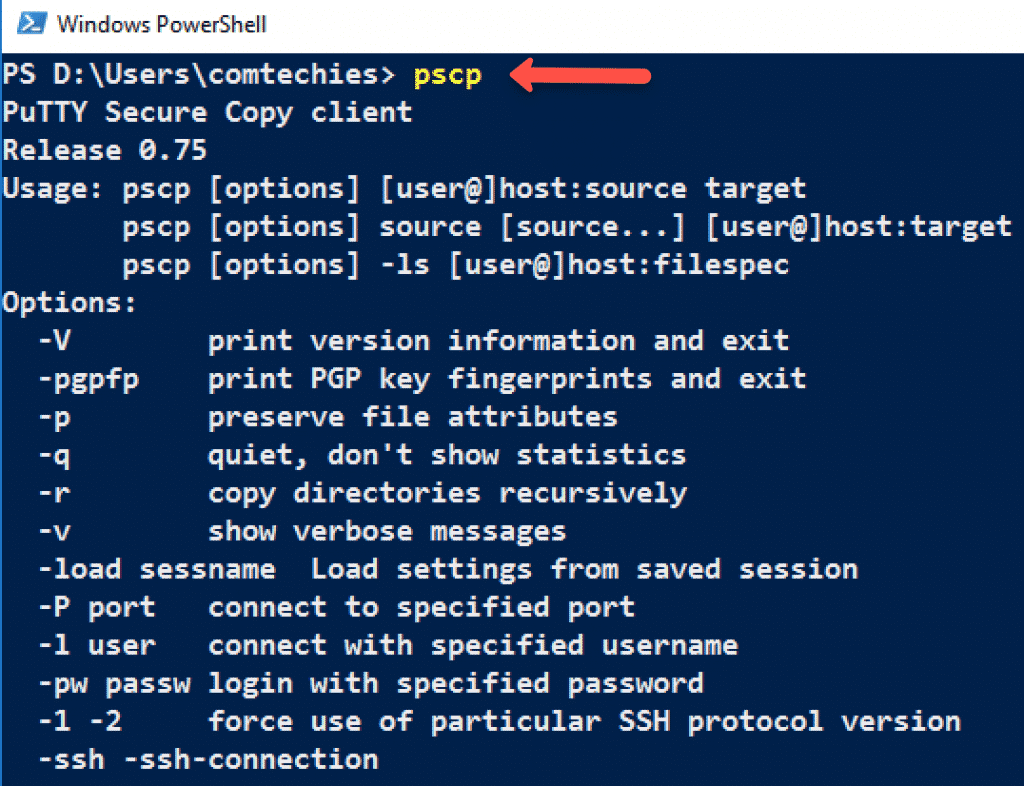
Step 3: Open Windows PowerShell and use the following command to verify if pscp is accessible from the path.
You should see the following output.
Step 4: Use the following format to copy the single file from Windows to the Linux box.
Here is the explanation of the command.
- -pw for the password.
- Replace password with the Linux user password.
- C:\Users\Admin\Desktop\test.txt represents the path of the file that has to be copied to the Linux system.
- 192.168.33.10 is the IP of the Linux server.
- /home/vagrant is the user-accessible path in the Linux system to copy the file.
If you want to copy all the files in a directory to Linux, you need to add a start to the folder. eg. folder\* . An example is shown below.
If you are using Linux private keys for authentication, you can use -i flag instead of -pw followed by the path to the .ppk , .pem or id_rsa file.
If your key file is in pem format, you can use the puttygen command to convert it to ppk. See this ec2 server guide for the pem to ppk conversion.
Info: Learn Linux & Windows administration from Pluralsight with its 10 days free account
For Linux Private key-based authentication, the command looks like below.
Copy File From Linux To Windows Using PSCP
You can use pscp to copy files from Linux to windows. use the following command format for the same.
The above command will copy the file in Linux from the specified path to the Windows desktop.
Copy File from Windows To Linux Using FTP GUI
If you are not familiar with the Windows command line, you can use an FTP tool like Filezilla.
This tool is really helpful if you are working with Web Hosting providers to upload your website files from your local workstation.
You can download Filezilla from here –> FileZilla Download.
After download, install Filzill as you install any other windows software.
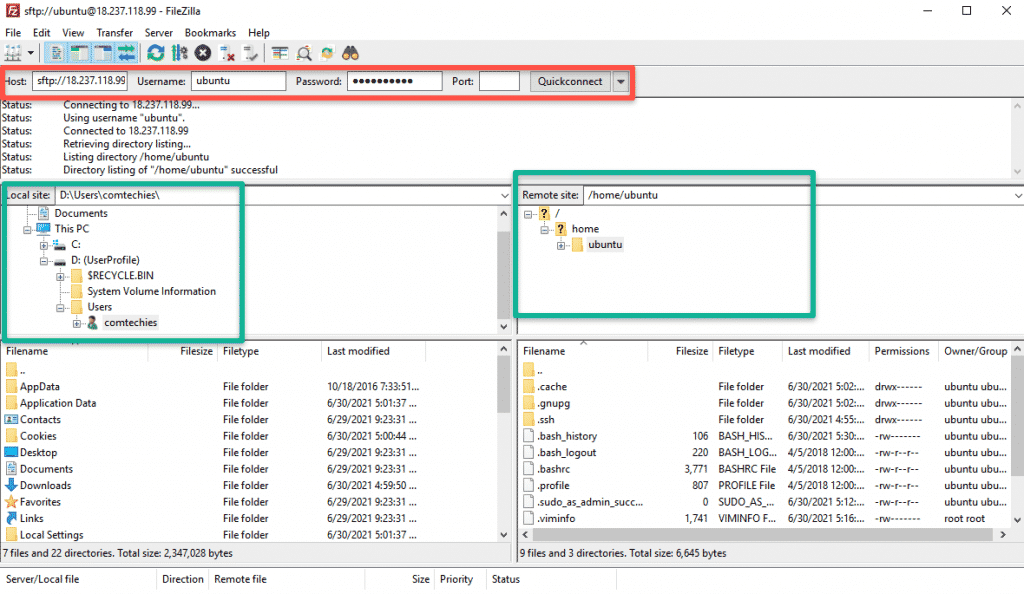
After installation, open the Filezilla app and enter the remote Linux server details as shown below. It will connect to the server and shows the remote server files in the file explorer.
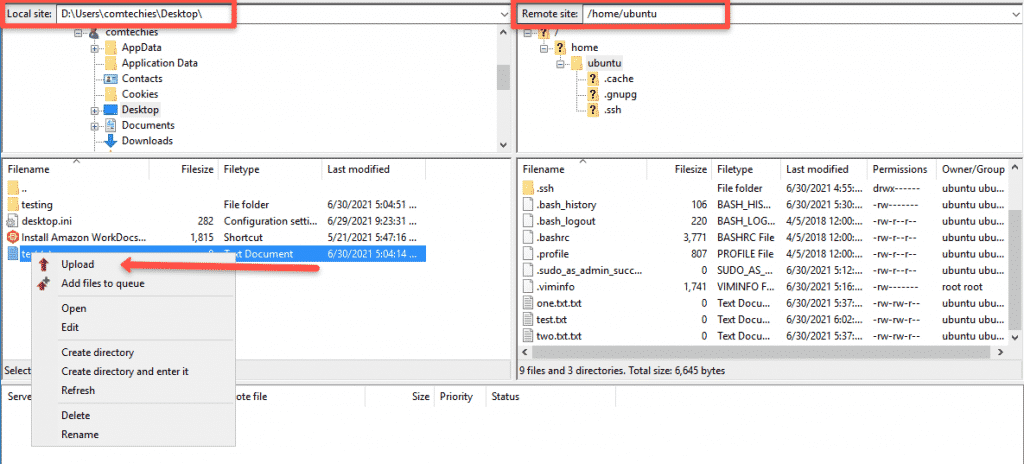
To upload a file, all you have to do is do a right-click and click upload, as shown in the image below. The file will get uploaded to the remote path, which is opened in the Filezilla explorer. You can also change the remote path from Filezilla.
Conclusion
I have shown two best and recommended ways to transfer files from Windows to Linux and vice versa.
If you face any issues while copying files, please drop the issues as a comment. I will look into it.
Источник
How to share and transfer files between Linux and Windows
File sharing between Windows and Linux connected over a local network can be done in several ways. This tutorial mentions the most common methods that use simple techniques.
![]()
P reviously we have shown you how to remotely connect to your Linux machine from a Windows one (Click here). Now, what if you need to transfer some files between your Windows and Linux systems?
Well, a USB drive comes handy for simple data transfers. For a large number of files at different times, you need another efficient method. Transferring your data between Linux and Windows using your local network is the recommended option. With an easy and quick one time setup, you can share your files between various machines.
File Sharing between Linux and Windows Systems
In this tutorial, we shall walk you through sharing your files between Ubuntu and Windows machines over a local network, and we shall also show you how to transfer files between Windows and Linux on the same PC.
Over the Network
Transferring files between Ubuntu and Windows can be done in many ways, but in this tutorial, we are going to discuss the following popular methods:
- Transfer files between Ubuntu and Windows via the SSH.
- Transfer files between Ubuntu and Windows using Samba.
- Transfer files between Ubuntu and Windows using Shared Network Folders.
Method 1: Transfer Files Between Ubuntu And Windows Via SSH
In this method, you need to install and enable SSH service on Ubuntu. Also, we need an SSH client application on Windows. In this tutorial, we shall be using Putty. Next, we are going to use the command line to share your files across the network.
Step 1. Install the SSH package on Ubuntu using the next command.
 Install The Open SSH Package On Ubuntu
Step 2. After installation finishes successfully, you can check the SSH service status using the following command.
The output of the command should look like the below screenshot:
 Check The SSH Service Status
If the service is not running, you can use the following command to start it:
Also, to enable the SSH service to start every time your system starts up, you can use the following command:
Step 3. Install the net-tools package.
 Install net-tools package
Step 4. Execute the next command to get your Ubuntu machine IP.
 Ubuntu Machine IP
Step 5. From your Windows machine, we need an SSH client (which is Putty) and a PSCP. PSCP is considered a secure copy tool that is used alongside with Putty to transfer files securely over a network.
You can download both (Putty and PSCP) from the Putty official website. (Click here.) Kindly note that Putty will need to be installed while the PSCP won’t. You have to put the PSCP.exe in the “C:\” drive to be used, as you should see shortly.
Step 6. Now open the file explorer and use the next command to start transferring your files from your Windows machine to Ubuntu.
 Copy File From Windows To Ubuntu Via SSH
Step 7. Next, you should enter your Ubuntu password.
 Enter Your Ubuntu Password
Step 8. After entering the password successfully, the command shall copy the text file from your Windows machine to your Ubuntu home. You can check your home directory now, and you should find the file there.
 Check The Copied File
Step 9. Now in case you need to transfer your files from Ubuntu machine to Windows, open the file explorer from your Windows machine and use the next command. Be careful, and do not forget the dot at the end of the command.
 Copy File From Ubuntu To Windows Via SSH
By executing the previous command, you should enter the password of your Ubuntu machine. Next, the file gets transferred from Ubuntu to the Windows current directory.
 File Copied Successfully
Method 2: Transfer Files Via Samba
In this method, we are going to install the Samba package on Ubuntu. Moreover, use the Windows run application to connect to the Ubuntu shared directories.
Step 1. Install the Samba package on Ubuntu using the following command.
 Install Samba Package On Ubuntu
Step 2. You can set a password to the samba share as follows.
 Add A User For Samba Share
where hendadel is an Ubuntu user that you shall use while accessing the Ubuntu shared directory.
Step 3. Let’s create a directory that is used for sharing your files.
 Create Directory For The Shared Data
Step 4. Using your favorite text editor, open the samba configuration file.
 Open Samba Configuration File
Step 5. Add the next lines at the end of the samba configuration file.
The samba configuration file should like the below:
 Edit Samba Configuration File
Save and exit the samba configuration file.
Step 6. Restart the samba service using the following command:
 Restart Samba Service
Step 7. From the Windows machine, open the run application from the Start menu and enter the Ubuntu machine IP with the shared directory name as follows.
 Remote Access To Your Ubuntu
Press the OK button to continue.
Step 8. A Windows Security message will appear, you should have to enter your samba username and password. Then press the OK button to continue.
 Authentication Required
Step 9. Now you should have access to your Ubuntu shared directory, and you can transfer files.
 Welcome To Your Ubuntu Shared Directory
Method 3: Shared Network Folders
This is the easiest method among all. In this method, we share any folder from the Windows machine to be visible in the Ubuntu machine.
Step 1. From the Windows machine, right-click on the network connections icon in the right bottom of the taskbar.
 Right Click On Network Connections
Step 2. Choose the “Open Network & Internet Settings.”
 Open Network and Internet Settings.
Step 3. Next, choose “Sharing Options.”
 Open Sharing Options
Step 4. Now from your current network profile, choose the following options:
- Turn on network discovery.
- Turn on file and printer sharing.
 Choose Options And Save Changes
Don’t forget to save your changes.
Step 5. Now open your file explorer and go to the directory that you need to share. Right-click on the folder then select Properties.
 Open Folder Properties
Step 6. After opening the folder properties, let’s choose the Sharing tab. Also, select the Advanced Sharing button.
 Open Advanced Sharing
Step 7. Mark “Share this folder” box.
 Check The Share This Folder
In case you need to set permissions on the shared folder like (Read, Write), you can select the permissions button and set your permissions.
 Set Sharing Permissions
Press the OK button to continue.
Step 8. Now from the Ubuntu machine, open the file browser.
 From Your Ubuntu Open The File Browser
Step 9. From the left panel, choose “Other Locations.”
 Open Other Locations
Step 10. In the bottom bar, enter your Windows machine IP and path to the shared folder as follows:
 Connect To Windows Shared Folder
Then press the Connect button.
Step 11. An authentication message should appear. Enter your username and password. Press the Connect button to continue.
 Enter Your Windows Machine Username And Password
Step 12. Next, you should be able to see your Windows shared folder. Now you can transfer files between the two machines.
 Welcome To Your Windows Shared Folder
Transferring files between Windows and Linux on the same machine
Previously, we looked at how we can share files between a Linux PC and a Windows PC over a network. Some of the utilities used included SSH, Samba, and Shared Network Folders. Here, we will look at a relatively similar situation only that this time around, it will be on the same machine.
You might be wondering why can’t we copy files directly from a Linux partition to a Windows partition and Vice-versa? The simple answer is that; It will work for one but doesn’t work for the other. Let’s look at the reasons behind this.
Why it isn’t easy
The NTFS partition format used by Windows doesn’t support Linux file permissions. Therefore, we can’t consider installing Linux on an NTFS partition other than the Ext4. On the other hand, Windows cannot read the Linux file system even though Linux systems can read an NTFS partition. In most cases, the Linux partition is not listed in the “This PC” section on Windows in a dual boot. Therefore, you can copy a file from the Windows partition on Linux but not the vice-versa.
A simple solution
With the above information in mind, we need to find a way to favor both operating systems and wouldn’t pose any data corruption issues. For example, if you delete or alter any file in the Windows partition while accessing it with Linux, there is a high probability that Windows might raise some errors on boot.
Since Linux can’t run on an NTFS or FAT32 partition and Windows can’t read a Linux file system, we will need to configure a third partition that can be accessed by both operating systems. This third partition will contain commonly shared files between the two. Let’s call it the SharedPartition.
We can use other methods to share files, including external storage like USB or online storage like Google Drive and DropBox. However, these are tedious as one will require a reboot to switch from one OS to another while the other method is dependent on bandwidth.
Create a SharedPartition
Whether you have an SSD or Hard drive, we will require at least Four partitions:
- Linux Partition
- Windows Partition
- A SWAP space
- The SharedPartition (NTFS)
I believe you already have the first three. To create the SharedPartition, you can safely check our post on ‘Creating or resizing partitions in Linux.‘ Ensure you format it to NTFS. Additionally, you might need to understand the partition Table used on your Drives. That can be GPT or MBR. Our post on ‘Booting Linux or Windows from a USB drive‘ gives you a comprehensive guide on this. You will also understand the advantage of one over the other.
Up to here, we already have a SharedPartition that can be accessed by both Operating Systems. However, we might need to perform some configurations like Auto-mount on Linux and setting it as the default location for various files.
Configure Auto-Mount on Linux
We will need to execute several commands on the command-line. If you are just getting started with, don’t panic. Please copy and paste the commands as they are below. Our Linux distribution of choice in this post is Ubuntu 20.04 LTS.
Note: Remember to replace the name SharedPartition with the label of your new partition in any of the commands.
Step 1. Install the ntfs-3g driver, which enables Linux to read and write NTFS partitions.
 Install NTFS-3g
Step 2. Create a directory where we will mount our new partition.
 Create Mount directory
Step 3. Get the UUID (universally unique identifier) of the new SharedPartition with the command below.
You should see an output like this.
 Know your UUID
Copy the UUID of the SharedPartition. The UUID identifies the partition in the /etc/fstab file.
Step 4. Since we will be editing the /etc/fstab file, create a backup with the command below.
Step 5. Execute the command below to edit /etc/fstab using the nano editor.
You should see a window like the one below. Add the following line at the end but remember to replace the UUID with yours.
 Edit etc-fstab
After this step, reboot your PC. You should now see the SharedPartition mounted under the ‘Other Locations’ menu.
 SharedPartition
Configure your Special Folders (Linux)
Special folders in Linux are those present on your Home directory. They include Desktop, Documents, Videos, etc. Execute the below command to edit their paths.
 Special Folders
Now, we need to edit the paths to point to our SharedPartition mounted in /media/SharedPartition. For example, for Downloads, we will add the path “/media/SharedPartition/Downloads” and delete the “$HOME/Downloads” path. After applying the changes, you should have something similar to this:
 Special Folders
Save your changes and close the Nano editor.
Configure your Special Folders (Windows)
Step 1. Open the File Explorer and type %userprofile% on the address bar. Hit enter.
 User Profiles
Step 2. Select a folder, say Downloads, that you want to access in both operating systems. Right-click and select the properties option.
Step 3. On the pop-up window that opens, select the Location tab.
 Location Tab
You will see the default path to your Downloads location.
Step 4. Click on the Move button. That will open a window where you will select your new Downloads path. Navigate to your SharedPartition and choose the Downloads folder already created in Linux. Click on the Select Folder button.
 Select Destination Folder
Step 5. Click on the Apply button to set the changes.
You will see a pop-up window prompting you to move the content in the old folder to this new location. Click OK.
 Apply Changes
That’s it. You can now proceed to do the same for the other Folders. Now, anything you save on these folders, e.g., Documents on Windows, will be accessible on Linux in the Documents directory.
Using another partition to share files between the two operating systems is the most reliable option since Windows cannot read the Linux file system without using third-party software. With this method, you don’t need to have duplicate files. Both operating systems can read and write on the same partition.
Источник


