Ps3 eye camera driver windows 10
Драйвер для веб-камеры PS3-Eye
С помощью CL-Eye можно подключить камеру от PS3 к компьютеру под управлением операционной системы Windows. PS3-Eye предназначена для использования на игровой приставке Playstation 3, но с помощью этого драйвера вы сможете использовать её на компьютере как обычную веб-камеру, например для общения по Skype.
У камеры PS3-Eye 4-канальный микрофон для записи звука. Разрешение камеры 640×480 при частоте 60 кадров в секунду. Интерфейс USB 2.0.
There are many different ways to get the PS Eye working on a Windows PC. This is pretty confusing, so expect to be confused.
| Driver | Cost | Notes |
|---|---|---|
| IPISoft PS3EYEDriver | Free | Supports multiple cameras. Applications like ex. skype cant see the cameras. The most easy PSEYE driver setup ! |
| PS3EYEDriver | Free | Wraps libusb. Open source and continues to be worked on so sometimes can be flaky. Supports as many cameras as there is bandwidth for. Instructions are below. |
| CL Eye Platform Driver | $2.99 USD | Exposes the camera as a DirectShow object so can be used easily by this and other software (e.g. Skype, I think, no guarantees). Only supports one camera. |
| CL Eye Platform SDK | $4.99 USD | Supports multiple cameras. Only works if you use your own (non-redistributable, developer version) CLEyeMulticam.dll. Delete the dll that comes with PSMoveService to use the DLL that gets installed with the SDK. |
| CL Eye redistributable + registered camera | $?? USD * n_cameras | Apparently, after you register your cameras, the redistributable CLEyeMulticam.dll that we supply works. I don’t think I ever correctly registered my camera so I don’t know if it actually works. |
| PS3EyeDirectShow | Free | Exposes the camera as a DirectShow object so can be used easily by this and other software (e.g. Skype, I think, no guarantees). https://github.com/jkevin/PS3EyeDirectShow |
Setup the camera drivers
Option A) IPIsoft PSEYE Driver Installation
NOTE: If you have already install libusb based drivers, please uninstall those drivers first in Windows device manager
This installation option is very simple. Just download the driver for your Windows OS architecture and all PSEYE Cameras should be recognized. IPISoft is software for Motion Capture Full Body system. This PS3Eye driver was not originally intended to be used with PSMoveService (opensource software), though it does appear to work. Therefore, please do not spam the support of IPISoft with questions about this driver. Use at your own risk.
Result in ‘Device Manager’, tested successfully in Windows 10 x64:

Option B) Libusb PSEYE Driver Installation
The instructions below apply to our customized version of the PS3EYEDriver wrapper around libusb.
Libusb Driver Pre-Install
Download UsbDeview from Nirsoft.net. This is a handy utility for showing all connected usb devices attached to your system and what drivers they are running. Once downloaded, launch usbdeview.exe .
- After you have plugged in the PS Eye camera you should see entries for the camera and the microphone of the ps3 eye.
- The cameras take a lot of USB bandwidth. This is especially a concern if using more than one camera. We have some tips here on how to manage your camera-connections. Also see what Oculus has to say on the matter.
- Under the «service name» column for the camera you should see «usbccgp» for the camera device and «usbaudio» for the audio device. a. If you don’t see «usbccgp» for the camera, right-click on the entry with the purple dot and select «uninstall selected devices», after which, unplug the ps3eye camera, and then plug it back in.
- Close usbdeview

Libusb Driver Install
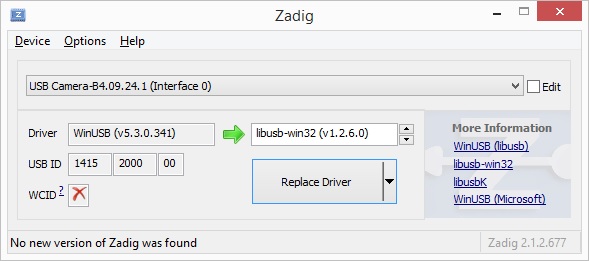
Download the Zadig usb utility from here. This is another handy usb utility for installing custom usb drivers. In our case we’re going to use it to install the libusb driver over the top of the default Windows driver for the PS Eye camera. Once downloaded, Launch zadig_2.2.exe .
- From the options menu launch select «List all devices»
- From the device list drop down select «USB Camera-B4.09.24.1 (Interface 0)»
- From the driver drop down select «libusb-win32 (v 1.2.6.0)»
- Click the Install Driver option
- There should be a few second delay and then it should say «driver installed successfully»
Note: Computer reboot might be require to complete installation. Note 2: Having an error message from the timeout expiration might not mean the driver was not install properly.
Libusb Driver Post-Install
- Launch usbdeview.exe again.
- You should now see an entry in the «service name» column for the PS3Eye camera that says «libusb0» a. If you don’t see «libusb0» for the camera, right-click on the entry with the purple dot and select «uninstall selected devices», then unplug the ps3eye camera, then plug it back in, and try reinstalling the lib usb driver.
- Close usbdeview

Now that the camera drivers are installed you should be able to run test_camera.exe and see a video feed (640×480/60Hz) for each camera you have plugged in (up to 3 cameras max).
If test_camera.exe closes immediately, or the video feed is stuck on a solid color, don’t panic. This is sadly a common occurrence, especially on a initial setup. It’s quite likely that you have to do some driver shenanigans in zadig to make this work.
If that worked the first time, please take a moment to celebrate your good fortune. Then launch PSMoveService.exe . You should see messages about any attached cameras getting opened in the log window.
Then launch the PSMoveConfigTool.exe and open the «Tracker Settings» and «Test Video Feed» sub menu. If your camera is set up properly then this should show you the images from the camera at 640×480/60Hz. While you have the video feed up, it’s also a good time to grab the move controller and see if the frame encompasses enough of your intended interaction area with the controller.
Also when the PS Eye camera is recording you should see the red LED turn on. Sometimes this light will get stuck on in the event of an application crash. Most of the time it won’t matter, but you can reset the camera simply by unplugging it and then plugging it back in again.
Item Preview
There Is No Preview Available For This Item
This item does not appear to have any files that can be experienced on Archive.org.
Please download files in this item to interact with them on your computer.
Show all files
Share or Embed This Item
Flag this item for
PLEASE SAVE YOUR TIME CAUSE THIS CL EYE DRIVER IS NOT WORKING. PLUS IS NOT IS NOT THE LATEST VERSION. HOWEVER, I GOT THE LATEST FULL VERSION FROM ONE FORUM. HERE IS THE DIRECT DOWNLOAD LINK FOR THOSE WHO NEED IT. P.S IT IS NOT MINE AND I AM JUST SHARING IT HERE.
—————————————————————
CL EYE DRIVER EMULINE (LATEST)
This driver has been abandoned since about 2012 but the CLEye website still collects money for their driver.
This driver has a written-in limitation that prevents more than one camera from being used. If you want to use more than one camera, you must purchase CLEye’s «Platform SDK» which is licensed per-user.
If you want to use your PS3eye like a webcam for applications such as Skype or OBS, use the download above.
Драйвер для ps eye камеры под windows
Нашел длайвер для PS Eye камеры под Windows
Установка:
1. Распакуйте архив и два архива которые находятся внутри него
2. Из папки Driver запустите файл Install.bat
3. Подключите камеру к компьютеру и дайте ему определить её (USB Camera-B3.04.06.1)
4. После того как виндовс завершил автоинсталляцию зайдите в Диспетчер Устройств, выберите USB Camera-B3.04.06.1 и нажмите Обновить драйвер
5. Укажите установщику путь к папке Driver из распакованного архива.
Всё, установка завершена — теперь в диспетчере устройств камера должна называться PS3 Eye Camera.
Для проверки её работы можно воспользоваться программой PS3EyeTest.exe из второго архива.
По сообщением пользователей драйвер успешно работает под 32-битными операционками WinXP и Vista. На счёт 64-битных версий ОС информации пока нет.
Со скайпом работает! осталось разобраться с мерцанием
Если верить туду чувака, он все сделал:)
— Make Setup application
— Create camera property pages
— Add camera resolution selection (640×480, 320×240, 160×120)
— Add selectable camera capture window (x, y, width, height)
— Add capture frame rate adjustment (640×480@60fps max, 320×240@120fps max)
— Add selection of Auto/Manual camera operation modes
— Manual adjustment for Exposure and Gain
— Add RGB-16/24/32 color output format (this will increase compatibility with the software out there)
— Implement 64-bit version of the PS3Eye driver
Всё круто, огромное спасибо, установила драйвер по первой ссылке. Камера сразу же определилась, работает в скайпе и других приложениях.
Автору респект. Оказалось всё элементарно, справится даже ребёнок 😉
P.S. это была цитата от моей девушки) она попросила меня поблагодарить автора, так как сама здесь не зарегистрирована.
| Текущее время: 05:55 . Часовой пояс GMT +3. |
| Страница 1 из 2 | 1 | 2 | > |
Powered by vBulletin® Version 3.8.7
Copyright ©2000 — 2021, vBulletin Solutions, Inc. Перевод: zCarot
PSPx Forum — Сообщество фанатов игровых консолей.
Драйвера для EyeToy Namtai
 Для тех, кто хочет воспользоваться камерой от Sony PlayStation 2 под названием EyeToy Namtai в качестве вебкамеры подключив ее к компьютеру придется немного попотеть при поиске подходящего драйвера под Windows 7 или Windows xp.
Потратил кучу времени, я всеже нашел способ подключить эту камеру к компьютеру под управлением Windows 7. Drivers для EyeToy Namtai выложены на многих сайтах, но скачать просто нереально – либо подписки, либо платные архивы, либо ссылки уже сдохли.
Как подключить EyeToy Namtai к компьютеру
Для начала подключаем вебкамеру к компьютеру и наблюдаем в диспетчере устройств как она распозналась. См. скриншот ниже.

драйвер для EyeToy Namtai , который выложил я на файлообменник. —>
Затем скачиваем драйвер для EyeToy Namtai , который выложил я на файлообменник.
После нажимаем в диспетчере устройств на нашей подключенной вебкамере к которой нет драйверов правой клавишей мыши и выбираем пункт «обновить драйвер». В всплывающем окне выбираем ручной способ и указываем ему папочку с драйвером, который скачали по ссылке выше.


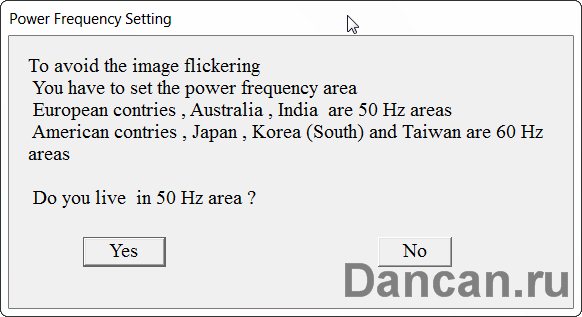
Драйвер будет благополучно устанавливаться и позавершению установки вам вылезет следующее окно (скриншот ниже), жмите YES.
Вот в принципе и все. В качестве результатов работы, предоставляю скриншот работы вебкамеры EyeToy Namtai в приложении Skype, которая направлена на монитор.

Если кому-то помог данной статьей, отписывайтесь в комментариях.


