- Драйвера asus для mac os
- ASUS Firmware Restoration 4+
- Screenshots
- Description
- What’s New
- Ratings and Reviews
- Doesn’t work for me
- No help at all
- Junk — don’t bother
- ASUS Device Discovery 4+
- Снимки экрана
- Описание
- Что нового
- Оценки и отзывы
- А зачем вообще нужно это приложение?
- Not working on MAC OS 10.13.6
- Not working on Mac OS 10.15.3
- Конфиденциальность приложения
- Нет сведений
- Информация
- Поддерживается
- Семейный доступ
- ASUS Firmware Restoration 4+
- Снимки экрана
- Описание
- Что нового
- Оценки и отзывы
- Функционал хуже, чем у windows версии
- Конфиденциальность приложения
- Сбор данных не ведется
- Информация
- Поддерживается
- Семейный доступ
- Download and install Windows support software on your Mac
- Install the latest macOS updates
- Format a USB flash drive
- Download the Windows support software
- Install the Windows support software
- Learn more
Драйвера asus для mac os

- UEFI bios:
- Скидываем все настройки в default.
- AHCI — enable;
- Vt-d: Disable (+ в Clover дропнуть DMAR таблицу)
- Vt-x: Enable (только для 10.13 и если используете виртуальные машины)
- Intel Virtualization Technology — Enable
- Serial-port: Disable
- XHCI Hand-off: Disable (рекомендуеться)
- XHCI Hand-off: Enabled (только если что то не работает в режиме Disable )
- IOAPIC 24-119 Entries: Enabled (подмечено что у многих с этим пунктом паникует, поэтому тестируйте)
- CSM: Disable (по возможности)
- Fasboot: Disable
- Secure boot: Disable or Other OS
Legacy bios:
. .
[i]Примечание:
- HDD должен быть подключен к SATA-0, контролер Intel.
- . [/i]
Для установки потребуется флешка не менее 8Гб.
- ПК на ОС Windows XP/7/8.
- Скачать утилиту Boot Disk Utility с страницы разработчика cvad или с форума applelife.ru со страницы посвящённой данной утилите.
- Установить по инструкции
- Зайти на флешку в папку EFI\CLOVER\ и удалить папку OEM и файл config-sample (не путать с config.plist).
- Зайти на https://github.com/aci…pleSupportPkg/releases скачать ApfsDriverLoader.efi и скопировать его в папку EFI\CLOVER\drivers64UEFI (необходимо для macOs 10.13 и выше!)
- Добавить в EFI\CLOVER\Kext\Other https://github.com/acidanthera/Lilu/releases
- Добавить в EFI\CLOVER\Kext\Other https://github.com/aci…WhateverGreen/releases
- Скачать образ Mac OS X по указанным ссылкам:
Нажми и качай! - Развернуть скаченный образ на подготовленную флешку.
- Инструкция с applelife.ru пункт «Заливка дистрибутива macOS на второй том загрузочного USB Flash drive:«:
- Перед распаковкой образа необходимо нажать кнопку ^Format disk^.
- В основном окне программы -> Destination Disk — выбираем наш USB Flash Drive -> Part2.
- Нажимаем кнопку «Restore Partition».
- В открывшемся окне проводника выбираем распакованный файл с расширением *.hfs.
- Тем, кто устанавливает на ноутбук (или имеет PS/2 мышь или клавиатуру) , обязательно скачать
 VoodooPS2Controller.kext.zip ( 97,46 КБ )
, новая версия:VoodooPS2Controller.kext.zip ( 93,86 КБ )
положить в папку EFI/CLOVER/KEXT/10.X или Other - Всё, установочная флешка готова, можно приступать к установке.
 VoodooPS2Controller.kext.zip ( 97,46 КБ )
За данный споcоб установки благодарим cvad и Skvo
Данная инструкция написана по материалам с applelife.ru
Установить один из загрузчиков на диск (если он не входит в состав сборки) :
— Загрузчик №1 — Clover (рекомендуется для большинства пользователей);
Как это сделать: UEFI, Legacy BIOS.
— Загрузчик №2 — OpenCore (для опытных пользователей)
— Загрузчик №3 — Chameleon (на данный момент существует для очень старых систем и особых случаев);
*загрузчик устанавливаем только один, на ваш выбор
После входа в macOS первое, что делаем:
- Устанавливаем кекст для сетевой карты;
- Настраиваем SMbios;
- «Заводим» видео-карту (разрешение должно быть правильным, и верхняя строка прозрачная);
- Поднимаем «нативное управление питанием» процессора;
- Поднимаем звук через AppleALC или VoodooHDA
.
21. Ставим програмулинки и «рюшечки».
Источник
ASUS Firmware Restoration 4+
Screenshots
![]()
Description
ASUS Firmware Restoration is a utility to upgrade/downgrade firmware version on your ASUS router.
Features:
1. Upgrade/Downgrade the firmware version on your ASUS router
What’s New
-Bug fixes
-Stability Improvements
Ratings and Reviews
Doesn’t work for me
My 2012 Mac mini running El Capitan can’t upload the version 7378 firmware to my AC3100 router. It uploads very slowly, then aborts saying it lost the connection between 18-24% complete. The result is an unrecoverable router. Tried it many times over two days with two lengthy calls to two different people at ASUS tech support. They both said send the router to them, and they will see what they can do. So, this software was totally unusable to me. Appreciate that they are trying to write an app for the Mac though — the manual says if you have a Mac you can’t perform the recovery procedure because they only had a Windows version when it was written.
No help at all
Downloaded the correct recovery firmware, followed the instructions to a T, tried uploading to router, got an error (paraphrasing): “The router could not be contacted. Please ensure the router is in Recovery Mode with a flashing blue light.”
The router is in recovery mode with a flashing blue light. Not sure what else to do, totally stuck. Will probably have to order a new router, not by ASUS. :/
Junk — don’t bother
Fails to do the only thing it’s meant to do. Won’t even upload firmware files.
Источник
ASUS Device Discovery 4+
Снимки экрана
![]()
![]()
Описание
ASUS Device Discovery is a utility to find the IP address of wireless router.
Features:
1. Scans your local area network to find ASUS routers
2. Configures your network to access routers
3. Open configuration website of routers
Что нового
1. Add Terms of Service.
2. Add Privacy Policy.
3. Bug fixes.
Оценки и отзывы
А зачем вообще нужно это приложение?
У этого приложение одна функция — перекинуть вас на сайт настройки роутера. Зачем его держать на компьютере не понятно.
Not working on MAC OS 10.13.6
Not working on Mac OS 10.15.3
Не работает на Mac OS 10.15.3. Печалька.
Конфиденциальность приложения
Разработчик ASUS не сообщил Apple о своей политике конфиденциальности и используемых им способах обработки данных. Подробные сведения доступны в политике конфиденциальности разработчика.
Нет сведений
Разработчик будет обязан предоставить сведения о конфиденциальности при отправке следующего обновления приложения.
Информация
русский, английский, венгерский, голландский, датский, испанский, итальянский, корейский, малайский, немецкий, норвежский (букмол), польский, португальский, тайский, традиционный китайский, турецкий, украинский, упрощенный китайский, финский, французский, чешский, шведский, японский
Поддерживается

Семейный доступ
С помощью семейного доступа приложением смогут пользоваться до шести участников «Семьи».
Источник
ASUS Firmware Restoration 4+
Снимки экрана
![]()
Описание
ASUS Firmware Restoration is a utility to upgrade/downgrade firmware version on your ASUS router.
Features:
1. Upgrade/Downgrade the firmware version on your ASUS router
Что нового
-Bug fixes
-Stability Improvements
Оценки и отзывы
Функционал хуже, чем у windows версии
Пытался восстановить прошивку на роутере у который в пермаментный recovery mode вывалился с адресом 192.168.2.1 вместо стандартного 192.168.1.1.
Данная утилита не смогла его найти и восстановить, а windows версия смогла.
Должен быть либо автоматический поиск ip, либо настройка для выбора адреса.
Для более простых случаев работает нормально.
Конфиденциальность приложения
Разработчик ASUS указал, что в соответствии с политикой конфиденциальности приложения данные могут обрабатываться так, как описано ниже. Подробные сведения доступны в политике конфиденциальности разработчика.
Сбор данных не ведется
Разработчик не ведет сбор данных в этом приложении.
Конфиденциальные данные могут использоваться по-разному в зависимости от вашего возраста, используемых возможностей или других факторов. Подробнее
Информация
русский, английский, венгерский, голландский, датский, испанский, итальянский, корейский, малайский, немецкий, норвежский (букмол), польский, португальский, тайский, традиционный китайский, турецкий, украинский, упрощенный китайский, финский, французский, чешский, шведский, японский
Поддерживается
Семейный доступ
С помощью семейного доступа приложением смогут пользоваться до шести участников «Семьи».
Источник
Download and install Windows support software on your Mac
After using Boot Camp Assistant to install or upgrade Microsoft Windows on your Mac, you might also need to install the latest Windows support software (drivers) from Apple.
When you install Microsoft Windows on your Mac, Boot Camp Assistant automatically opens the Boot Camp installer, which installs the latest Windows support software (drivers). If that doesn’t happen, or you experience any of the following issues while using Windows on your Mac, follow the steps in this article.
- Your Apple mouse, trackpad, or keyboard isn’t working in Windows.
Force Touch isn’t designed to work in Windows. - You don’t hear audio from the built-in speakers of your Mac in Windows.
- The built-in microphone or camera of your Mac isn’t recognized in Windows.
- One or more screen resolutions are unavailable for your display in Windows.
- You can’t adjust the brightness of your built-in display in Windows.
- You have issues with Bluetooth or Wi-Fi in Windows.
- You get an alert that Apple Software Update has stopped working.
- You get a message that your PC has a driver or service that isn’t ready for this version of Windows.
- Your Mac starts up to a black or blue screen after you install Windows.
If your Mac has an AMD video card and is having graphics issues in Windows, you might need to update your AMD graphics drivers instead.

Install the latest macOS updates
Before proceeding, install the latest macOS updates, which can include updates to Boot Camp.
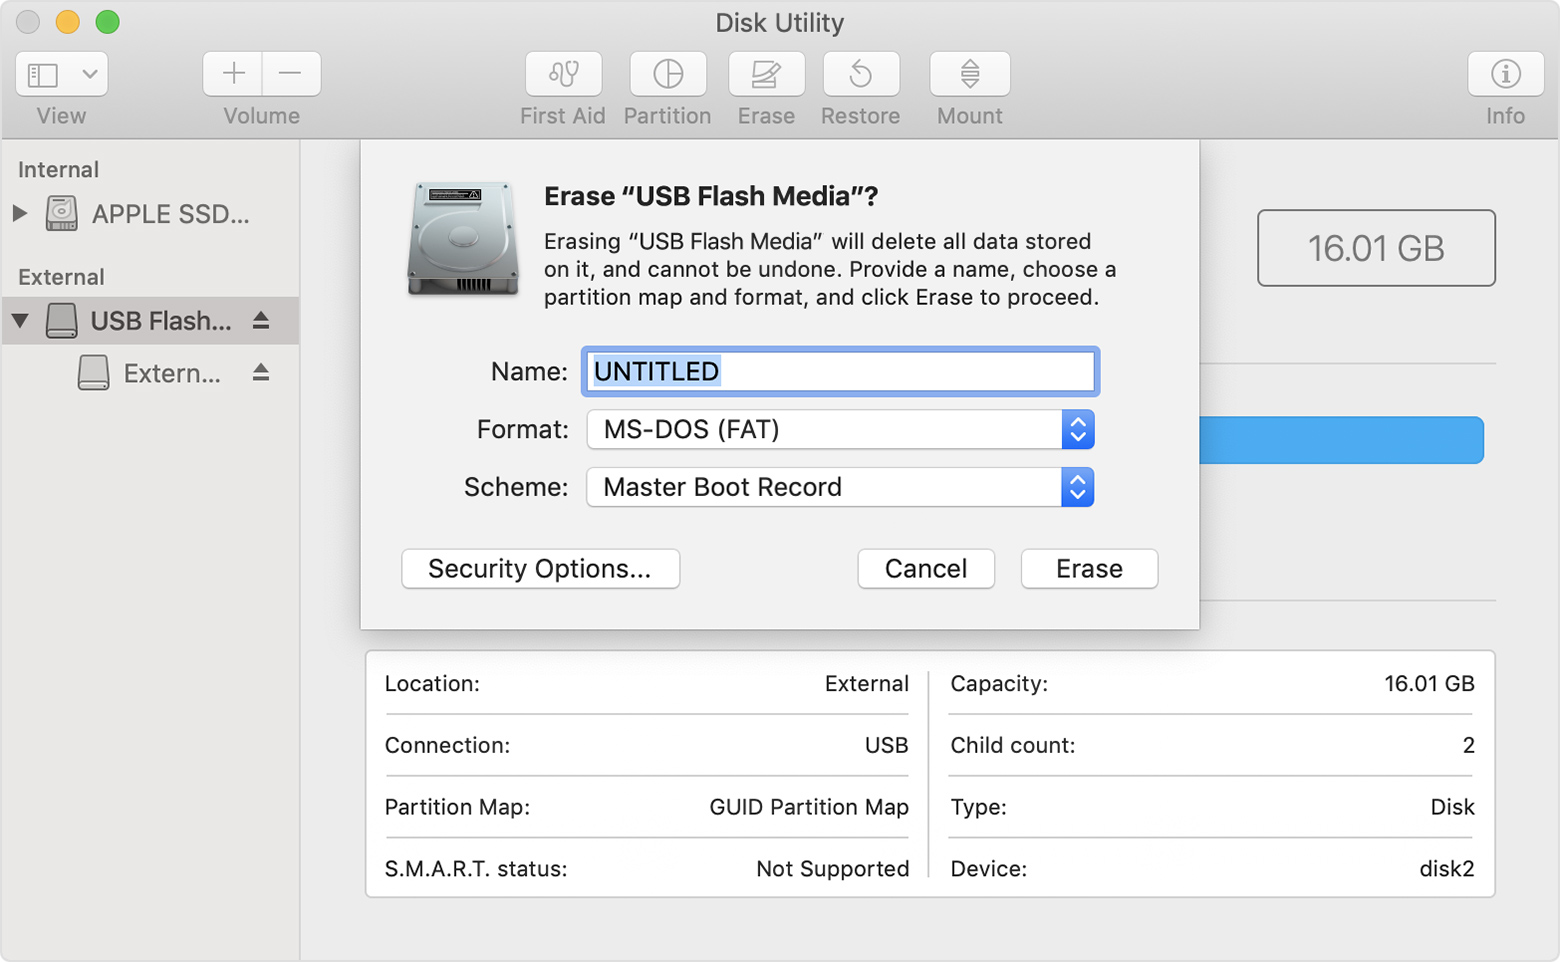
Format a USB flash drive
To install the latest Windows support software, you need a 16GB or larger USB flash drive formatted as MS-DOS (FAT).
- Start your Mac from macOS.
- Plug the USB flash drive into your Mac.
- Open Disk Utility, which is in the Utilities folder of your Applications folder.
- Choose View > Show All Devices from the menu bar.
- From the sidebar in Disk Utility, select your USB flash drive. (Select the drive name, not the volume name beneath it.)
- Click the Erase button or tab.
- Choose MS-DOS (FAT) as the format and Master Boot Record as the scheme.
- Click Erase to format the drive. When done, quit Disk Utility.
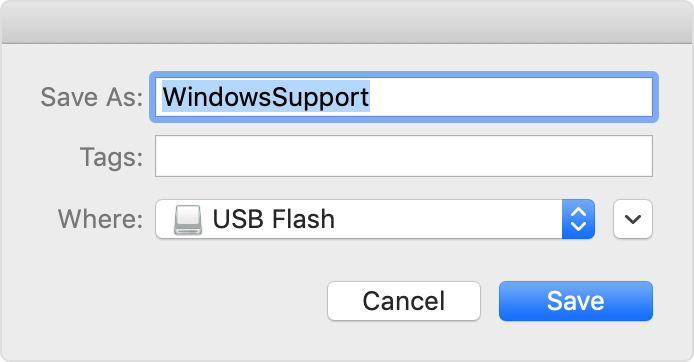
Download the Windows support software
- Make sure that your Mac is connected to the Internet.
- Open Boot Camp Assistant, which is in the Utilities folder of your Applications folder.
- From the menu bar at the top of your screen, choose Action > Download Windows Support Software, then choose your USB flash drive as the save destination. When the download completes, quit Boot Camp Assistant.
Install the Windows support software
After downloading the Windows support software to your flash drive, follow these steps to install the software. (If you’re attempting to resolve issues with a Bluetooth mouse or keyboard, it might be easier to use a USB mouse or keyboard until these steps are complete.)
- Make sure that the USB flash drive is plugged into your Mac.
- Start up your Mac in Windows.
- From File Explorer, open the USB flash drive, then open Setup or setup.exe, which is in the WindowsSupport folder or BootCamp folder. When you’re asked to allow Boot Camp to make changes to your device, click Yes.
- Click Repair to begin installation. If you get an alert that the software hasn’t passed Windows Logo testing, click Continue Anyway.
- After installation completes, click Finish, then click Yes when you’re asked to restart your Mac.
Learn more
If you can’t download or save the Windows support software:
- If the assistant says that the Windows support software could not be saved to the selected drive, or that the USB flash drive can’t be used, make sure that your USB flash drive has a storage capacity of at least 16GB and is formatted correctly.
- If the assistant doesn’t see your USB flash drive, click Go Back and make sure that the drive is connected directly to the USB port on your Mac—not to a display, hub, or keyboard. Disconnect and reconnect the drive, then click Continue.
- If the assistant says that it can’t download the software because of a network problem, make sure that your Mac is connected to the Internet.
- Make sure that your Mac meets the system requirements to install Windows using Boot Camp.
If a Mac feature still doesn’t work after updating the Windows support software, search for your symptom on the Apple support website or Microsoft support website. Some features of your Mac aren’t designed to work in Windows.
Information about products not manufactured by Apple, or independent websites not controlled or tested by Apple, is provided without recommendation or endorsement. Apple assumes no responsibility with regard to the selection, performance, or use of third-party websites or products. Apple makes no representations regarding third-party website accuracy or reliability. Contact the vendor for additional information.
Источник


