- Радиостанция Baofeng UV-5R
- Все о радиостанциях Baofeng UV-5R и любительской радиосвязи
- Baofeng uv-5r драйвер USB кабеля скачать для Pofung
- Как установить драйвера для рации?
- Install CHIRP for Baofeng UV-5R on Linux or Win10
- Baofeng UV-5R (Pofung UV-5R) tranceiver
- USB programming cable
- CHIRP radio programming tool
- CHIRP: Windows 10 install
- CHIRP: Linux install
- Editing radio settings and finding the firmware version
- To be continued
Радиостанция Baofeng UV-5R
Все о радиостанциях Baofeng UV-5R и любительской радиосвязи

Baofeng uv-5r драйвер USB кабеля скачать для Pofung

Для всех пользователей радиостанций Baofeng и Pofung, рано или поздно, приходит время подключиться к компьютеру через USB кабель, но оказывается рации, без особого драйвера подключить не возможно! Вот именно для этого мы представляем для наших посетителей, архив с драйвером usb шнура для раций баофенг совершенно бесплатно и не регистрируясь на сайте.
Как установить драйвера для рации?
Для успешной установки драйвера USB кабеля нужно выполнить следующие шаги:
- Подключаем сразу кабель к компьютеру не подключив к рации.
Потому как кабель вставляется в разъёмы микрофона или наушников, если Вы подключите кабель параллельно с рацией (без установленного драйвера кабеля usb), то при включении радиостанция Baofeng UV-5R сразу будет активироваться на передачу. При этом возможен перегрев рации.
- Установите драйвер кабеля. Попробуйте с начала установочные файлы, которые можно найти внутри директории «USB Cable Driver» на оригинальном диске, входящем в комплект с купленным кабелем. После установки драйвера в Диспетчере устройств в столбце «Порты (COM и LPT)» должно высветится устройство Prolific USB-to-Serial Comm Port.
Если возле появившегося устройства Prolific USB-to-Serial Comm Port имеются проблемы в виде предупреждающего жёлтого треугольничка с восклицательным знаком — это говорит о том, что драйвер был установлен некорректно или не совместим с оборудованием. Если одна из проблем присутствует — то действовать далее не имеет смысла, т.к. оборудование баофенг в последствии не будет распознано ПО и не сможет функционировать для программирования. Общее описание ситуации с драйверами приведено ниже.
В определённый момент китайские подделки заполонили рынки кабелями с платами, использующими те же самые Vendor ID (VID_067B) и Product ID (PID_2303), что и оригинальные платы от Prolific. Производитель отреагировал на это выпуском новой версии своих микросхем, и прекращением поддержки всех предыдущих версий плат и ПО к ним. Из-за этого большинство поддельных китайских кабелей, которые всё ещё обитают на рынке в огромном количестве и вероятнее всего могут попасться и вам. Такие микросхемы будут распознаны ПО как поддельные, при установке актуального ПО от Prolific. Отсюда и появляются все эти баги, ошибки с кодом «Code 10» и жёлтые треугольнички. Эти баги можно устранить установкой более устаревших версий драйвера, (например мне помогло откатиться до драйвера версии 2008 года), но такое решение не будет актуальным всегда. Как только ваш компьютер пройдет процедуру обновления через Windows Update, то скорее всего, что драйвер кабеля будет снова будет обновлен до актуальной версии, особенно если в настройках обновлений вы разрешили автоматические обновления (без вашего ведома).
Baofeng uv-5r драйвер USB кабеля скачать
Еще вам обязательно понадобится программа CHIRP — она предназначена специально для программирования раций. На родном диске есть своя утилита, так же её можно качнуть на сайте Baofeng или Zastone. Но я выбираю всем известный софт CHIRP, он универсален и под него можно скачать готовые пресеты с каналами.
Install CHIRP for Baofeng UV-5R on Linux or Win10

Programming the very affordable Baofeng UV-5R (also available as Pofung UV-5R) dual band mobile radio can be quite complicated. Luckily, there is a program called CHIRP. This free and open-source radio programming tool together with a USB programming cable makes setting up your radio a breeze. In this blog post we will install CHIRP and a programming cable on Windows 10 and Linux (Ubuntu/Mint/Debian) to work with the Baofeng UV-5R tranceiver. It will enable basic downloading and uploading of frequencies and settings from and to the radio. In later posts we will have a more in-depth look at al the settings available. Then we wil also see how to program the radio for GMRS or PMR use, and how to set it up as a basic radio scanner.
Disclaimer: this documentation is for educational purposes only. For operating this radio you are most likely required to be a licensed radio amateur or own a commercial licence. Be sure to check the rules and regulations in your area first.
 Baofeng UV-5R handheld dualband tranceiver
Baofeng UV-5R (Pofung UV-5R) tranceiver
The UV-5R is a cheap but decent Chinese tranceiver that is sold for the ultra-low price of around 30 USD (25 EUR). The radio is dual band (VHF/UHF, 136-174/400-520MHz, 5 Watt) and has 128 memory channels which can be alpha tagged. Together with the scanning capabilities, this makes the UV-5R also a basic but useful scanning radio. The coverage of the GMRS, FRS and PMR bands, the FM radio (65.0MHz-108.0MHz) and the LED flashlight make it a popular choice for ‘preppers’. And for that price, the radio even comes with a wrist strap, battery and charger included.
.JPG)
Tested and recommended by OneGuyOneBlog.com:
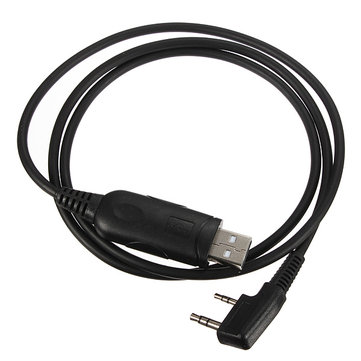
USB programming cable
For connecting the radio to the PC I used this generic, cheap Kenwood-style serial cable. It came without any drivers, and at least for Windows 10 and Linux (Ubuntu, Mint) you don’t need any. Just plug in the cable and Windows and Linux will recognize it.
In Windows 10, you should find it as “USB SERIAL CH340 (COMx)” under Settings > Devices. This also shows the COM-port to be used in CHIRP later on.
In linux, the command LSUSB should list the USB-serial adapter like this:
Bus 003 Device 012: ID 1a86:7523 QinHeng Electronics HL-340 USB-Serial adapter
In my experience it’s best to connect it straight to the PC; connecting it via a USB hub may cause problems.
Tested and recommended by OneGuyOneBlog.com:
CHIRP radio programming tool
CHIRP is a free, open-source tool for programming amateur radios. It supports many manufacturers and models, as well as provides a way to interface with multiple data sources and formats. Another big advantage is that it’s multi-platform: it’s available for Windows, Linux and Mac. CHIRP not only makes the programming so much easier, it also provides access to features not available through the radio’s buttons or keypad. For exmaple, with CHIRP you can give each memory channel a name or ‘alpha tag’ of 7 characters. Then instead of the frequency, the tag can be shown in the radio’s display. This tagging can not be done by using just the radio’s keypad.
CHIRP: Windows 10 install
The Windows 10 install is pretty straightforward:
-
- After plugging in the USB cable, download the latest Windows installer (“chirp-daily-xxxxxxxx-installer.exe”) from the CHIRP download page;
- Run the installer, ignoring the Windows Defender warnings. After installation is complete, run CHIRP (from the application menu);
- Select the “Radio” menu and then “Download From Radio” (Alt+D);
 Install CHIRP for Baofeng UV-5R on Windows 10 – Download from Radio
Choose your radio settings: the COM (USB) port (for me it was “COM5”), the vendor (“Baofeng”) and the model (“UV-5R”); Install CHIRP for Baofeng UV-5R on Windows 10 – Radio settings - At the warning “Proceed with experimental driver?”, click “Yes” to continue;
- Follow the instructions on hooking up the radio:
1. Turn radio off;
2. Connect cable to mic/spkr connector;
3. Make sure connector is firmly connected;
4. Turn radio on (volume may need to be set at 100%);
5. Ensure that the radio is tuned to channel with no activity;
6. Click OK to download image from device; Install CHIRP for Baofeng UV-5R on Windows 10 – Instructions
The image will now be downloaded from your radio (a.k.a. “cloning”). Install CHIRP for Baofeng UV-5R on Windows 10 – Cloning
After the image is downloaded you can use it as template. You can edit it and save multiple versions to disk, or upload an image back to your tranceiver. Install CHIRP for Baofeng UV-5R on Windows 10 – Image file
 Install CHIRP for Baofeng UV-5R on Windows 10 – Download from Radio
 Install CHIRP for Baofeng UV-5R on Windows 10 – Radio settings
 Install CHIRP for Baofeng UV-5R on Windows 10 – Instructions
 Install CHIRP for Baofeng UV-5R on Windows 10 – Cloning
 Install CHIRP for Baofeng UV-5R on Windows 10 – Image file
 CHIRP: Linux install
The Ubuntu/Linux Mint/Debian install (I installed it on Mint) is not very different from the Windows 10 one (for screenshots, see the Windows install above):
- After plugging in the USB cable, issue these commands to download and install CHIRP:
sudo apt-add-repository ppa:dansmith/chirp-snapshots
sudo apt-get update
sudo apt-get install chirp-daily - After installation is complete, run CHIRP;
- Select the “Radio” menu and then “Download From Radio” (Alt+D);
- Choose your radio settings: the serial port (for me it was “/dev/ttyUSB0”), the vendor (“Baofeng”) and the model (“UV-5R”);
- At the warning “Proceed with experimental driver?”, click “Yes” to continue;
- Follow the instructions on hooking up the radio:
1. Turn radio off;
2. Connect cable to mic/spkr connector;
3. Make sure connector is firmly connected;
4. Turn radio on (volume may need to be set at 100%);
5. Ensure that the radio is tuned to channel with no activity;
6. Click OK to download image from device; - The image will now be downloaded from your radio (a.k.a. “cloning”).
- You can now use the downloaded image as template. You can edit it and save multiple versions to disk, or upload an image back to your tranceiver.
Note: if you get an “Access denied” error when accessing the serial port, you need to add your username to the dialout group. For instance, when your username is “johndoe” you should issue the command:
sudo adduser johndoe dialout
Editing radio settings and finding the firmware version
With CHIRP, you can also edit the radio’s settings. You can even adjust a quite few settings that are not available through the keypad and LCD screen. Just click the “Settings” tab on the left, below the “Memories” tab. Here you will also find your tranceiver’s firmware version under “Other Settings > Firmware Message 1“. You can only upload an image to a tranceiver with a matching firmware version.
 Install CHIRP for Baofeng UV-5R on Windows 10 – Settings
To be continued
In some future blog post(s) we will take a closer look at all the available channel options, the radio settings and how to adjust them for GMRS, FRS and PMR communications. And finally we will see how we can set up the Baofeng/Pofung UV-5R as a cheap and basic radio scanner. To be continued!


