- tehnotone.com
- In tone with technology
- Windows 10 MTK VCOM USB Drivers for 32 & 64 bit + Drivers installation tutorial
- To determine the version of Windows 10 that you have (32 bit or 64 bit):
- To disable Windows 10 64 bit driver signature enforcement:
- To install the MTK VCOM USB Drivers on 32 & 64 bit Windows 10:
- Как установить драйвер SP Flash Tool
- Как установить драйвер SP Flash Tool
- Способ — 1 Установка драйвера SP Flash Tool (USB VCOM) для Windows 8 — 10
- Способ — 2 Установка драйвера SP Flash Tool (USB VCOM) для Windows 7 — 10
tehnotone.com
In tone with technology
Windows 10 MTK VCOM USB Drivers for 32 & 64 bit + Drivers installation tutorial
This drivers will make the connection to your MTK device possible form a Windows 10 PC on a 32 or 64 bit configuration. The drivers that you will find on this page are unsigned so if you are running Windows 10 64 bit you are required to temporary disable the driver signature verification enforcement in order to be able to install.
To determine the version of Windows 10 that you have (32 bit or 64 bit):
- Right-click on Start then click on System
- In the System window that opens, in System section, you will find your version of Windows next to System type
- Windows 10: 64 bit or 32 bit? How to find out?
To disable Windows 10 64 bit driver signature enforcement:
- On your 64 bit Windows 10 desktop click on Start then on Settings
- Click on Update & security then in the left pane click on Recovery
- Under Advanced startup click on Restart now button
- Click on Troubleshoot then on Advanced options
- Click on Startup Settings then on Restart button
- The computer will restart with the Startup Settings screen
- To disable the driver signature enforcement until next restart press on number key 7 or F7 on your keyboard.
- After restart you can proceed with the unsigned MTK drivers installation for your 64 bit Windows
- After you install the unsigned drivers, to use them again in the future, you have to repeat this procedure
To install the MTK VCOM USB Drivers on 32 & 64 bit Windows 10:
-
- Download the drivers *.zip archive and extract the folder from inside on to the desktop:
- Download Windows 10 MTK VCOM USB Preloader Drivers
- Right-click on Startthen click on Device Manager
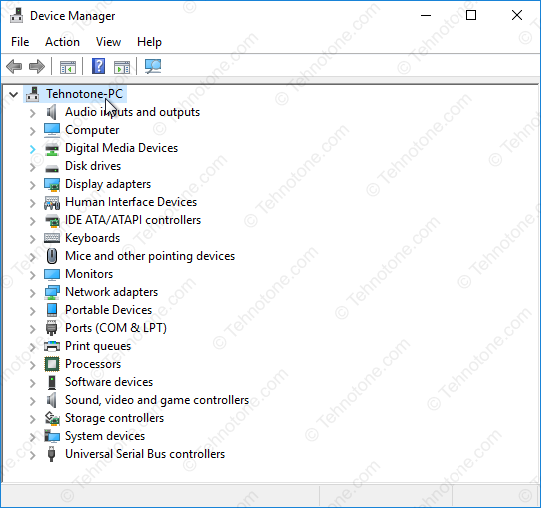
- In the Device Manager Window click on the first item – your computer name
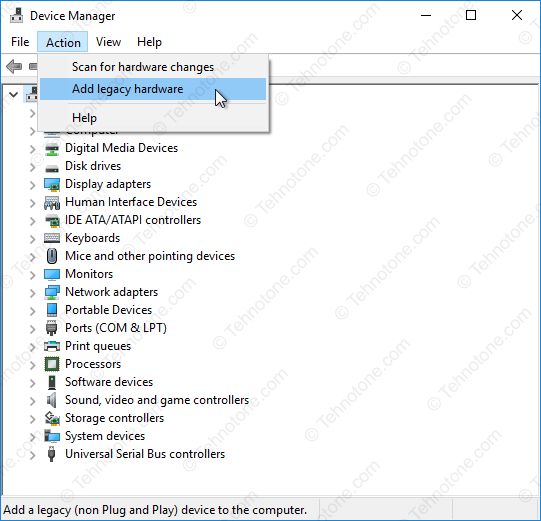
- Click on Action then Add legacy hardware
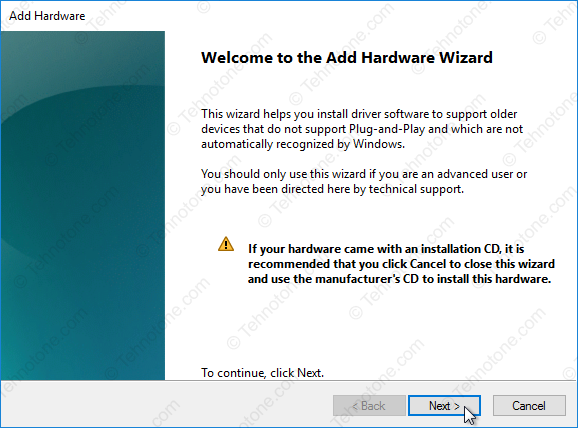
- On the Welcome to the Add hardware Wizard window click on Next button
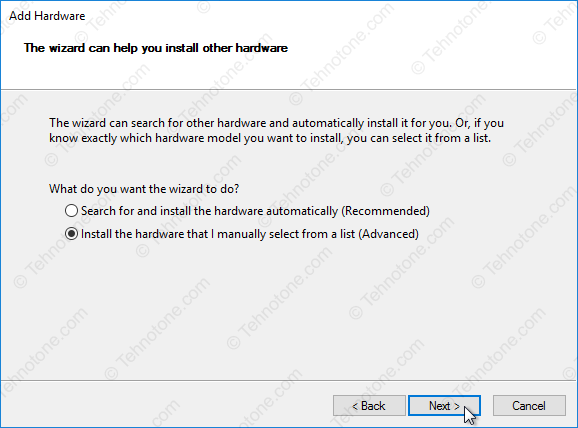
- Select Install the hardware that I manually select from a list (Advanced) and then click on Next button
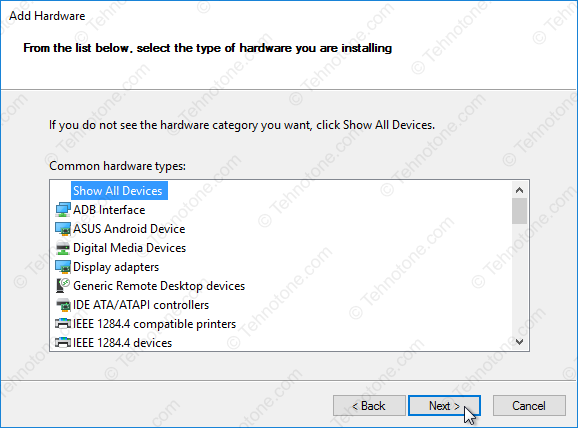
- Click on Show All Devices then on Next button
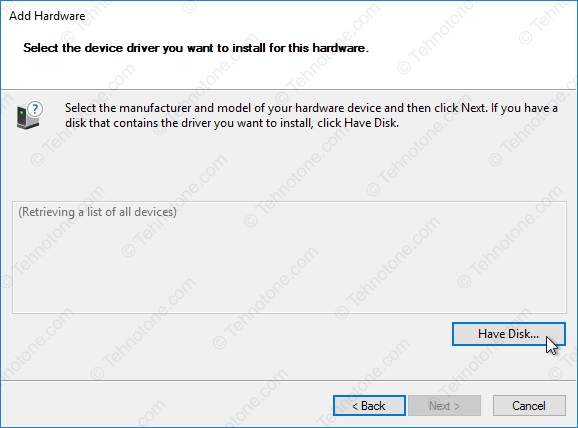
- In the Add Hardware window click on Have Disk… button
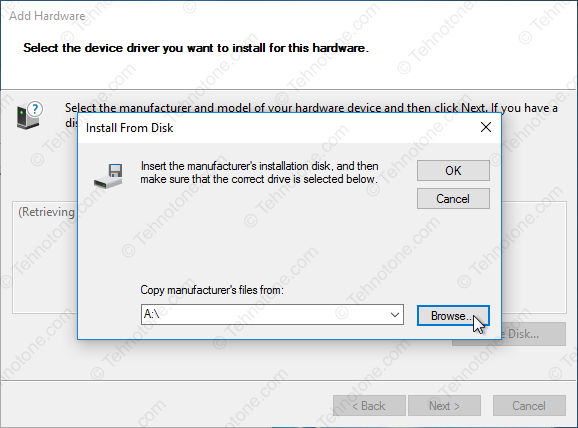
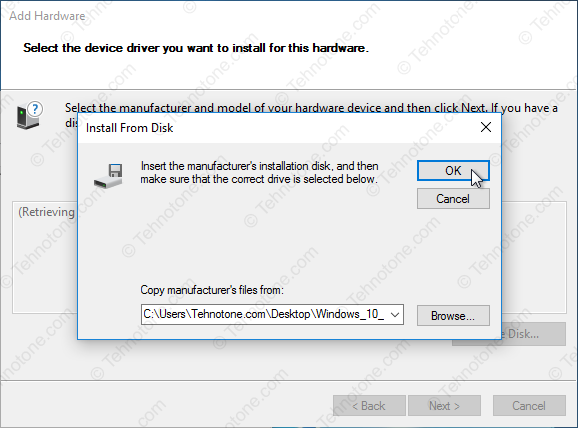
- In the Install From Disk window click on Browse… button
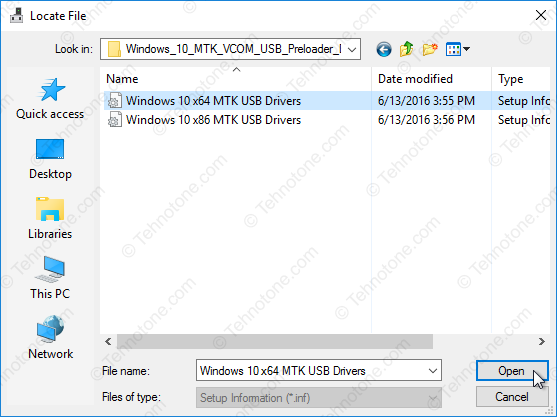
- In the next window – Locate file – browse for the folder that you have extracted on the desktop at the beginning
- Select the version of the driver according to your Windows 10 version – x64 for 64 bit and x86 for 32 bit and click Open button
- Click the OK button to load the driver
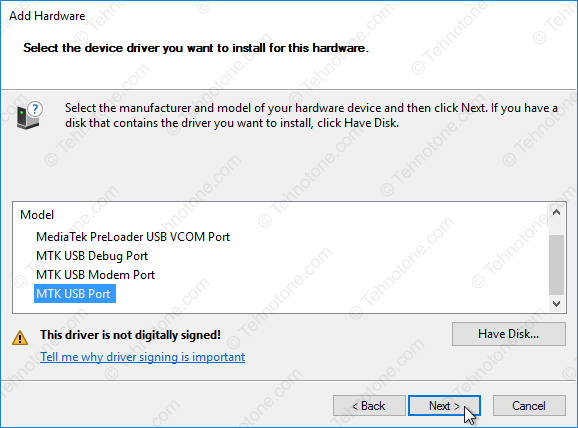
- From the list of drivers select MTK USB Port and click on Next button
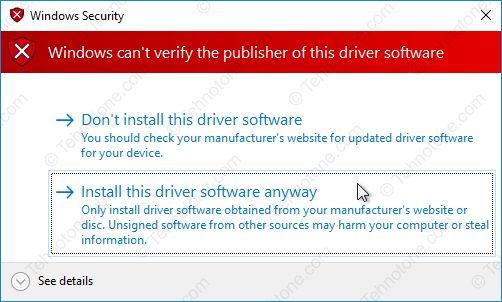
- If a red warning window will open, click on Install this driver software anyway
This action will add the following drivers in to the operating system:
- MediaTek DA USB VCOM Port
- MediaTek PreLoader USB VCOM Port – for transferring the firmware to your device
- MTK USB DEBUG Port
- MTK USB Modem Port
- MTK USB port – for transfering PreLoader to your device (and recovery in case of bad or corrupt firmware)
Now we need to remove the device that we have installed but leave the drivers in the operating system.
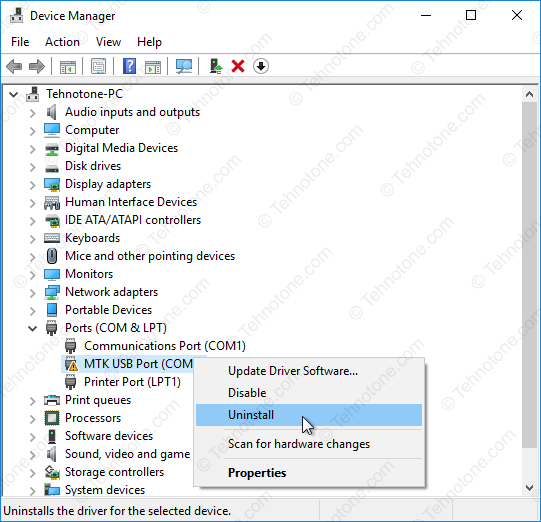
To do that, in the Device Manager window we expand Ports (COM & LPT) section
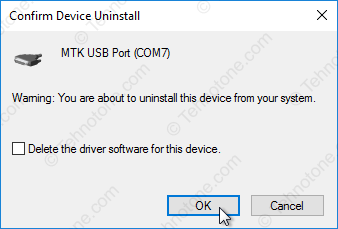
- Right-click and click Uninstall on the MTK USB Port
- In the Confirm Device Uninstall window make sure that the box Delete the driver software for this device is empty
- You need to leave the drivers in the operating system and only remove the device that you added
- Click on the OK button to finalise
Now, when you will connect your dead (or turned off) MTK device to the Windows 10 computer by USB, the device will be recognized either trough a MediaTek Preloader USB VCOM Port interface or as a MTK USB port if it is bricked or it has bad/corrupt firmware. The SP Flash Tool will be able to transfer the firmware to your device trough this interfaces. Make sure you connect the device after you press the Download button in SP Flash Tool, as the communication interface will only be alive for 2 seconds if no data is being sent.
If you have trouble installing a new MTK driver in your system or you see a high or unusual number beside COM Ports displayed in the Device Manager, you might want to clean the USB driver garbage in your system with USBDeview – Download USBDeview download for 32 & 64 bit Windows – learn what it does and how to get rid of unwanted USB drivers and COM Port duplicates.
Как установить драйвер SP Flash Tool
вкл. 07 Май 2019 . Опубликовано в Android — Общее
Ни как не получается установить драйвер SP Flash Tool , для того чтобы прошить ваше устройство Android? Мы подготовили вам подробную инструкцию
Как установить драйвер SP Flash Tool
Содержание — Как установить драйвер SP Flash Tool
Большинство недорогих устройств Android («китайцы», LG, Lenovo, Prestigio, Sony, HTC, Samsung) работают на чипах MTK от компании Mediatek. Когда приходит момент прошивки данных Android устройств , то у многих возникают проблема с установкой драйвера MTK на компьютеры Windows.
Способ — 1 Установка драйвера SP Flash Tool (USB VCOM) для Windows 8 — 10
1. Скачайте драйвер Windows+10_MTK+VCOM+USB+Preloader+Drivers.zip и распакуйте архив, например на рабочий стол.
2. Откройте «Проводник» -> перейти в «Компьютер» -> на пустом месте правый клик мыши и выбрать «Свойства«
в боковом меню выбрать «Диспетчер устройств» (если не понятно смотрите видео в конце статьи)
3. В диспетчере устройств кликните один раз по имени ПК, а далее в меню на панели выбрать «Действие» и выбрать «Установить старое устройство»
4. Жмем «далее»
5. Выберите пункт «Установка оборудования, выбранного из списка вручную» и нажимаем кнопку «Далее»
6. Выберите «Показать все устройства» и снова нажать «Далее»
7. Выбираем «Установить с диска» и снова «Далее»
8. Нажимаем на обзор
и в проводнике переходим в папку со скаченными драйверами, выберите для 64 или 32-разрядной системы
9. Из списка выбираем «MTK USB port» и нажимаем несколько раз »Далее»
10. Появиться окно с предупреждением, выбрать «Все равно установить этот драйвер»
11. В Диспетчере устройств, вкладка «Порты (COM и LPT)», удаляем устройство, но не драйвер!
Перезагружаем компьютер! Драйвер установлен!
Способ — 2 Установка драйвера SP Flash Tool (USB VCOM) для Windows 7 — 10
После того как вы скачали драйвера MTK для SP Flash Tool, разархивируйте их и разместите на рабочем столе или на диске C:\.
1. Откройте «Проводник» -> перейти в «Компьютер» -> на пустом месте правый клик мыши и выбрать «Свойства«
в боковом меню выбрать «Диспетчер устройств» (если не понятно смотрите видео в конце статьи)
2. Отключите от компьютера (если было подключено) и выключите устройство Android
3. Извлеките батарею (если это возможно) и не вставляйте ее обратно
4. Подключите с помощью USB ваш Android
и внимательно смотрите в «Диспетчере устройств» когда появиться «Неизвестное устройство» или «MTK Preloader» и быстро выберите его
5. Далее «выполните поиск драйверов на этом компьютере»
и укажите папку с драйвером MTK для прошивки в SP Flash Tool
После чего у вас должна произойти установка драйвера, если этого не произошло, тогда попробуйте отключить цифровую подпись Windows .
P.S. : Если у вас ничего не получается, тогда попробуйте другой USB кабель или установить драйвера MTK для SP Flash Tool на другом компьютере.
