- Драйвера gaomon s620 linux
- About
- [OLD] How to setup a Gaomon, Wacom or any other tablet on Linux! (Driver + Tablet Area + More!)
- Нет аккаунта?
- [OLD] How to setup a Gaomon, Wacom or any other tablet on Linux! (Driver + Tablet Area + More!)
- Step 1: Installing the drivers from source.
- Step 2: Confirming that the tablet drivers are working.
- Step 3: Resizing the tablet area!
- Step 4: [Optional] Locking tablet area to a single monitor.
- Step 5: [Optional] Create an optional script that will quickly load your tablet config.
- Step 6: [Optional] Make the script execute automatically when the tablet gets plugged in.
- Run S56K and M106K Tablet on Linux System
- Method from DIGImend project.
- Method from one of our customers
Драйвера gaomon s620 linux
Configuring the GAOMON S620 graphics tablet in Linux MINT / DEBIAN / UBUNTU / MX
Out of the box the device works immediately. Positions normally, but is detected by the system as some variant of the touchpad in the SETUP/Mouse and Touchpad menu. Pressing force is displayed correctly in the Krita graphical editor, but the function keys don’t work.
The lsusb command identifies it as 256c:006d.
The following is required for the device to work fully:
- change file /usr/share/X11/xorg.conf.d/70-wacom.conf (for old LM versions — 50-wacom.conf), added to the end of file:
- After rebooting, the xsetwacom —list command will output the following:
Accordingly, the SETUP/MUSIC and TACHPAD menus now have two GAOMON items instead of one.
- the buttons can now be reassigned:
For stylus:
where *** is combination of the «key» word and pressed keys. In the case of function keys (CTRL, ALT, SHIFT, etc.), you will first write the + symbol, then the name of the function key (this symbolises the key being pressed), then the desired key in combination with the function key, then the — symbol, then the function key (this symbolises the key being released). For example, [CTRL] V , will be written as «key +ctrl v -ctrl».
For four tablet keys:
where *** is the combination described above.

From these commands you can create a BASH file and run it before using the tablet:
- file that reassigns the lower pen key to Del (for easy erasing of selected fragment), four tablet keys for copy, paste, reduce scaling, enlarge scaling functions.
A list of supported keys can be seen with the command xsetwacom —list modifiers
About
Configuring the GAOMON S620 graphics tablet in Linux MINT / DEBIAN / UBUNTU / MX
Источник
[OLD] How to setup a Gaomon, Wacom or any other tablet on Linux! (Driver + Tablet Area + More!)
Нет аккаунта?
[OLD] How to setup a Gaomon, Wacom or any other tablet on Linux! (Driver + Tablet Area + More!)
THIS POST IS NO LONGER MAINTAINED DUE TO AN EASIER SETUP PROCESS. NEW INSTRUCTIONS LINK: community/forums/topics/1340468 .
DISCLAIMER: This guide does not support XP-PEN as of Aug 9, 2020. I cannot control this as this is DIGImend’s issue. The guide will only support the tablets that DIGImend supports. This guide also may not work with every tablet.
Hello! I have been browsing the internet on how to fully setup my Gaomon tablet on my Linux operating system. I didn’t find a tutorial to how to fully setup a tablet on Linux, so this tutorial will be a all-in-one guide on how to fully setup your tablet! This guide will teach you how setup all of this!
Since I did all of these steps on Linux Mint 19.3, these steps should work on any Ubuntu or Debian distro. These steps should also work on Arch or any other distro, but you may have to install a couple of required libraries to make everything work.
This guide is really only for people who have experience with Linux. If you are a beginner using Linux, this tutorial may be overwhelming for you.
Table Of Contents
— 1: Installing the drivers from source.
— 2: Confirming that the tablet drivers are working.
— 3: Resizing the tablet area!
— 4: [Optional] Locking tablet area to a single monitor.
— 5: [Optional] Create an optional script that will quickly load your tablet config.
— 6: [Optional] Make the script execute automatically when the tablet gets plugged in.
Step 1: Installing the drivers from source.
This sounds intimidating, but don’t worry, this is actually the easiest step!
The first step is to install the driver files for your tablet. We first have to download the drivers. To do this click this link: https://github.com/DIGImend/digimend-kernel-drivers/archive/master.zip . The file should start downloading after you click it.
We are going to install it from source since I have experienced instability with the github releases.
First, extract the folder inside the .zip file anywhere you want, preferably your Desktop. Once you do that, you want to enter the folder that you just entered via your terminal. To do that, open your terminal and type:
In my case, the driver folder I extracted is located on my desktop at /home/fantasy/Desktop/digimend-kernel-drivers-master, so I would put in:
Next, we are going to run a couple of commands. First we are going to make sure we have the proper files to make the drivers work. To do this, run:
If a prompt comes up and states «Do you want to continue? [Y/n],» press ENTER and restart your computer and CD back into the driver directory. If you get «linux-headers-X.X.X-XX-generic is already the newest version (X.X.X-XX.XX
XX.XX.X)», just continue with the tutorial.
Now here comes the important part. Run these two commands (make sure you are in the driver directory.):
and
After doing these two commands, unplug your tablet and restart your computer. Once it turns on, login and then plugin your tablet.
If you ever want to uninstall the drivers, CD into the driver directory and execute «sudo make uninstall». If you ever accidentally delete the driver directory and want to uninstall the drivers, don’t worry! Just extract the drivers and follow the same steps all the way up to the «make» part and stop there. Then execute the uninstall command!
Step 2: Confirming that the tablet drivers are working.
There are a couple ways of checking if your tablet works. One way of doing this is by going into your tablet settings and checking if you can change basic settings of the tablet. For me it looks like this:
(If it shows that no tablet is detected, that means your drivers are probably not working. Continue following the directions by executing the command below to check if that is the case.)
Another way to check if your tablet is working to execute
Two options should appear.
If nothing is popping up, that means DIGImend is definitely not detecting your tablet. Make sure you installed the driver properly.
Sometimes whenever I boot into my computer and plug in my tablet, it does not detect it. Rebooting my PC while the tablet is plugged in fixes this issue though. If it still does not work. Try running «sudo make uninstall» and «make clean» and start over and re-download the drivers.
If you have and it still does not work, consider making a comment and/or filing an issue on DIGImend’s issue page here.
(Optional) To test that data is passing through the tablet, do these commands:
A list should form that looks like this:
For me, I see that my Gaomon S620 Tablet has two inputs. To make sure that my tablet is sending the correct data, I will have to print out the active properties of the stylus. To do this, find the stylus input. For me it is «GAOMON Gaomon Tablet Pen stylus id=16.»
Type in the following command, where is the number of your stylus input:
Since my id for my stylus is 16, I would put in:
Now put your pen on your tablet, some text should print in your terminal. You can keep removing and placing your pen to keep testing if it works.
This was some of my output:
As you can see, as I repeatedly lifted my pen off the tablet, the terminal detected the pressure of the pen.
Step 3: Resizing the tablet area!
Congratulations! You have now reached the hard part! Don’t worry, it isn’t that hard.
The first thing to do is to list the ids of our tablet using the xsetwacom tool. Don’t worry if you are using a Gaomon or some other tablet. The DIGImend drivers allows the Wacom tool to understand your tablet values.
Execute this command again:
Two entries should appear, one with your pad and one with your stylus for me it looks like
Now we have to find the default area of our tablet. To do this find the id of your stylus interface. For me, it is 15. I would put in
. where 15 is your stylus id! This id will also be used to modify the properties of your tablet, so keep this number in the back of your head.
Now lets get our area! Now execute the following command (replace 15 with your id of course):
My output is:
So here is where it gets tricky.
Ignore the pink text.
So basically the red and green areas are self explanitory. So remember my default values that I got ( 0 0 33020 20320 )? Those numbers are what we will be modifying. Each number has a place on each side of your tablet (interaction area).
On the top right, you can see what number is what (for me).
A and B work differently than C and D .
The higher the numbers are for A and B , the closer they get to C and D .
The lower the numbers are for C and D , the closer they get to A and B , (that is why the first two numbers are 0’s).
They are opposites in how they function.
For example I set the values of my tablet area to 5000 5000 20020 14000 . The area would then look something like this:
Now that we understand the values, lets finally begin experimenting with what values suites well.
This will take a while of constantly tweaking values, but if you usually have your tablet area set to one monitor, I HIGHLY recommend you to do step 4 before continuing. If you enable monitor lock after you get your perfect values, it will screw up how your cursor moves and you will have to redo the values.
Now, to change the area, its actually really easy since you now understand how the values work.
The format is:
If you don’t have a reference for tablet values, try dividing C and D by 2 and inserting what you get into there.
For me, I found the perfect values for my Gaomon S620. I use (without monitor lock):
When you finally find the perfect values for your tablet, make sure you save the command somewhere so you can execute it when you replugin your tablet.
We are done with the hard part!
Now is a good time to rehydrate! Go drink some Water, Lemonade, Orange Juice, whatever fits your fancy.
If you are satisfied with how everything works and want to stop here, I suggest you leave a comment since this is my first post. Any constructive critisism or love is very appreciated.
Step 4: [Optional] Locking tablet area to a single monitor.
To do this we need to first list all of the available displays:
Output:
Now lets tell xsetwacom to lock our monitor. I want to lock my tablet to the monitor connected via the DP-2 port, so I execute:
. where DP-2 is your output. For some reason this does not work for me so I just use the X11 geometry string of my display:
Save the final command somewhere.
Step 5: [Optional] Create an optional script that will quickly load your tablet config.
If you want to make your life a bit more simpler, then putting your config in a script can help.
This time we are going to be using the name of the stylus interface since there is a chance that the id can change upon reboot. You can find the name by using the good ol’ «xsetwacom —list» command.
I am going to use «GAOMON Gaomon Tablet Pen stylus» and my values as an example.
Do:
Then put in the commands that you use with #!/bin/bash at the first line. For example, my config:
You can paste into nano by pressing CTRL + SHIFT + V. Same with copying.
If you are declaring a monitor lock, make sure you do that before you call your tablet area. Ex:
To run it, right click it and go to permissions. Then check «Allow executing file as program.» After that, double click the file on your desktop and hit «Run in Terminal.»
Step 6: [Optional] Make the script execute automatically when the tablet gets plugged in.
If you know what you are doing, you can continue. This step can possibly break your system so be careful.
Источник
Run S56K and M106K Tablet on Linux System
For some reasons, GAOMON doesn’t develop specific drivers for Linux system or its distros. However, some customers have given us suggestions to make GAOMON tablets run on a Linux system. Thanks for their efforts. Now we put the solutions here for your reference. If you had a better solution, greatly welcome to tell us!
Method from DIGImend project.
This solution is a collection of graphics tablet drivers for the Linux kernel, produced and maintained by the DIGImend project. Thanks to the efforts of the author, Nikolai Kondrashov, and other volunteers, after installing the driver offered by DIGImend project, you can run S56K and M106K on Linux system computer. If you met some questions, you can discuss and get help from DIGImend project.
Here is the link and recommend you read it carefully:
Method from one of our customers
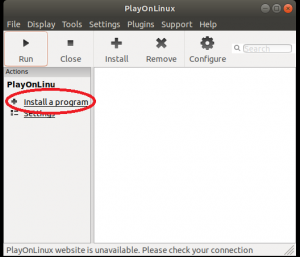
One of our customers has successfully run S56K on Ubuntu and offered his solution for reference, but this doesn’t mean all of you could make it. This solution uses PlayOnLinux to simulate a windows environment. So just a suggestion for your reference. Click PlayOnLinux wiki, you can get support and details from PlayOnLinux team. Here we list out steps the customer has done to run GAOMON driver on Ubuntu for your reference.
- After installing PlayOnLinux, please open its interface and click the ‘Run’ option and then select ‘Install a program’

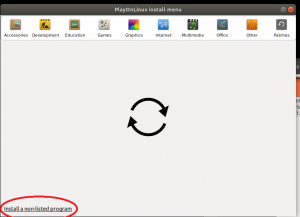
- Select ‘Install a non-listed program’ and then go next
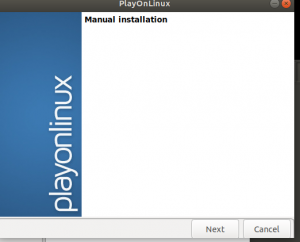
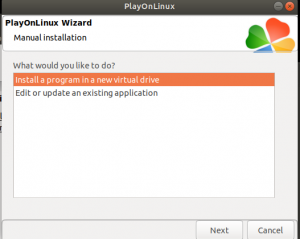
- Select ‘Install a program in a new virtual drive’ and click ‘Next’
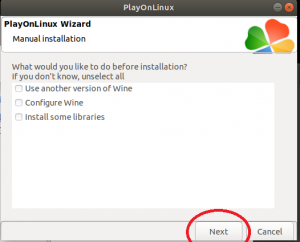
- Don’t choose the three options, just go ‘next’.
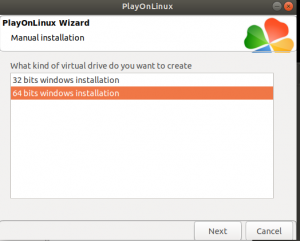
- There are two options you could choose. It depends on what kind of bits of your Linux OS is. Please choose a corresponding bit and go ‘Next’.
- Click ‘Browse’ to choose the wins GAOMON driver setup package, then you could run the GAOMON driver trough PlayOnLinux on your Linux OS.

If this solution failed to help you, please feel free to contact us. We’re always here for you.
You can submit your issue from here: GAOMON SUPPORT TEAM.
Источник


