- How to Uninstall Ubuntu from Windows Dual Boot Safely
- Uninstall Ubuntu safely from Windows dual boot mode
- Part 1: Run a sanity check and make Windows as default boot manager
- Step 1: Access UEFI boot settings
- Step 2: Move Windows Boot Manager up the boot order
- Part 2: Deleting Linux partition on Windows
- Step 1: Go to disk management
- Step 2: Identify Linux partition
- Step 3: Delete Linux partition
- Step 4: Extend Windows partition
- Step 1:
- Step 2:
- Step 3:
- Step 4:
- Step 5:
- Step 6:
- Step 7:
- Step 8: If the trick in step 6 didn’t work
- [2021 Tips] How to Remove Ubuntu from Dual Boot
- How to Remove Ubuntu from Dual Boot (2 Steps)
- How You Install Ubuntu on Your Computer
- Step 1 — Delete the Linux Partition (Two Methods)
- Method 1. Delete Your Linux Partition with Disk Management
- Method 2. Delete Your Linux Partition with Software
- Step 2 — How to Fix the Windows Boot Loader
- Bonus Tip — How to Back Up Ubuntu Data Without Booting into System
- Conclusion
How to Uninstall Ubuntu from Windows Dual Boot Safely
Last updated April 20, 2020 By Abhishek Prakash 239 Comments
Brief: This beginner’s guide shows you how to safely remove Ubuntu or any other Linux distribution from Windows dual boot.
Trust me, installing Ubuntu in dual boot with Windows is not that difficult a task. Similarly, removing Ubuntu from dual boot is also not that complicated.
In both cases, you need to take a bit of precautions with disk partitions. Having a Windows recovery and proper backups always helps.
In this tutorial, I am going to show you the steps for uninstalling Ubuntu from Windows dual boot. The steps should be equally valid for any other Linux distribution be it Linux Mint, Debian, Fedora, Arch etc.
Uninstall Ubuntu safely from Windows dual boot mode
The process is composed of two parts:
- Change the boot order in UEFI settings and give priority to Windows Boot Manager. You may also delete Grub entry from UEFI setting, if your system gives you this option. If that doesn’t work then you’ll have to repair boot with a bootable Windows disk.
- Deleting the Ubuntu partition from Windows.
As the last resort, you need to have a bootable Windows disk or recovery disk so that you can use it to repair the boot after removing Ubuntu (if needed).
Part 1: Run a sanity check and make Windows as default boot manager
I want you to have as few troubles as possible. And hence I recommend change the boot setting and make Windows boot manager as the default option to boot.
Let me explain a bit here. When you install Ubuntu or some other Linux, it adds Grub bootloader to your boot settings and makes it the default.
So, now your system has two boot loaders or boot manager (whatever you want to call it). Grub gives you option to boot into Ubuntu or Windows.

Windows boot manager lets you boot into Windows directly. And this is what you are going to use here.
Step 1: Access UEFI boot settings
Before you go on and delete the Linux partition, it will be a wise move to check if you can make Windows boot manager as the default boot option. This way, when you remove Linux, your boot process won’t be disturbed.
Access the UEFI settings from Windows. Search for UEFI and go to Change advanced startup options:

Click on Restart now:

On the blue screen next, select Troubleshoot:

Select Advanced Options next:

On the next screen, select UEFI Firmware Settings:

Hit restart button on the next screen:

Step 2: Move Windows Boot Manager up the boot order
Now your system will boot into UEFI settings. Now, the next screen will look different for different systems and manufacturers. You have to look for boot tab here.
On my Acer predator, it looks like the image below. Here, use arrow keys to select Windows Boot Manager and press F5 to move it up the order. Press F10 to save and exit.
Now, your system should boot straight into Windows. To verify, restart your system a couple of times and see if the system boots into Windows without showing the grub screen of Linux.
If that happens, you are good to go with the next step which is to delete the Linux partition and reclaim your disk space.
Part 2: Deleting Linux partition on Windows
Let’s see how to delete the Linux partition and extend your Windows disk with available freespace afterwards.
Step 1: Go to disk management
Log into Windows. Press Windows+R and type diskmgmt.msc into the dialog box. This will open the Windows disk management tool.

Step 2: Identify Linux partition
Since you installed Linux, it’ll be easy for you to recognize the Linux partition by its size.
Another hint for identifying the Linux partition is to look for those that don’t have a file system and drive number. Windows partitions are labeled with a drive number, such as C, D, E, etc., and usually use the NTFS or FAT file system.
As you can see, I have three Linux partitions here as I created root, swap and home separately when I installed Ubuntu.

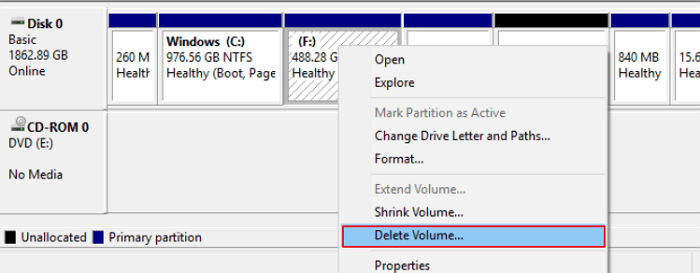
Step 3: Delete Linux partition
Select the Linux partition(s), right click on them and opt for the Delete Volume option.

It will throw you a warning – just select Yes here.

Step 4: Extend Windows partition
The deleted partition(s) will now be available as a chunk of free space. You can either extend the existing volume or create a new Windows partition from it.
I would suggest that you create a new drive (or volume or partition, whatever you want to call it) as this will be easier if you decide to dual boot Linux with Windows again.

After deleting the Linux partition, of your system boots into a broken Grub screen which shows a message like grub rescue error, you need to use Windows recovery disk and fix the Windows bootloader.
Step 1:
Put in the Windows installation disk and restart your computer. Press F10 or F12 at boot time to go into BIOS/UEFI and choose to boot from removable disk.

Step 2:
Choose to repair your computer:

Step 3:
Go for the Troubleshoot option here:

Step 4:
On the troubleshooting page, choose Advanced options:

Step 5:
Look for the command prompt option in here:

Step 6:
In the command line, type the following command to fix the Windows boot loader:
Normally, it works instantly. You don’t even have to wait for it.

Step 7:
Once it’s done, restart your computer and this time boot normally from the hard disk. You should be able to boot into Windows. If you still see a Grub rescue error, try the steps below.
Step 8: If the trick in step 6 didn’t work
If the command in step 6 didn’t work, try Automatic repair from the advanced troubleshooting options.

It will take some time to find the issue and then repair it.

Now if you reboot, you should go into Windows normally without seeing any Grub rescue error thingy.
I hope this guide helped you safely remove Ubuntu from Windows dual boot. Feel free to ask any questions or make a suggestion.
Like what you read? Please share it with others.
Источник
[2021 Tips] How to Remove Ubuntu from Dual Boot
«I have absolutely no experience with Linux, and I desperately need to get my computer back and running again with Windows. How do I remove Ubuntu and reinstall Windows?»
How to Remove Ubuntu from Dual Boot (2 Steps)
If you have installed Linux on its own partition in a dual-boot configuration, there’s usually no easy uninstaller that will remove it for you. Instead, you need to delete its partitions and repair the Windows boot loader manually. Here are the steps to uninstall Ubuntu fromВ dual boot.
| Workable Solutions | Step-by-step Troubleshooting |
|---|---|
| Step 1 — Delete the Linux Partition |
|
| Step 2 — Fix the Windows Boot Loader |
|
How You Install Ubuntu on Your Computer
How you uninstall Linux depends on how you’ve installed it. If you installed Linux as the only operating system, you have to reinstall Windows over Linux to get your Windows system back. Suppose you install Ubuntu with Wubi. You can easily uninstall it from Windows:
- Boot into Windows and go to «Control Panel > Programs and Features».
- Find Ubuntu and select «Uninstall».
If you installed Linux to its own partition in a dual-boot configuration, you need to follow the steps below to remove Ubuntu.
Step 1 — Delete the Linux Partition (Two Methods)
To remove Ubuntu from dual boot, you need to delete the Linux partition first. There are two ways to make it: using Disk Management or a disk management tool.
Method 1. Delete Your Linux Partition with Disk Management
To run Disk Management, you need to boot into Windows 11/10/8/7.В
Step 1. In Windows 11/10/8/7, press Windows + R keys to bring up the Run box, type diskmgmt.msc, and hit «Enter». Windows Disk Management window will show up.
Step 2. Locate and right-click the Linux partition and choose «Delete Volume».
Step 3. Select «Yes» to let the system complete the removing partition process.
Method 2. Delete Your Linux Partition with Software
Here is a reliable way to help do this job in just a few simple clicks with the help of professional partition manager software — EaseUS Partition Master. This software allows you to delete and remove all Ubuntu-related system partitions with Windows OS running on your PC.
оћѓ Happy autumn sale once for all
Download, install this software, and activate it for deleting Ubuntu from your computer but keep Windows OS now:
Step 1.В Launch EaseUS Partition Master on your computer.
Step 2.В Select to delete partition or delete all partitions on hard drive.
- Delete single partition: right-click on a partition thatВ you want to delete and choose «Delete. «.
- Delete all partitions: right-click a hard drive that you want to delete all partitions, and select «Delete All. «.
Make sure that you’ve backed up the important data on the selected partition because this manner will compeletely removeВ data.
Step 3. Click «OK» to confirm the deletion.
Step 4. Click «Execute xx Operation» on the top menu and then click «Apply» to save the change.
0:00 — 0:39 Delete single volumes; 0:39 — 1:09 Delete all partitions.
Step 2 — How to Fix the Windows Boot Loader
After deleted the Ubuntu partition, you need to use a Windows installer disc to overwrite the Linux boot loader with the Windows boot loader. If you don’t have a Windows installer disc, you can create a Windows repair disc and use it.
Step 1. Insert CD/DVD into DVD-ROM or connected external DVD drive.
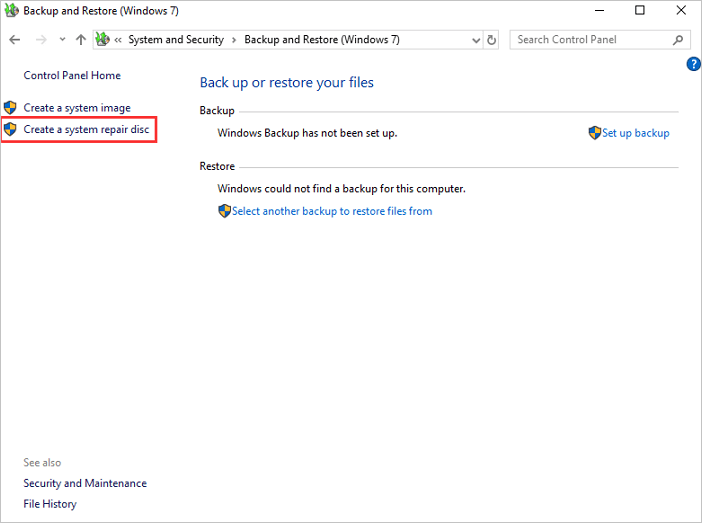
Step 2. Click «Control Panel» on the computer screen, then click «Backup and Restore (Windows 7)».
Step 3. Click «Create a system repair disc» from the left column to open the repair disc creation window. Follow the on-screen instructions to create a system repair disc.В
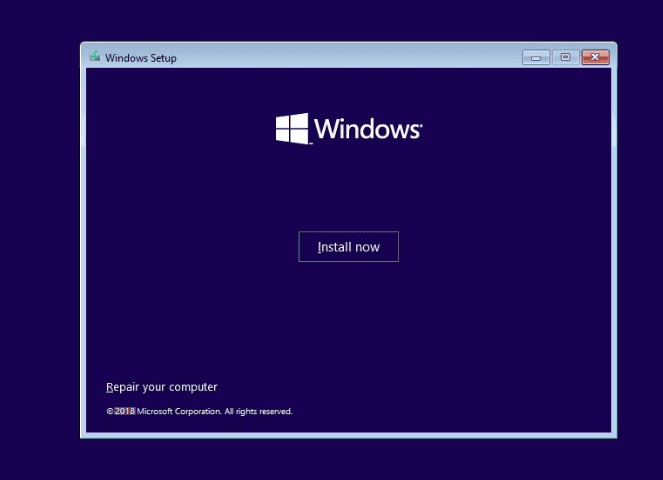
Step 4. Insert the Windows installer or recovery disc into your computer, restart your computer, and let it boot from the Windows installer disc.
Step 5. After booting from your installation or recovery disc, skip the initial languages screen, and then click the «Repair your computer» option on the main install screen.
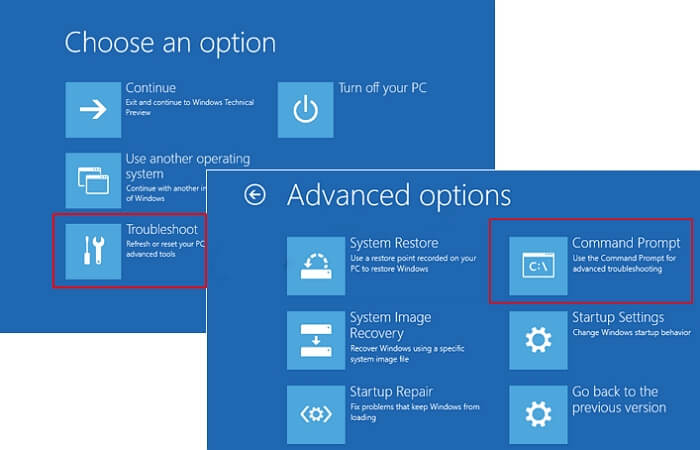
Step 6. On the Choose an option screen, click «Troubleshoot > Advanced options > Command Prompt».
Step 7. Type the command below and then press «Enter».
- bootrec /fixmbr
- bootrec /fixboot
- bootrec /scanos
- bootrec /rebuildbcd
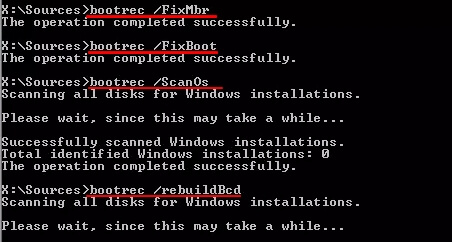
You can now restart your computer. It will boot from its hard drive, starting the Windows operating system. If you are not familiar with CMD, you can repair MBR with software.
Bonus Tip — How to Back Up Ubuntu Data Without Booting into System
If you have important data, how can you make a backup without booting into Linux? You can run EaseUS Todo Backup. With it, you can back up files without OS. Follow the steps below to back up important data:
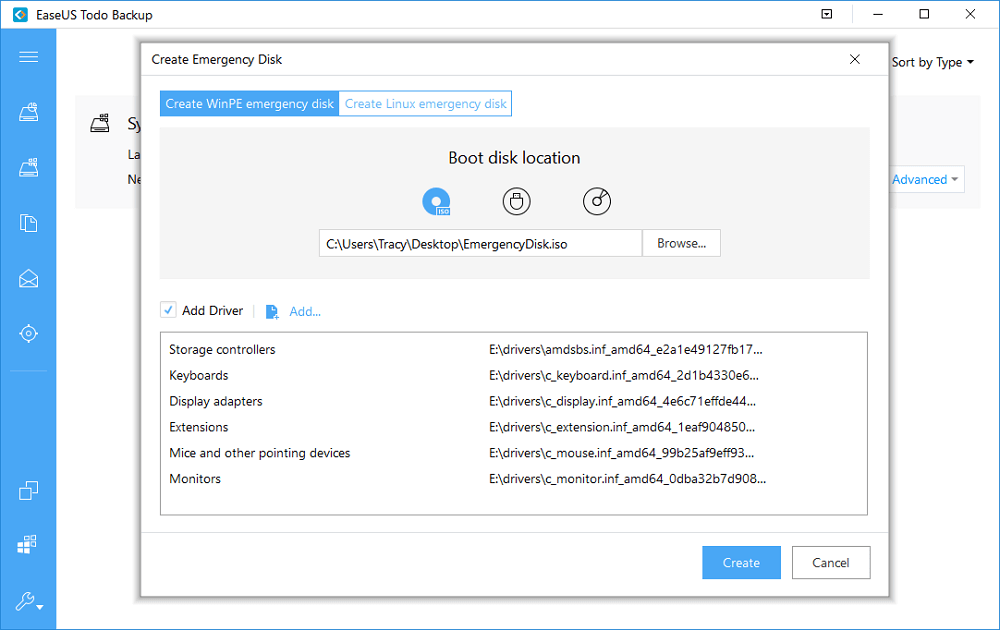
Step 1: Download and Install EaseUS Todo Backup on the working computer. Click «Tools» — «Create Emergency Disk».
Follow the tool to create a Windows bootable media. You are suggested to add disk, RAID, and network card driver to avoid Todo backup have trouble recognizing your hard disk or network drive in the WinPE environment.
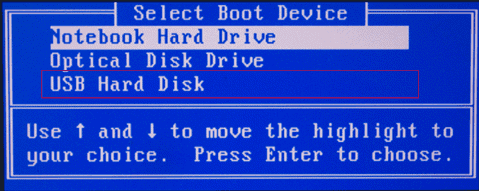
Step 2: When it’s done, insert this emergency disk to the computer that needs backing up.
Restart the PC, and Press F2/DEL to enter BIOS. Change the boot sequence, and then start the computer and run EaseUS backup software from the bootable disk.
Step 3: On the main window, click «File» and choose the files or data you want to back up.

Step 4: Click «Browse» to select a destination to save your backup file.
It’s recommended to save the backup file to external storage media or cloud drive.В
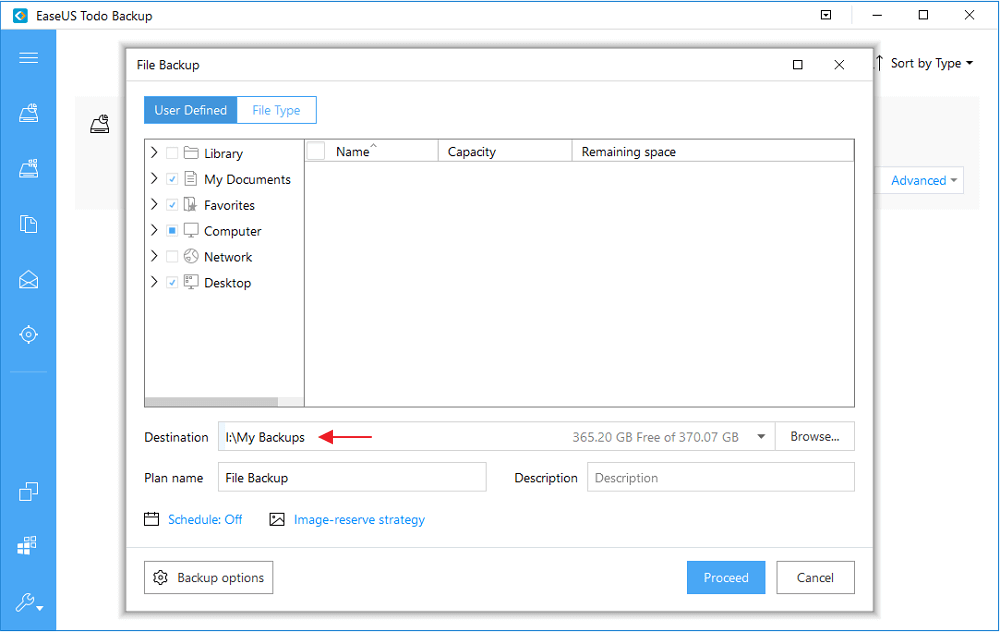
Step 5: Click «Proceed» to execute your operation.
Conclusion
You can fix the error if installing Ubuntu on Windows PC as a dual-boot didn’t go so well. If you still have problems, you can contact EaseUS to get additional help.
оћѓ Happy autumn sale once for all
Was This Page Helpful?
Tracy joined in EaseUS in 2013 and has been working with EaseUS content team for over 7 years. Being enthusiastic in computing and technology, she writes tech how-to articles and share technical solutions about Windows & Mac data recovery, file/system backup and recovery, partition management and iOS/Android data recovery.
I love that the changes you make with EaseUS Partition Master Free aren’t immediately applied to the disks. It makes it way easier to play out what will happen after you’ve made all the changes. I also think the overall look and feel of EaseUS Partition Master Free makes whatever you’re doing with your computer’s partitions easy.
Partition Master Free can Resize, Move, Merge, Migrate, and Copy disks or partitions; convert to local, change label, defragment, check and explore partition; and much more. A premium upgrade adds free tech support and the ability to resize dynamic volumes.
It won’t hot image your drives or align them, but since it’s coupled with a partition manager, it allows you do perform many tasks at once, instead of just cloning drives. You can move partitions around, resize them, defragment, and more, along with the other tools you’d expect from a cloning tool.
Roxanne/2021/09/02
Jean/2021/08/30
Roxanne/2021/09/18
Tracy King/2021/05/17
About EaseUS Partition Master
All-round disk & partition management software for personal and commercial use. Let it manage your storage drive: resize, format, delete, clone, convert, etc.
Источник


