- Dual booting kali linux and windows
- Installation Prerequisites
- Resize Linux Procedure
- Kali Linux Installation Procedure
- Post Installation
- Dual booting kali linux and windows
- Installation Prerequisites
- Resize Windows Procedure
- Kali Linux Installation Procedure
- Post Installation
- Time/System Clock
- How to dual-boot Windows 10, Kali Linux 2 on a PC with UEFI firmware
Dual booting kali linux and windows
Installing Kali Linux alongside another Linux installation can be quite useful. However, you need to exercise caution during the setup process. First, make sure that you’ve backed up any important data on your Linux installation. Since you’ll be modifying your hard drive, you’ll want to store this backup on external media. Once you’ve completed the backup, we recommend you peruse our Kali Linux Hard Disk install guide, which explains the normal procedure for a basic Kali Linux install.
In our example, we will be installing Kali Linux alongside an installation of Ubuntu (Server 18.04), which is currently taking up 100% of the disk space in our computer. We will start by resizing our current Linux partition to occupy less space and then proceed to install Kali Linux in the newly-created empty partition.
Installation Prerequisites
This guide will make the following assumptions:
- You have read our single boot Kali Linux install guide, as this has the same Installation Prerequisites (System requirements & setup assumptions).
- When downloading Kali Linux, pick the live image, rather than the installer option.
- A single disk to install to (rather than a dedicated disk per operating system).
We need to use a different image from the single boot Kali Linux install guide, as we need the live image. This is because we need to edit the disk structure without mounting any partitions (otherwise they would be in-use). After we have finished altering the disk layout, we can still install Kali Linux using the live image, but there will be a few differences such as:
Both of these can be addressed post installation, as it saves swapping to the installer image (as you will need either multiple CD/DVD/USBs or to re-image half way though).
This installation has the potential to go wrong very easily as it involves editing existing partitions. Be aware of what partitions you are modifying and where you are installing Kali Linux to.
Having a backup of your Linux files available is a good idea in the event something goes wrong.
Resize Linux Procedure
Before we can install Kali Linux, there needs to be room on the hard disk. By booting into a live Kali Linux session with your chosen installation medium, we can resize the partition to our desired size, as the disk will not be in use because Kali Linux will all be in memory.
To start resizing, make sure you insert your Kali Linux installation medium and power on the device. If needed, press any keyboard shortcuts for a “boot order menu” (depends on each manufacture) or boot into BIOS/UEFI and change the boot order to point to the installation medium first.
When the boot menu/options appears, you should see at least one new option. Depending on the manufacture, hardware, how the system is configured and install medium, you may see more options (e.g. Can you boot into non-UEFI?).
You may need to try a few different options in order to find success.
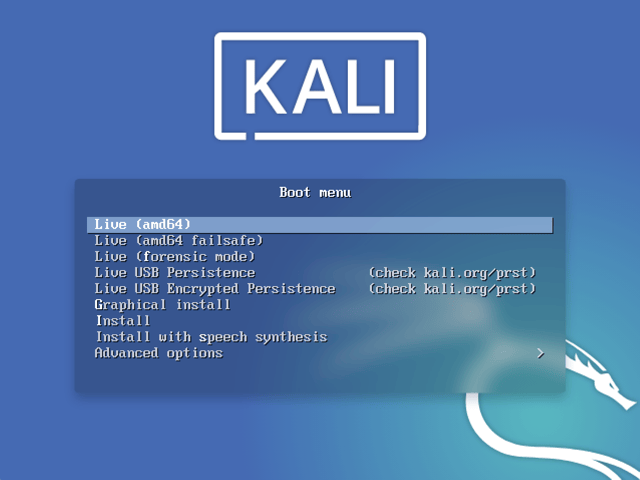
- You should be greeted with the Kali Linux boot screen. Select Live, and you should be booted into the Kali Linux default desktop.

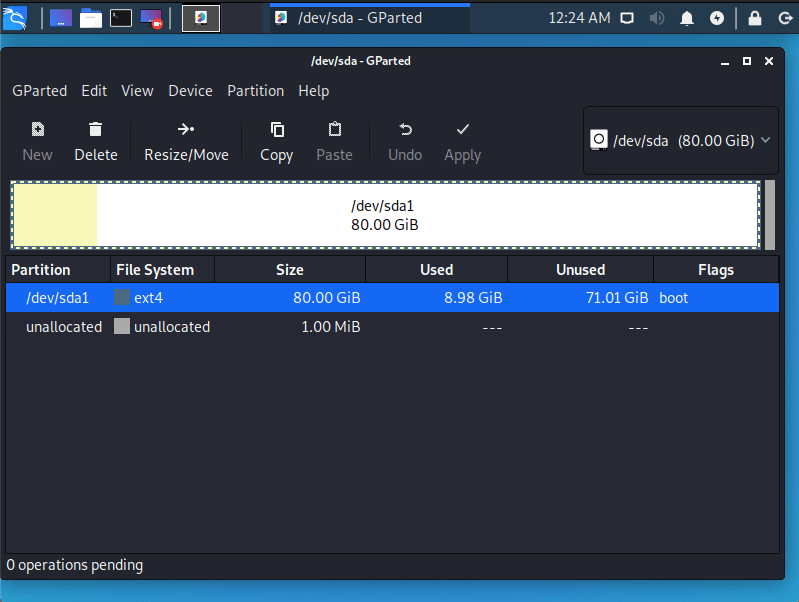
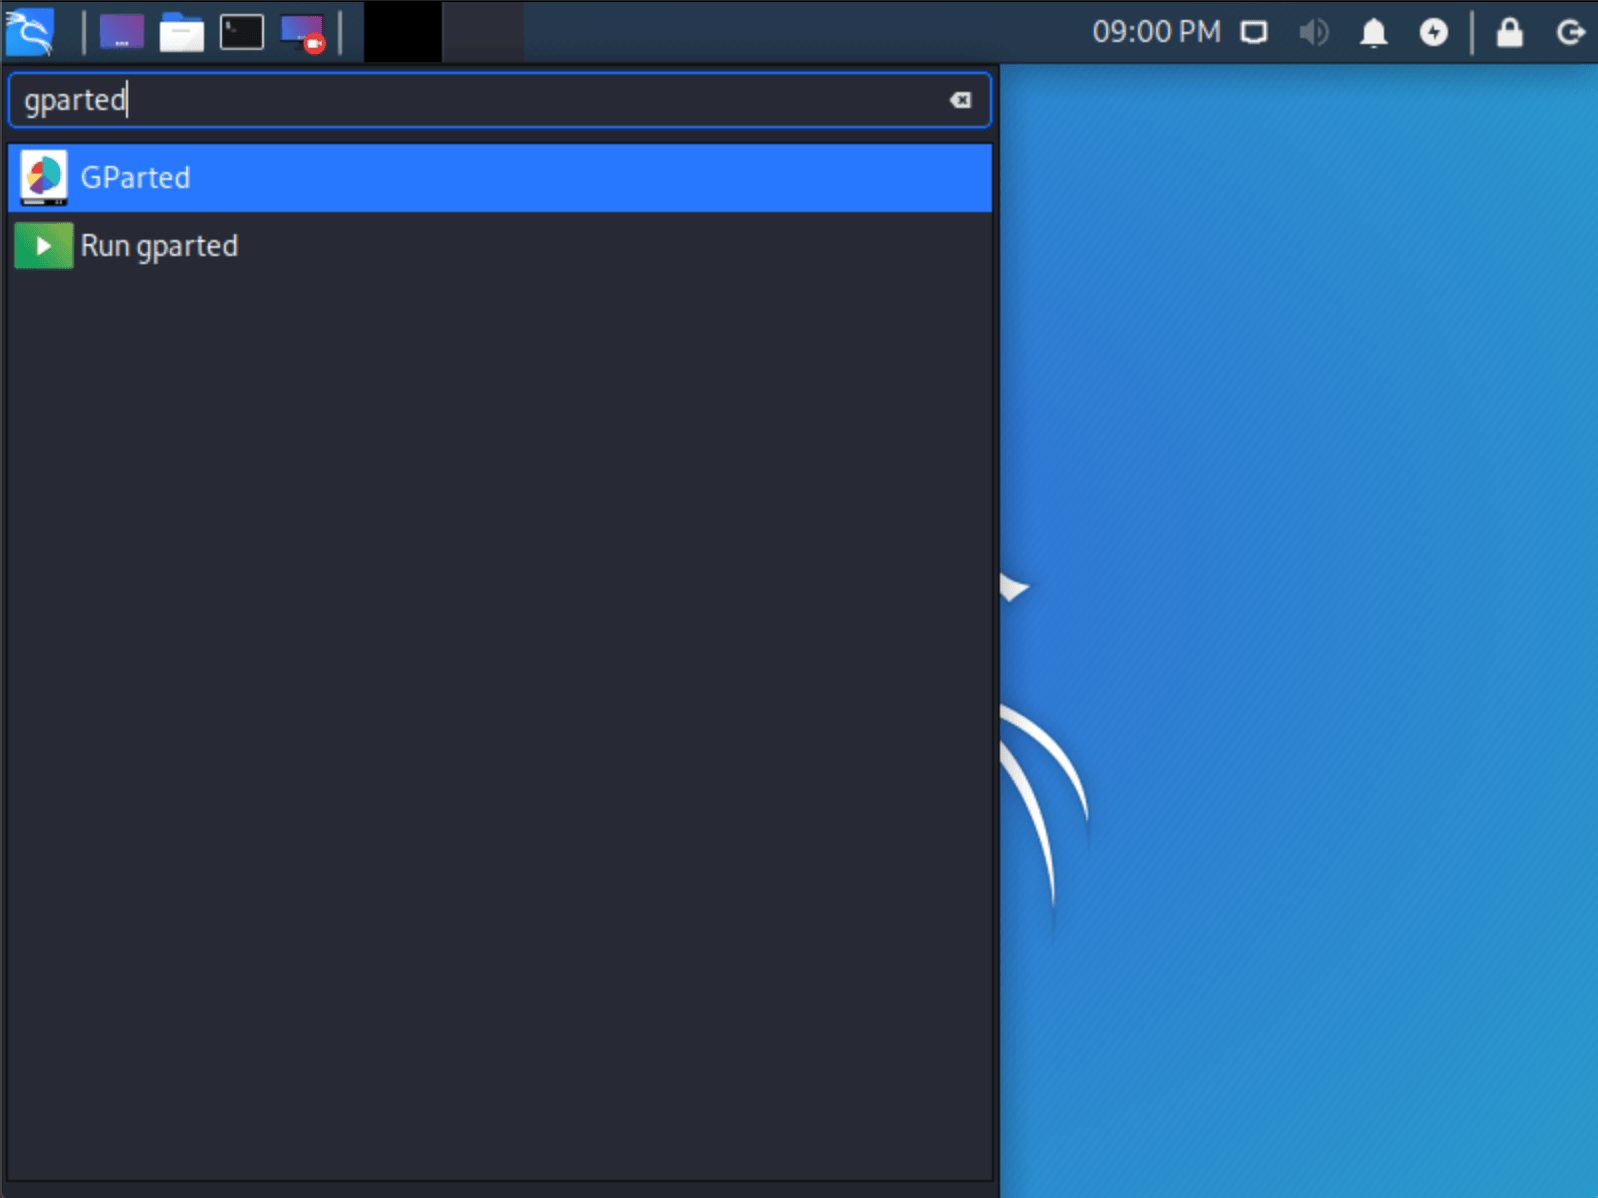
- Now launch GParted, which we’ll use to shrink the existing Linux partition to give us enough room to install Kali Linux in the free space.

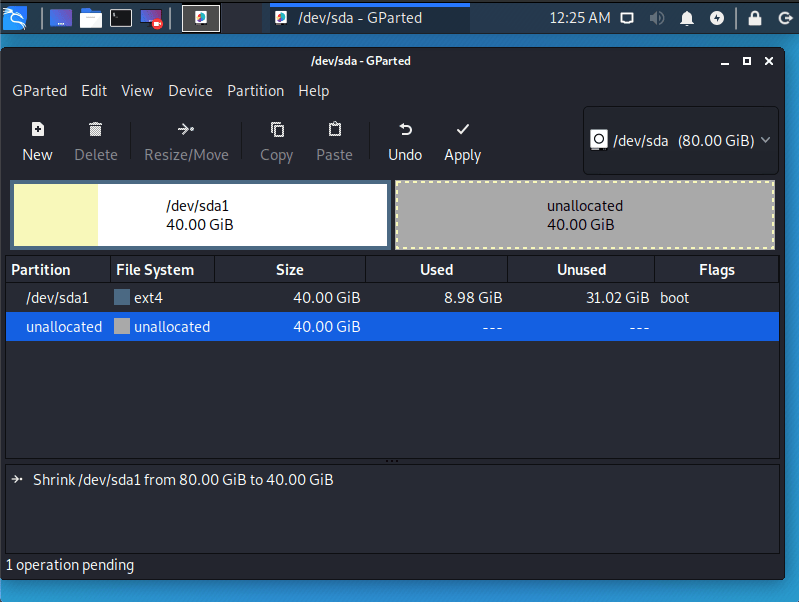
- Once GParted has opened, select your Linux partition ( /dev/sda1 ) & resize it leaving enough space (we recommend at least 20 GB) for the Kali Linux installation.
Depending on your setup, the disk structure may be different to include:
- A swap partition
- Separate partitions for certain directories (e.g. /home , /var and /tmp )
You often just want to select the largest partition (commonly the data/home directory)
If you are moving past into any non-white in the partition then you are editing a section that is in use.
Only remove from the area of the partition that is not in use.
If you wish to organize the partition to group all the Linux partitions together, placing the free space at the end, you may do so.
- Once you have resized your Linux partition, ensure you “Apply All Operations” on the hard disk. Exit gparted and reboot.
Kali Linux Installation Procedure
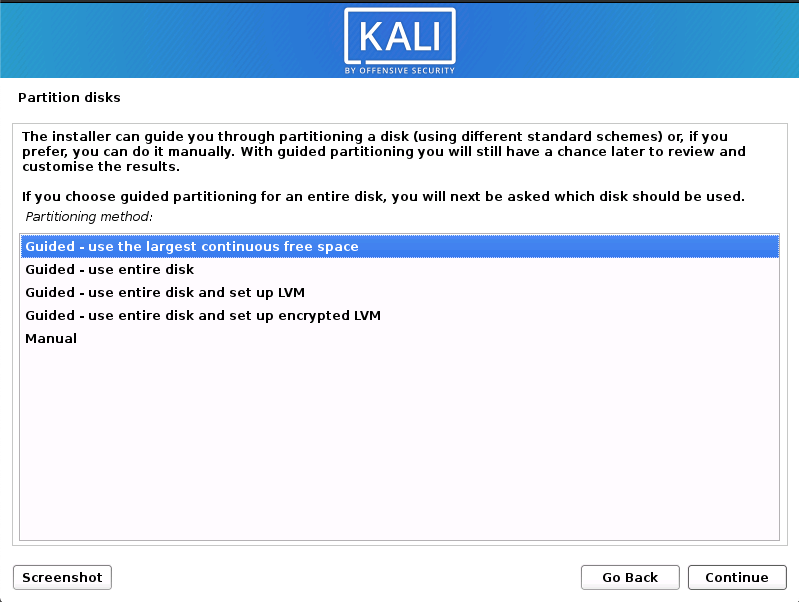
- The installation procedure from this point onwards is similar to a Kali Linux Hard Disk install, until the point of the partitioning. At this point, you need to select “Guided — use the largest continuous free space” (rather than “Guided — the entire disk”) which got created earlier with gparted.
- You can carry on following the single boot Kali Linux install guide, expect you will not have the option to select desktop environment or metapackages as you are using the live image. Once the installation is done, reboot.
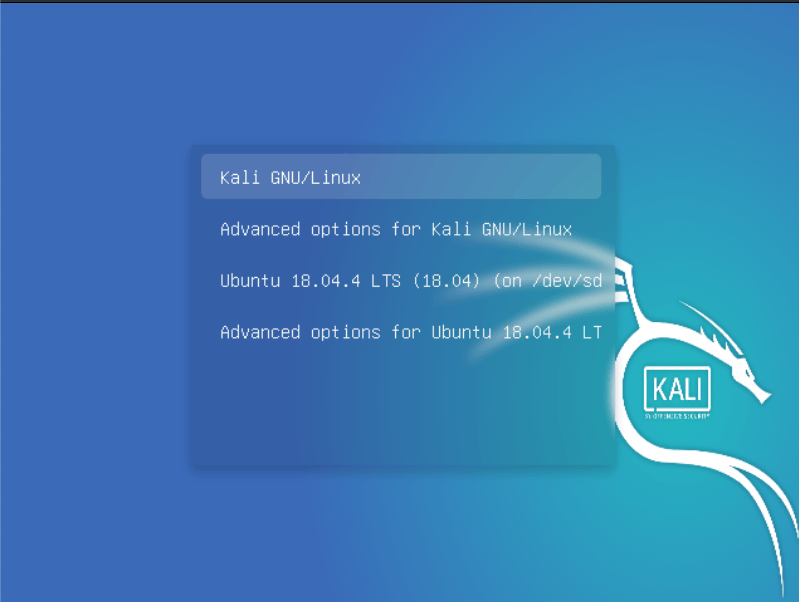
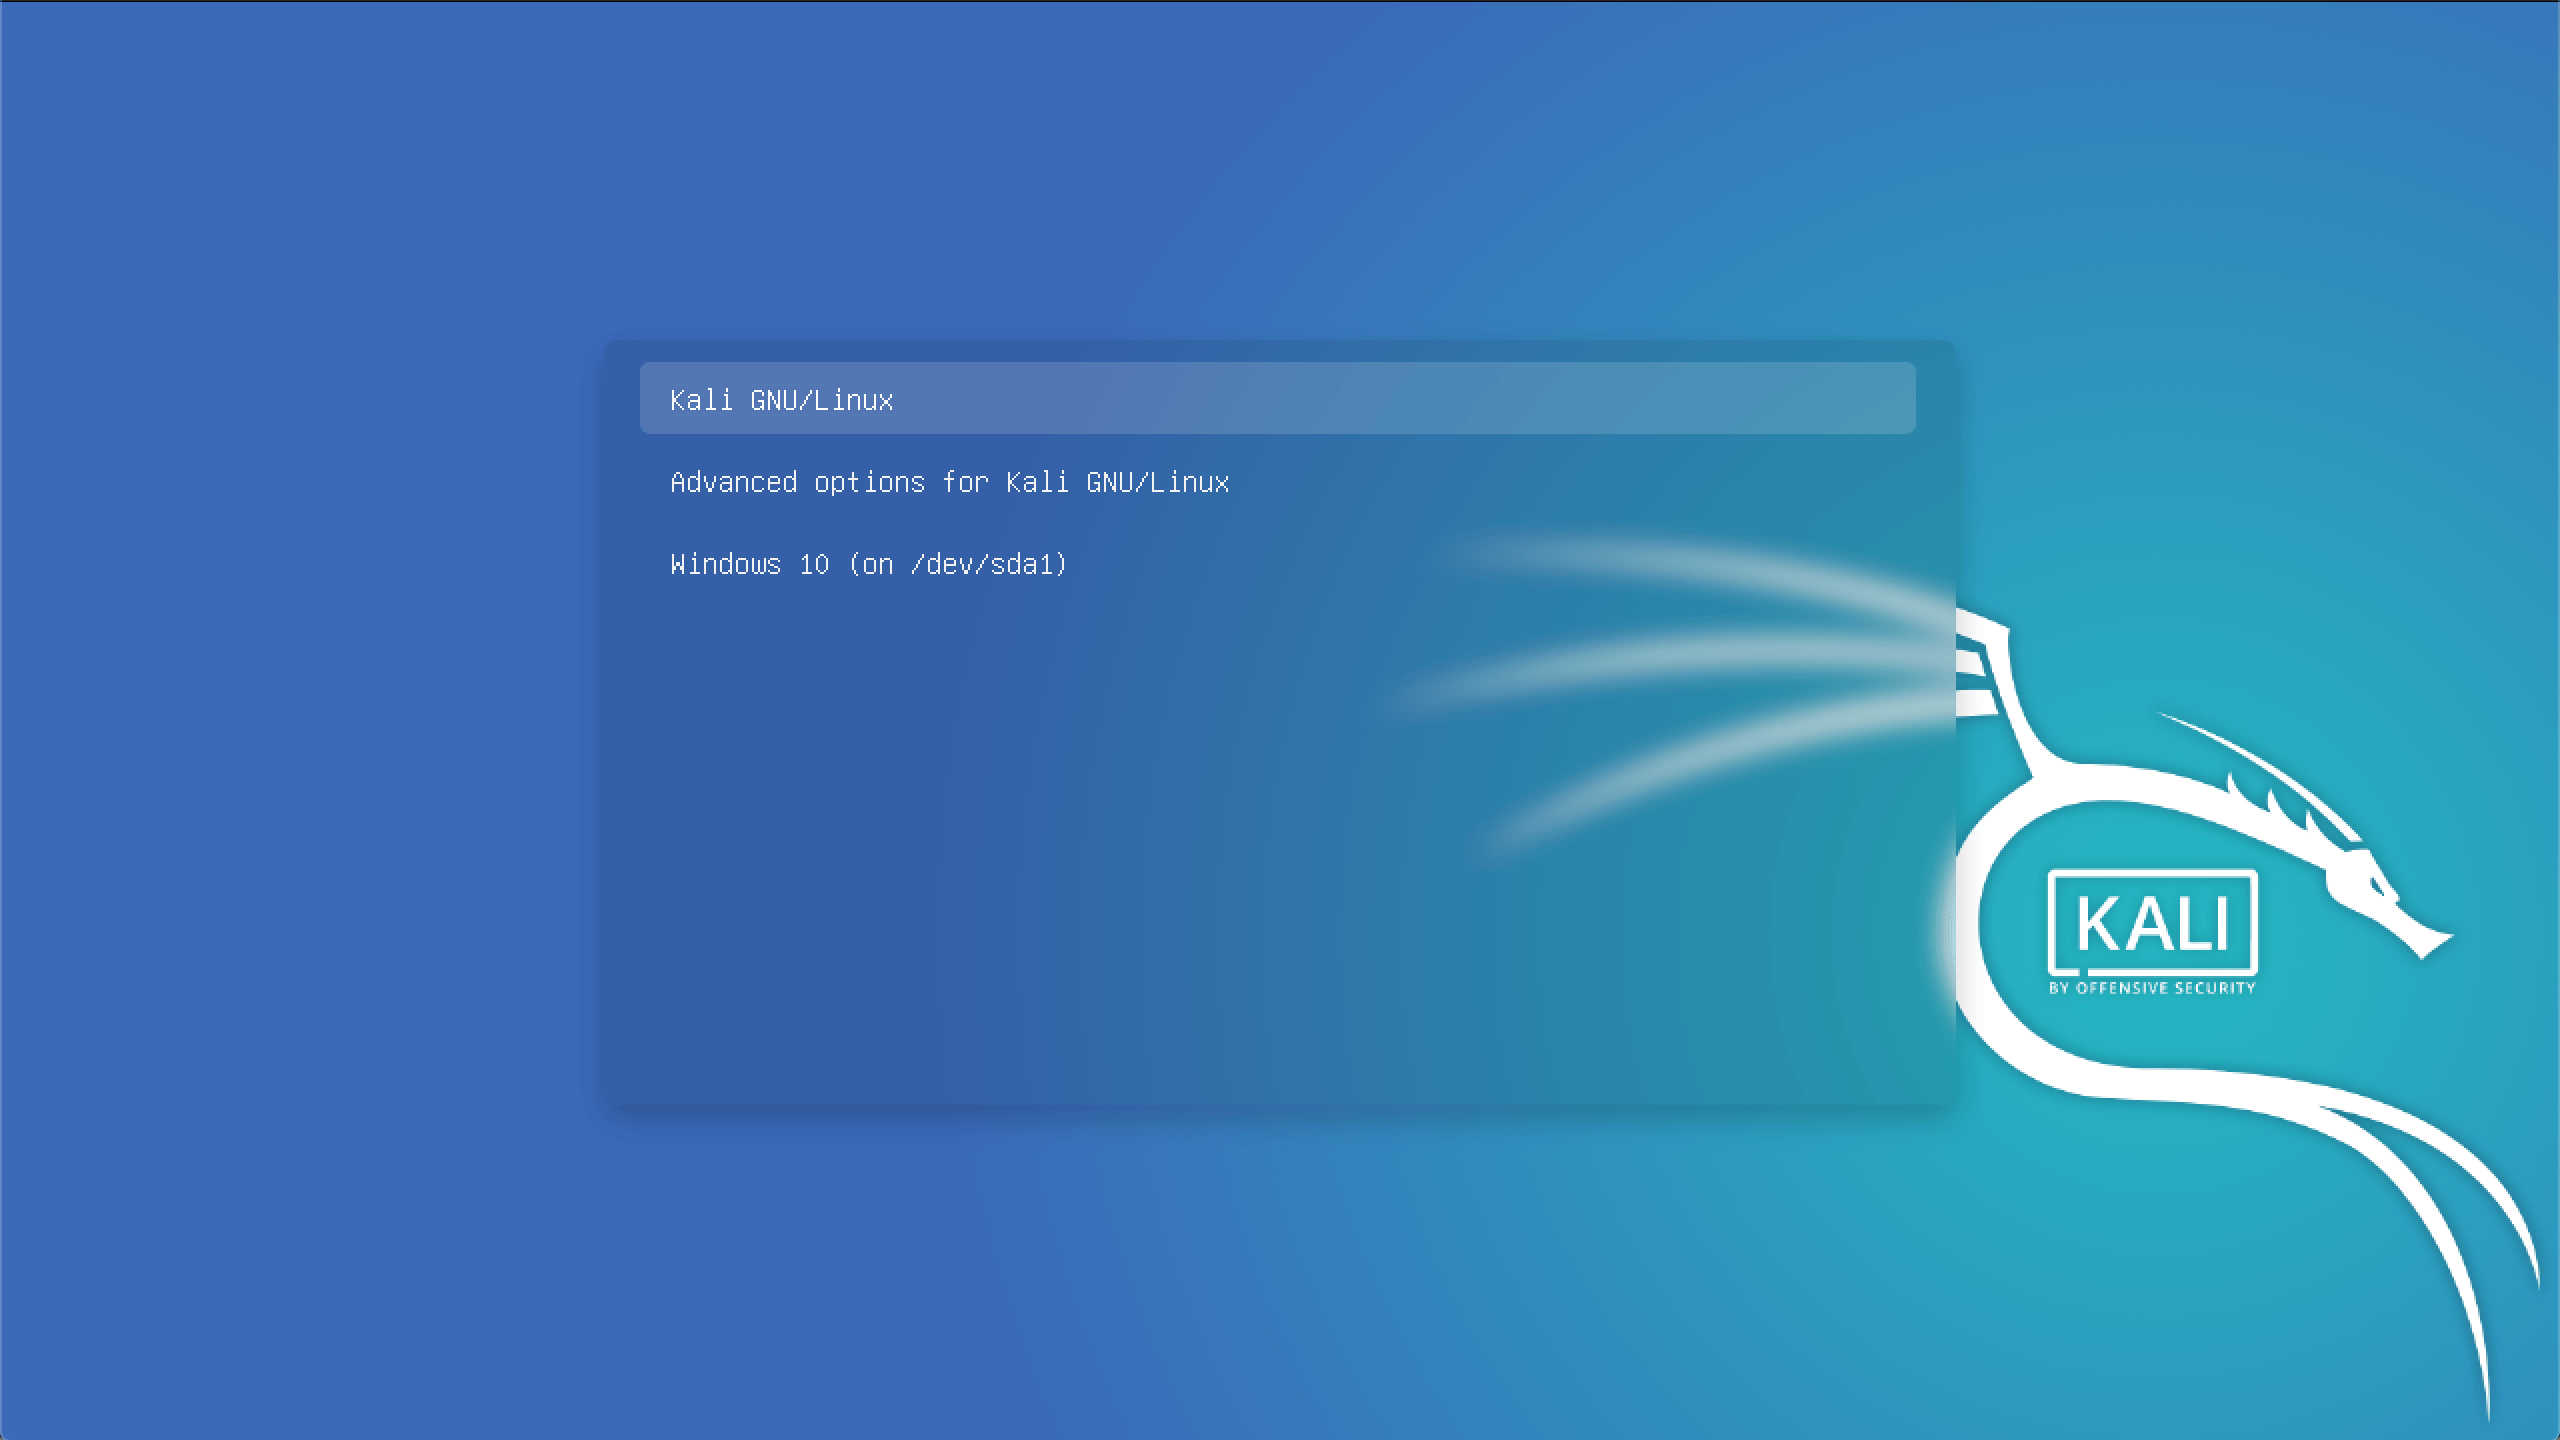
You should be greeted with a GRUB boot menu, which will allow you to boot either into Kali Linux or the other Linux operating system.
Post Installation
Now that you’ve completed installing Kali Linux, it’s time to customize your system.
The General Use section has more information and you can also find tips on how to get the most out of Kali Linux in our User Forums.
Updated on: 2021-Sep-27
Author: gamb1t
Источник
Dual booting kali linux and windows
Installing Kali Linux next to a Windows installation has its benefits. However, you need to exercise caution during the setup process. First, make sure that you’ve backed up any important data on your Windows installation. Since you’ll be modifying your hard drive, you’ll want to store this backup on external media. Once you’ve completed the backup, we recommend you peruse our Kali Linux Hard Disk install guide, which explains the normal procedure for a basic Kali Linux install.
In our example, we will be installing Kali Linux alongside an installation of Windows (10), which is currently taking up 100% of the disk space in our computer. We will start by resizing our current Windows partition to occupy less space and then proceed to install Kali Linux in the newly-created empty partition.
Installation Prerequisites
This guide will make the following assumptions:
- You have read our single boot Kali Linux install guide, as this has the same Installation Prerequisites (System requirements & setup assumptions).
- When downloading Kali Linux, pick the live image, rather than the installer option.
- A single disk to install to (rather than a dedicated disk per operating system).
We need to use a different image from the single boot Kali Linux install guide, as we need the live image. This is because we need to edit the disk structure without mounting any partitions (otherwise they would be in-use). After we have finished altering the disk layout, we can still install Kali Linux using the live image, but there will be a few differences such as:
Both of these can be addressed post installation, as it saves swapping to the installer image (as you will need either multiple CD/DVD/USBs or to re-image half way though).
This installation has the potential to go wrong very easily as it involves editing existing partitions. Be aware of what partitions you are modifying and where you are installing Kali Linux to.
Having a backup of your Linux files available is a good idea in the event something goes wrong.
Resize Windows Procedure
Before we can install Kali Linux, there needs to be room on the hard disk. By booting into a live Kali Linux session with your chosen installation medium, we can resize the partition to our desired size, as the disk will not be in use because Kali Linux will all be in memory.
To start resizing, make sure you insert your Kali Linux installation medium and power on the device. If needed, press any keyboard shortcuts for a “boot order menu” (depends on each manufacture) or boot into BIOS/UEFI and change the boot order to point to the installation medium first.
When the boot menu/options appears, you should see at least one new option. Depending on the manufacture, hardware, how the system is configured and install medium, you may see more options (e.g. Can you boot into non-UEFI?).
You may need to try a few different options in order to find success.
You may need to disable secure boot
- You should be greeted with the Kali Linux boot screen. Select Live, and you should be booted into the Kali Linux default desktop.
- Now launch GParted, which we’ll use to shrink the existing Windows partition to give us enough room to install Kali Linux in the free space.
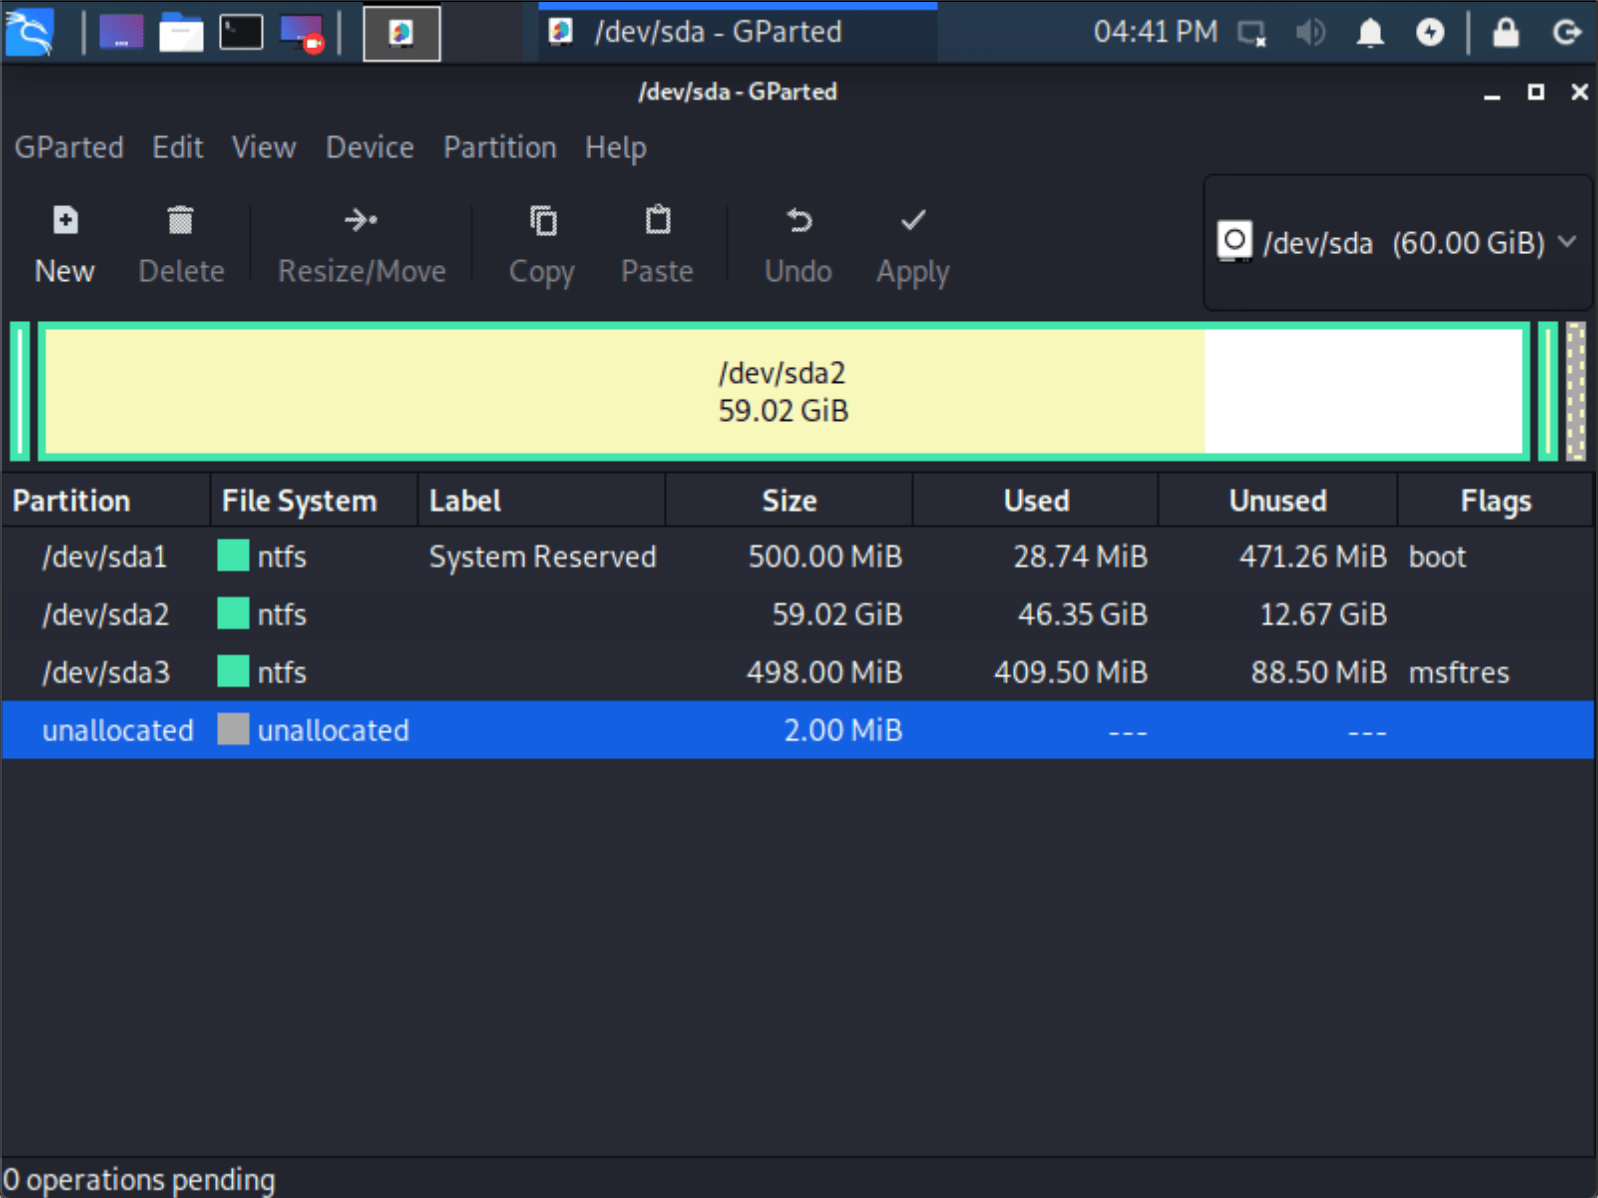
- Once GParted has opened, select your Windows partition ( /dev/sda2 ) & resize it leaving enough space (we recommend at least 20 GB) for the Kali Linux installation.
Depending on your setup, it is often the second option (the largest partition). In our example, there are three partitions:
- Window’s boot partition ( /dev/sda1 )
- Window’s main operating system itself ( /dev/sda2 )
- Window’s System Recovery partition ( /dev/sda3 )
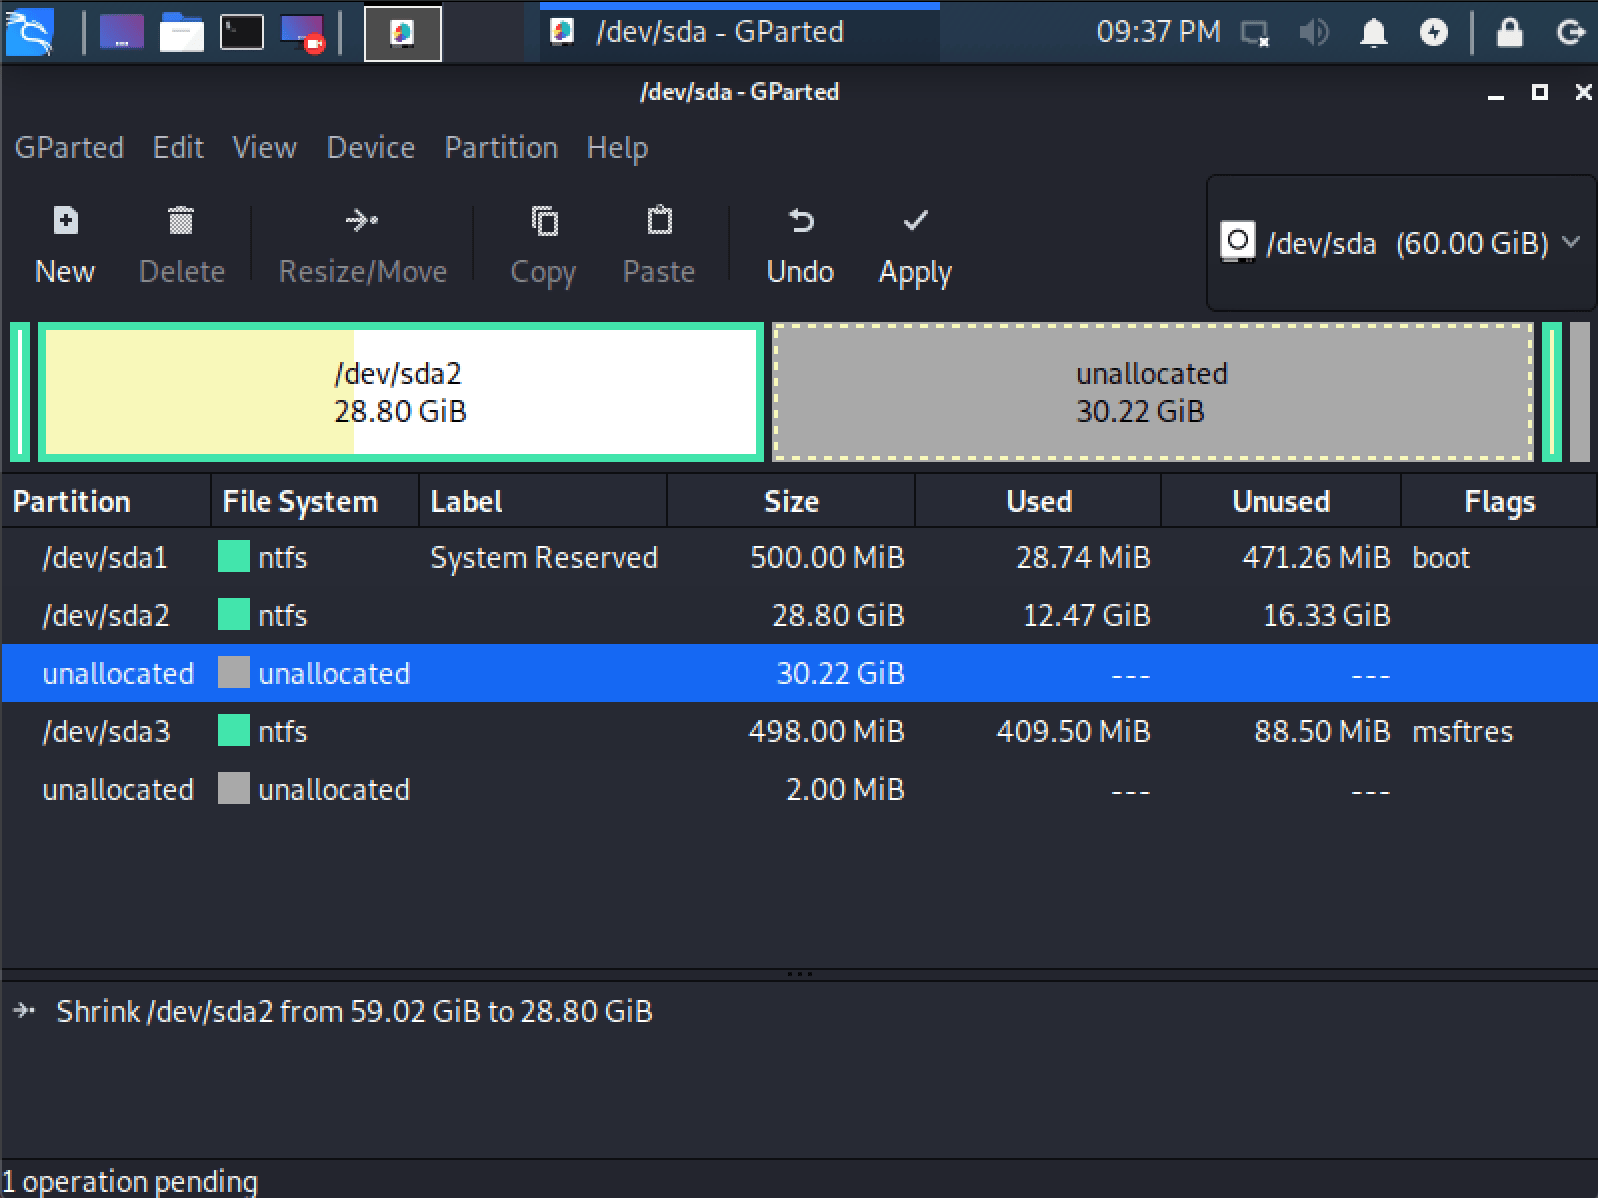
If you are moving past into any non-white in the partition then you are editing a section that is in use.
Only remove from the area of the partition that is not in use.
It is normal to leave the third partition ( /dev/sda3 ), and only shrink the actual install ( /dev/sda2 ).
If you wish to organize the partition to group all the Windows partitions together, placing the free space at the end, you may do so.
- Once you have resized your Windows partition, ensure you “Apply All Operations” on the hard disk. Exit gparted and reboot.
Kali Linux Installation Procedure
- The installation procedure from this point onwards is similar to a Kali Linux Hard Disk install, until the point of the partitioning. At this point, you need to select “Guided — use the largest continuous free space” (rather than “Guided — the entire disk”) which got created earlier with gparted.

- You can carry on following the single boot Kali Linux install guide, except you will not have the option to select desktop environment or metapackages as you are using the live image. Once the installation is done, reboot.
You should be greeted with a GRUB boot menu, which will allow you to boot either into Kali Linux or Windows.
Post Installation
Now that you’ve completed installing Kali Linux, it’s time to customize your system.
The General Use section has more information and you can also find tips on how to get the most out of Kali Linux in our User Forums.
Time/System Clock
One thing that may be worth knowing about is that occasionally the time will get changed between the Windows and the Linux system. To fix this, we can do the following:
To undo this we can simply do:
Updated on: 2021-Sep-27
Author: g0tmi1k
Источник
How to dual-boot Windows 10, Kali Linux 2 on a PC with UEFI firmware
Kali Linux 2 is the latest edition of Kali Linux, a desktop distribution that’s based on Debian and designed solely for security and hacking purposes.
In this tutorial, you’ll read how to dual-boot it with Windows 10 on a single hard drive on a computer with UEFI firmware.
Because the Kali Linux 2 installer, in automated disk partitioning mode, allocates disk space to partitions non-proportionally, completing the task of dual-booting Kali Linux 2 and Windows 10 on a single hard drive involves creating the Kali Linux 2 partitions manually. So you’ll need to have at least a basic understanding of disks and disk partitions in Linux. If you don’t, take a few minutes to read A beginner’s guide to disks and disk partitions in Linux and 7 tips for dual-booting Linux distributions and Windows.
The following are the steps involved in setting up a dual-boot system between Windows 10 and Kali Linux 2 on a single hard drive on a computer with UEFI firmware:
- Recover space from the hard drive
- Partition the recovered space for installing Kali Linux 2. For this tutorial, we’ll create three partitions for Kali Linux 2: One for the root partition; the second for the home partition. This is optional, but it’s always nice to have your home directory in a separate partition; the third and last partition will be for swap space, unformatted disk space that the system may use as virtual memory
- Completing related and important dual-booting tasks
To get from here to there, you need to:
- Have downloaded an installation image of Kali Linux 2, which you can grab from https://www.kali.org/downloads. Burn it to a blank DVD, or transfer it to a USB stick (recommended).
- Have a computer with Windows 10 installed. Space for installing Kali Linux 2 will be derived from the free space left on the hard drive
If you have all those in place, let’s get started.
Step 1 – Recover Free Space From the Hard Drive :
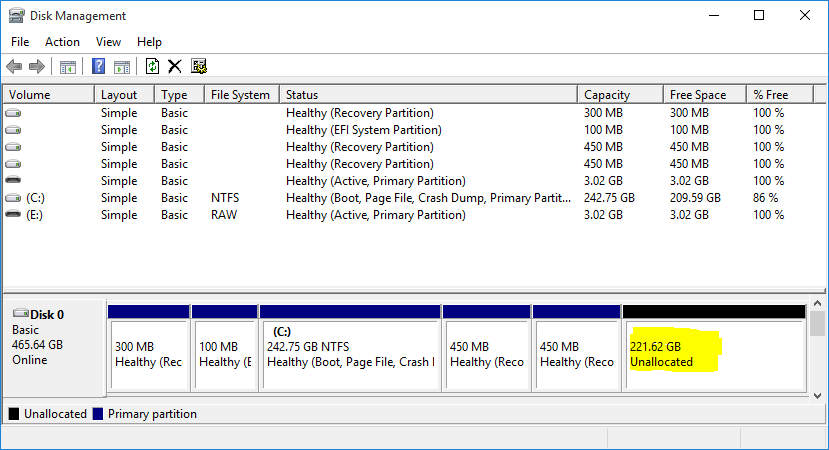
The hard drive on the test system used for this tutorial is 500 GB in size, with about half of that occupied by Windows 10. The other unused part, recovered by shrinking the C drive, will be used for creating partitions for Kali Linux 2. To shrink a Windows 10 C drive, simply right-click on it and select Shrink Volume. Follow the prompts to complete the process.
When completed, there will be an Unallocated space after the C drive, or after whatever partition you recovered the disk space from. Figure 1 shows the layout of the partitions on the hard drive used for this setup, as seen from the Windows 10 partition manager. The highlighted segment will be used for installing Kali Linux 2.
 Figure 1: Windows 10 partition manager showing Windows 10 partitions and the free space
Step 2 – Booting From the Installation Media :
Boot the computer with the installation media you made in the optical drive or in a USB port. Just before it boots into the default boot disk, enter the boot menu by pressing the appropriate F-key, usually the F11 or F12 key. The idea is so the computer boots from the UEFI-aware version of the installer. It should without intervention, but just to be sure, you want to complete this step.
When at the boot menu, you should see two entries for the installation media, like those shown in Figure 2. The UEFI: PNY USB 2.0 FD 1100 entry boots into the target installer, so if you find an entry just like that on yours, select it and press the ENTER key to boot into it.
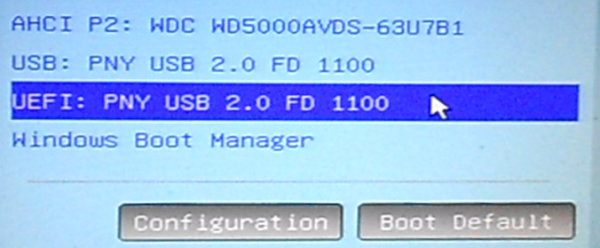 Figure 2: Computer’s boot menu
At the Kali Linux EFI Boot Menu, you’ll be presented with a bunch of boot options. The default will boot into a GNOME 3 Live desktop. This would normally be the best option to boot into, but the version of the installer you access from the Live desktop does not render properly, so I recommend that you skip the Live desktop and boot straight into the graphical installer. And you do that by selecting the Graphical Install option, as shown in Figure 3.
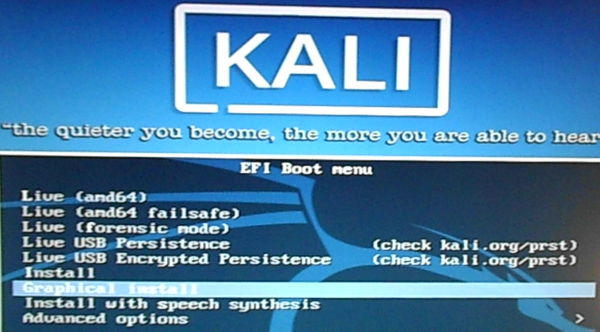 Figure 3: Kali Linux 2.0 EFI boot menu
Step 3 – The Debian Installer Disk Partitioner :
After booting into the Debian Installer, which is the name of the graphical installer used by Kali Linux 2, click through several steps until you get to the disk partition methods step, shown in Figure 4. The option to select here, is Manual. So select it and click the Continue button, or press the ENTER key.
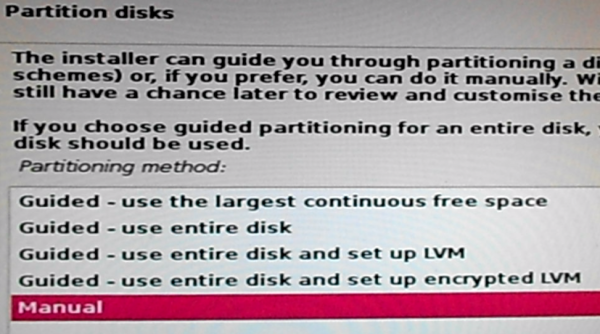 Figure 4: Disk partition options of Kali Linux 2
That should open the manual disk partitioning tool’s window, where all the detected disks should be listed, along with their associated partitions. Shown in Figure 5 are the Windows 10 partitions on the target disk, with the space recovered in Step 1 listed as Free Space. That free space will be used in steps 4, 5 and 6 to create partitions for Kali Linux 2. So select it, then click Continue.
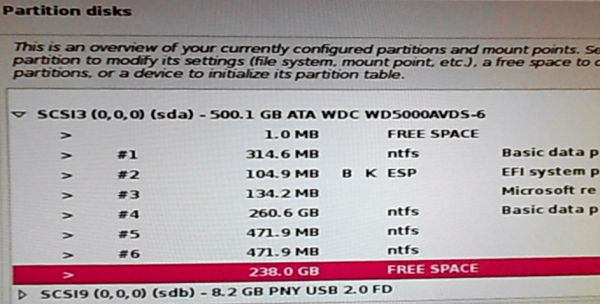 Figure 5: Manual disk partitioning window of Kali Linux 2
Step 4 – Create the Root Partition :
That should open a window like the one shown in Figure 6. We have to create a new partition, so select the first option. Continue.
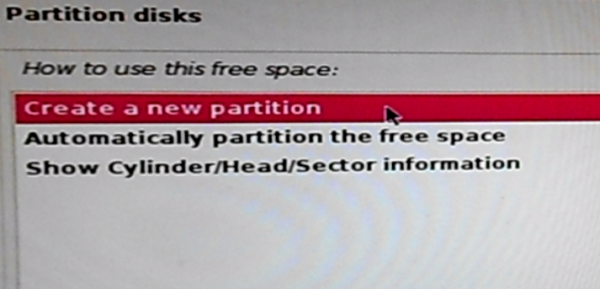 Figure 6: Creating new disk partition on Kali Linux 2
Specify the amount of disk space to allocate to the root partition. In this exampe I allocated 50 GB to it. that seems to be too much, but if you intend to use the system for a long time, 50 GB is a reasonable amount. You can go much lower, if you’re tight on disk space. Continue.
 Figure 7: Specify root partition size of Kali Linux 2
Stick with the default here. Continue.
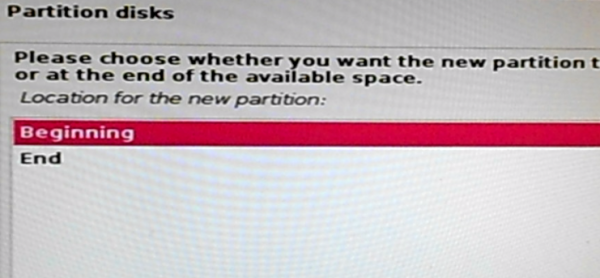 Figure 8: Specify location of the root partition of Kali Linux 2
This shows the specs of the new partition. No need to change anything, so select Done setting up the partition. Continue.
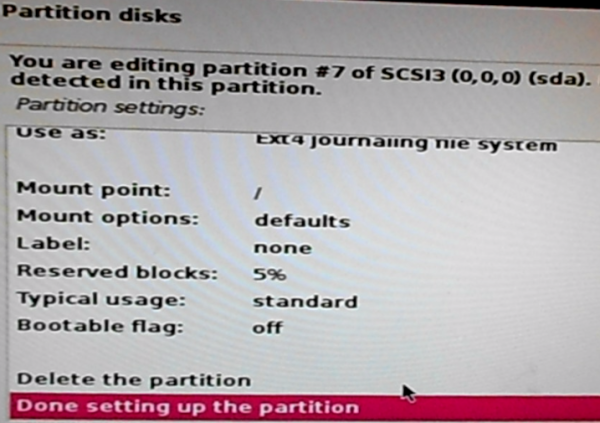 Figure 9: Kali Linux 2 root partition details
Back to the main disk partitioning window, you should see the new partition. Now you have to repeat the process to create the other partitions, so select the remaining free space, then click Continue.
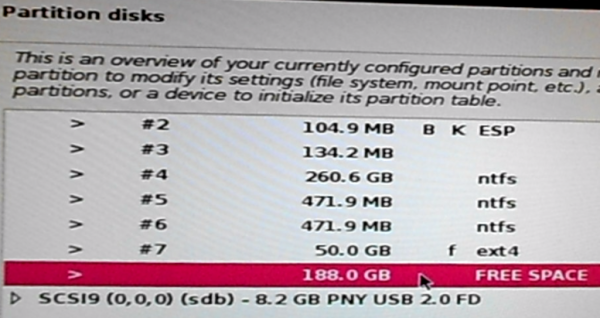 Figure 10: Kali Linux 2 free disk space
Step 5 – Create the Home Partition :
The second partition we’re going to create will be mounted at /home, and the procedure is a repeat of the one used to create the root partition. So the drill should be familiar. Here, select the default. Continue.
Figure 11: Creating new disk partition on Kali Linux 2
Specify a suitable disk space for the partition. Continue.
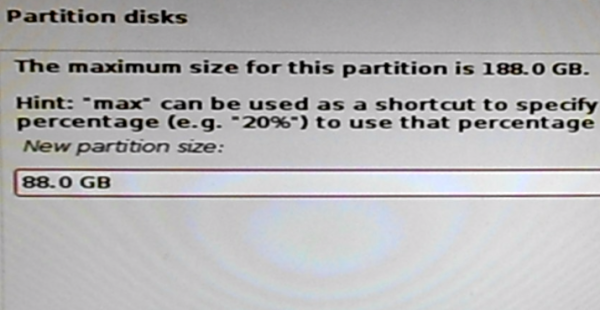 Figure 12: Specify /home partition size on Kali Linux 2
Stick with the default. Continue.
Figure 13: Specify location of the home partition of Kali Linux 2
As with the previous partition, the specs of this partition do not need to be modified, so select Done setting up the partition. Continue.
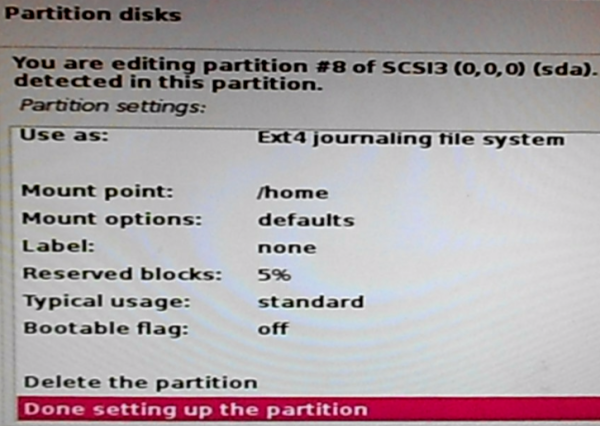 Figure 14: Kali Linux 2 /home partition details
Back one more time to the main disk partitioning window, select the free space, then click Continue to begin creating the last partition.
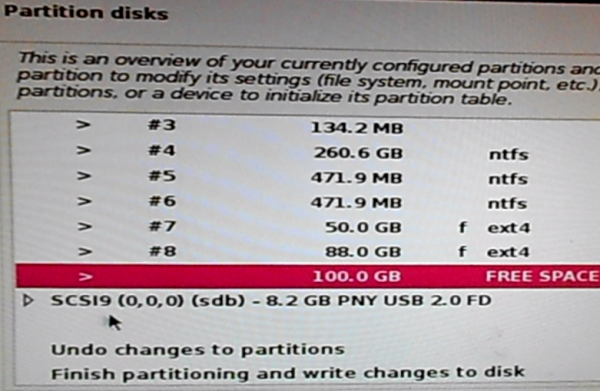 Figure 15: Kali Linux 2 free disk space
Источник


